Manage groups

This article explains how admins create and manage Databricks groups. For an overview of the Databricks identity model, see Databricks identities and roles.

Overview of group management

Groups simplify identity management by making it easier to assign access to workspaces, data, and other securable objects. All Databricks identities can be assigned as members of groups.

Difference between account groups and workspace-local groups

While users and service principals created at the workspace level are automatically synchronized to the account, groups created at the workspace level are not. Instead, Databricks has the concept of account groups and workspace-local groups.

  • Account groups can be granted access to data in a Unity Catalog metastore and permissions to identity federated workspaces. Account groups can be created only by account admins using the account console and the SCIM (Account) REST API.

  • Workspace-local groups are legacy groups. These groups are identified as workspace-local in the workspace admin settings page. Workspace-local groups cannot be assigned to additional workspaces or granted access to data in a Unity Catalog metastore.

Note

In identity federated workspaces, workspace-local groups can only be managed by workspace admins using the Groups API.

Databricks recommends using account groups instead of workspace-local groups. You must enable your workspace for identity federation to use account groups. If you enable identity federation in an existing workspace, you can use both account groups and workspace-local groups side-by-side, but Databricks recommends turning workspace-local groups into account groups to take advantage of centralized workspace assignment and data access management using Unity Catalog. See Migrate workspace-local groups to account groups.

Who can manage groups?

To manage groups in Databricks, you must be either an account admin or a workspace admin.

  • Account admins can add groups to the account and manage group members. They can also assign groups to workspaces and configure data access for them across workspaces, as long as those workspaces use identity federation.

  • Workspace admins can add account groups to their identity federated workspace and manage access to objects and functionality in the workspace, such as the ability to create clusters or pools. Workspace admins cannot create or manage account groups. Workspace admins can create and manage workspace-local groups. In identity federated workspaces, workspace-local groups can only be managed using the API.

Workspace admins are members of the admins group in the workspace, which is a reserved group that cannot be deleted.

Add groups to your account

As an account admin, you can add groups to your Databricks account using the account console, a provisioning connector for your identity provider, or the SCIM (Account) API.

Add groups to your account using the account console

To add a group to the account using the account console, do the following:

  1. As an account admin, log in to the account console.

  2. In the sidebar, click User management.

  3. On the Groups tab, click Add group.

  4. Enter a name for the group.

  5. Click Confirm.

  6. When prompted, add users, service principals, and groups to the group.

Add users, service principals, and groups to an existing group using the account console

To add users, service principals, and groups to an existing group using the account console, do the following:

  1. As an account admin, log in to the account console.

  2. In the sidebar, click User management.

  3. On the Groups tab, select the group you want to update.

  4. Click Add members.

  5. Search for the user, group, or service principal you want to add and select it.

  6. Click Add.

To give group members access to a workspace, you need to add the group to the workspace using identity federation. See Add groups to workspaces.

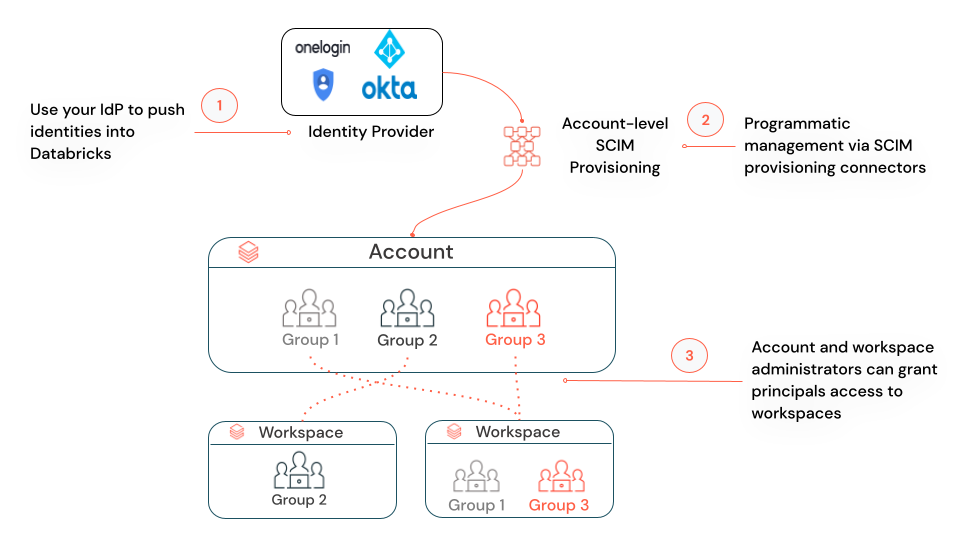
Sync groups to your Databricks account from an identity provider

You can sync groups from your identity provider (IdP) to your Databricks account using a SCIM provisioning connector. For instructions, see Provision identities to your Databricks account.

Important

If you already have SCIM connectors that sync identities directly to your workspaces and those workspaces are enabled for identity federation, we recommend that you disable those SCIM connectors when the account-level SCIM connector is enabled. If you have workspaces that are not using identity federation, you must continue to use any SCIM connectors you have configured for those workspaces, running in parallel with the account-level SCIM connector.

Add groups to your account using the SCIM APIs

Account admins can add and manage groups in the Databricks account using the SCIM API for Accounts.

Workspace admins can’t add groups using this API, but they can list and view groups. To do this, they must invoke the API using a different endpoint URL:

  • Account admins use accounts.cloud.databricks.com/api/2.0/accounts/{account_id}/scim/v2/.

  • Workspace admins use {workspace-domain}/api/2.0/account/scim/v2/.

For details, see the Account Groups API.

Assign the account admin role to a group

You cannot assign the account admin role to a group using the account console, but you can assign it to groups using the SCIM API for Accounts. See the Account Groups API.

Remove groups from your Databricks account

Account admins can remove groups from a Databricks account. Workspace admins cannot.

Important

When you remove a group, all users in that group are deleted from the account and lose access to any workspaces they had access to, unless they are members of another group or have been directly granted access to the account or any workspaces. We recommend that you refrain from deleting account-level groups unless you want them to lose access to all workspaces in the account. Be aware of the following consequences of deleting users:

  • Applications or scripts that use the tokens generated by the user will no longer be able to access the Databricks API

  • Jobs owned by the user will fail

  • Clusters owned by the user will stop

  • Queries or dashboards created by the user and shared using the Run as Owner credential will have to be assigned to a new owner to prevent sharing from failing

To remove a group using the account console, do the following:

  1. As an account admin, log in to the account console.

  2. In the sidebar, click User management.

  3. On the Groups tab, find the group you want to remove.

  4. Click the Kebab menu kebab menu at the far right of the user row and select Delete.

  5. In the confirmation dialog box, click Confirm delete.

If you remove a group using the account console, you must ensure that you also remove the group using any SCIM provisioning connectors or SCIM API applications that have been set up for the account. If you don’t, SCIM provisioning will simply add the group and its members back the next time it syncs. See Sync users and groups from your identity provider.

To remove a group from a Databricks account using SCIM APIs, see Provision identities to your Databricks account and the Account Groups API.

Migrate workspace-local groups to account groups

This section applies only to workspaces that are enabled for identity federation.

Groups created at the workspace level (workspace-local groups) are not automatically synchronized to the account as account groups. You can use workspace-local groups in the workspace they are defined in, but you cannot manage them using account-level interfaces, and you cannot use them to manage data access across workspaces using Unity Catalog. Therefore Databricks recommends that you convert them to account groups.

You can use any of the following methods to migrate workspace-local groups to the account level:

  • Convert them manually. Create a new account group using the account console and add each member to the new account. Then use the workspace admin settings page to delete the workspace-local group.

    See Add groups to your account using the account console.

  • Convert them using a SCIM provisioning connector. Set up or modify a SCIM provisioning connector to add a group to the account that replicates the workspace-local group. Then delete the group using the workspace admin settings page or workspace-level SCIM (Groups) API. If you have an active SCIM provisioning connector for the workspace, you should shut it down. You should be provisioning all users and groups at the account level.

    See Sync users and groups from your identity provider.

  • Convert them using the SCIM APIs. Use the SCIM (Account) API to add a group to the account that replicates the workspace-local group. Then delete the group using the workspace admin settings page or workspace-level SCIM (Groups) API.

    See the Account Groups API and Workspace Groups API.

After you migrate the workspace-local group to the account, you need to grant the new account group access to the workspace and the objects, and the functionality that the workspace-local group originally had access to so that the group members maintains that access. Follow Add groups to workspaces to assign workspace permissions to the new account groups, and use the Permissions API to grant the group access to objects within the workspace.

Add groups to workspaces

Workspace admins can add account groups to identity-federated workspaces using the workspace admin settings page and the Workspace Assignment API. Workspace admins can add and manage workspace-local groups in non-identity federated workspaces using the workspace admin settings page and the workspace-level SCIM (Groups) API.

Assign a group to a workspace using the account console

To add groups to a workspace using the account console, the workspace must be enabled for identity federation. Only account groups are assignable to workspaces.

  1. As an account admin, log in to the account console.

  2. In the sidebar, click Workspaces.

  3. On the Permissions tab, click Add permissions.

  4. Search for and select the group, assign the permission level (workspace User or Admin), and then click Save.

Assign a group to a workspace using REST APIs

You’ll use different REST APIs to assign groups to workspaces depending on whether the workspace is enabled for identity federation, as follows:

  • Workspace enabled for identity federation: Account and workspace admins can use the Workspace Assignment API to assign groups to workspaces. See Workspace Assignment API.

  • Workspace not enabled for identity federation: A workspace admin can use the workspace-level SCIM (Groups) API to create workspace-local groups in workspaces and add members. See the Groups API.

Manage workspace-local groups

This section applies only to workspaces that are not enabled for identity federation.

Workspace admins can add and manage workspace-local groups using the workspace admin settings page, a provisioning connector for your identity provider, and the Groups API.

Add a workspace-local group to a workspace using the admin settings

Workspace admins can add and manage workspace-local groups using the workspace admin settings page in non-identity federated workspaces.

To add a workspace-local group to a workspace using the admin settings, do the following:

  1. As a workspace admin, log in to the Databricks workspace.

  2. Click your username in the top bar of the Databricks workspace and select Admin Settings.

  3. On the Groups tab, click Create Group.

  4. Enter a group name and click Create.

    Group names must be unique. You cannot change a group name. If you want to change a group name, you must delete the group and recreate it with the new name.

Add users, service principals, and groups to a workspace-local group using the admin settings

Note

You cannot add a child group to the admins group.

  1. As a workspace admin, log in to the Databricks workspace.

  2. Click your username in the top bar of the Databricks workspace and select Admin Settings.

  3. On the Groups tab, select the group you want to update.

  4. On the Members tab, click Add users, groups, or service principals.

  5. On the dialog, browse or search for the users, service principals, and groups you want to add and select them.

  6. Click Confirm.

    You might need to click the down arrow in the selector to hide the drop-down list and show the Confirm button.

Remove a user, group, or service principal from a workspace-local group

  1. As a workspace admin, log in to the Databricks workspace.

  2. Click your username in the top bar of the Databricks workspace and select Admin Settings.

  3. Select the group you want to update.

  4. On the Members tab, find the user, group, or service principal you want to remove and click the X in the Actions column.

  5. Click Remove Member to confirm.

The user, group, or service principal loses all child group memberships and entitlements and instance profiles granted by virtue of membership in this group. However, the identity might retain those entitlements by virtue of membership in other groups or user-level grants.

Note

You can also remove a child workspace-local group from its parent workspace-local group by going to the Parents tab for the group you want to remove. Find the parent group you want to remove the child workspace-local group from and click the X in the Actions column.

All entitlements and instance profiles assigned to the parent group are removed from the members of the group. However, they might retain those entitlements and instance profiles by virtue of membership in other groups or user-level grants.

View parent workspace-local groups

  1. As a workspace admin, log in to the Databricks workspace.

  2. Click your username in the top bar of the Databricks workspace and select Admin Settings.

  3. Click the Groups tab and select the group you want to view.

  4. On the Parents tab, view the parent groups for your group.

Sync workspace-local groups to your Databricks account from an identity provider

You can sync groups from your identity provider (IdP) to your Databricks workspace using a SCIM provisioning connector. For instructions, see Provision identities to a Databricks workspace.

Add workspace-local groups to your account using the SCIM APIs

Workspace admins can add and manage workspace-local groups using the workspace-level SCIM API. For instructions, see Groups API.

Manage a group’s workspace entitlements

An entitlement is a property that allows a user, service principal, or group to interact with Databricks in a specified way. Entitlements are assigned to users at the workspace level. The following table lists entitlements and the workspace UI and API property name that you use to manage each one. You can use the workspace admin settings page and workspace-level SCIM REST APIs to manage entitlements.

Entitlement name (UI)

Entitlement name (API)

Default

Description

Workspace access

workspace-access

Granted by default.

When granted to a user or service principal, they can access the Data Science & Engineering and Databricks Machine Learning persona-based environments.

Can’t be removed from workspace admins.

Databricks SQL access

databricks-sql-access

Granted by default.

When granted to a user or service principal, they can access Databricks SQL.

Allow unrestricted cluster creation

allow-cluster-create

Not granted to users or service principals by default.

When granted to a user or service principal, they can create clusters. You can restrict access to existing clusters using cluster-level permissions.

Can’t be removed from workspace admins.

Allow pool creation (not available via UI)

allow-instance-pool-create

Can’t be granted to individual users or service principals.

When granted to a group, its members can create instance pools.

Can’t be removed from workspace admins.

You manage group entitlements at the workspace level, regardless of whether the group was created in the account or is workspace-local.

Add an entitlement for a group using the admin settings

  1. As a workspace admin, log in to the Databricks workspace.

  2. Click your username in the top bar of the Databricks workspace and select Admin Settings..

  3. On the Groups tab, select the group you want to update.

  4. On the Entitlements tab, select the entitlement you want to grant to all users in the group.

Remove an entitlement for a group using the admin settings

  1. As a workspace admin, log in to the Databricks workspace.

  2. Click your username in the top bar of the Databricks workspace and select Admin Settings..

  3. On the Groups tab, select the group you want to update.

  4. On the Entitlements tab, clear the checkbox for the entitlement you want to revoke for all users in the group.

  5. In the confirmation dialog, click Remove.

Group members lose the entitlement, unless they have permission granted as an individual user or through another group membership.