Authenticate with an identity provider token
This page explains how to authenticate to Databricks using a token issued by your organization’s identity provider.
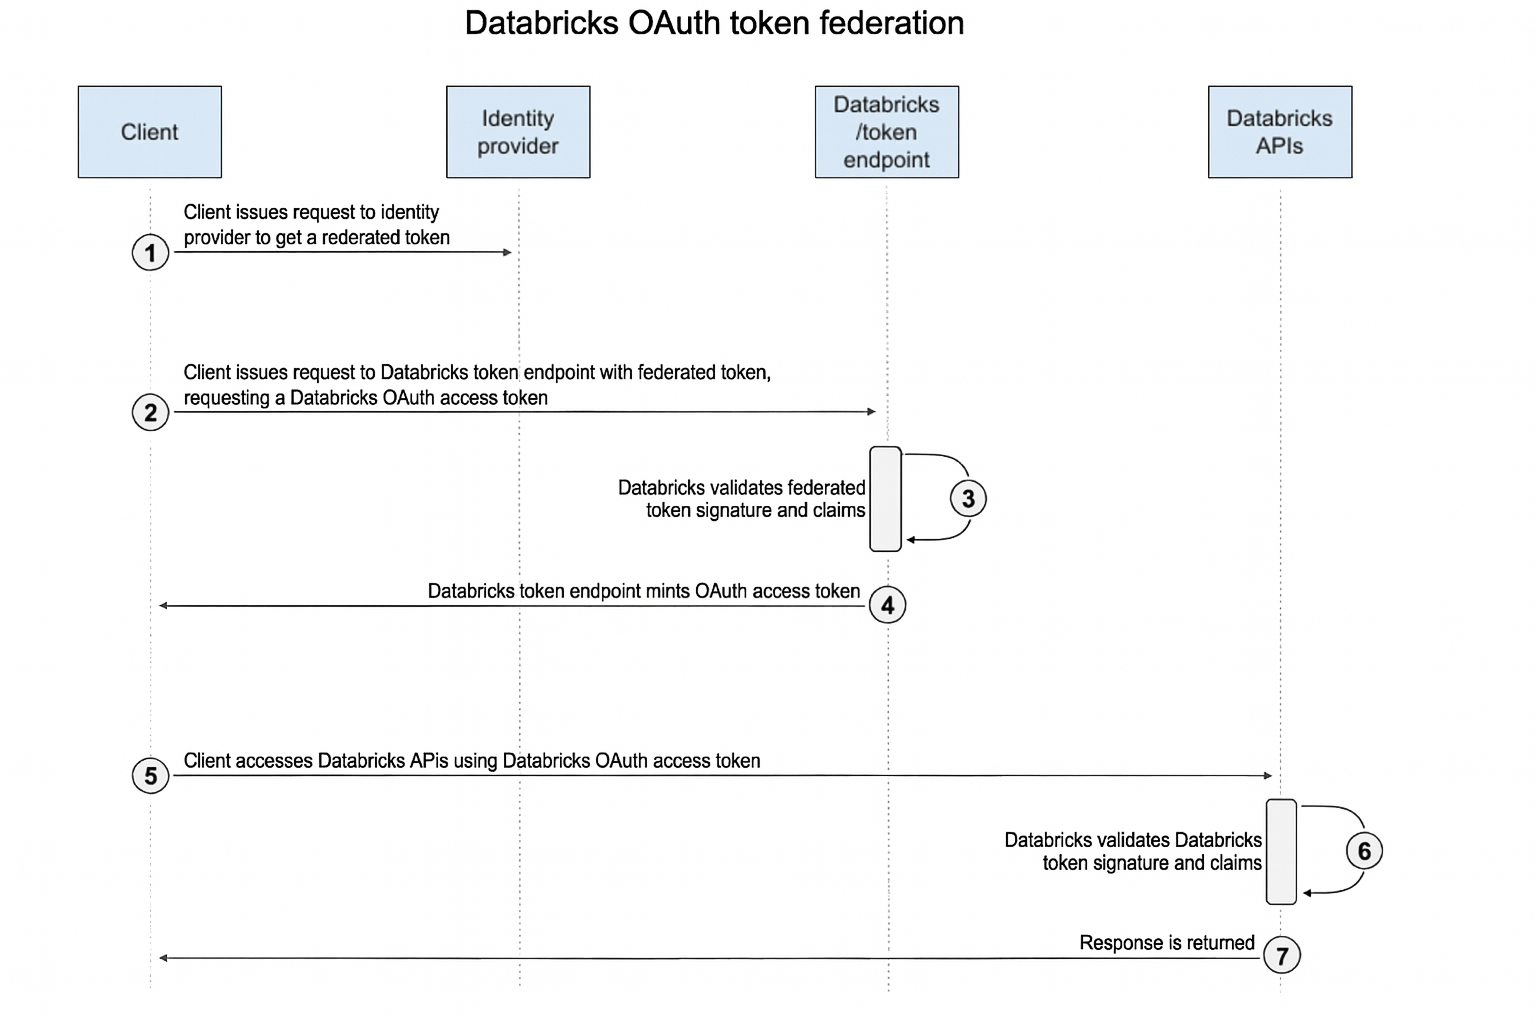
Databricks supports OAuth 2.0 Token Exchange to let you exchange a federated identity token for a Databricks OAuth token. With token federation, the Databricks CLI, SDKs, and other tools can automatically handle this exchange and manage access tokens for you.
The lifetime of each access token is derived from the lifetime of the federated token that you provide, which is most commonly one hour but can vary. The tools refresh tokens automatically as needed, so you don't need to manually request or rotate credentials.
Authentication process
To authenticate Databricks API access with a token from a federated identity provider, first set the required environment variables or configuration fields. Your preferred tool or SDK retrieves the federated JSON Web Token (JWT) from the location you specify, exchanges it for a Databricks OAuth token, and uses the OAuth token to authenticate Databricks REST API calls.
Prerequisites
Before you begin, perform the following steps:
- Create a federation policy for your account or service principal.
- Obtain a valid JWT from your identity provider that matches the policy. Tokens must be signed using RS256 or ES256. The steps vary by provider, so refer to your provider’s documentation or ask an administrator.
Configure your environment
Configure your environment based on where your federated token comes from. Set the following environment variables, .databrickscfg fields, Terraform fields, or Config fields:
- Databricks host:
https://accounts.cloud.databricks.comfor account operations or the target workspace URL, for examplehttps://dbc-a1b2345c-d6e7.cloud.databricks.comfor workspace operations. - Databricks account ID: Only required if the host is the account console URL.
- Service principal client ID: Only required for workload identity federation. Must not be set if authenticating using an account-wide token federation policy.
- Databricks authentication type:
env-oidcif the token comes from an environment variable.file-oidcif the token comes from a file. - OIDC token environment variable: The name of the environment variable that contains the token. Only required if the authentication method is
env-oidc. Defaults toDATABRICKS_OIDC_TOKEN. - OIDC token filepath: Path to the file that contains the federated token. Only required if the authentication method is
file-oidc.
For a complete reference of all unified authentication environment variables and configuration fields, see Environment variables and fields for unified authentication.
Choose your preferred configuration method to set up the authentication environment:
- Environment
- Profile
- CLI
- Connect
- VS Code
- Terraform
- Python
- Java
- Go
Set the following environment variables:
export DATABRICKS_HOST=<workspace-url-or-account-console-url>
export DATABRICKS_ACCOUNT_ID=<account-id>  # If DATABRICKS_HOST is the account console URL
export DATABRICKS_CLIENT_ID=<client-id>    # Only for workload identity federation
export DATABRICKS_AUTH_TYPE=<auth-method> # env-oidc or file-oidc
export DATABRICKS_OIDC_TOKEN_ENV=<token-env-name>  # If auth type is env-oidc
export DATABRICKS_OIDC_TOKEN_FILEPATH=<token-filepath-name> # If auth type is file-oidc
Create or identify a .databrickscfg configuration profile with the following fields:
[<profile-name>]
host = <workspace-url-or-account-console-url>
account_id = <account-id>  # If host is the account console URL
client_id = <client-id>    # Only for workload identity federation
auth_type = <auth-method>  # env-oidc or file-oidc
oidc_token_env = <token-env-name>  # If auth type is env-oidc
oidc_token_filepath = <token-filepath-name> # If auth type is file-oidc
For the Databricks CLI, do one of the following:
- Set the environment variables as specified on the Environment tab.
- Set the values in your
.databrickscfgfile as specified on the Profile tab.
Environment variables always take precedence over values in your .databrickscfg file.
For Databricks Connect, you can either:
- Use a config profile: Set workspace-level values in your
.databrickscfgfile as described on the Profile tab. Also set thecluster_idto your workspace instance URL. - Use environment variables: Set the same values as shown on the Environment tab. Also set the
DATABRICKS_CLUSTER_IDto your workspace instance URL.
Values in .databrickscfg take precedence over environment variables.
To initialize Databricks Connect with these settings, see Compute configuration for Databricks Connect.
For the Databricks extension for Visual Studio Code, do the following:
- Set the values in your
.databrickscfgfile for Databricks workspace-level operations as specified on the Profile tab. - In the Configuration pane of the Databricks extension for Visual Studio Code, click Configure Databricks.
- In the Command Palette, for Databricks Host, enter your workspace URL, for example
https://dbc-a1b2345c-d6e7.cloud.databricks.com, and then pressEnter. - In the Command Palette, select your target profile's name in the list for your URL.
For more details, see Set up authorization for the Databricks extension for Visual Studio Code.
For account-level operations
provider "databricks" {
  alias = "accounts"
}
For workspace-level operations:
provider "databricks" {
  alias = "workspace"
}
For workspace-level operations:
from databricks.sdk import WorkspaceClient

# Uses environment configuration automatically
w = WorkspaceClient()
For account-level operations:
from databricks.sdk import AccountClient

# Uses environment configuration automatically
a = AccountClient()
For workspace-level operations:
import com.databricks.sdk.WorkspaceClient;

// Uses environment configuration automatically
WorkspaceClient w = new WorkspaceClient();
For account-level operations:
import com.databricks.sdk.AccountClient;

// Uses environment configuration automatically
AccountClient a = new AccountClient();
For workspace-level operations:
import "github.com/databricks/databricks-sdk-go"

// Uses environment configuration automatically
w := databricks.Must(databricks.NewWorkspaceClient())
For account-level operations:
import "github.com/databricks/databricks-sdk-go"

// Uses environment configuration automatically
a := databricks.Must(databricks.NewAccountClient())
For more information about authenticating with Databricks tools and SDKs that use Go and that implement Databricks client unified authentication, see Authenticate the Databricks SDK for Go with your Databricks account or workspace.
Access Databricks APIs
After you configure your environment, you can use the Databricks CLI and SDKs normally. They automatically handle the token exchange and use the resulting OAuth token for API authentication.
- CLI
- Python
- Java
- Go
databricks clusters list
from databricks.sdk import WorkspaceClient

w = WorkspaceClient()  # Uses environment configuration
clusters = w.clusters.list()
import com.databricks.sdk.WorkspaceClient;

WorkspaceClient w = new WorkspaceClient();
List<ClusterDetails> clusters = w.clusters().list();
import "github.com/databricks/databricks-sdk-go"

w := databricks.Must(databricks.NewWorkspaceClient())
clusters := w.Clusters.ListAll(context.Background(), compute.List{})
Implement a custom authorization provider
If your federated token comes from a source other than environment variables or a file, you can use one of the Databricks SDKs to write a custom implementation to retrieve your federated token.
- Python
- Java
- Go
from databricks.sdk import oidc
from databricks.sdk.core import (Config, CredentialsProvider, credentials_strategy, oidc_credentials_provider)


class MyCustomIdTokenSource(oidc.IdTokenSource):
    def id_token(self) -> oidc.IdToken:
        token = ...  # Implement logic to return the ID token here
        return oidc.IdToken(jwt=token)


@credentials_strategy("my-custom-oidc", "")
def my_custom_oidc_strategy(cfg: Config) -> CredentialsProvider:
    return oidc_credentials_provider(cfg, MyCustomIdTokenSource())


if __name__ == "__main__":
    cfg = Config(
        host="https://my-workspace.cloud.databricks.com",
        credentials_strategy=my_custom_oidc_strategy
    )
    from databricks.sdk import WorkspaceClient
    w = WorkspaceClient(config=cfg)
    # Use the client...
import com.databricks.sdk.WorkspaceClient;
import com.databricks.sdk.core.DatabricksConfig;
import com.databricks.sdk.core.CredentialsProvider;
import com.databricks.sdk.core.oauth.IDTokenSource;
import com.databricks.sdk.core.oauth.IDToken;

public class CustomOIDCExample {

    // Custom IDTokenSource that returns an OIDC ID token
    static class MyCustomIdTokenSource implements IDTokenSource {
        @Override
        public IDToken getIDToken(String audience) {
            // TODO: Implement logic to fetch or generate the ID token
            String jwt = "...";  // your OIDC token here
            return new IDToken(jwt);
        }
    }

    public static void main(String[] args) {
        // TODO: Wrap MyCustomIdTokenSource in a CredentialsProvider
        // See the SDK documentation for the appropriate method
        CredentialsProvider provider = ...; // Configure with MyCustomIdTokenSource

        // Configure with workspace host and custom OIDC provider
        DatabricksConfig cfg = new DatabricksConfig()
            .setHost("https://my-workspace.cloud.databricks.com")
            .setCredentialsProvider(provider);

        // Initialize the workspace client
        WorkspaceClient w = new WorkspaceClient(cfg);

        System.out.println("Databricks client initialized: " + w);

        // Use the client...
    }
}
This example shows how to implement a custom IDTokenSource. For the latest method to configure a CredentialsProvider with your custom token source, consult the Databricks SDK for Java documentation or refer to the SDK source code on GitHub.
package main

import (
    "context"
    "fmt"

    "github.com/databricks/databricks-sdk-go"
    "github.com/databricks/databricks-sdk-go/config"
    "github.com/databricks/databricks-sdk-go/credentials"
)

// MyCustomIdTokenSource implements a custom OIDC token source
type MyCustomIdTokenSource struct{}

func (s *MyCustomIdTokenSource) IDToken(ctx context.Context) (*credentials.IDToken, error) {
    // TODO: Implement logic to return the ID token
    token := "..."
    return &credentials.IDToken{JWT: token}, nil
}

// myCustomOIDCStrategy is a custom credentials strategy
func myCustomOIDCStrategy(cfg *config.Config) (credentials.CredentialsProvider, error) {
    return credentials.NewOIDCCredentialsProvider(cfg, &MyCustomIdTokenSource{}), nil
}

func main() {
    cfg := &config.Config{
        Host: "https://my-workspace.cloud.databricks.com",
    }

    // Register the custom credentials strategy
    credentials.Register("my-custom-oidc", myCustomOIDCStrategy)

    // Initialize the Databricks workspace client with custom auth
    w, err := databricks.NewWorkspaceClientWithConfig(cfg)
    if err != nil {
        panic(err)
    }

    fmt.Println("Databricks client initialized:", w)
    // Use the client...
}
Manually exchange a token
If you aren't using the Databricks SDKs, CLI, or other tools that support unified authentication, you can manually exchange a JWT from your identity provider for a Databricks OAuth token. To do so, send a request to the Databricks token endpoint using the OAuth 2.0 Token Exchange (RFC 8693).
First obtain a federated JWT from your identity provider following their documentation. Then exchange the JWT for a Databricks OAuth token and use that token to access Databricks REST APIs:
Exchange a federated JWT for a Databricks OAuth token
For account-wide federation policies, this command exchanges a federated JWT for a Databricks OAuth token:
curl --request POST https://<databricks-workspace-host>/oidc/v1/token \
  --data "subject_token=${FEDERATED_JWT_TOKEN}" \
  --data 'subject_token_type=urn:ietf:params:oauth:token-type:jwt' \
  --data 'grant_type=urn:ietf:params:oauth:grant-type:token-exchange' \
  --data 'scope=all-apis'
To access Databricks account resources, use the URL https://<databricks-account-host>/oidc/accounts/<account-id>/v1/token.
For service principal federation policies, include the client ID in the request:
curl --request POST https://<databricks-workspace-host>/oidc/v1/token \
  --data "client_id=${CLIENT_ID}" \
  --data "subject_token=${FEDERATED_JWT_TOKEN}" \
  --data 'subject_token_type=urn:ietf:params:oauth:token-type:jwt' \
  --data 'grant_type=urn:ietf:params:oauth:grant-type:token-exchange' \
  --data 'scope=all-apis'
Replace CLIENT_ID with the service principal UUID (for example, 7cb2f8a4-49a7-4147-83db-35cb69e5cede).
If the token from your identity provider is valid and matches your federation policy, you receive a standard JSON response that includes a Databricks OAuth token in the access_token field. This OAuth token can be used to access Databricks APIs. The resulting Databricks OAuth token has the same expiration (exp) claim as the JWT provided in the subject_token parameter.
Example response:
{
  "access_token": "eyJraWQ...odi0WFNqQw",
  "scope": "all-apis",
  "token_type": "Bearer",
  "expires_in": 3600
}
Use the OAuth token to call Databricks APIs
You can then use the resulting Databricks OAuth token as a bearer token to access Databricks APIs. For example, to call the Databricks SCIM Me API to retrieve your Databricks user and display name:
TOKEN='<your-databricks-oauth-token>'

curl --header "Authorization: Bearer $TOKEN" \
  --url https://${DATABRICKS_WORKSPACE_HOSTNAME}/api/2.0/preview/scim/v2/Me
The response should appear similar to the following:
{
  "userName": "username@mycompany.com",
  "displayName": "Firstname Lastname"
}