Configure Microsoft Teams notifications
This feature is in Public Preview.
AI/BI dashboards support sending scheduled snapshots to Microsoft Teams channels. This allows teams to receive dashboard updates directly in their Teams workspace. This page explains how to create a Microsoft Teams app and configure a Teams channel as a notification destination. Dashboard editors can then add this notification destination as a subscriber to scheduled dashboards. For information about adding a Teams channel as a subscriber, see Subscribe a Slack or Microsoft Teams channel.
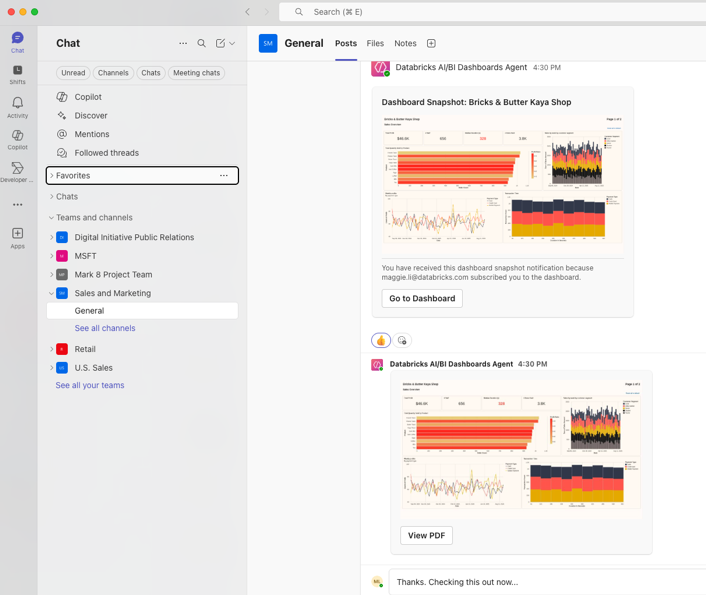
Teams subscriptions deliver dashboard snapshots that include:
- A PNG image snapshot of the dashboard visible directly in the channel
- A direct link to open the dashboard in Databricks
- A PDF snapshot attachment in the message thread
Requirements
You must have the following permissions:
- You must be a Databricks workspace admin to configure notification destinations.
- You must have the appropriate permissions to create and configure apps in Microsoft Copilot Studio and Microsoft Entra ID.
During the setup process, you collect authentication credentials from Microsoft to configure the Databricks notification destination.
After you configure the notification destination, any user with CAN EDIT permissions on a dashboard can add the Teams destination as a subscriber to schedules they manage.
Step 1: Create and configure a Microsoft Teams app
Create a Microsoft Copilot Studio bot for your Teams workspace and configure the necessary permissions.
Create the Microsoft Copilot Studio bot
Complete the following steps from the Microsoft Copilot Studio documentation:
Configure app permissions in Microsoft Entra ID
- Go to the Microsoft Entra admin center.
- Click Applications > App registrations.
- Find and select the app registration associated with your Copilot Studio bot using the Application ID from the previous step.
- In the left sidebar, click API permissions.
- Click Add a permission.
- In Microsoft APIs, click Microsoft Graph > Application permissions.
- Add the following permissions:
Files.Read.AllSites.ReadWrite.All
- Click Add permissions.
- Click Grant admin consent to grant the permissions for your organization.
Create an authentication secret
- In the Microsoft Entra admin center, with your app registration selected, click to Certificates & secrets.
- Click Client secrets > New client secret.
- Enter a description and select an expiration period.
- Click Add.
- Copy the Value of the newly created secret. This value is displayed only once and you need it to configure the Databricks notification destination.
Get the tenant ID
- In the Microsoft Entra admin center, with your app registration selected, navigate to Overview.
- Copy the Directory (tenant) ID. You need this value to configure the Databricks notification destination.
Publish the bot and add to Teams channel
Complete the following steps from the Microsoft Copilot Studio documentation:
Create an incoming webhook for the channel
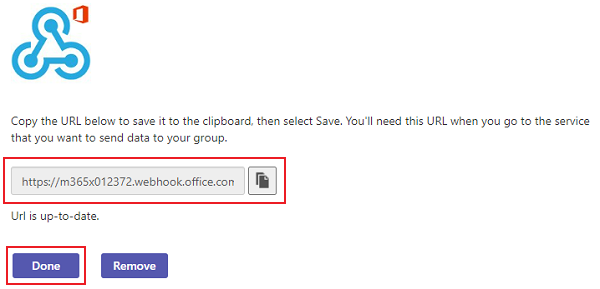
- In Microsoft Copilot Studio documentation, follow the steps to Create an Incoming Webhook.
- Copy and save the generated webhook URL.
- Click Done.
Get the Teams channel URL
- In Microsoft Teams, navigate to the destination channel.
- Click the hamburger menu ••• next to the channel name.
- Click Copy link. Ensure to copy the channel URL and not the Teams URL. You need this URL to configure the Databricks notification destination.
Step 2: Configure the notification destination in Databricks
Create a notification destination in your Databricks workspace that points to your Microsoft Teams channel.
-
Log in to your Databricks workspace.
-
Click your username in the upper right corner of the workspace.
-
Select Settings from the dropdown.
-
In the Workspace admin section, click the Notifications tab.
-
Click Manage in the Notification destinations section.
-
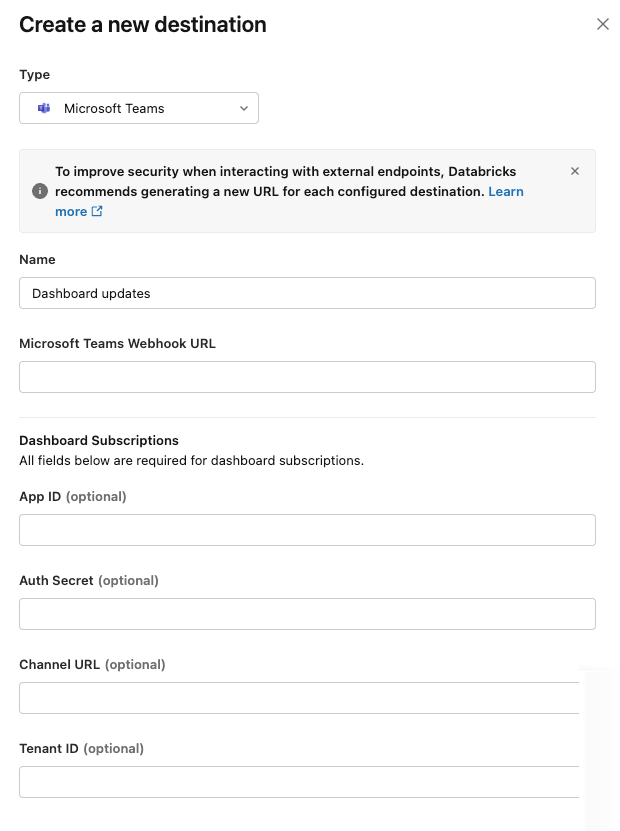
Click Add destination.
-
Select Microsoft Teams from the destination type dropdown.
-
Enter the following information:
- Name: A descriptive name for this Teams channel destination
- Microsoft teams Webhook URL: The webhook URL from the Teams incoming webhook
- App ID: The Application ID from your Microsoft Copilot Studio bot
- Auth Secret: The client secret value from Microsoft Entra ID
- Channel URL: The channel URL from Microsoft Teams
- Tenant ID: The Directory (tenant) ID from Microsoft Entra ID
-
Click Create.
Users can now add this Teams notification destination as a subscriber to dashboard schedules.
For instructions on subscribing Teams channels to dashboard schedules, see Subscribe a Slack or Microsoft Teams channel.
Troubleshooting
Use the following to troubleshoot common errors with Microsoft Teams notifications.
Missing PDF attachment
If the Teams notification appears without a PDF attachment, verify that:
- The Application ID is correctly configured in the notification destination
- The auth secret is valid and has not expired
- The app has been granted the required
Files.Read.AllandSites.ReadWrite.Allpermissions in Microsoft Entra ID - Admin consent has been granted for the API permissions
Notification not appearing
If notifications do not appear in your Teams channel:
- Verify the webhook URL is correct and matches the destination channel
- Verify the auth secret uses the client secret value from Microsoft Entra ID and not the secret ID
- Check that the bot has been published and added to the destination channel
- Ensure the channel URL is correct
- Verify the tenant ID matches your Microsoft organization
- Confirm the schedule is active and not paused
Next steps
- Subscribe Teams channels to dashboard schedules. See Subscribe a Slack or Microsoft Teams channel
- Configure Slack notification destinations. See Configure Slack notifications
- Configure email notification destinations. See Manage notification destinations