Build and publish a Designer App
This feature is in Beta. To use it, a workspace admin must turn on Governed agentic app-building from the Previews page. See Manage Databricks previews.
Turn a Lakeflow Designer visual data prep into an app that your colleagues can run on their own. You add a form that asks for the values they care about, such as a region or a file, choose which results they see, and publish the app into an App Space. For example, you can publish a sales workflow so that a regional manager picks a region and a quarter and gets the report without asking you to run it. To learn what Designer Apps are, see Designer Apps in Lakeflow Designer.
Prerequisites
- A workspace admin must turn on the Governed agentic app-building preview, which turns on App Spaces. Without it, the Apps button doesn't appear in Lakeflow Designer. See Manage Databricks previews.
- An active App Space that gives each app its own identity must exist. App Spaces that use a shared service principal aren't supported. See Create an App Space.
- You must have the Workspace access entitlement. See Access entitlements.
- You must have edit access to the visual data prep file.
- You must have permission to manage the app and to read the App Space. See Permissions.
- The visual data prep must define the parameters that you want app users to set. See Define parameters.
- To ask app users to upload files, you need a Unity Catalog volume to store the uploads. See What are Unity Catalog volumes?.
Create an app
-
Open the visual data prep file in Lakeflow Designer.
-
In the toolbar, click Apps, and then click New.
Lakeflow Designer creates an app named Untitled app and opens it next to the canvas.
-
Click the edit icon next to the app name and enter a new name. Each app in a file must have a unique name.

To switch between building the app next to the canvas and building it on its own, use the Split view and Full page buttons next to the app name. To close the app and return to the canvas, click the close button.
To open an existing app later, click Apps in the toolbar and select the app. The menu shows each app's status.
Build the form
The app's form asks app users for the values of visual data prep parameters. Each input in the form sends a value to a parameter. Defaults come from the visual data prep.
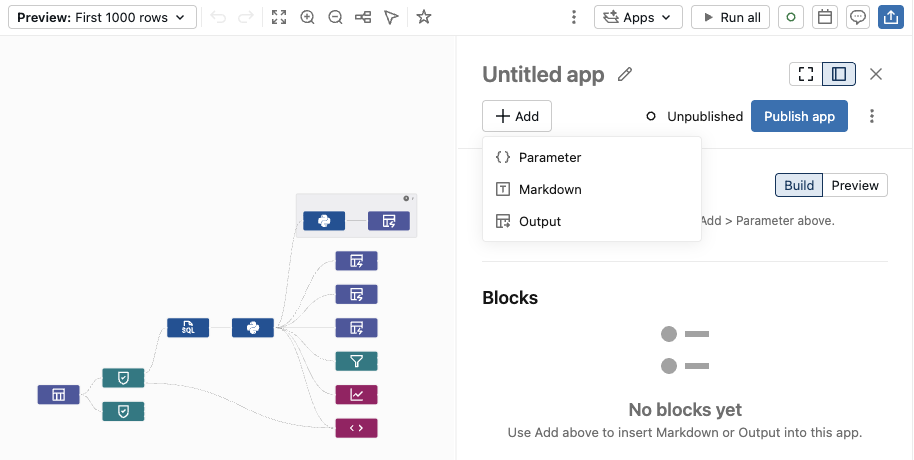
To add an input, a choice, a section, or a file upload, click Add, and then click Parameter. To check the form as app users see it, click Preview next to the Form heading. For the full steps, see Build the form for a Designer App.
Add outputs
An output block shows the result of an operator in the visual data prep.
- Click Add, and then click Output.
- Under Add output, select the outputs to add. For an operator with more than one output, such as a Filter or Join, select the specific output, such as True or Matched. To find an output, enter its name in Search.
- Click Add selected outputs.
You can add the following outputs:
- Tables: The output of an operator that produces a table. Tables show up to 1,000 rows.
- Charts: The output of a Visualization operator. Configure the chart in the visual data prep before you add its output to the app.
- HTML pages: The page that an HTML operator produces.
- Files: The files that an Output operator writes when its output type is a file. App users can download these files.

If an operator or its group is disabled in the visual data prep, its output block shows a message instead of a preview. To preview the output, enable the operator or group. See Enable or disable an operator with a parameter.
Add Markdown and arrange blocks
To add text that helps app users, such as instructions for filling in the form, a description of what the app does, or headings that separate the results, click Add, and then click Markdown. App users see this text in the published app. Enter the text in the block, and use the formatting toolbar to add headings, lists, links, and other formatting.
To arrange the app, do any of the following:
- To reorder a block, drag its handle.
- To remove a block, click the delete icon on the block.
- To hide a block until results are available, click the eye icon on the block. By default, blocks are always visible.
An app can have up to 20 output and Markdown blocks.
Configure storage
When an app asks users to upload files, you must select a storage volume to store their files before you publish. You usually select it when you add the file upload to the form. See Ask app users to upload a file. You can also choose where the app writes file outputs.
- Click the kebab menu next to Publish app, and then click App settings….
- For Storage volume, select a Unity Catalog volume. The app stores uploaded files in this volume.
- Optionally, for App output volume, select a volume to write all file outputs to. To write file outputs to the locations set in each Output operator, click Use operator locations.
- Click Save settings.
The app's service principal writes uploaded files to the storage volume. The runner job writes file outputs with its run-as identity, which is normally you. Files stay in their volumes until someone deletes them. If an Output operator writes to a Home volume in a nested schema, select an App output volume before you publish.
Build an app with Genie Code
You can ask Genie Code to create an app and change its blocks. For example, enter "Create an app that asks for a region and shows the revenue table" in the Genie Code prompt. See Prompt Genie Code on the canvas.
Genie Code can do the following in the app that is open:
- Add outputs and Markdown blocks, and change their text and titles.
- Build the form: add inputs, choices, sections, and file uploads, set their controls and labels, and show inputs only when a condition is met.
- Reorder and remove blocks, and rename the app.
To publish, change app settings, share, revert, or delete the app, use the app controls yourself.
Publish the app
- Click Publish app.
- The first time you publish, select an App Space from Select App Space. You can also select the App Space ahead of time in App settings…. Only active App Spaces appear in the list.
- The first time you publish, review the Publish with the Job's data permissions dialog, and then click Acknowledge and publish. See Data access and permissions.
- Wait for publishing to finish. Lakeflow Designer shows each step, such as preparing the job and creating the app.
While publishing, Lakeflow Designer grants the app's service principal the access it needs to run: CAN MANAGE on the runner job, CAN READ on the app's source folder, and read access to each volume that the app uses, with write access to the storage volume. You must have permission to grant this access.

To verify the app, click View published app. The app opens in a new tab. The first time the app opens, it can take a few minutes to start.
After the app is published, share it with app users. See Share the app.
How publishing and runs work
A Designer App goes from the visual data prep to app users as follows:
- You build the app's form and blocks in the visual data prep file.
- You click Publish app. Lakeflow Designer creates a runner job and a Databricks app in an App Space.
- An app user sets values in the form and clicks Run.
- The runner job runs the visual data prep with its run-as identity and the values that the app user set.
- The app shows the results to the app user.
When you publish an app, Lakeflow Designer takes a snapshot of the visual data prep and the app, and creates the following resources:
- A runner job that runs the visual data prep with the values that app users enter. To open it, see View the runner job.
- A Databricks app in the App Space that you select. The app serves the form and the results.
Changes that you make to the visual data prep or the app after you publish don't reach app users until you publish again. See Update and republish the app.
When an app user clicks Run, the app submits a run of the runner job with the values that they entered. The job runs the visual data prep with its configured run-as identity, which is normally you. The app polls the run and shows the results when the run finishes.
Each app user sees only their own runs. Run history, results, cancellation, and file downloads in the app are limited to the user who started the run.
Troubleshooting
The Apps button doesn't appear
App Spaces is turned off in the workspace. Ask a workspace admin to turn on the Governed agentic app-building preview. See Manage Databricks previews.
Items in the form need fixing before you can publish
The form has problems, such as two inputs that fill the same parameter. Fix the problems that appear under each row of the form, and then publish again. See Fix problems in the form.
Publishing requires permission to manage this App and read its App Space
Ask the App Space owner to grant you the permissions you need. See Permissions.
Select a storage volume in App settings before publishing
The form has a file upload but no storage volume. Select a volume. See Configure storage.
The name is already in use by another app
Rename the app, and then publish again.
Publishing failed while preparing the app's job
Click Retry Job setup. To check the job, click Open Jobs.
Choose an active App Space that uses individual App identities
The App Space uses a shared service principal, which Designer Apps don't support. Select a different App Space.
The selected app output depends on node
An output in the app depends on an Output operator that writes a file on every run but isn't in the app, or on an Output operator that the app doesn't support as a file output. Remove the dependency, or add the Output operator to the app as a file output, and then publish again.
A parameter name starts with _lb_
Designer Apps reserve parameter names that start with _lb_ for the runner job. Rename the parameter in the visual data prep, and then publish again.
Cannot determine the destination volumes for Output
Lakeflow Designer can't work out which volumes an Output operator writes to, for example, because its path uses a complex expression or a dropdown parameter with many choices. Use a fixed volume or a dropdown parameter with a simple string expression and fewer choices, or select an App output volume in App settings…. See Configure storage.
Could not prepare the App's resource access
You don't have permission to grant the app's service principal access to the runner job, the source folder, or a volume. An App Space permission doesn't let you share these resources. Ask their owner to grant you the access, and then publish again.