Move a visual data prep file to production
Every visual data prep file you build in Lakeflow Designer is backed by production-ready code and stored as a notebook named <name>.designer.ipynb. You can move it to production with the same tools you use for other Databricks code: store it in Git, run it as a job, and deploy it with Declarative Automation Bundles.
Store and version in Git
The workspace stores visual data prep files natively. To version a visual data prep file, place it in a Git folder and track it like any other notebook:
- Create a Git folder in your workspace.
- Move the visual data prep file into that Git folder.
- Track, commit, and version the file like any other notebook in Git. In Git, the file appears as
<file_name>.designer.ipynb.
For more about Git folders, see Databricks Git folders. To export or import a visual data prep file, see Export and import a visual data prep file.
Handle externally modified operator code
Designer detects when an operator's generated code changes outside the visual data prep editor, such as through Git or a bundle deployment. To preserve the changed code, Designer prevents edits to the operator in the UI or by Genie Code. To discard the changes, open the operator, select Regenerate code, and confirm. Designer recreates the code from the operator configuration.

Schedule as a job
You can automate a visual data prep file by scheduling it as a job.
- Schedule directly: Click the Schedule button in the top menu to create a scheduled job for your visual data prep file.
- Add to a job: Create a Databricks job and add your visual data prep file as a task. This enables you to combine that visual data prep file with other tasks in a larger pipeline. In the task Type drop-down, select Visual data prep, then select the file.
Scheduled runs display each operator as an individual node in the Jobs task graph, so you can inspect per-operator results in a run the same way you do on the canvas.
To view and manage existing schedules, click Schedule again to open the list. Click Add schedule to create another, or open a schedule's  kebab menu to Edit, Run now, Pause, Clone, View in Jobs, or Delete it.
Display operator output in a run
By default, a scheduled run generates output only for terminal operators (operators with no downstream connection), such as an Output operator. To see the results of every operator in the run, expand Advanced settings in the schedule dialog and select Display operator output.
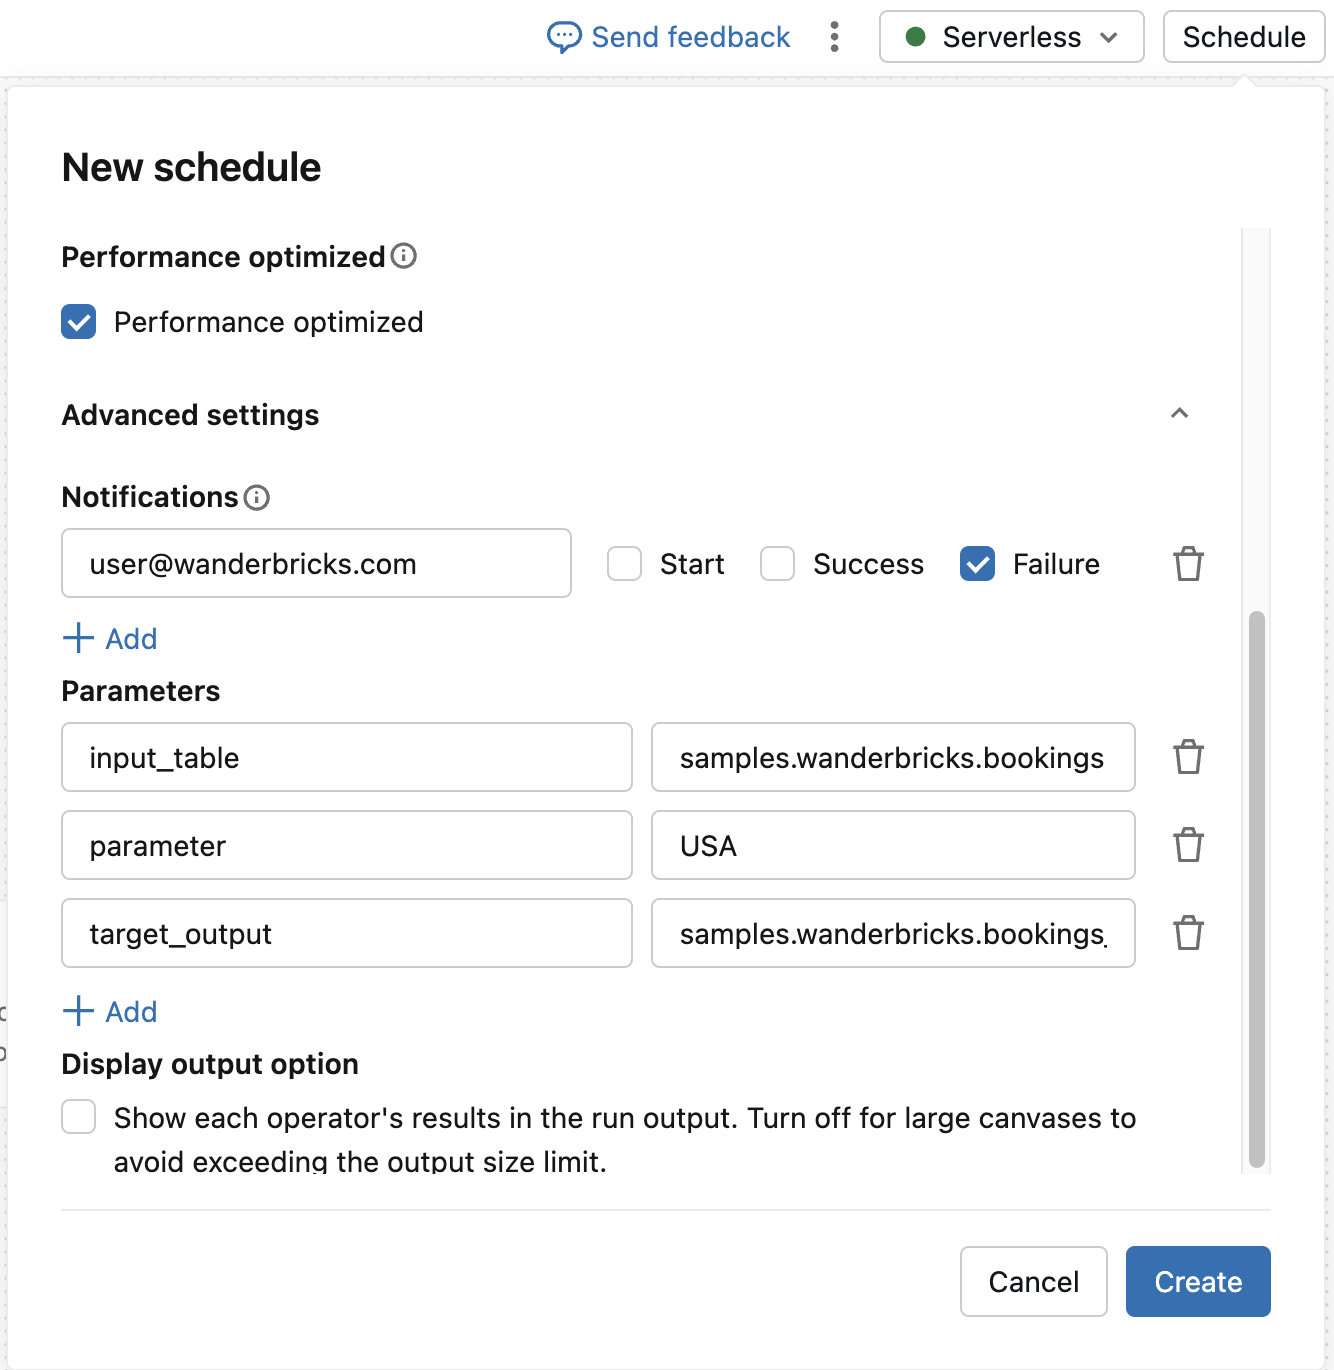
Turn this option off for large canvases to avoid exceeding the run output size limit.
Select the serverless environment
When you work with a visual data prep file, you can select the serverless environment used for both interactive runs and scheduled jobs. Configure it from the  Environment side pane in the right sidebar, the same way you do for a notebook. Under Base environment, select an environment version. See Configure the serverless environment.
Parameterize across environments
Parameters are named values defined for the visual data prep file as a whole. For supported uses and syntax, see Parameters.
Parameters let you run the same visual data prep file against different environments, for example, a test catalog during development and a production catalog in production.
- When you schedule a job in the UI: Override the parameter values for each schedule. For example, create one schedule that runs with an
environmentparameter set totestand another that runs with it set toproduction. - When you deploy with a bundle: Set the parameter values through the job's
parameters, and use bundle targets to supply different values per environment. Bundle development and production targets let you deploy the same job to separate environments with environment-specific settings. See Declarative Automation Bundles deployment modes and Declarative Automation Bundles configuration.
At runtime, a visual data prep file reads its parameters the same way whether it runs interactively or as a job, so the same file works across all of your environments without changes.
Deploy with Declarative Automation Bundles
Declarative Automation Bundles let you define and deploy Databricks resources such as jobs as source files, so you can apply software engineering best practices like source control, code review, testing, and CI/CD to your visual data prep files. See What are Declarative Automation Bundles?.
To deploy a visual data prep file with a bundle, define a notebook task and reference the .designer.ipynb file path in notebook_task.notebook_path. In a bundle, a visual data prep file uses the notebook_task key, even though the Jobs UI shows it as a Visual data prep task type.
The following example defines a job that runs a visual data prep file located next to the bundle configuration file:
resources:
  jobs:
    daily_prep_job:
      name: daily_prep_job
      tasks:
        - task_key: run_visual_data_prep
          notebook_task:
            notebook_path: ./my_transformation.designer.ipynb
Deploy and run the bundle with the Databricks CLI:
databricks bundle deploy
databricks bundle run daily_prep_job
For the full set of notebook task keys, see Notebook task. For a complete walkthrough of defining a job in a bundle, see Develop a job with Declarative Automation Bundles.
Automate with CI/CD
To validate and deploy visual data prep bundles automatically, integrate them into a CI/CD pipeline. For an example using GitHub Actions, see GitHub Actions.