Tutorial: Develop a Databricks app locally with Databricks Connect
Databricks Apps lets you create secure data and AI applications on the Databricks platform that you can easily share with users. By developing a Databricks app with PySpark and Databricks Connect, you can leverage the power of Apache Spark in your app. Similar to a JDBC driver, Databricks Connect can be embedded in any application to interact with Databricks. In addition, Databricks Connect provides the full expressiveness of Python through PySpark, enabling you to run all data transformations with Spark on Databricks compute.
For more information about apps and Databricks Connect, see Databricks Apps and Databricks Connect.
This tutorial walks through creating a simple Databricks app in the Databricks workspace, then developing it locally using Databricks Connect. The app runs on serverless compute with Python 3.11 and Databricks Connect 15.4.*. To use a different version, the Python version and Databricks Connect versions must be compatible. See Databricks Connect versions.
For a more advanced sample app that uses Databricks Connect, see the Databricks Demos GitHub repository.
Requirements
- Your Databricks workspace and local development environment must meet the requirements for Databricks Apps. See Set up your Databricks Apps workspace and development environment.
- Your Databricks workspace must have Unity Catalog enabled and serverless compute available (enabled by default in workspaces with Unity Catalog).
- Databricks CLI version 0.250.0 or above is installed on your local machine. To check your installed version of the Databricks CLI, run the command
databricks -v. To install the Databricks CLI, see Install or update the Databricks CLI. - Python 3.11 is installed on your local machine.
Step 1: Configure authentication and serverless compute
This tutorial uses serverless compute and Databricks OAuth user-to-machine (U2M) authentication and a Databricks configuration profile for authenticating to your Databricks workspace.
Use the Databricks CLI to initiate OAuth login by running the following command. Use DEFAULT as the profile name and complete the on-screen instructions to log in to your Databricks workspace.
databricks auth login --configure-serverless --host <workspace-url>
Step 2: Create an app
Now create a Databricks app in the workspace.
-
In your Databricks workspace, click + New > App in the left sidebar.
-
Under Install from a template, go to the Dash tab.
-
Choose the Hello world template.
-
Name the app dash-hello-world and click Install.
This creates a new app based on the selected template, deploys it to your workspace, and starts it. To view the app, click the Running URL at the top of the Overview page:

Step 3: Copy the app to your local machine
Next, download the app source code to your local machine.
-
Copy the first command under Sync the files on the app page.
-
In a local terminal, create a directory
dash-hello-world, then run the copied command, for example:Bashmkdir dash-hello-world
cd dash-hello-world
databricks workspace export-dir /Workspace/Users/someone@example.com/databricks_apps/dash-hello-world_2025_12_01-18_38/dash-hello-world-app .
The command copies two new files to the directory named app.py and app.yaml. app.yaml defines the app’s configuration, including its entry point and permissions. app.py contains the code that implements the app’s functionality and user interface.
Step 4: Add Databricks Connect
Create a Python virtual environment for your Databricks app and add databricks-connect as a requirement.
-
Create a virtual environment called
.myvenvat the root of the project folder and activate it:Bashpython3.11 -m venv .myvenv
source .myvenv/bin/activate -
Update your app dependencies in the
requirements.txtin your project. Adddatabricks-connect==15.4.*:dash== 3.3.*
dash-bootstrap-components==2.0.*
pandas
plotly==6.5.*
databricks-sql-connector
databricks-sdk
python-dotenv
dash-ag-grid
databricks-connect==15.4.* -
Install the dependencies in
requirements.txtinto your virtual environment:Bashpip install -r requirements.txt
Step 5: Modify the app and test locally
Customize and develop your app locally.
-
Update
app.pyto read data from Databricks using Databricks Connect and leverage Apache Spark to perform data transformations. Also, add code to make the data interactive, add a styling option, and allow data uploads.Python# app.py
import pandas as pd
from dash import Dash, dcc, html
import plotly.express as px
import dash_bootstrap_components as dbc
from databricks.connect.session import DatabricksSession
from pyspark.sql.functions import col
spark = DatabricksSession.builder.serverless().getOrCreate()
# Data transformations with Spark in Python
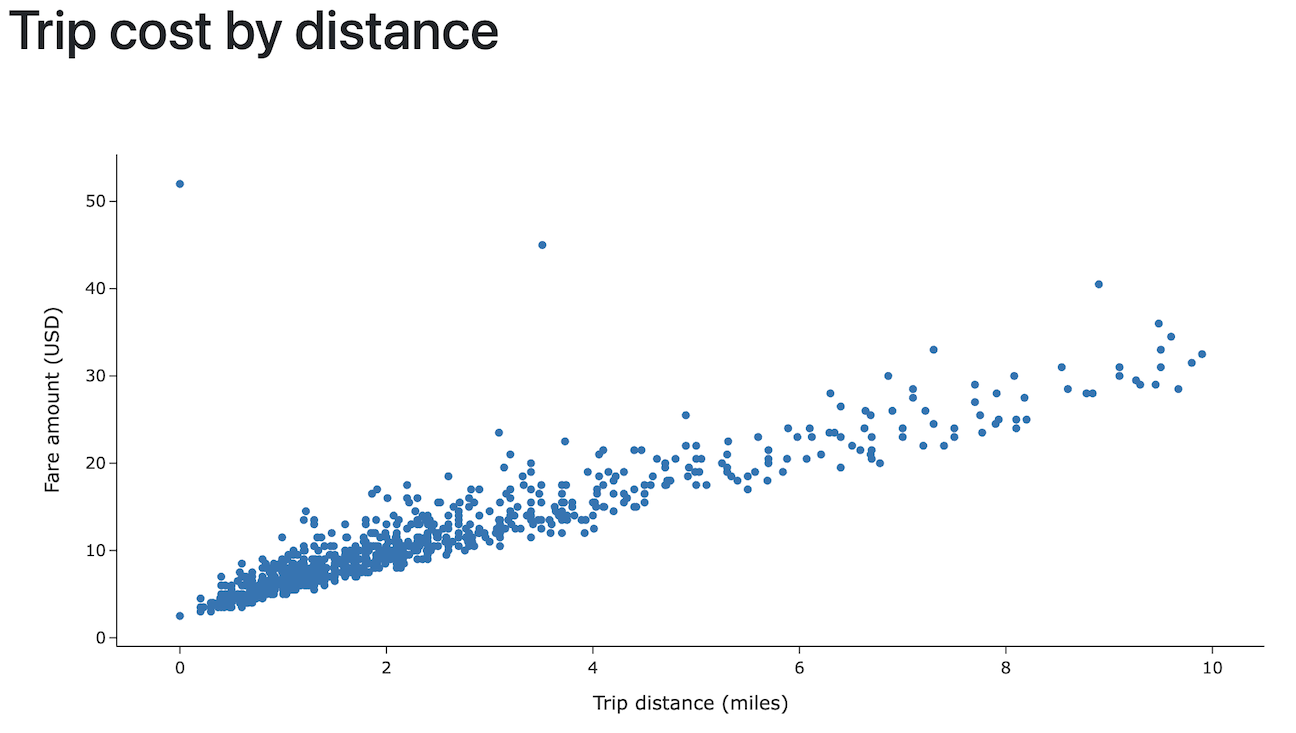
df = (spark.read.table("samples.nyctaxi.trips")
.select('trip_distance', 'fare_amount')
.filter(col('trip_distance') < 10)
.limit(1000))
chart_data = df.toPandas()
# Initialize the Dash app with Bootstrap styling
dash_app = Dash(__name__, external_stylesheets=[dbc.themes.BOOTSTRAP])
# Define the app layout
dash_app.layout = dbc.Container([
dbc.Row([dbc.Col(html.H1('Trip cost by distance'), width=12)]),
dcc.Graph(
id='fare-scatter',
figure=px.scatter(chart_data, x='trip_distance', y='fare_amount',
labels={'trip_distance': 'Trip distance (miles)', 'fare_amount': 'Fare amount (USD)'},
template='simple_white'),
style={'height': '500px', 'width': '1000px'}
)
], fluid=True)
if __name__ == '__main__':
dash_app.run(debug=True) -
Run and test your app locally. You can use either Python or the Databricks CLI to run it.
-
Run the Python app.
Bashpython app.pyNavigate to
http://127.0.0.1:8050/in a browser window to view the app. -
Or use the
databricks apps run-localcommand to run and debug the app. This command installs all dependencies and prepares the virtual environment, then starts the app and the debugger on port 5678.Bashdatabricks apps run-local --prepare-environment --debugNavigate to http://localhost:8001 in a browser window to view the app.
To set breakpoints in Visual Studio Code, install the Python debugger extension, then go to Run > Start Debugging > Remote Attach.
-
Step 6: Redeploy the app
Finally, upload your locally modified app to your Databricks workspace and deploy it to compute.
To avoid uploading your entire Python virtual environment to Databricks, your project should have a .gitignore file either at the root with .myvenv in it, or inside the .myvenv folder that excludes these files.
-
In your Databricks workspace, click Compute, then Apps. Select the
dash-hello-worldapp. -
Under Sync the files, copy the command under Sync future edits back to Databricks and run it from your local app project folder:
Bashdatabricks sync --watch . /Workspace/Users/someone@example.com/databricks_apps/dash-hello-world_2025_12_05-21_35/dash-hello-world-app -
To deploy the modified app to compute, copy the command under Deploy to Databricks Apps on the app page and run it from your local app project folder:
Bashdatabricks apps deploy dash-hello-world --source-code-path /Workspace/Users/someone@example.com/databricks_apps/dash-hello-world_2025_12_05-21_35/dash-hello-world-app
If the deployment is successful, the command outputs confirmation JSON:
{
    "create_time": "2025-12-06T01:30:16Z",
    "creator": "someone@example.com",
    "deployment_artifacts": {
    "source_code_path": "/Workspace/Users/1234abcd-5678-90ab-cdef-123456abcdef/src/abcd1234efgh5678ijkl9012mnop3456"
    },
    "deployment_id": "abcd1234efgh5678ijkl9012mnop3456",
    "mode": "SNAPSHOT",
    "source_code_path": "/Workspace/Users/someone@example.com/databricks_apps/dash-hello-world_2025_12_05-21_35/dash-hello-world-app",
    "status": {
    "message": "App started successfully",s
    "state": "SUCCEEDED"
    },
    "update_time": "2025-12-06T01:30:20Z"
}
Additional resources
- Configure authorization to manage who can access and edit your app.
- Integrate your app with Databricks platform features such as Databricks secrets or Databricks SQL.
- Share your app with other users in your workspace or across your organization.
- Explore app templates and experiment with different frameworks and capabilities.