Information Extraction
This page covers the new version of Information Extraction. For information about the previous version, see Use Information Extraction (legacy)
Information Extraction transforms unstructured documents and text into key, structured insights using a defined schema. This lets you use information embedded in unstructured text, PDFs, images, or tables directly for analysis, reporting, or downstream agents and applications.
Examples of Information Extraction include:
- Extracting legal parties and terms from contracts.
- Extracting line items and payment terms from invoices.
- Pulling key details from medical records and notes.
Information Extraction uses default storage to store temporary data transformations, model checkpoints, and internal metadata that power each agent. When you delete an agent, Databricks removes all data associated with the agent from default storage.
Information extraction is available through the Agent Bricks UI, in SQL, and with the REST API.
Create an information extraction agent in the UI
Requirements
- A workspace that includes the following:
- Serverless compute enabled. See Serverless compute requirements.
- Unity Catalog enabled. See Enable a workspace for Unity Catalog.
- Access to a serverless usage policy with a nonzero budget.
- This function is only available in some regions, see AI function availability.
- For workspaces with the Enhanced Security and Compliance add-on,
- See regional support for
ai_extractfor the appropriate compliance standard. - See Manage Databricks previews for how to enable it on your workspace.
- See regional support for
- Ability to use the
ai_extractSQL function. - Unstructured data that you want to extract information from. The data must be in a Unity Catalog volume or table.
- To build your agent, you must have at least 1 file in your Unity Catalog volume or 1 row in your table.
Go to  Agents in the left navigation pane of your workspace. Click Create Agent > Information Extraction.
Step 1. Select the data to extract information from
-
On the Start with your data page, select the files or data you want to extract information from. You can do any of the following:
- Drag and drop one or more files into the upload area, or click to browse for files to upload.
- Click Select volume to select a Unity Catalog volume with supported file types.
- Click Select table to select a Unity Catalog table that contains text data.
-
If you select a table, select the column that contains the data to extract from. You must select a column with a supported type, such as STRING or VARIANT, before you can continue. If the table has no supported columns, select a different table.
-
Click Create Agent. This button is enabled only after you select a valid data source, and, for a table, a supported column.
Step 2. Configure and refine your extraction schema
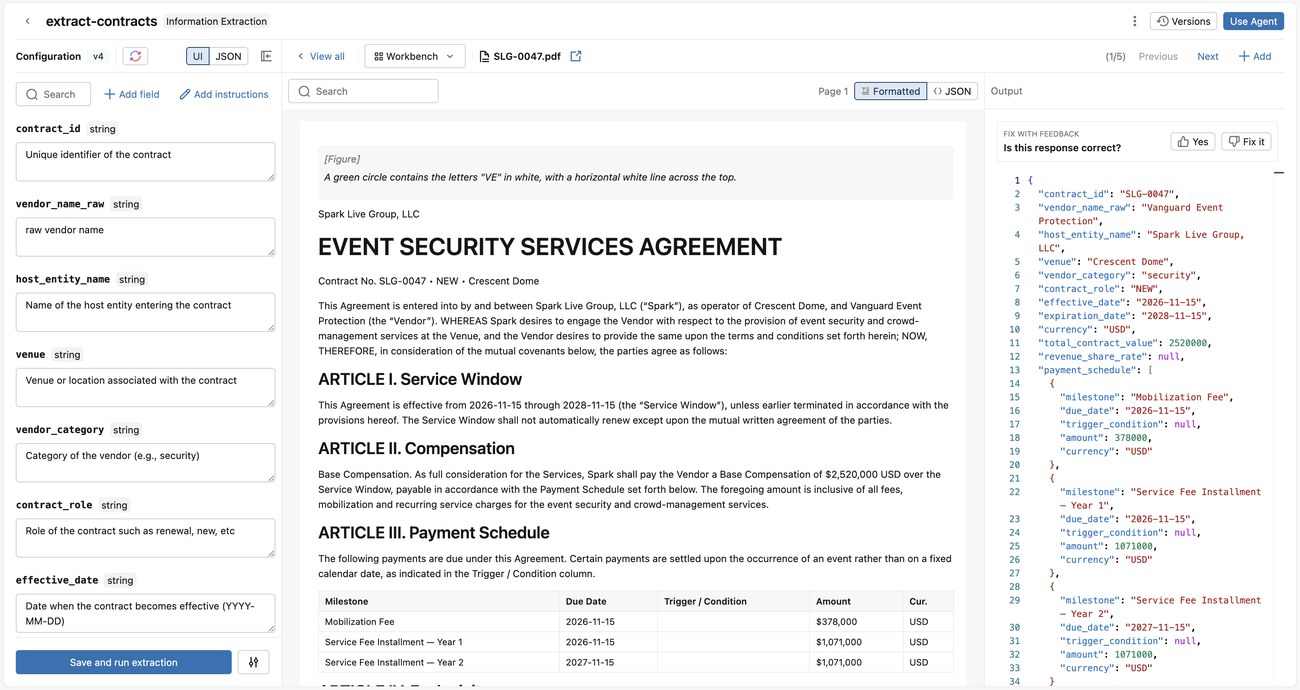
After Information Extraction processes your data, configure and refine what data you want to extract from your documents.
-
Under Configuration, define your extraction schema. There are several ways to do this:
- Enter natural language that describes the information you want to extract and click Generate Schema. Information Extraction automatically generates a JSON schema with field names and definitions for you. Edit these descriptions as needed.
- Alternatively, click Or, Define manually to manually define your schema:
- Click Add field.
- Enter your field name, type, and description.
- Click Confirm.
- Repeat for each field you want to extract.
- Click Save and run extraction.
- You can also click JSON to edit the JSON schema directly. Click Apply Changes when complete.
Each time you update your schema and click Save and run extraction, Information Extraction updates the extraction agent, runs the extraction, and shows the results for each input.
To configure additional options, click the options toggle
 next to Save and run extraction, then enable one or more of the following options:
- Precision mode: Improves accuracy for nuanced fields and long documents.
- Citations: Shows source references for extracted values.
- Confidence scores: Shows confidence levels for extracted values.
-
On the left, review the parsed document and the agent's extraction. Iterate the extraction results in two ways. First, provide natural language feedback on one or more inputs, which auto-tunes your descriptions when you press Save and run extraction. Second, manually revise the schema descriptions, which take effect when you press Save and run extraction.
-
Use versions to compare or revert to a previous configuration. Click Versions, then click Compare to compare the schema definition of a previous version with the current version. Click Restore to restore a previous version.
Step 3. Evaluate and improve extraction quality
To measure how well your agent performs and improve it systematically, evaluate the agent against a labeled dataset. An evaluation scores each extraction against a known correct answer (ground truth), so you can track field-level accuracy across versions and target the fields that need work.
Add an evaluation dataset
Before running an evaluation, you need to have an evaluation dataset in Unity Catalog. The dataset must be a Unity Catalog table with two columns:
- An input column with the text or document to extract from. This can be
STRINGtext or theVARIANToutput ofai_parse_document. - A ground truth column with the expected extraction result as a JSON string. Each value must conform to your agent's extraction schema, matching the
ai_extractadvanced schema.
Run an evaluation
To run an evaluation for your extraction agent:
- In the workbench, open the evaluation dropdown and click Run evaluation. This opens the Create evaluation run dialog.
- In Evaluation dataset table, select the Unity Catalog table that holds your labeled examples.
- Under Column mapping, select the Input column that holds the agent input and the Ground truth column that holds the expected response.
- Click Run evaluation. Information Extraction saves the current configuration as a new version and scores each row against its ground truth.
Review the evaluation results
As the run progresses, documents stream into the Documents tab and any mismatched fields are shown per document. When the run finishes, Information Extraction shows the Overview tab, which includes:
- A scorecard with Overall field accuracy and Documents fully correct. If a previous evaluation run exists, the scorecard shows the change from that run.
- A Per-field scores table. Click any field to open its drilldown, which shows accuracy, precision, recall, and F1. Click Show failed documents to see each document that failed to extract that field and their extracted output.
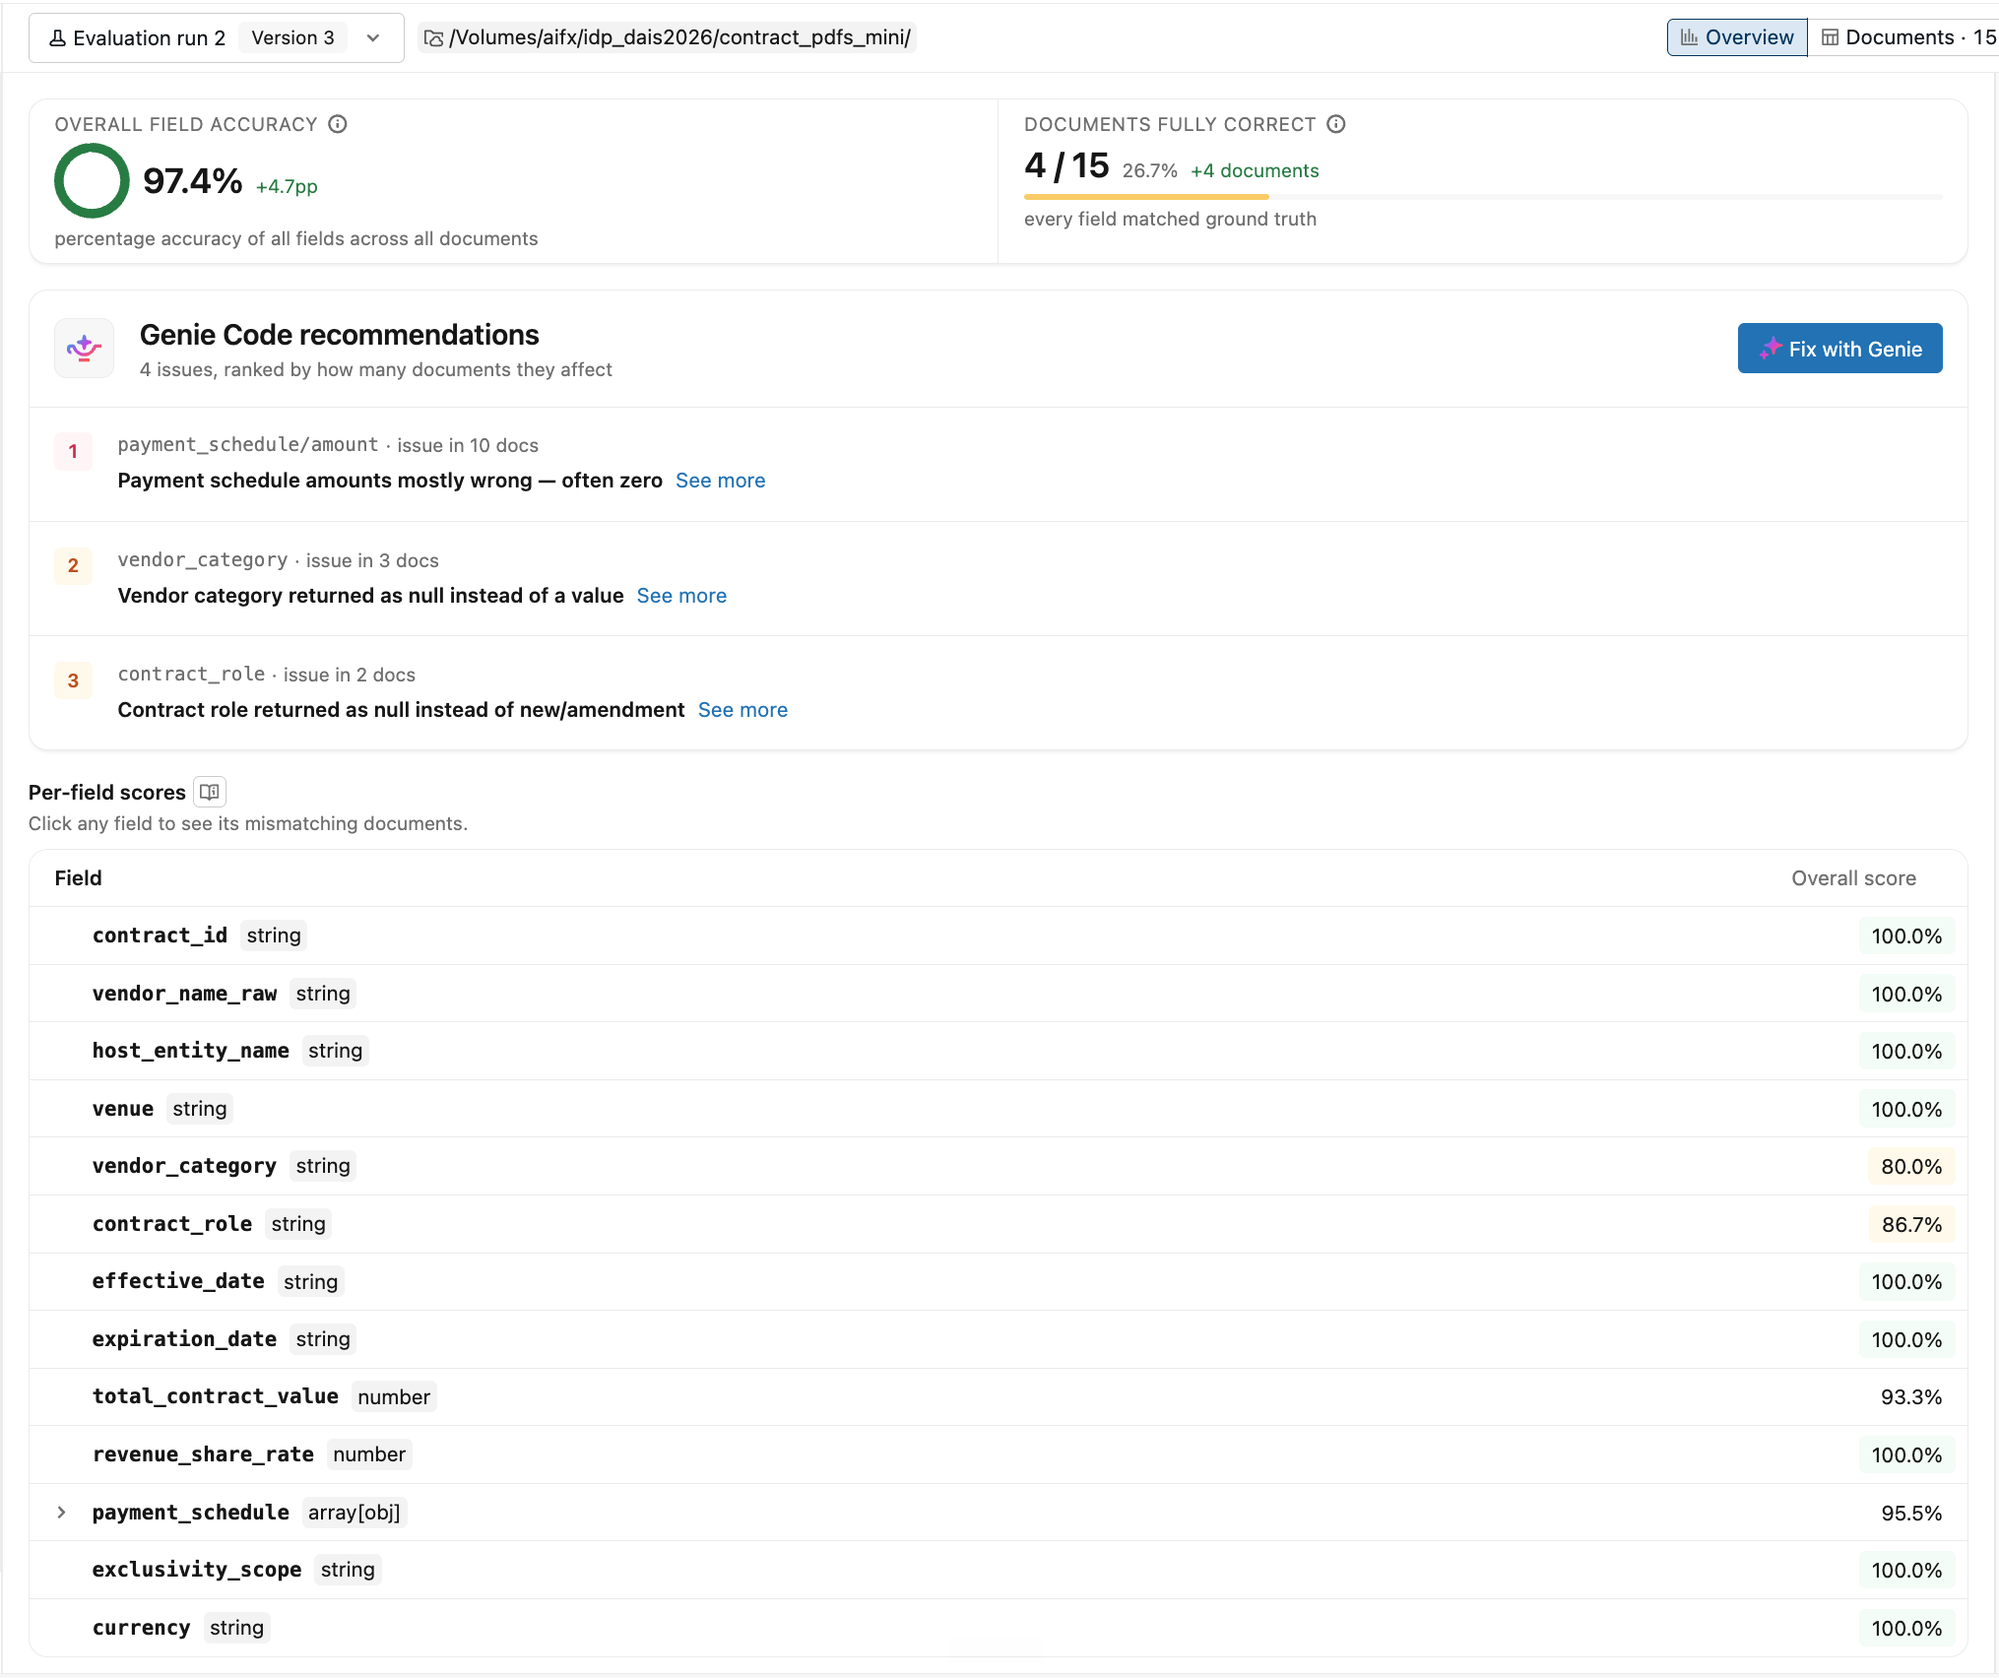
Switch to the Documents tab to inspect individual documents. Each row shows the ratio of matched fields and the fields that were mismatched. Use the Fields dropdown to filter on documents that had a specific mismatched field. Click a document to compare the agent response with the ground truth side by side.
Apply Genie Code fixes
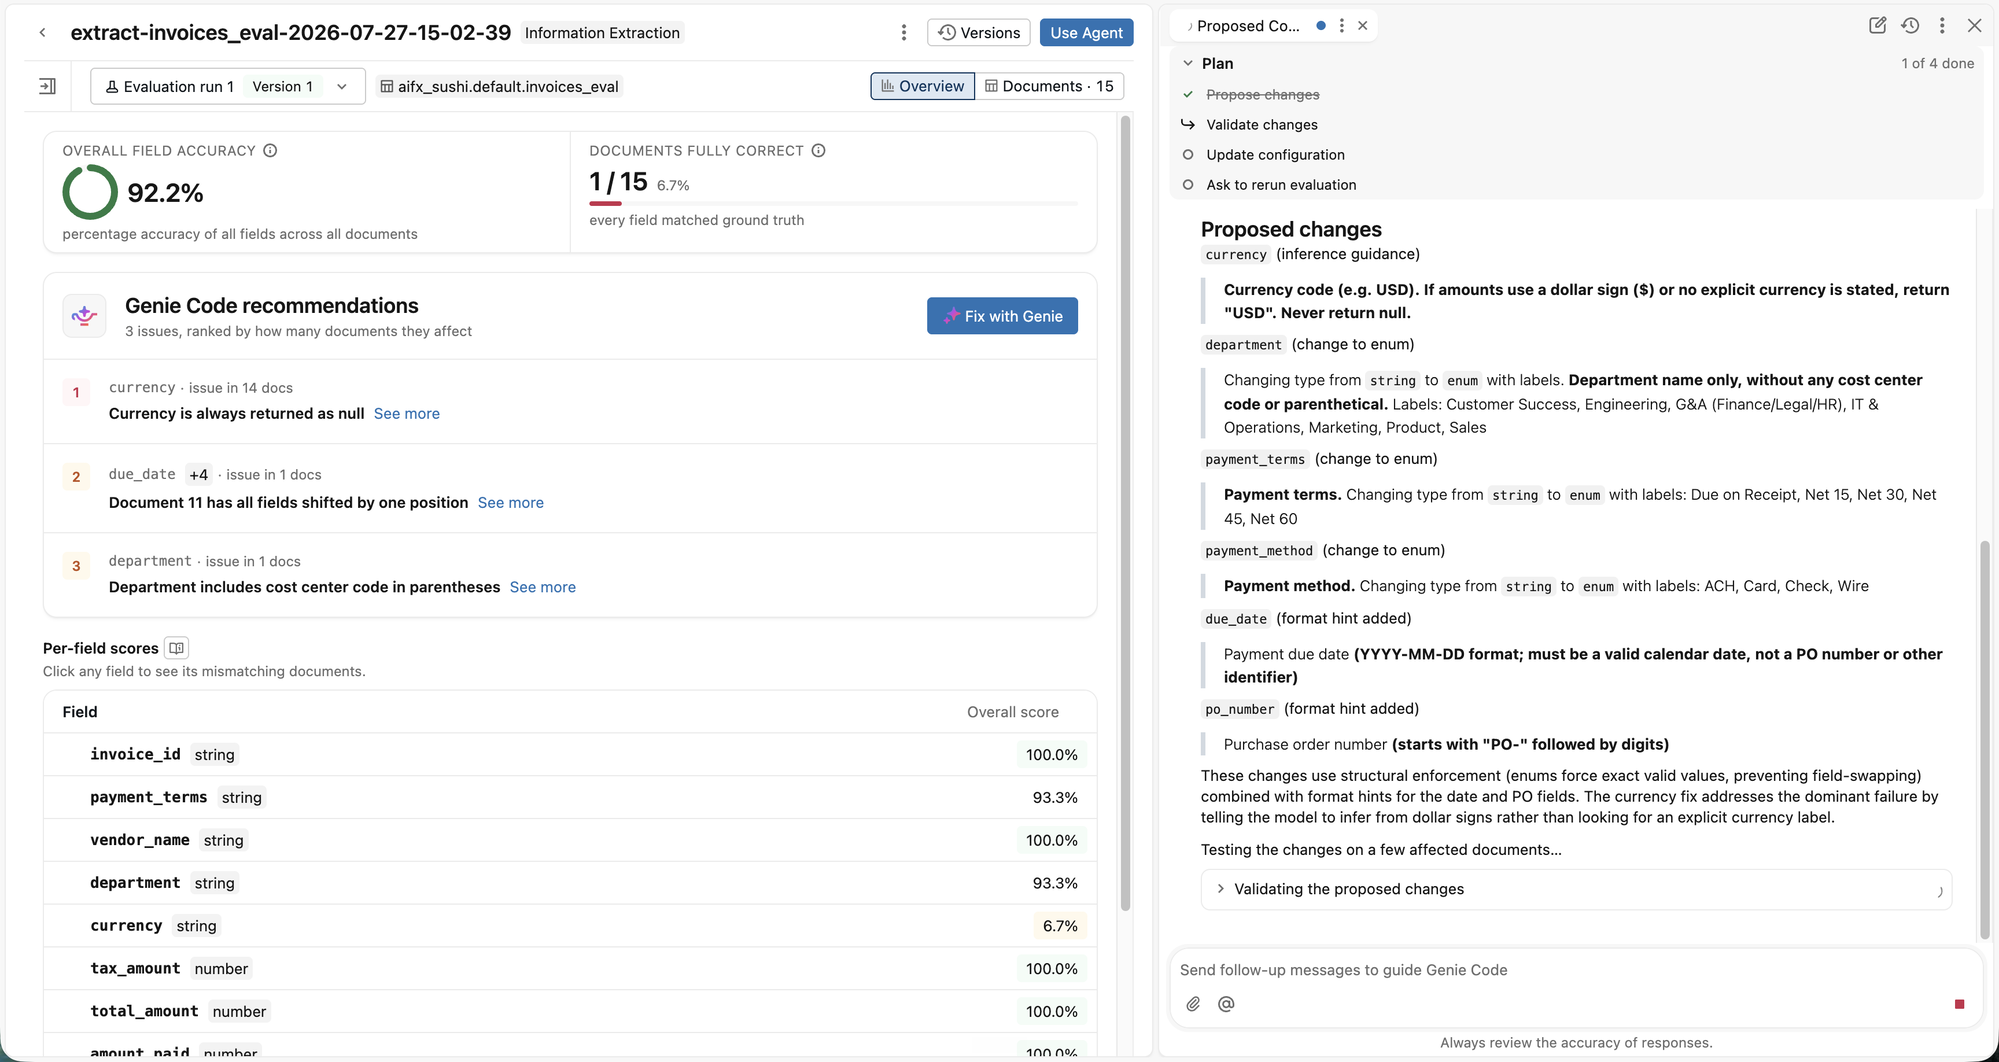
After a run finishes, Information Extraction analyzes the results and surfaces issues in Genie Code recommendations, ranked by number of affected documents. Each finding describes a potential quality issue. Click Fix with Genie to open an interactive Genie Code chat that proposes schema and instruction changes, validates them against the affected documents, and offers to rerun a full evaluation.
Step 4. Use your extraction agent
After you're happy with the agent's performance, use the agent to extract information.
Click Use Agent in the upper-right. You can select either:
- Run in SQL to use the agent to extract information from all your data. This opens a SQL query that uses
ai_extractto extract information from your volume or table using the schema defined. For more information on usingai_extractin SQL queries, seeai_extractfunction. - Create a Lakeflow pipeline that runs on scheduled intervals to invoke your agent on new data. This creates a Lakeflow pipeline that updates a streaming table with your extracted data. You can configure the pipeline's schedule to run when new data arrives. For more information on Lakeflow pipelines, see Spark Declarative Pipelines.
Extract information in SQL
Call ai_extract in SQL to extract fields at scale:
SELECT ai_extract(
  'Invoice #12345 from Acme Corp for $1,250.00 dated 2024-01-15',
  '{
    "invoice_id": {"type": "string", "description": "Unique invoice identifier"},
    "vendor_name": {"type": "string", "description": "Legal business name"},
    "total_amount": {"type": "number", "description": "Total invoice amount"},
    "invoice_date": {"type": "string", "description": "Date in YYYY-MM-DD format"}
  }',
  options => map('version', '2.1')
);
See the ai_extract SQL reference.
Extract information with the REST API
Use the REST API to extract structured fields from applications, services, and automation workflows. See the REST API docs for reference.
The default rate limit for ai_extract REST API requests is 120 requests per minute per workspace. Contact your Databricks account team to request a higher limit.
The following example extracts structured fields from invoice text:
curl -X POST "$DATABRICKS_HOST/api/2.0/ai-functions/ai-extract" \
     -H "Authorization: Bearer $DATABRICKS_TOKEN" \
     -H "Content-Type: application/json" \
     -d '{
  "content": "Invoice #12345 from Acme Corp for $1,250.00 dated 2024-01-15",
  "schema": {
    "vendor_name": {
      "type": "string"
    },
    "total_amount": {
      "type": "number"
    }
  }
}'
Limitations
- See Limitations
- Information Extraction agents have a 128k token max context length.
- Union schema types are not supported.