Backfill jobs
After you have created a job that runs on a schedule, there are times when you need to backfill data into the system. For example:
- An error in the system caused data to be missed over a period of time. You need to backfill data for that date range.
- You want to bring in data from before the system was running for historical analysis.
A backfill for data should use the same job automation that you use to keep your data up to date. Job backfills allow you to run jobs using your existing automation for different date ranges.
How a backfill works
A backfill runs your job multiple times with different parameters to recreate the job runs from an earlier date range. To create a backfill, you select the date range that you want to backfill for and the time interval that is used to split the range into job runs. When you run the backfill, it generates the number of runs based on the date range and time interval selected.
You can set up the backfill to override the existing parameters that are passed to each run, or you can add new parameters that the job uses when present.
The job must handle the parameters that you give it to process the correct data for the backfill date range. This might require changes to your job. For an example of how to create a query that correctly handles a date range, see the tutorial, Set up a recurring query with backfill support using Lakeflow Jobs.
How date ranges generate job runs
A backfill typically consists of multiple job runs set to the same time interval as your regular job runs over the time that you need to backfill. By using the same time interval your regular job, the performance and optimizations that you have set up in your job are maintained. Splitting the backfill into multiple runs also allows them to be triggered in parallel, completing the backfill faster.
For example, if you had errors in your hourly processing on August 9th and 10th, you need to generate a backfill to cover data that was missed on those days. Create a backfill for those two days, giving it a time interval of 1 hour. This triggers up to 48 runs, one for each hour's worth of data in the date range. Each run is passed parameters for the hour it should process.
How backfills run in parallel
A backfill that has more than one time interval in its date range triggers multiple runs, which can be run in parallel in many cases. How can you set up parallel runs?
Jobs have a maximum concurrency limit. By default this is set to one, but you can set it higher. This is in the job settings, and can be accessed under Advanced settings:
-
In your workspace, click
 Jobs & Pipelines in the sidebar.
 -
Click the name of the job for which you want to edit settings. This opens the job monitoring details page.
-
Settings are shown in the right panel. Select Advanced settings.
-
Under Advanced settings, you can edit the maximum concurrent runs by clicking
 .
.Setting this to a number greater than one allows that number of parallel job runs. For example, setting this to
2allows two job runs to run at the same time.
Jobs with pipeline tasks can't be run in parallel, and display a warning. See Limitations.
Prerequisites
Your job must support a parameter for a date or time used to get the correct data in the backfill process. Many jobs that run on a regular schedule already have a parameter that uses a time that you can override, but you can also set a parameter that is unique to your backfills.
Create a backfill
You create a backfill through the jobs user interface.
-
In your workspace, click
Jobs & Pipelines in the sidebar. -
Click the name of the job for which you want to create a backfill. This opens the job monitoring details page.
-
Click the down arrow (
 ) next to Run now at the top of the page.
 -
Select Run backfill from the drop down that appears. This opens the Run backfill dialog.
-
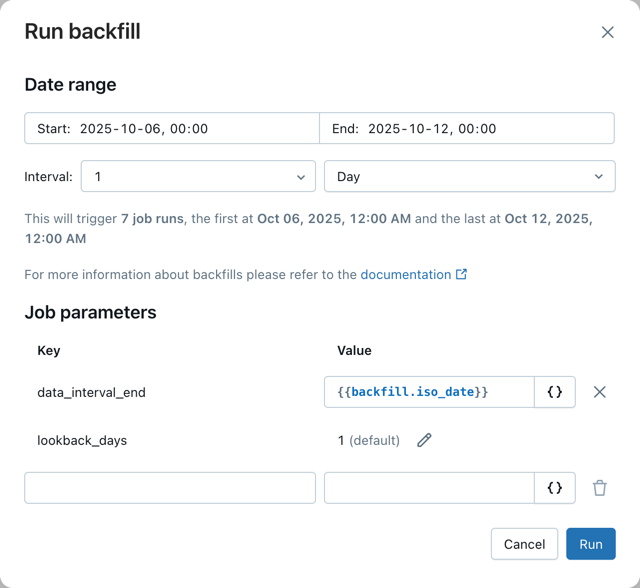
Select a Date and time range to the range that you want to backfill.
-
Databricks chooses a default time interval for your backfills, based on your trigger or schedule. If you want to change the time interval, in the drop downs to the right of Every, select the time interval you want. For example, to use 1 hour time interval, choose 1 and Hour for the time interval. At the bottom of the dialog, the interface includes a note of the number of new runs that your selections generate.
If your backfill splits the date range into more than 100 runs, a warning appears when you are setting it up and you are unable to start the backfills. In this case, you must alter your Date and time range into multiple steps with under 100 runs each. You can do this with multiple backfills, or by increasing the time interval for the backfills.
-
Under Job parameters, your existing parameters are shown with keys and values. If you have a parameter or set of parameters for the date range of the job, you can override those by editing the Value field. Otherwise you can create a new parameter by adding a new Key and Value.
For example, if your job takes the job trigger time as an iso datetime parameter, you could override that parameter with
{{backfill.iso_datetime}}. To see a list of possible value references, click the { } button next to the value you want to override, and select a reference to insert it into the Value field.For a list of parameters, including the backfill-specific parameters, see Supported value references.
You can also add other parameters that aren't in your normal parameter list, that can be picked up by your automation. For example, if you wanted to have different processing for a backfill job, you could add a
backfillparameter set totrue. -
Optionally override any other parameters that are used to control the job to match the data that you want to backfill.
-
Click Run to start the backfill runs.
Backfill runs show up in the runs list with the text Backfill in their name, to differentiate them from other job runs.
Limitations
-
Backfills always run completely. You can't run a subset of tasks or tables in a backfill.
-
Lakeflow pipelines specific limitations:
- Pipeline tasks are not parameterized. The pipeline is run as-is.
- Pipeline tasks can't be run concurrently, so jobs with pipeline tasks are run sequentially rather than in parallel. A warning is shown in the Run backfill dialog when this happens, and in Settings, if you set the maximum concurrent runs greater than 1 when there is a pipeline task in the job.
Databricks recommends backfilling Lakeflow pipelines using the pipeline append once functionality. For more information, see Backfilling historical data with pipelines.
Additional resources
To see a tutorial that shows how to create a query and parameters that can be used by a backfill job, see Set up a recurring query with backfill support using Lakeflow Jobs.