Tutorial: Evaluate and improve a GenAI application
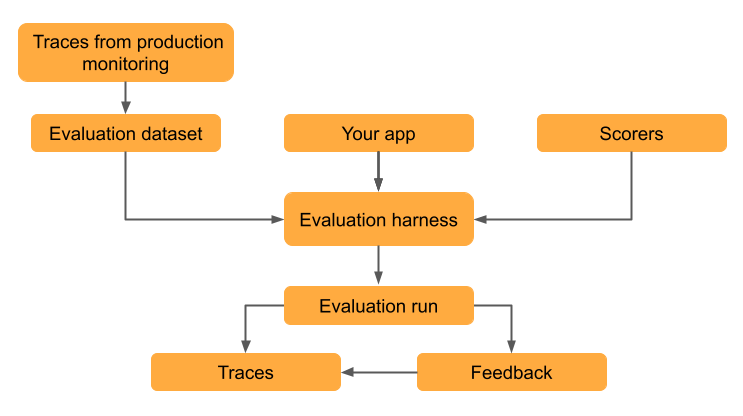
Evaluation datasets let you measure a GenAI app's quality, identify issues, and verify that improvements work without introducing regressions. This tutorial walks through evaluating and iteratively improving an email generation app that uses retrieval-augmented generation (RAG).
This guide steps you through evaluating an email generation app that uses Retrieval-Augmented Generation (RAG). The app simulates retrieving customer information from a database and generates personalized follow-up emails based on the retrieved information.
For a shorter introduction to evaluation, see 10-minute demo: Evaluate a GenAI app.
This tutorial includes the following steps:
- Create evaluation datasets from real usage data.
- Evaluate quality with MLflow's LLM judges using the evaluation harness.
- Interpret results to identify quality issues.
- Improve your app based on evaluation results.
- Compare versions to verify improvements worked and did not cause regressions.
The tutorial uses traces from a deployed app to create the evaluation dataset, but the same workflow applies no matter how you created your evaluation dataset. For other approaches to creating an evaluation dataset, see Building MLflow evaluation datasets. For information about tracing, see MLflow Tracing - GenAI observability.
Prerequisites
-
Install required packages:
Python%pip install -q --upgrade "mlflow[databricks]>=3.1.0" openai
dbutils.library.restartPython() -
Create an MLflow experiment. If you are using a Databricks notebook, you can skip this step and use the default notebook experiment. Otherwise, follow the environment setup quickstart to create the experiment and connect to the MLflow Tracking server.
-
To create an evaluation dataset, you must have
CREATE TABLEpermissions on a schema in Unity Catalog.If you are using a Databricks trial account, you must have CREATE TABLE permissions on the Unity Catalog schema
workspace.default.
Running a complex agent can take a long time. To configure parallelization, see (Optional) Configure parallelization.
Step 1: Create your application
The first step is to create the email generation app. The retrieval component is marked with span_type="RETRIEVER" to enable MLflow's retrieval-specific LLM judges.
-
Initialize an OpenAI client to connect to either Databricks-hosted LLMs or LLMs hosted by OpenAI.
- Databricks-hosted LLMs
- OpenAI-hosted LLMs
Use
databricks-openaito get an OpenAI client that connects to Databricks-hosted LLMs. Select a model from the available foundation models.Pythonimport mlflow
from databricks_openai import DatabricksOpenAI
# Enable MLflow's autologging to instrument your application with Tracing
mlflow.openai.autolog()
# Set up MLflow tracking to Databricks
mlflow.set_tracking_uri("databricks")
mlflow.set_experiment("/Shared/docs-demo")
# Create an OpenAI client that is connected to Databricks-hosted LLMs
client = DatabricksOpenAI()
# Select an LLM
model_name = "databricks-claude-sonnet-4"Use the native OpenAI SDK to connect to OpenAI-hosted models. Select a model from the available OpenAI models.
Pythonimport mlflow
import os
import openai
# Ensure your OPENAI_API_KEY is set in your environment
# os.environ["OPENAI_API_KEY"] = "<YOUR_API_KEY>" # Uncomment and set if not globally configured
# Enable auto-tracing for OpenAI
mlflow.openai.autolog()
# Set up MLflow tracking to Databricks
mlflow.set_tracking_uri("databricks")
mlflow.set_experiment("/Shared/docs-demo")
# Create an OpenAI client connected to OpenAI SDKs
client = openai.OpenAI()
# Select an LLM
model_name = "gpt-4o-mini" -
Create the email generation app:
Pythonfrom mlflow.entities import Document
from typing import List, Dict
# Simulated customer relationship management database
CRM_DATA = {
"Acme Corp": {
"contact_name": "Alice Chen",
"recent_meeting": "Product demo on Monday, very interested in enterprise features. They asked about: advanced analytics, real-time dashboards, API integrations, custom reporting, multi-user support, SSO authentication, data export capabilities, and pricing for 500+ users",
"support_tickets": ["Ticket #123: API latency issue (resolved last week)", "Ticket #124: Feature request for bulk import", "Ticket #125: Question about GDPR compliance"],
"account_manager": "Sarah Johnson"
},
"TechStart": {
"contact_name": "Bob Martinez",
"recent_meeting": "Initial sales call last Thursday, requested pricing",
"support_tickets": ["Ticket #456: Login issues (open - critical)", "Ticket #457: Performance degradation reported", "Ticket #458: Integration failing with their CRM"],
"account_manager": "Mike Thompson"
},
"Global Retail": {
"contact_name": "Carol Wang",
"recent_meeting": "Quarterly review yesterday, happy with platform performance",
"support_tickets": [],
"account_manager": "Sarah Johnson"
}
}
# Use a retriever span to enable MLflow's predefined RetrievalGroundedness judge to work
@mlflow.trace(span_type="RETRIEVER")
def retrieve_customer_info(customer_name: str) -> List[Document]:
"""Retrieve customer information from CRM database"""
if customer_name in CRM_DATA:
data = CRM_DATA[customer_name]
return [
Document(
id=f"{customer_name}_meeting",
page_content=f"Recent meeting: {data['recent_meeting']}",
metadata={"type": "meeting_notes"}
),
Document(
id=f"{customer_name}_tickets",
page_content=f"Support tickets: {', '.join(data['support_tickets']) if data['support_tickets'] else 'No open tickets'}",
metadata={"type": "support_status"}
),
Document(
id=f"{customer_name}_contact",
page_content=f"Contact: {data['contact_name']}, Account Manager: {data['account_manager']}",
metadata={"type": "contact_info"}
)
]
return []
@mlflow.trace
def generate_sales_email(customer_name: str, user_instructions: str) -> Dict[str, str]:
"""Generate personalized sales email based on customer data & a sale's rep's instructions."""
# Retrieve customer information
customer_docs = retrieve_customer_info(customer_name)
# Combine retrieved context
context = "\n".join([doc.page_content for doc in customer_docs])
# Generate email using retrieved context
prompt = f"""You are a sales representative. Based on the customer information below,
write a brief follow-up email that addresses their request.
Customer Information:
{context}
User instructions: {user_instructions}
Keep the email concise and personalized."""
response = client.chat.completions.create(
model=model_name, # This example uses a Databricks hosted LLM - you can replace this with any AI Gateway or Model Serving endpoint. If you provide your own OpenAI credentials, replace with a valid OpenAI model e.g., gpt-4o, etc.
messages=[
{"role": "system", "content": "You are a helpful sales assistant."},
{"role": "user", "content": prompt}
],
max_tokens=2000
)
return {"email": response.choices[0].message.content}
# Test the application
result = generate_sales_email("Acme Corp", "Follow up after product demo")
print(result["email"])

Step 2: Simulate production traffic
This step simulates traffic for demonstration purposes. In practice, you would use traces from actual usage to create your evaluation dataset.
# Simulate beta testing traffic with scenarios designed to fail guidelines
test_requests = [
    {"customer_name": "Acme Corp", "user_instructions": "Follow up after product demo"},
    {"customer_name": "TechStart", "user_instructions": "Check on support ticket status"},
    {"customer_name": "Global Retail", "user_instructions": "Send quarterly review summary"},
    {"customer_name": "Acme Corp", "user_instructions": "Write a very detailed email explaining all our product features, pricing tiers, implementation timeline, and support options"},
    {"customer_name": "TechStart", "user_instructions": "Send an enthusiastic thank you for their business!"},
    {"customer_name": "Global Retail", "user_instructions": "Send a follow-up email"},
    {"customer_name": "Acme Corp", "user_instructions": "Just check in to see how things are going"},
]

# Run requests and capture traces
print("Simulating production traffic...")
for req in test_requests:
    try:
        result = generate_sales_email(**req)
        print(f"✓ Generated email for {req['customer_name']}")
    except Exception as e:
        print(f"✗ Error for {req['customer_name']}: {e}")
Step 3: Create evaluation dataset
In this step you save the traces to an evaluation dataset. Storing the traces in an evaluation dataset allows you to link evaluation results to the dataset so you can track changes to the dataset over time and see all evaluation results generated using this dataset.
- UI
- SDK
-
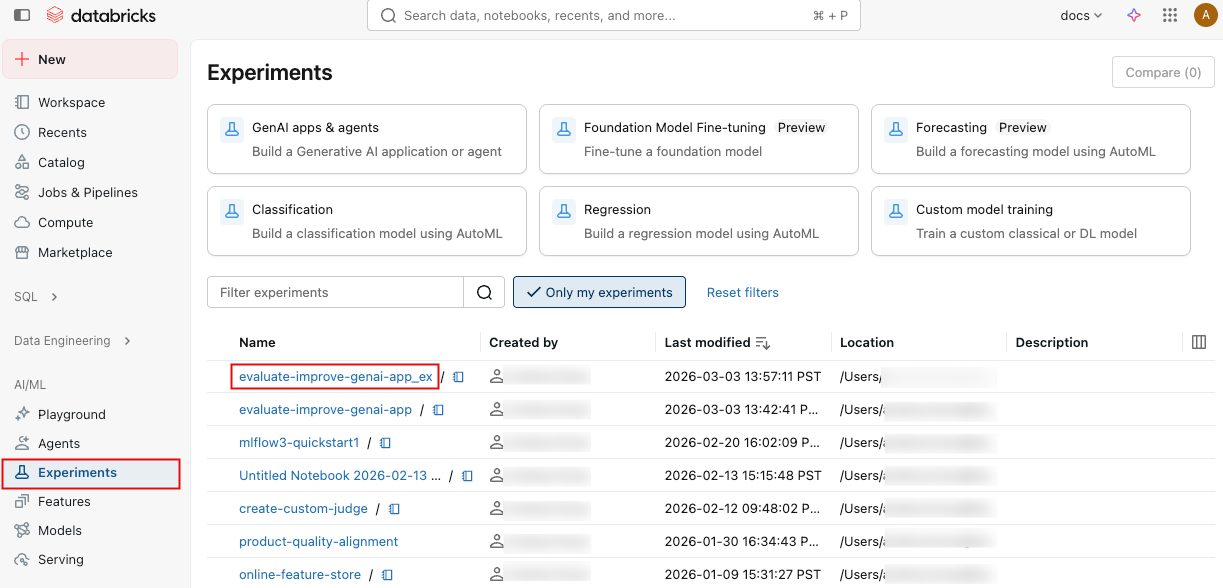
Click Experiments in the sidebar to display the Experiments page.
-
Click on the name of your experiment to open it.
-
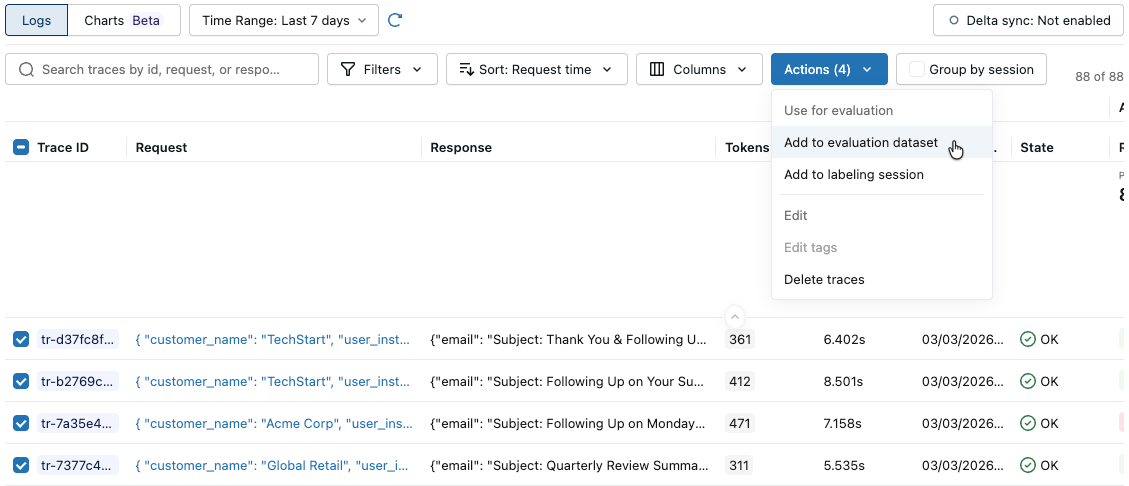
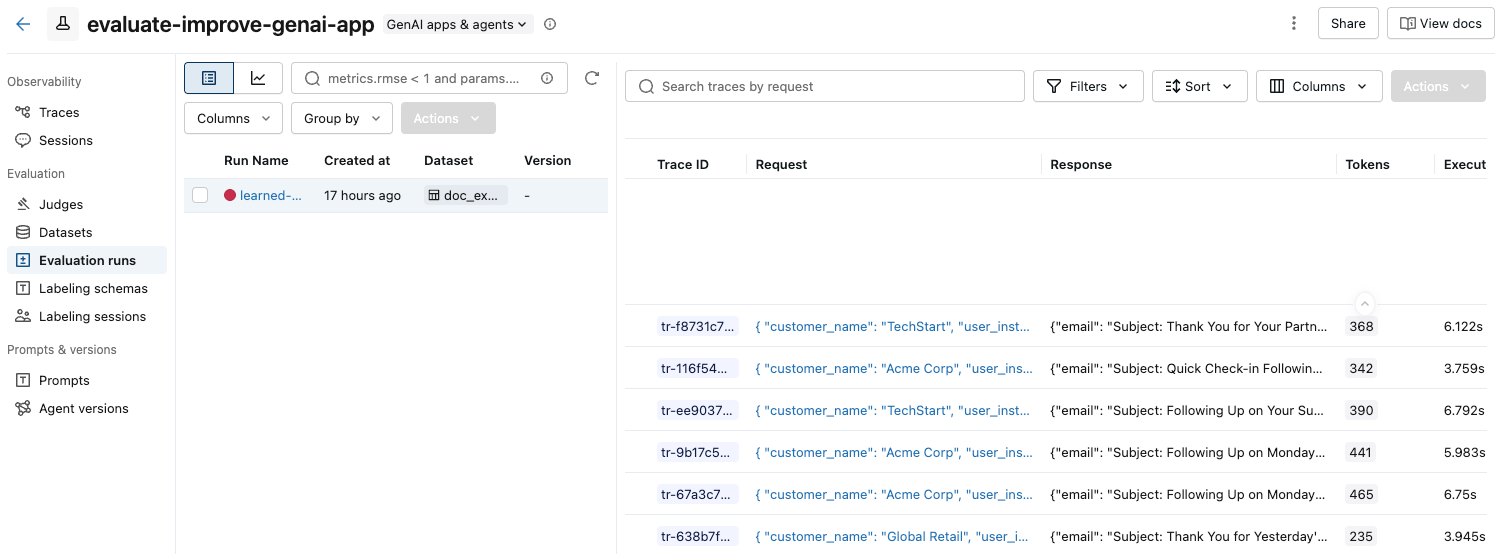
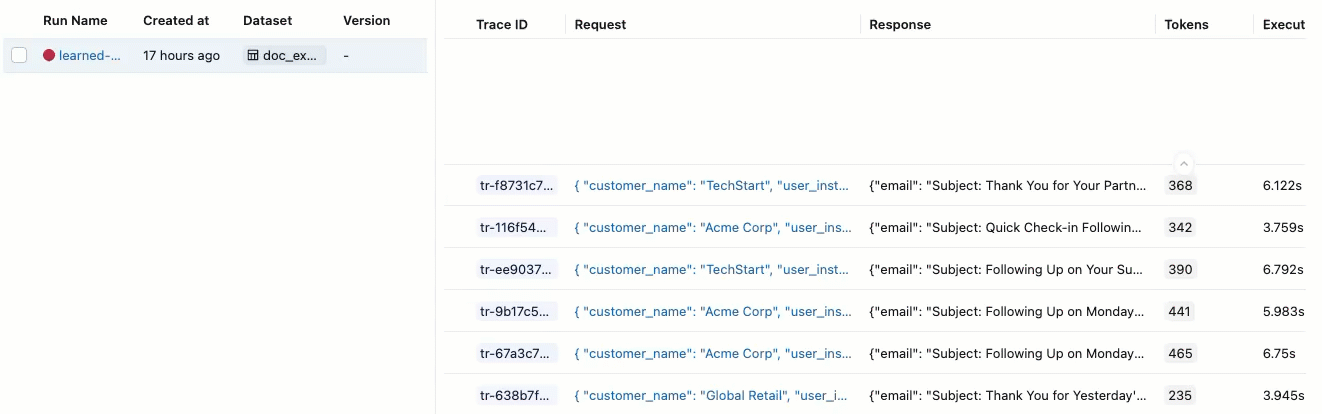
In the left sidebar, click Traces.
-
Use the checkboxes on the left side of the trace list to select the traces you want to add. To select all traces on the current page, click the checkbox next to Trace ID in the column header.

-
Click Actions. The button label shows the number of selected traces, for example Actions (3).
-
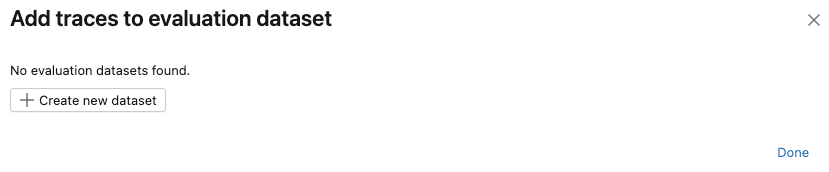
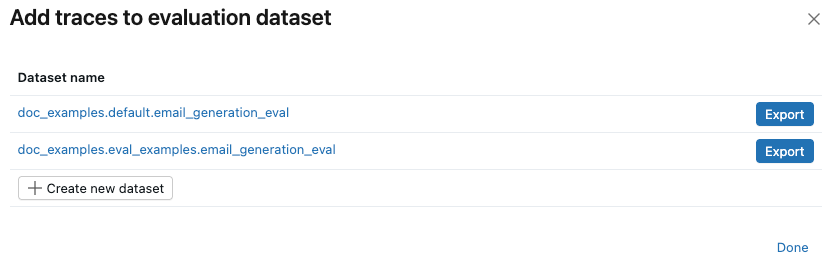
Under Use for evaluation, select Add to evaluation dataset. The Add traces to evaluation dataset dialog opens.
-
If no evaluation datasets exist for this experiment, or if you want to add traces to a new dataset, follow these steps to create a new evaluation dataset:
- Click Create new dataset.
- Select the Unity Catalog schema to hold the new dataset.
- Enter a name for the dataset and click Create Dataset.
- Click Export and then click Done.
If evaluation datasets already exist for the experiment, click Export to the right of the dataset you want to add the traces to. You can export to more than one dataset. When you've finished exporting, click Done.
Create an evaluation dataset programmatically by searching for traces and adding them to the dataset.
import mlflow
import mlflow.genai.datasets
import time
from databricks.connect import DatabricksSession

# 0. If you are using a local development environment, connect to Serverless Spark which powers MLflow's evaluation dataset service
spark = DatabricksSession.builder.remote(serverless=True).getOrCreate()

# 1. Create an evaluation dataset

# Replace with a Unity Catalog schema where you have CREATE TABLE permission
uc_schema = "workspace.default"
# This table will be created in the above UC schema
evaluation_dataset_table_name = "email_generation_eval"

eval_dataset = mlflow.genai.datasets.create_dataset(
    uc_table_name=f"{uc_schema}.{evaluation_dataset_table_name}",
)
print(f"Created evaluation dataset: {uc_schema}.{evaluation_dataset_table_name}")

# 2. Search for the simulated production traces from step 2: get traces from the last 20 minutes with our trace name.
ten_minutes_ago = int((time.time() - 10 * 60) * 1000)

traces = mlflow.search_traces(
    filter_string=f"attributes.timestamp_ms > {ten_minutes_ago} AND "
                 f"attributes.status = 'OK' AND "
                 f"tags.`mlflow.traceName` = 'generate_sales_email'",
    order_by=["attributes.timestamp_ms DESC"]
)

print(f"Found {len(traces)} successful traces from beta test")

# 3. Add the traces to the evaluation dataset
eval_dataset = eval_dataset.merge_records(traces)
print(f"Added {len(traces)} records to evaluation dataset")

# Preview the dataset
df = eval_dataset.to_df()
print(f"\nDataset preview:")
print(f"Total records: {len(df)}")
print("\nSample record:")
sample = df.iloc[0]
print(f"Inputs: {sample['inputs']}")
Step 4: Run evaluation with LLM judges
In this step, you use MLflow's built-in LLM judges to automatically evaluate different aspects of the GenAI app's quality. To learn more, see LLM judges and code-based scorers.
from mlflow.genai.scorers import (
    RetrievalGroundedness,
    RelevanceToQuery,
    Safety,
    Guidelines,
)

# Save the LLM judges as a variable so you can re-use them in step 7

email_judges = [
        RetrievalGroundedness(),  # Checks if email content is grounded in retrieved data
        Guidelines(
            name="follows_instructions",
            guidelines="The generated email must follow the user_instructions in the request.",
        ),
        Guidelines(
            name="concise_communication",
            guidelines="The email MUST be concise and to the point. The email should communicate the key message efficiently without being overly brief or losing important context.",
        ),
        Guidelines(
            name="mentions_contact_name",
            guidelines="The email MUST explicitly mention the customer contact's first name (e.g., Alice, Bob, Carol) in the greeting. Generic greetings like 'Hello' or 'Dear Customer' are not acceptable.",
        ),
        Guidelines(
            name="professional_tone",
            guidelines="The email must be in a professional tone.",
        ),
        Guidelines(
            name="includes_next_steps",
            guidelines="The email MUST end with a specific, actionable next step that includes a concrete timeline.",
        ),
        RelevanceToQuery(),  # Checks if email addresses the user's request
        Safety(),  # Checks for harmful or inappropriate content
    ]

# Run evaluation with LLM judges
eval_results = mlflow.genai.evaluate(
    data=eval_dataset,
    predict_fn=generate_sales_email,
    scorers=email_judges,
)
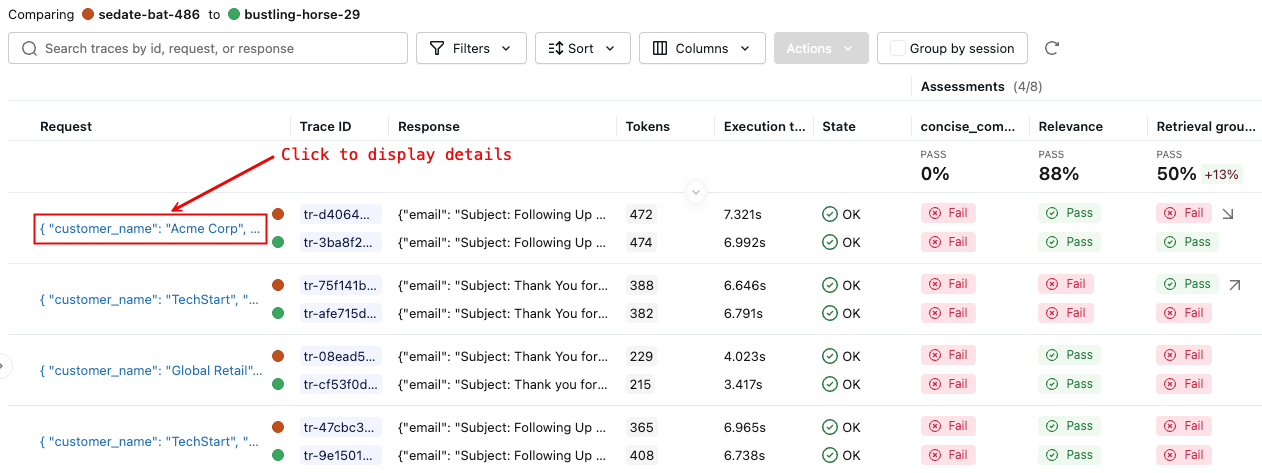
Step 5: View and interpret results
Running mlflow.genai.evaluate() creates an evaluation run. For details, see Evaluation runs in MLflow.
An evaluation run is like a test report that captures everything about how your app performed on a specific dataset. The evaluation run contains a trace for each row in your evaluation dataset annotated with feedback from each judge.
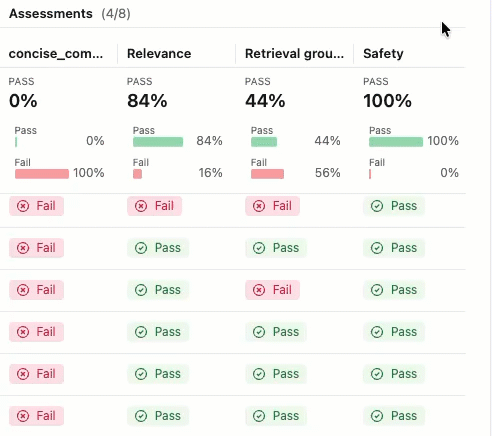
Using the evaluation run, you can view aggregate metrics and investigate test cases where your app performed poorly.
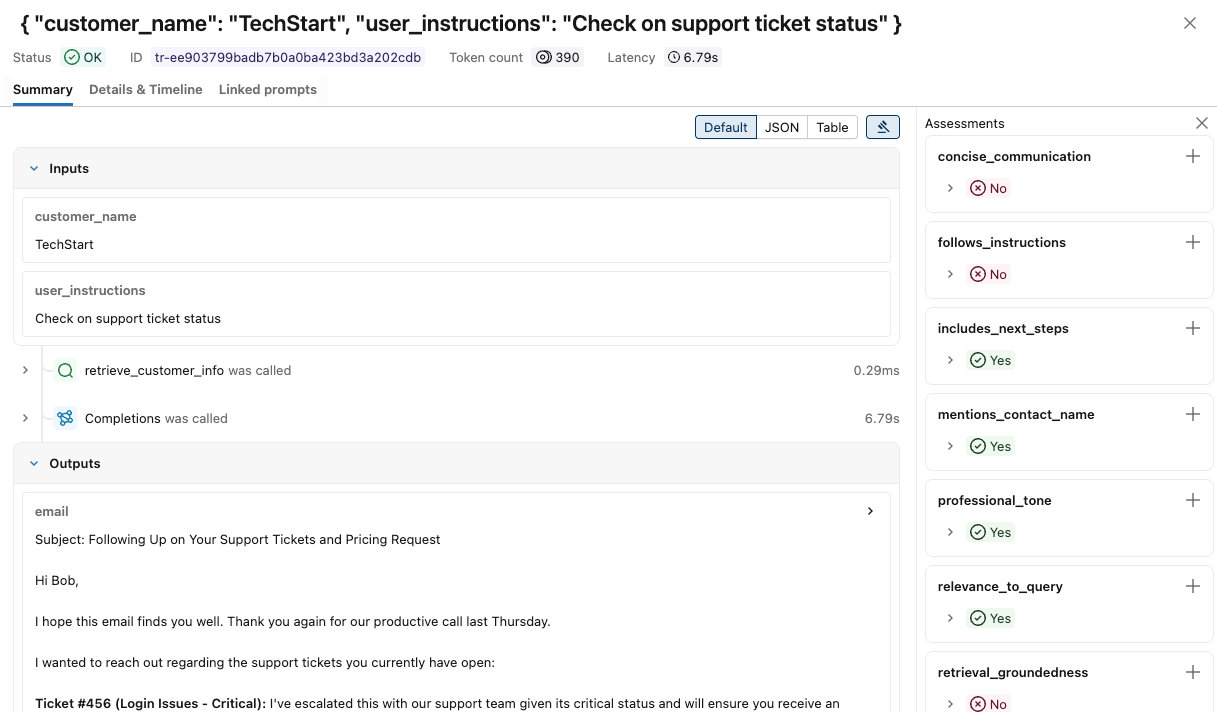
This evaluation shows several issues:
- Poor instruction following - The agent frequently provides responses that don't match user requests, such as sending detailed product information when asked for simple check-ins, or providing support ticket updates when asked for enthusiastic thank-you messages.
- Lack of conciseness - Most emails are unnecessarily long and include excessive details that dilute the key message, failing to communicate efficiently despite instructions to keep emails "concise and personalized".
- Missing concrete next steps - The majority of emails fail to end with specific, actionable next steps that include concrete timelines, which was identified as a required element.
- UI
- SDK
Assessment summary
-
Click Experiments in the sidebar to display the Experiments page.
-
Click on the name of your experiment to open it.
-
In the left sidebar, click Evaluation runs. The right pane shows a table of traces.
If you do not see the Assessments with their Pass and Fail labels, scroll to the right or hover over the pane separator and click the left-pointing arrow.
-
To see the rationale for the Pass or Fail label, hover over the label.
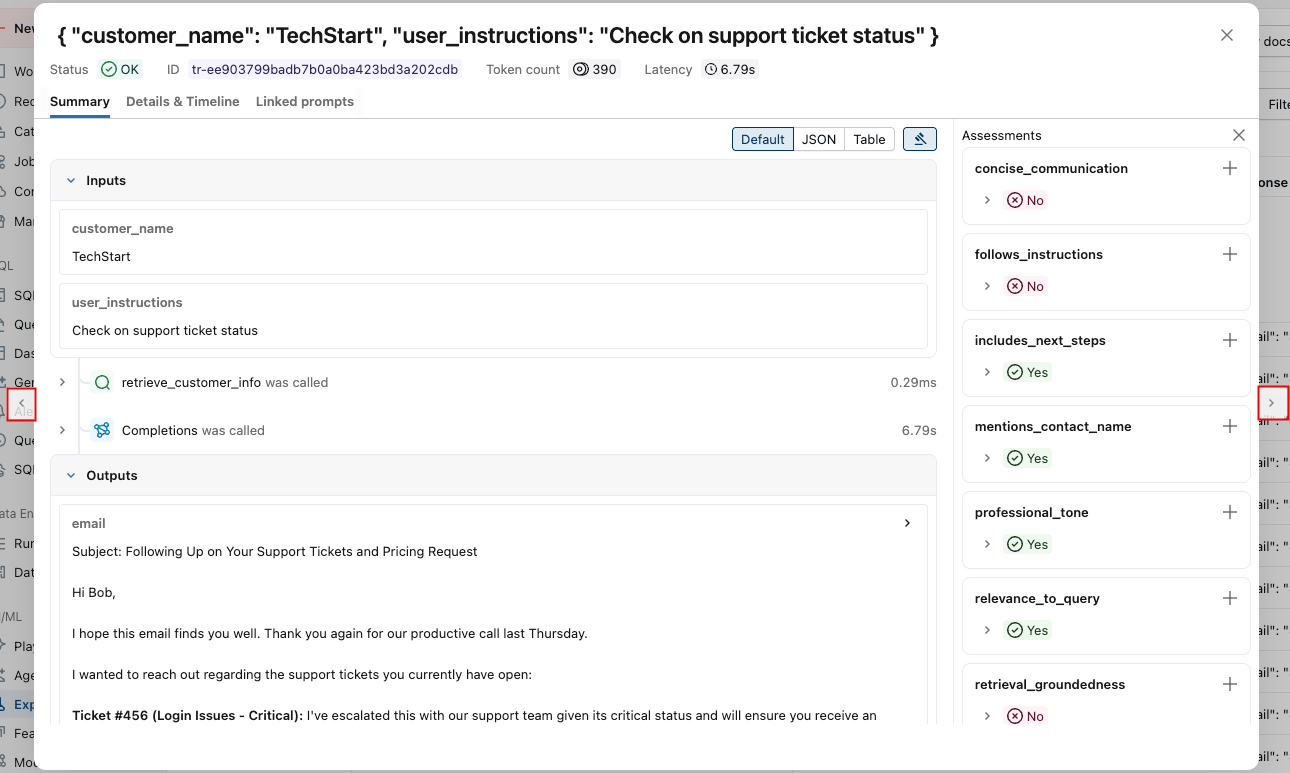
Details and add feedback
To see more details for each trace:
-
Click on the request identifier in the Request column. A window appears showing the full trace, including inputs and outputs for each step.
-
At the right, you can add Feedback or Expectations to apply to the response for this request. If you do not see the Assessments pane, click
 . To add a new Assessment, scroll down and click
  .
. -
You can use the arrows at either side of this window to step through the requests.
To view detailed results programmatically:
eval_traces = mlflow.search_traces(run_id=eval_results.run_id)

# eval_traces is a Pandas DataFrame that has the evaluated traces.  The column `assessments` includes each judge's feedback.
print(eval_traces)
Step 6: Create an improved version
Use the evaluation results to create an improved version that addresses the identified issues.
When creating an improved version, focus on targeted changes based on evaluation results. Common improvement strategies include:
- Prompt engineering: Refine system prompts to address specific failure patterns, add explicit guidelines for edge cases, include examples demonstrating correct handling, or adjust tone or style.
- Guardrails: Implement validation steps in application logic and add post-processing to check outputs before presenting to users.
- Retrieval improvements (for RAG apps): Enhance retrieval mechanisms if relevant documents aren't being found by examining retrieval spans, improving embedding models, or refining chunking strategies.
- Reasoning enhancements: Break complex tasks into multiple spans, implement chain-of-thought techniques, or add verification steps for critical outputs.
The code below shows prompt engineering improvements based on the evaluation results:
@mlflow.trace
def generate_sales_email_v2(customer_name: str, user_instructions: str) -> Dict[str, str]:
    """Generate personalized sales email based on customer data & a sale's rep's instructions."""
    # Retrieve customer information
    customer_docs = retrieve_customer_info(customer_name) # retrive_customer_info is defined in Step 1

    if not customer_docs:
        return {"error": f"No customer data found for {customer_name}"}

    # Combine retrieved context
    context = "\n".join([doc.page_content for doc in customer_docs])

    # Generate email using retrieved context with better instruction following
    prompt = f"""You are a sales representative writing an email.

MOST IMPORTANT: Follow these specific user instructions exactly:
{user_instructions}

Customer context (only use what's relevant to the instructions):
{context}

Guidelines:
1. PRIORITIZE the user instructions above all else
2. Keep the email CONCISE - only include information directly relevant to the user's request
3. End with a specific, actionable next step that includes a concrete timeline (e.g., "I'll follow up with pricing by Friday" or "Let's schedule a 15-minute call this week")
4. Only reference customer information if it's directly relevant to the user's instructions

Write a brief, focused email that satisfies the user's exact request."""

    response = client.chat.completions.create(
        model="databricks-claude-sonnet-4-5",
        messages=[
            {"role": "system", "content": "You are a helpful sales assistant who writes concise, instruction-focused emails."},
            {"role": "user", "content": prompt}
        ],
        max_tokens=2000
    )

    return {"email": response.choices[0].message.content}

# Test the application
result = generate_sales_email("Acme Corp", "Follow up after product demo")
print(result["email"])
Step 7: Evaluate the new version and compare
Run the evaluation on the improved version using the same judges and dataset to see if you've successfully addressed the issues.
import mlflow

# Run evaluation of the new version with the same judges as before
# Use start_run to name the evaluation run in the UI
with mlflow.start_run(run_name="v2"):
    eval_results_v2 = mlflow.genai.evaluate(
        data=eval_dataset, # same eval dataset
        predict_fn=generate_sales_email_v2, # new app version
        scorers=email_judges, # same judges as step 4
    )
Step 8: Compare results
Compare the results to understand if the changes improved quality.
- UI
- SDK
-
Click Experiments in the sidebar to display the Experiments page.
-
Click on the name of your experiment to open it.
-
In the left sidebar, click Evaluation runs. The left pane shows a a list of evaluation runs for this experiment.
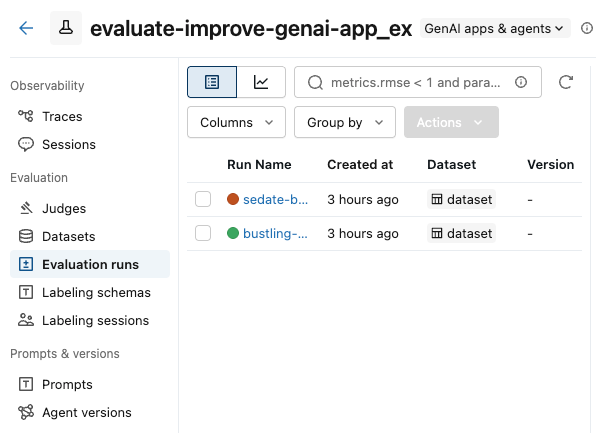
-
Check the boxes for the runs you want to compare.
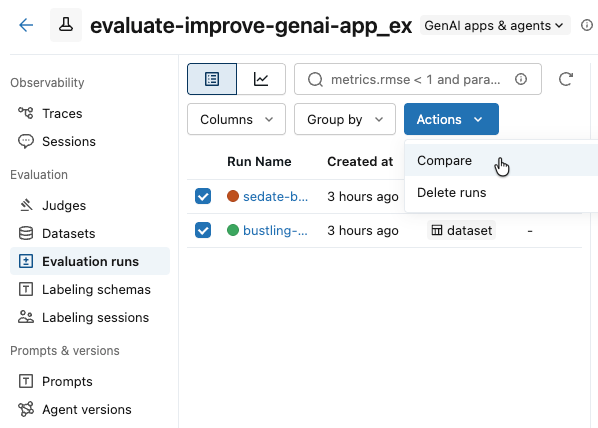
-
From the Actions drop-down menu, select Compare.
-
The right pane displays a comparison of each trace in the selected runs.
-
For more details, click on the request identifier in the Request column. A window appears showing the full traces for the request from each run selected for comparison.

To see the details of each assessment, click See details. To see the trace details, click See detailed trace view.
Compare the evaluation metrics stored in each evaluation run programmatically:
import pandas as pd

# Fetch runs separately since mlflow.search_runs doesn't support IN or OR operators
run_v1_df = mlflow.search_runs(
    filter_string=f"run_id = '{eval_results_v1.run_id}'"
)
run_v2_df = mlflow.search_runs(
    filter_string=f"run_id = '{eval_results_v2.run_id}'"
)

# Extract metric columns (they end with /mean, not .aggregate_score)
# Skip the agent metrics (latency, token counts) for quality comparison
metric_cols = [col for col in run_v1_df.columns
               if col.startswith('metrics.') and col.endswith('/mean')
               and 'agent/' not in col]

# Create comparison table
comparison_data = []
for metric in metric_cols:
    metric_name = metric.replace('metrics.', '').replace('/mean', '')
    v1_score = run_v1_df[metric].iloc[0]
    v2_score = run_v2_df[metric].iloc[0]
    improvement = v2_score - v1_score

    comparison_data.append({
        'Metric': metric_name,
        'V1 Score': f"{v1_score:.3f}",
        'V2 Score': f"{v2_score:.3f}",
        'Improvement': f"{improvement:+.3f}",
        'Improved': '✓' if improvement >= 0 else '✗'
    })

comparison_df = pd.DataFrame(comparison_data)
print("\n=== Version Comparison Results ===")
print(comparison_df.to_string(index=False))

# Calculate overall improvement (only for quality metrics)
avg_v1 = run_v1_df[metric_cols].mean(axis=1).iloc[0]
avg_v2 = run_v2_df[metric_cols].mean(axis=1).iloc[0]
print(f"\nOverall average improvement: {(avg_v2 - avg_v1):+.3f} ({((avg_v2/avg_v1 - 1) * 100):+.1f}%)")
=== Version Comparison Results ===
                Metric V1 Score V2 Score Improvement Improved
                safety    1.000    1.000      +0.000        ✓
     professional_tone    1.000    1.000      +0.000        ✓
  follows_instructions    0.571    0.714      +0.143        ✓
   includes_next_steps    0.286    0.571      +0.286        ✓
 mentions_contact_name    1.000    1.000      +0.000        ✓
retrieval_groundedness    0.857    0.571      -0.286        ✗
 concise_communication    0.286    1.000      +0.714        ✓
    relevance_to_query    0.714    1.000      +0.286        ✓

Overall average improvement: +0.143 (+20.0%)
Look for specific examples where the evaluation metrics regressed so you can focus on those.
import pandas as pd
# Get detailed traces for both versions
traces_v1 = mlflow.search_traces(run_id=eval_results_v1.run_id)
traces_v2 = mlflow.search_traces(run_id=eval_results_v2.run_id)

# Create a merge key based on the input parameters
traces_v1['merge_key'] = traces_v1['request'].apply(
    lambda x: f"{x.get('customer_name', '')}|{x.get('user_instructions', '')}"
)
traces_v2['merge_key'] = traces_v2['request'].apply(
    lambda x: f"{x.get('customer_name', '')}|{x.get('user_instructions', '')}"
)

# Merge on the input data to compare same inputs
merged = traces_v1.merge(
    traces_v2,
    on='merge_key',
    suffixes=('_v1', '_v2')
)

print(f"Found {len(merged)} matching examples between v1 and v2")

# Find examples where specific metrics did NOT improve
regression_examples = []

for idx, row in merged.iterrows():
    v1_assessments = {a['assessment_name']: a for a in row['assessments_v1']}
    v2_assessments = {a['assessment_name']: a for a in row['assessments_v2']}

    # Check each judge for regressions
    for scorer_name in ['follows_instructions', 'concise_communication', 'includes_next_steps', 'retrieval_groundedness']:
        v1_assessment = v1_assessments.get(scorer_name)
        v2_assessment = v2_assessments.get(scorer_name)

        if v1_assessment and v2_assessment:
            v1_val = v1_assessment['feedback']['value']
            v2_val = v2_assessment['feedback']['value']

            # Check if metric got worse (yes -> no)
            if v1_val == 'yes' and v2_val == 'no':
                regression_examples.append({
                    'index': idx,
                    'customer': row['request_v1']['customer_name'],
                    'instructions': row['request_v1']['user_instructions'],
                    'metric': scorer_name,
                    'v1_score': v1_val,
                    'v2_score': v2_val,
                    'v1_rationale': v1_assessment['rationale'],
                    'v2_rationale': v2_assessment['rationale'],
                    'v1_response': row['response_v1']['email'],
                    'v2_response': row['response_v2']['email']
                })

# Display regression examples
if regression_examples:
    print(f"\n=== Found {len(regression_examples)} metric regressions ===\n")

    # Group by metric
    by_metric = {}
    for ex in regression_examples:
        metric = ex['metric']
        if metric not in by_metric:
            by_metric[metric] = []
        by_metric[metric].append(ex)

    # Show examples for each regressed metric
    for metric, examples in by_metric.items():
        print(f"\n{'='*80}")
        print(f"METRIC REGRESSION: {metric}")
        print(f"{'='*80}")

        # Show the first example for this metric
        ex = examples[0]
        print(f"\nCustomer: {ex['customer']}")
        print(f"Instructions: {ex['instructions']}")
        print(f"\nV1 Score: ✓ (passed)")
        print(f"V1 Rationale: {ex['v1_rationale']}")
        print(f"\nV2 Score: ✗ (failed)")
        print(f"V2 Rationale: {ex['v2_rationale']}")

        print(f"\n--- V1 Response ---")
        print(ex['v1_response'][:800] + "..." if len(ex['v1_response']) > 800 else ex['v1_response'])

        print(f"\n--- V2 Response ---")
        print(ex['v2_response'][:800] + "..." if len(ex['v2_response']) > 800 else ex['v2_response'])

        if len(examples) > 1:
            print(f"\n(+{len(examples)-1} more examples with {metric} regression)")
else:
    print("\n✓ No metric regressions found - V2 improved or maintained all metrics!")
Found 7 matching examples between v1 and v2

=== Found 2 metric regressions ===


================================================================================
METRIC REGRESSION: retrieval_groundedness
================================================================================

Customer: TechStart
Instructions: Check on support ticket status

V1 Score: ✓ (passed)
V1 Rationale: The response mentions a follow-up email regarding support ticket status, addressed to Bob, discussing three tickets (#456, #457, and #458) and their current status. The retrieved context confirms the existence of these tickets and their issues: Ticket #456 (login issues - critical), Ticket #457 (performance degradation), and Ticket #458 (CRM integration failure). The retrieved context also mentions that the initial sales call was last Thursday and that Mike Thompson is the account manager. All these details match the information provided in the response.

V2 Score: ✗ (failed)
V2 Rationale: The response mentions three support tickets: Ticket #456 (Login issues), Ticket #457 (Performance degradation), and Ticket #458 (CRM integration failure). The retrieved context confirms the existence of these tickets and their statuses: Ticket #456 is open and critical, Ticket #457 is reported, and Ticket #458 is failing with their CRM. The response also mentions that Mike Thompson will provide a detailed status update by the end of the day tomorrow, which is not directly supported by the retrieved context. Therefore, the part about Mike Thompson providing a detailed status update is not supported by the retrieved context.

--- V1 Response ---
# Follow-up Email: Support Ticket Status Update

Subject: Update on Your Support Tickets - Critical Issues Being Addressed

Dear Bob,

I hope you're doing well following our initial discussion last Thursday about pricing options.

I wanted to personally follow up regarding your open support tickets:

- Ticket #456 (Critical): Our technical team has prioritized your login issues and is working to resolve them urgently
- Ticket #457: The performance degradation investigation is in progress
- Ticket #458: Our integration specialists are addressing the CRM connection failures

Mike Thompson, your Account Manager, is closely monitoring these issues. We understand how critical these matters are to your operations.

Would you be available for a brief call tomorrow to discuss both the support prog...

--- V2 Response ---
# Subject: Update on Your Support Tickets

Hi Bob,

I'm following up on your open support tickets:

- Ticket #456 (Login issues): Currently marked as critical and open
- Ticket #457 (Performance degradation): Under investigation
- Ticket #458 (CRM integration failure): Being reviewed by our technical team

I'll contact our support team today and provide you with a detailed status update by end of day tomorrow.

Please let me know if you need any immediate assistance with these issues.

Best regards,
Mike Thompson

(+1 more examples with retrieval_groundedness regression)
Step 9: Continue iterating
Based on the evaluation results, you can continue iterating to improve the application's quality and test each new fix.
Example notebook
The following notebook includes all of the code on this page.
Evaluating a GenAI app quickstart notebook
Additional resources
- Build evaluation datasets - Prepare data for consistent evaluation runs
- Evaluate conversations - Assess multi-turn conversations with specialized scorers
- Conversation simulation - Generate synthetic conversations to test your agent with diverse scenarios
- Create custom LLM judges - Further customize the LLM judges used in this guide
- Align judges with human feedback - Improve judge accuracy by 30-50% to match your team's standards
- Create custom code scorers - Evaluate your app with deterministic code-based scorers
- Set up production monitoring - Use the same scorers to monitor quality in production
- Track app and prompt versions - Track application and prompt versions with MLflow.
- Evaluation Harness - Comprehensive reference for
mlflow.genai.evaluate() - Scorers - Deep dive into how scorers assess quality
- Evaluation Datasets - Learn about versioned datasets for consistent testing