Create and manage labeling sessions
Labeling sessions provide a structured way to gather feedback from domain experts on the behavior of your GenAI applications. A labeling session is a special type of MLflow run that contains a specific set of traces that you want domain experts to review using the MLflow Review App.
The goal of a labeling session is to collect human-generated assessments (labels) on existing MLflow Traces. You can capture either Feedback or Expectation data, which can then be used to improve your GenAI app through systematic evaluation. For more information on collecting assessments during app development, see Label during development.
Labeling sessions appear in the Evaluations tab of the MLflow UI. Because labeling sessions are logged as MLflow runs, you can also access the traces and associated assessments using the MLflow API mlflow.search_runs().
How labeling sessions work
A labeling session acts as a container for traces and their associated labels, enabling systematic feedback collection that can drive evaluation and improvement workflows. When you create a labeling session, you define:
- Name: A descriptive identifier for the session.
- Assigned users: Domain experts who will provide labels.
- Agent: (Optional) The GenAI app to generate responses if needed.
- Labeling schemas: The questions and format for feedback collection. You can use built-in schemas (
EXPECTED_FACTS,EXPECTED_RESPONSE,GUIDELINES) or create custom ones. See Create and manage labeling schemas for detailed information on creating and using schemas. - Multi-turn chat: Whether to support conversation-style labeling.
The optional Agent field connects a labeling session to the Review App's Chat UI for interactive testing. The Chat UI requires an agent deployed to a Model Serving endpoint and does not currently support agents deployed on Databricks Apps. Reviewing and labeling existing traces works regardless of how your agent is deployed.
For details of the LabelingSession API, see mlflow.genai.LabelingSession.
Create labeling sessions
You can create labeling sessions using the UI or the API.
Session names might not be unique. Use the MLflow run ID (session.mlflow_run_id) to store and reference sessions.
Create sessions using the UI
To create a labeling session in the MLflow UI:
-
In the Databricks workspace, in the left sidebar, click Experiments.
-
Click the name of your experiment to open it.
-
Click Labeling sessions in the sidebar.
-
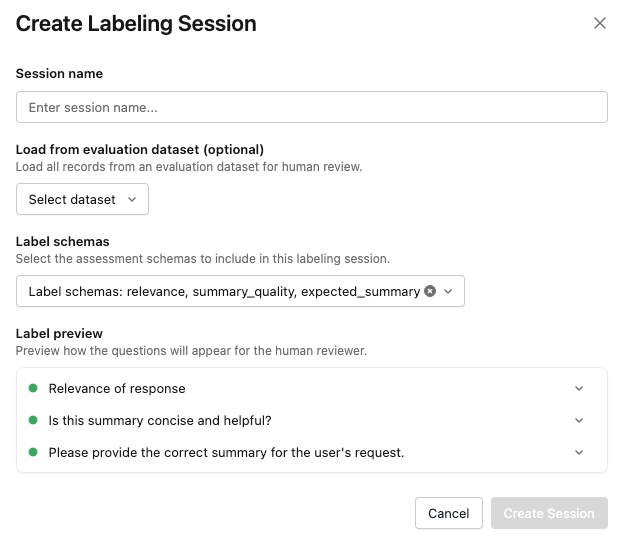
Click Create session. The Create Labeling Session dialog appears.
-
Enter a name for the session.
You can also optionally specify an evaluation dataset or select labeling schemas.
The Label preview section lets you view how the questions appear for reviewers.
-
When you are ready, click Create Session. The new session appears in the list on the left side of the page.
-
To share the session with reviewers, click the session name in the list, and then click Share at the upper right.

-
Enter an email address for each reviewer and click Save. Reviewers are notified and given access to the review app.
View sessions using the UI
To view reviewer feedback for a session, click the session name in the list, then click the request.
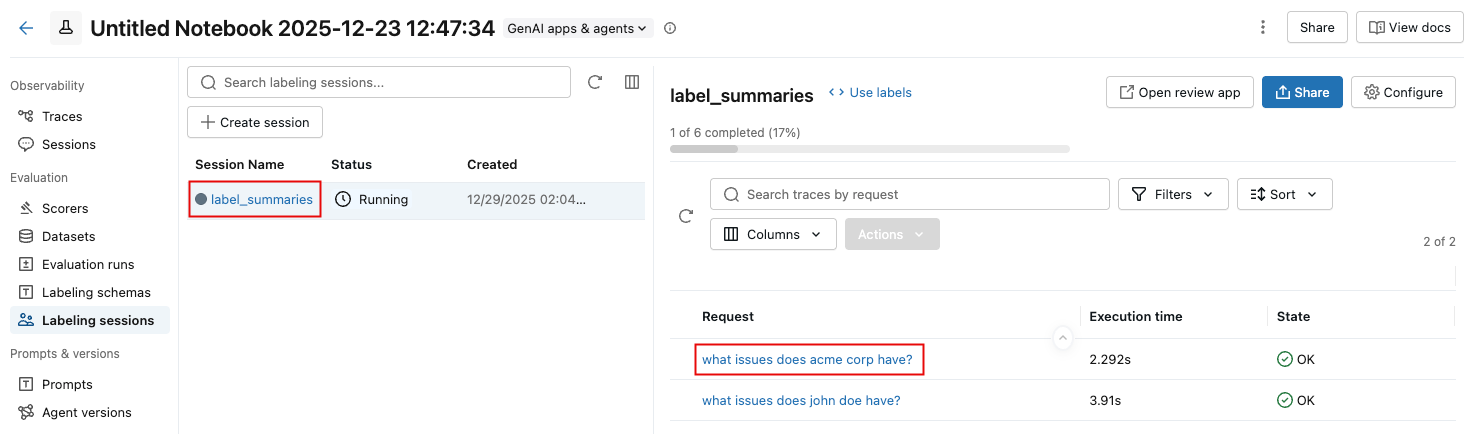
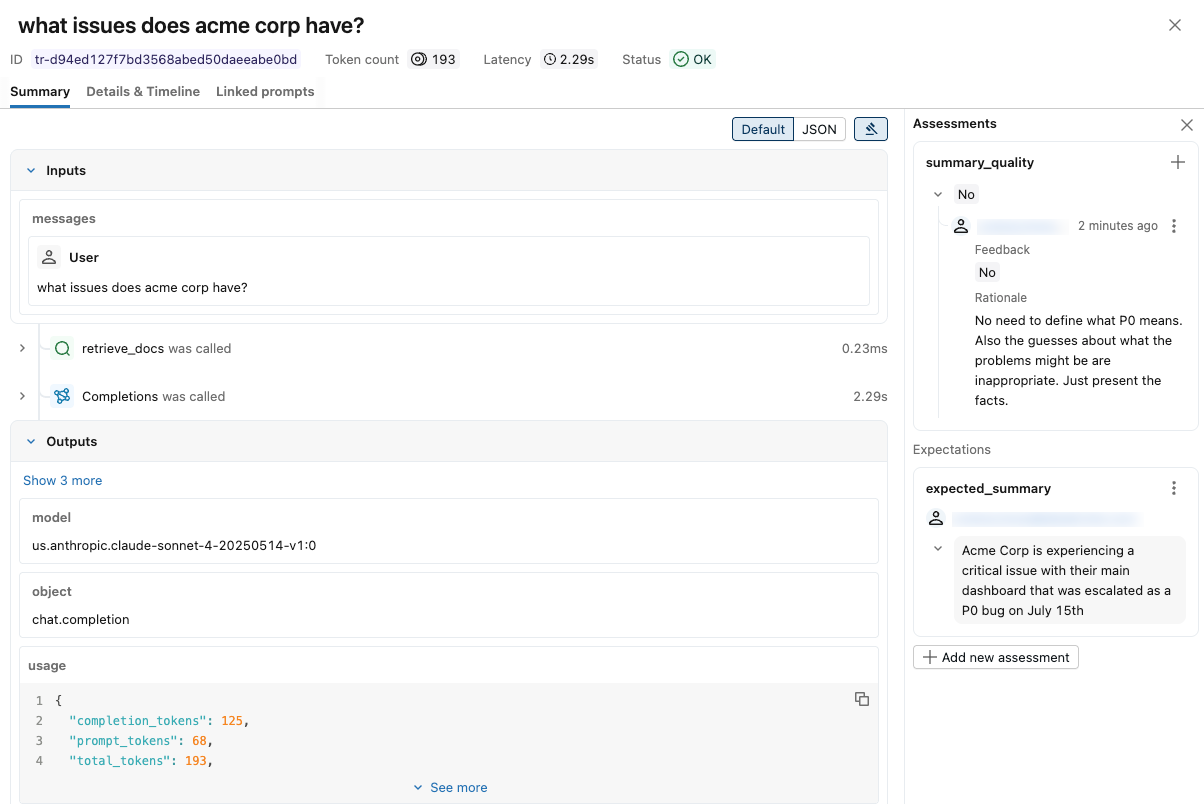
A notification appears showing the trace and reviewer assessments. To display reviewers' input, click Assessments at the upper right.
Create sessions using the API
To create sessions with full programmatic control over all configuration options, use the MLflow API mlflow.genai.labeling.create_labeling_session().
Create a basic session
import mlflow.genai.labeling as labeling
import mlflow.genai.label_schemas as schemas

# Create a simple labeling session with built-in schemas
session = labeling.create_labeling_session(
    name="customer_service_review_jan_2024",
    assigned_users=["alice@company.com", "bob@company.com"],
    label_schemas=[schemas.EXPECTED_FACTS]  # Required: at least one schema needed
)

print(f"Created session: {session.name}")
print(f"Session ID: {session.labeling_session_id}")
Create a session using custom label schemas
import mlflow.genai.labeling as labeling
import mlflow.genai.label_schemas as schemas

# Create custom schemas first
quality_schema = schemas.create_label_schema(
    name="response_quality",
    type="feedback",
    title="Rate the response quality",
    input=schemas.InputCategorical(options=["Poor", "Fair", "Good", "Excellent"]),
    overwrite=True,
)

# Create session using the schemas
session = labeling.create_labeling_session(
    name="quality_assessment_session",
    assigned_users=["expert@company.com"],
    label_schemas=["response_quality", schemas.EXPECTED_FACTS],
)
Manage labeling sessions
For API details, see mlflow.genai.get_labeling_sessions and mlflow.genai.delete_labeling_sessions.
Retrieve sessions
import mlflow.genai.labeling as labeling

# Get all labeling sessions
all_sessions = labeling.get_labeling_sessions()
print(f"Found {len(all_sessions)} sessions")

for session in all_sessions:
    print(f"- {session.name} (ID: {session.labeling_session_id})")
    print(f"  Assigned users: {session.assigned_users}")
Get a specific session
import mlflow
import mlflow.genai.labeling as labeling
import pandas as pd

# Get all labeling sessions first
all_sessions = labeling.get_labeling_sessions()

# Find session by name (note: names may not be unique)
target_session = None
for session in all_sessions:
    if session.name == "customer_service_review_jan_2024":
        target_session = session
        break

if target_session:
    print(f"Session name: {target_session.name}")
    print(f"Experiment ID: {target_session.experiment_id}")
    print(f"MLflow Run ID: {target_session.mlflow_run_id}")
    print(f"Label schemas: {target_session.label_schemas}")
else:
    print("Session not found")

# Alternative: Get session by MLflow Run ID (if you know it)
run_id = "your_labeling_session_run_id"
run = mlflow.search_runs(
    experiment_ids=["your_experiment_id"],
    filter_string=f"tags.mlflow.runName LIKE '%labeling_session%' AND attribute.run_id = '{run_id}'"
).iloc[0]

print(f"Found labeling session run: {run['run_id']}")
print(f"Session name: {run['tags.mlflow.runName']}")
Delete sessions
import mlflow.genai.labeling as labeling

# Find the session to delete by name
all_sessions = labeling.get_labeling_sessions()
session_to_delete = None
for session in all_sessions:
    if session.name == "customer_service_review_jan_2024":
        session_to_delete = session
        break

if session_to_delete:
    # Delete the session (removes from Review App)
    review_app = labeling.delete_labeling_session(session_to_delete)
    print(f"Deleted session: {session_to_delete.name}")
else:
    print("Session not found")
Add traces to sessions
After you create a session, you must add traces to it for expert review. You can do this using the UI or the add_traces() API. For API details, see mlflow.genai.LabelingSession.add_traces.
For details on how traces are rendered and displayed to labelers in the Review App UI, including how different data types (dictionaries, OpenAI messages, tool calls) are presented, see Review App content rendering.
Add traces using the UI
To add traces to a labeling session:
-
In the Databricks workspace, in the left sidebar, click Experiments.
-
Click the name of your experiment to open it.
-
Click Traces in the sidebar.
-
Select the traces you want to add by checking the box to the left of the Trace ID.
-
From the Actions drop-down menu, select Add to labeling session.
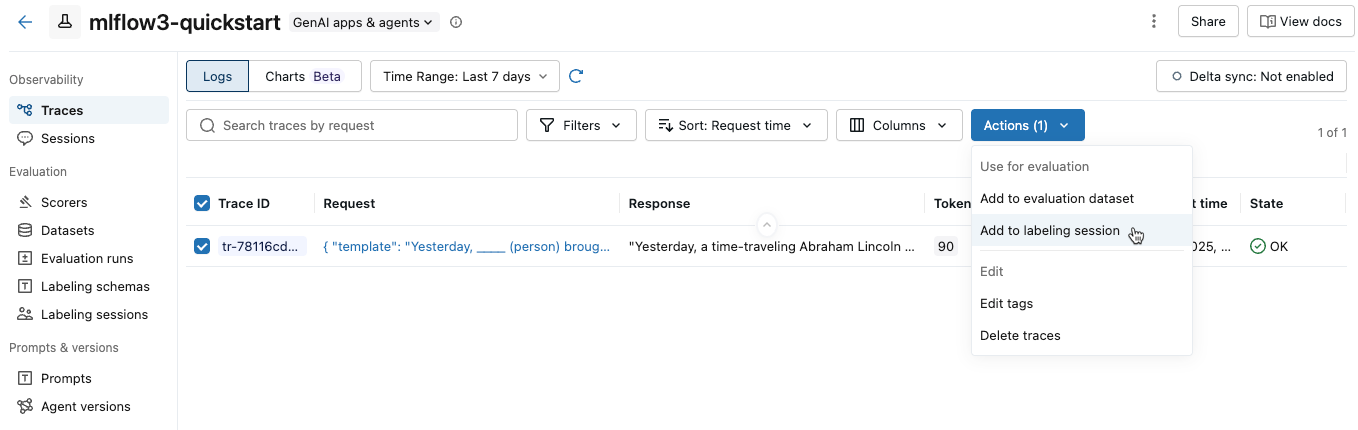
A dialog appears showing existing labeling sessions for the experiment.
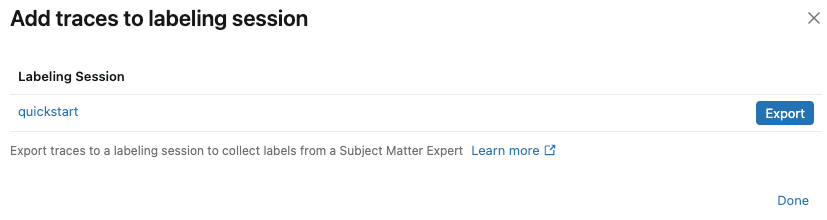
-
In the dialog, click Export next to the labeling session that you want to add the traces to, then click Done.
Add traces from search results
-
Initialize an OpenAI client to connect to either Databricks-hosted LLMs or LLMs hosted by OpenAI.
- Databricks-hosted LLMs
- OpenAI-hosted LLMs
Use
databricks-openaito get an OpenAI client that connects to Databricks-hosted LLMs. Select a model from the available foundation models.Pythonimport mlflow
from databricks_openai import DatabricksOpenAI
# Enable MLflow's autologging to instrument your application with Tracing
mlflow.openai.autolog()
# Set up MLflow tracking to Databricks
mlflow.set_tracking_uri("databricks")
mlflow.set_experiment("/Shared/docs-demo")
# Create an OpenAI client that is connected to Databricks-hosted LLMs
client = DatabricksOpenAI()
# Select an LLM
model_name = "databricks-claude-sonnet-4"Use the native OpenAI SDK to connect to OpenAI-hosted models. Select a model from the available OpenAI models.
Pythonimport mlflow
import os
import openai
# Ensure your OPENAI_API_KEY is set in your environment
# os.environ["OPENAI_API_KEY"] = "<YOUR_API_KEY>" # Uncomment and set if not globally configured
# Enable auto-tracing for OpenAI
mlflow.openai.autolog()
# Set up MLflow tracking to Databricks
mlflow.set_tracking_uri("databricks")
mlflow.set_experiment("/Shared/docs-demo")
# Create an OpenAI client connected to OpenAI SDKs
client = openai.OpenAI()
# Select an LLM
model_name = "gpt-4o-mini" -
Create sample traces and add them to a labeling session:
Pythonimport mlflow.genai.labeling as labeling
# First, create some sample traces with a simple app
@mlflow.trace
def support_app(question: str):
"""Simple support app that generates responses"""
mlflow.update_current_trace(tags={"test_tag": "C001"})
response = client.chat.completions.create(
model=model_name, # This example uses Databricks hosted Claude 3.5 Sonnet. If you provide your own OpenAI credentials, replace with a valid OpenAI model e.g., gpt-4o, etc.
messages=[
{"role": "system", "content": "You are a helpful customer support agent."},
{"role": "user", "content": question},
],
)
return {"response": response.choices[0].message.content}
# Generate some sample traces
with mlflow.start_run():
# Create traces with negative feedback for demonstration
support_app("My order is delayed")
support_app("I can't log into my account")
# Now search for traces to label
traces_df = mlflow.search_traces(
filter_string="tags.test_tag = 'C001'", max_results=50
)
# Create session and add traces
session = labeling.create_labeling_session(
name="negative_feedback_review",
assigned_users=["quality_expert@company.com"],
label_schemas=["response_quality", "expected_facts"]
)
# Add traces from search results
session.add_traces(traces_df)
print(f"Added {len(traces_df)} traces to session")
Add individual trace objects
-
Initialize an OpenAI client to connect to either Databricks-hosted LLMs or LLMs hosted by OpenAI.
- Databricks-hosted LLMs
- OpenAI-hosted LLMs
Use
databricks-openaito get an OpenAI client that connects to Databricks-hosted LLMs. Select a model from the available foundation models.Pythonimport mlflow
from databricks_openai import DatabricksOpenAI
# Enable MLflow's autologging to instrument your application with Tracing
mlflow.openai.autolog()
# Set up MLflow tracking to Databricks
mlflow.set_tracking_uri("databricks")
mlflow.set_experiment("/Shared/docs-demo")
# Create an OpenAI client that is connected to Databricks-hosted LLMs
client = DatabricksOpenAI()
# Select an LLM
model_name = "databricks-claude-sonnet-4"Use the native OpenAI SDK to connect to OpenAI-hosted models. Select a model from the available OpenAI models.
Pythonimport mlflow
import os
import openai
# Ensure your OPENAI_API_KEY is set in your environment
# os.environ["OPENAI_API_KEY"] = "<YOUR_API_KEY>" # Uncomment and set if not globally configured
# Enable auto-tracing for OpenAI
mlflow.openai.autolog()
# Set up MLflow tracking to Databricks
mlflow.set_tracking_uri("databricks")
mlflow.set_experiment("/Shared/docs-demo")
# Create an OpenAI client connected to OpenAI SDKs
client = openai.OpenAI()
# Select an LLM
model_name = "gpt-4o-mini" -
Create and add individual trace objects to a labeling session:
Pythonimport mlflow.genai.labeling as labeling
# Set up the app to generate traces
@mlflow.trace
def support_app(question: str):
"""Simple support app that generates responses"""
mlflow.update_current_trace(tags={"test_tag": "C001"})
response = client.chat.completions.create(
model=model_name, # This example uses Databricks hosted Claude 3.5 Sonnet. If you provide your own OpenAI credentials, replace with a valid OpenAI model e.g., gpt-4o, etc.
messages=[
{"role": "system", "content": "You are a helpful customer support agent."},
{"role": "user", "content": question},
],
)
return {"response": response.choices[0].message.content}
# Generate specific traces for edge cases
with mlflow.start_run() as run:
# Create traces for specific scenarios
support_app("What's your refund policy?")
trace_id_1 = mlflow.get_last_active_trace_id()
support_app("How do I cancel my subscription?")
trace_id_2 = mlflow.get_last_active_trace_id()
support_app("The website is down")
trace_id_3 = mlflow.get_last_active_trace_id()
# Get the trace objects
trace1 = mlflow.get_trace(trace_id_1)
trace2 = mlflow.get_trace(trace_id_2)
trace3 = mlflow.get_trace(trace_id_3)
# Create session and add traces
session = labeling.create_labeling_session(
name="negative_feedback_review",
assigned_users=["name@databricks.com"],
label_schemas=["response_quality", schemas.EXPECTED_FACTS],
)
# Add individual traces
session.add_traces([trace1, trace2, trace3])
Retrieve feedback responses
After reviewers complete a labeling session, MLflow stores their responses as Assessments on the traces in the session. You can retrieve them in the UI or with the MLflow API.
- UI
- API
Open the Experiments UI, click the labeling session, then click the request. Click Assessments at the upper right to view each reviewer's responses. For screenshots, see View sessions using the UI.
Use mlflow.search_traces() with the session's mlflow_run_id. The returned DataFrame includes an assessments column containing each reviewer's labels.
import mlflow

traces = mlflow.search_traces(run_id=session.mlflow_run_id)
print(traces[["trace_id", "assessments"]])
For API details, see mlflow.search_traces.
Manage assigned users
User access requirements
Any user in the Databricks account can be assigned to a labeling session, regardless of whether they have workspace access. However, granting a user permission to a labeling session will give them access to the labeling session's MLflow experiment.
Set up permissions for users
- For users who do not have access to the workspace, an account admin uses account-level SCIM provisioning to sync users and groups automatically from your identity provider to your Databricks account. You can also manually register these users and groups to give them access when you set up identities in Databricks. See User and group management.
- For users who already have access to the workspace that contains the review app, no additional configuration is required.
When you assign users to a labeling session, the system automatically grants necessary WRITE permissions on the MLflow Experiment containing the labeling session. This gives assigned users access to view and interact with the experiment data.
Add users to existing sessions
To add users to existing sessions, use set_assigned_users. For API details, see mlflow.genai.LabelingSession.set_assigned_users.
import mlflow.genai.labeling as labeling

# Find existing session by name
all_sessions = labeling.get_labeling_sessions()
session = None
for s in all_sessions:
    if s.name == "customer_review_session":
        session = s
        break

if session:
    # Add more users to the session
    new_users = ["expert2@company.com", "expert3@company.com"]
    session.set_assigned_users(session.assigned_users + new_users)
    print(f"Session now has users: {session.assigned_users}")
else:
    print("Session not found")
Replace assigned users
import mlflow.genai.labeling as labeling

# Find session by name
all_sessions = labeling.get_labeling_sessions()
session = None
for s in all_sessions:
    if s.name == "session_name":
        session = s
        break

if session:
    # Replace all assigned users
    session.set_assigned_users(["new_expert@company.com", "lead_reviewer@company.com"])
    print("Updated assigned users list")
else:
    print("Session not found")
Sync to evaluation datasets
You can synchronize collected Expectations to Evaluation Datasets.
How dataset synchronization works
The sync() method performs an intelligent upsert operation. For API details, see mlflow.genai.LabelingSession.sync.
- Each trace's inputs serve as a unique key to identify records in the dataset.
- For traces with matching inputs, expectations from the labeling session overwrite existing expectations in the dataset when the expectation names are the same.
- Traces from the labeling session that do not match existing trace inputs in the dataset are added as new records.
- Existing dataset records with different inputs remain unchanged.
This approach allows you to iteratively improve your evaluation dataset by adding new examples and updating ground truth for existing examples.
Dataset synchronization
import mlflow.genai.labeling as labeling

# Find session with completed labels by name
all_sessions = labeling.get_labeling_sessions()
session = None
for s in all_sessions:
    if s.name == "completed_review_session":
        session = s
        break

if session:
    # Sync expectations to dataset
    session.sync(to_dataset="customer_service_eval_dataset")
    print("Synced expectations to evaluation dataset")
else:
    print("Session not found")
Best practices
Session organization
-
Use clear, descriptive, date-stamped names, such as
customer_service_review_march_2024. -
Keep sessions focused on specific evaluation goals or time periods.
-
Aim for 25-100 traces per session to avoid reviewer fatigue.
-
Always store the
session.mlflow_run_idwhen you create a session. Use the run ID for programmatic access instead of relying on session names, as the session name might not be unique.Pythonimport mlflow.genai.labeling as labeling
# Good: Store run ID for later reference
session = labeling.create_labeling_session(name="my_session", ...)
session_run_id = session.mlflow_run_id # Store this!
# Later: Use run ID to find session via mlflow.search_runs()
# rather than searching by name through all sessions
User management
- Assign users based on domain expertise and availability.
- Distribute labeling work evenly across multiple experts.
- Remember that users must have access to the Databricks workspace.
Additional resources
- Label existing traces - Step-by-step guide using labeling sessions
- Create custom labeling schemas - Define structured feedback questions
- Build evaluation datasets - Convert labeled sessions into test datasets