Lakebase Change Data Feed
The Lakebase Change Data Feed feature is in Public Preview.
What is Lakebase Change Data Feed?
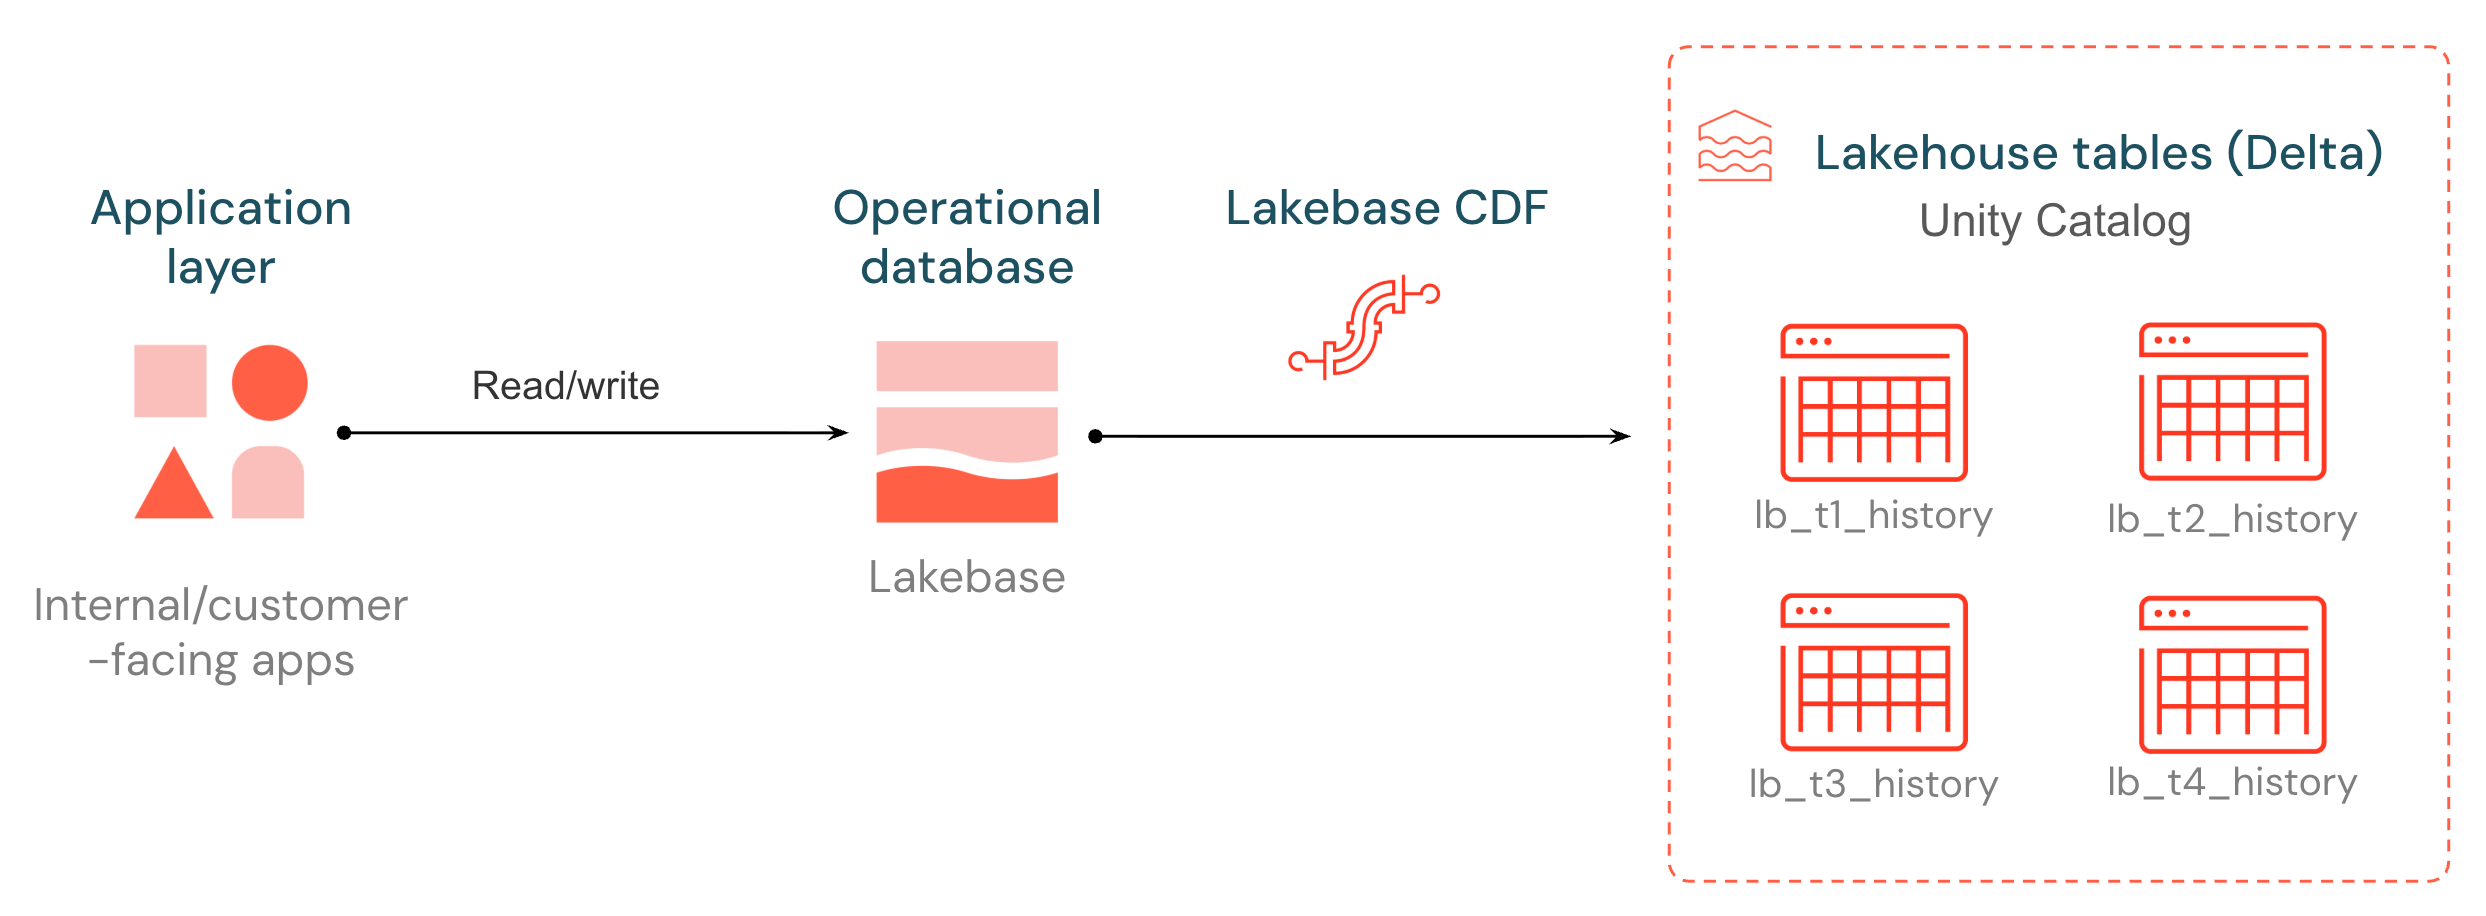
Lakebase introduces a native Change Data Feed (CDF), unlocking your operational data for downstream pipelines, models, and applications. Every insert, update, and delete on a Lakebase Postgres table is captured from the write-ahead log and stored as a new row in a Unity Catalog managed Delta table, batched and flushed every ~15 seconds. The change history is stored in an open format that any compute engine can read.
The destination tables follow the same shape as Delta Change Data Feed: each row carries a _pg_change_type, an LSN, a transaction ID, and a timestamp. Operational changes become a first-class source for ETL, audit, and downstream consumers — without standing up an external CDC stack.
Use cases
Lakebase CDF brings operational data into the lakehouse so downstream pipelines and applications can react to changes as they happen.
Use case | Description |
|---|---|
ETL pipelines | Use Lakebase as the bronze source for medallion pipelines. Build incremental Lakeflow pipelines or Spark Structured Streaming jobs against the change feed and update downstream silver and gold tables. |
Audit logs | Maintain a complete, queryable history of every insert, update, and delete on a Lakebase table for compliance and forensics. The history is immutable Delta. |
External systems | Store Lakebase change data in an open format that any engine can consume. Because the destination is a Delta table in Unity Catalog, external systems and non-Databricks readers can access the feed directly. |
Enable this preview
A workspace admin must enable the Lakebase Change Data Feed preview from the workspace Previews page.
Requirements
- Lakebase Autoscaling: A Lakebase Autoscaling project running Postgres 17.
- Source database: Tables must reside in the
databricks_postgresdatabase in Lakebase. Each project is created with this default database. This is a known limitation. - Unity Catalog: The identity configuring CDF needs USE CATALOG, USE SCHEMA, and CREATE TABLE on the destination catalog and schema. See Grant permissions on an object.
- Default storage: Destination catalogs configured with default storage are not supported.
- Lakebase project: Your Postgres role requires CAN MANAGE permissions on the Lakebase project. Project owners have CAN MANAGE by default. See Manage project permissions.
- Data types: See Data type mapping. Types without a direct Delta equivalent are stored as STRING.
Set up Lakebase CDF
To get started, set replica identity full on the tables you want in the feed (Step 1), then start CDF in the Lakebase app (Step 2). Your data appears as lb_<table_name>_history Delta tables in the Unity Catalog catalog and schema you choose.
Step 1: Set replica identity full
For a Lakebase table to participate in CDF, it must have REPLICA IDENTITY FULL set. By default Postgres logs only the primary key when a row is updated or deleted. Setting full identity tells Postgres to record both the before-and-after row state in the write-ahead log, which CDF needs to build a complete change history.
You can run these commands in the Lakebase SQL Editor or any Postgres client.
- Single table
- All existing tables in a schema
- Auto-apply to future tables
ALTER TABLE <table_name> REPLICA IDENTITY FULL;
To set replica identity on every existing table in a schema (public in this example), run:
DO $$
DECLARE r record;
BEGIN
  FOR r IN
    SELECT table_schema, table_name
    FROM information_schema.tables
    WHERE table_schema = 'public'
      AND table_type = 'BASE TABLE'
  LOOP
    EXECUTE format(
      'ALTER TABLE %I.%I REPLICA IDENTITY FULL;',
      r.table_schema, r.table_name
    );
  END LOOP;
END $$;
To make every newly-created table automatically receive REPLICA IDENTITY FULL, install a Postgres event trigger. It runs after every CREATE TABLE and sets the identity on the new table:
CREATE OR REPLACE FUNCTION public.set_full_replica_identity()
RETURNS event_trigger
LANGUAGE plpgsql
AS $$
DECLARE
  obj record;
BEGIN
  FOR obj IN
    SELECT * FROM pg_event_trigger_ddl_commands()
    WHERE command_tag = 'CREATE TABLE'
  LOOP
    EXECUTE format(
      'ALTER TABLE %s REPLICA IDENTITY FULL;',
      obj.object_identity
    );
  END LOOP;
END $$;

CREATE EVENT TRIGGER set_full_replica_identity_on_create
ON ddl_command_end
WHEN TAG IN ('CREATE TABLE')
EXECUTE FUNCTION public.set_full_replica_identity();
Combine the event trigger with the loop in the previous tab to cover both existing and future tables in one setup.
Check which tables have replica identity set
To see which tables in a schema have replica identity configured, run:
SELECT n.nspname AS table_schema,
       c.relname AS table_name,
       CASE c.relreplident
         WHEN 'd' THEN 'default'
         WHEN 'n' THEN 'nothing'
         WHEN 'f' THEN 'full'
         WHEN 'i' THEN 'index'
       END AS replica_identity
FROM pg_class c
JOIN pg_namespace n ON n.oid = c.relnamespace
WHERE c.relkind = 'r'
  AND n.nspname = 'public'
ORDER BY n.nspname, c.relname;
Only rows with replica_identity = 'full' are ready for CDF.
Step 2: Start the change data feed
Lakebase CDF is configured at the schema level. Once started, every current and future table in the source schema is included in the feed.
- In your Databricks workspace, open Lakebase Postgres from the app switcher (top right).
- Select your Lakebase project and the branch you want to use (for example, production or main).
- Open Branch overview by clicking the branch name in the top breadcrumb, then click the Lakebase CDF tab.
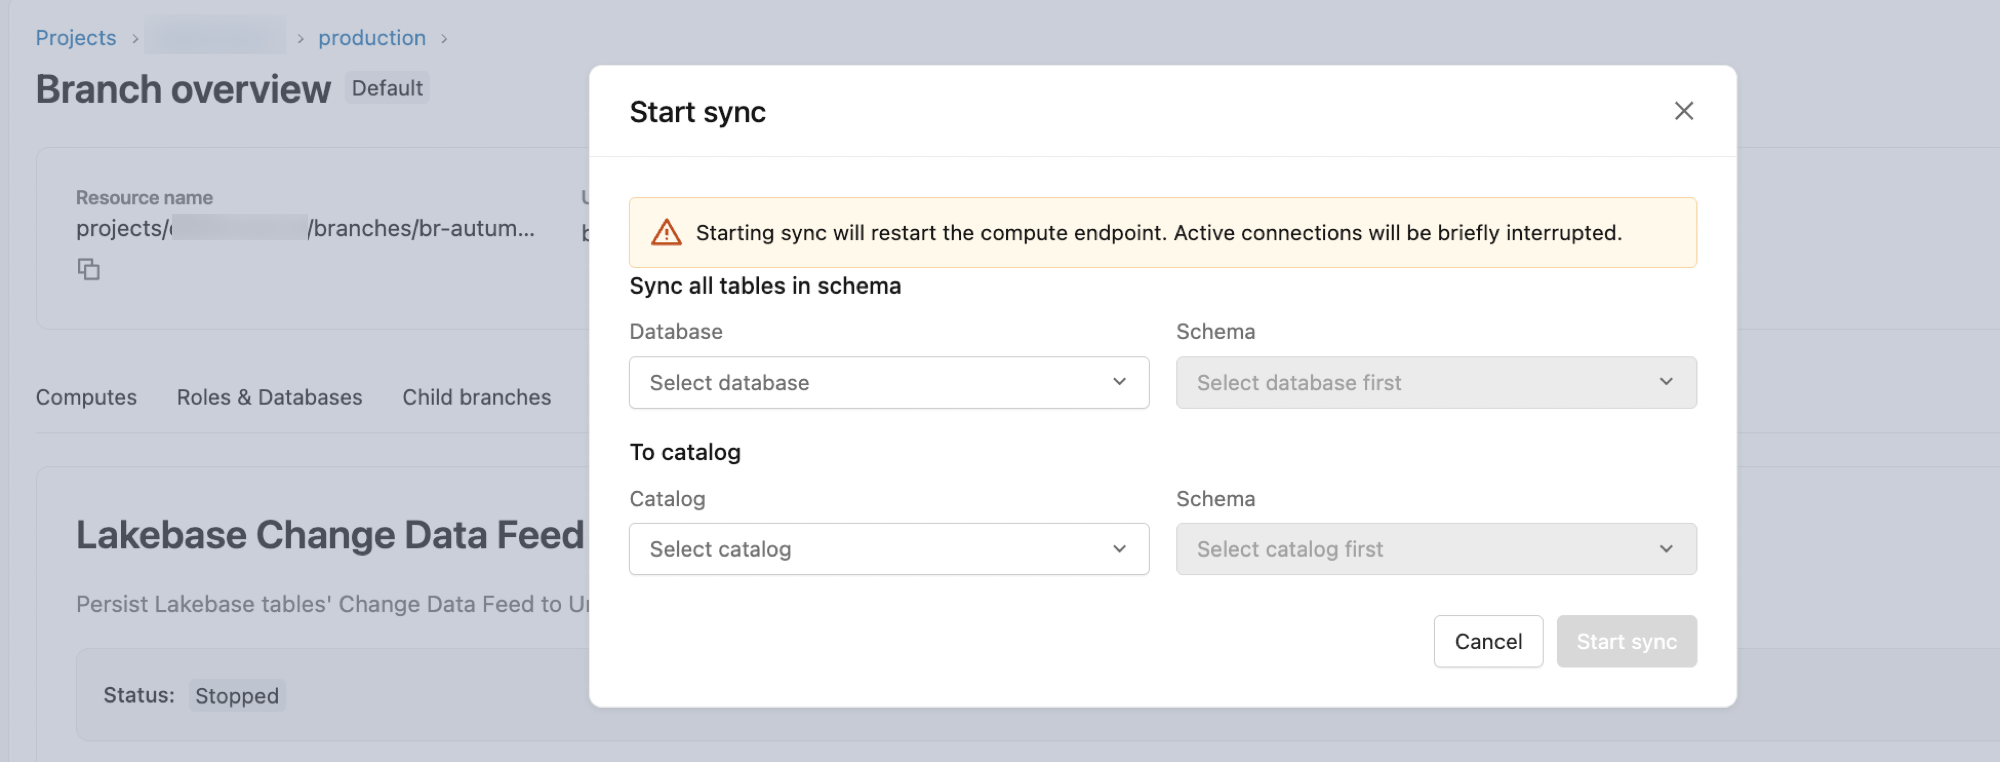
- Click Start.
- In the configuration dialog:
- Database: Defaults to
databricks_postgres. - Schema: Select the source Postgres schema.
- To Catalog: Select the destination Unity Catalog catalog.
- Schema: Select the destination Unity Catalog schema.
- Database: Defaults to
- Click Start to begin the feed.
Tables appear in the destination as lb_<table_name>_history. To find them, open Catalog in the sidebar, navigate to the destination catalog and schema, and open the Tables tab.
The Lakebase CDF tab has two sub-tabs:
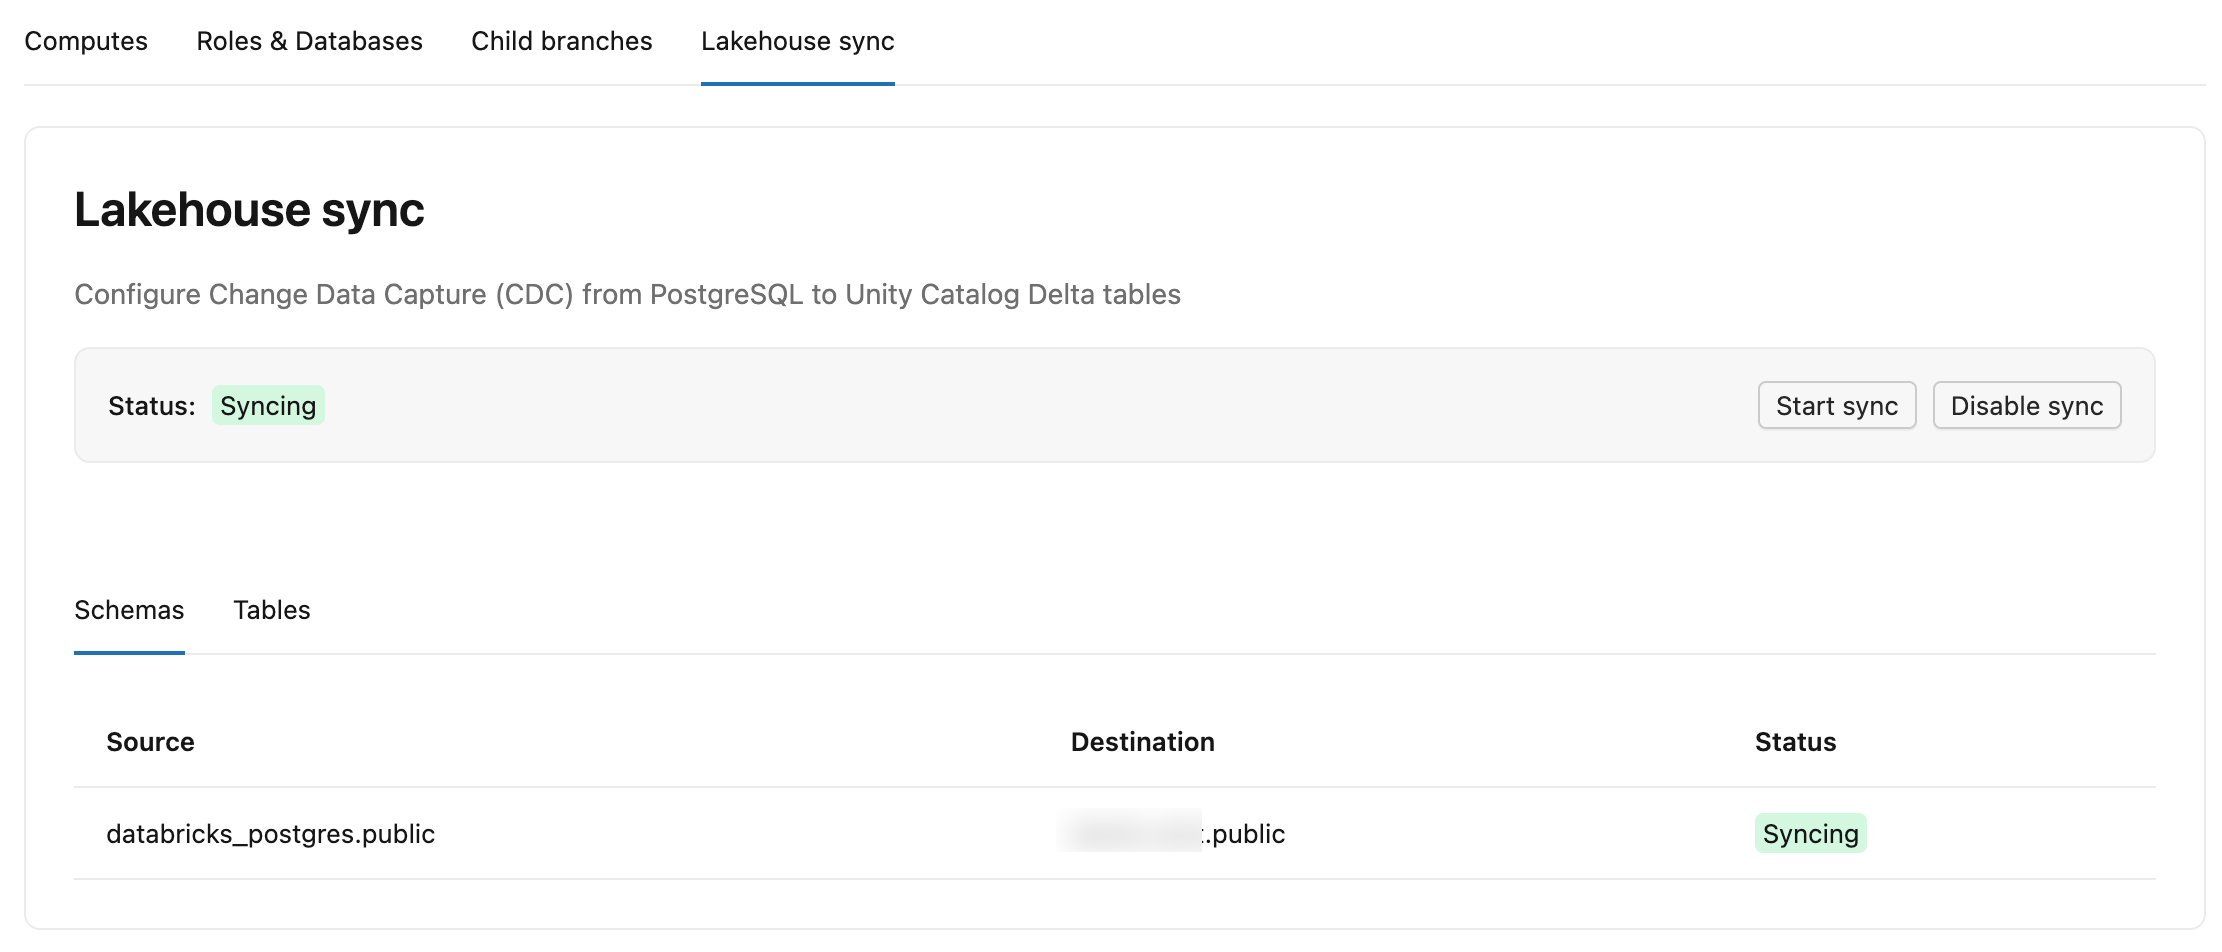
- Schemas: Lists each source schema, its destination catalog and schema in Unity Catalog, and a status.
- Tables: Lists each source table, its destination
lb_<table_name>_historytable, status (StreamingorSnapshotting), Committed LSN (how far the feed has written to Delta, shown as-while still in initial snapshot), and Last update (last time the table received changes).
You can also inspect feed state from Postgres by running this in the Lakebase SQL Editor:
SELECT * FROM wal2delta.tables;
The result includes table_oid, status (STREAMING or SNAPSHOTTING), committed_lsn, and last_write_time per table.
What is wal2delta? Lakebase CDF is powered by the wal2delta Postgres extension, which runs inside the Lakebase compute. It uses logical decoding to capture write-ahead log (WAL) changes and writes them to Delta tables in Unity Catalog.
Destination table schema
CDF writes one Delta table per source table, named lb_<table_name>_history in your destination catalog and schema. In addition to your source columns, each row carries these system columns:
Column | Type | Description |
|---|---|---|
| TEXT | Operation type: |
| BIGINT | Postgres Log Sequence Number. |
| INTEGER | Postgres Transaction ID. |
| TIMESTAMP | Timestamp when the change was processed (without timezone). |
| BIGINT | Monotonic sort key used to order all changes. |
Common change patterns
- Initial snapshot: The first time CDF runs on an existing Lakebase table, each existing row is written with
_pg_change_type = 'insert'. - Updates: An update produces two rows: one with
_pg_change_type = 'update_preimage'(old row) and one with_pg_change_type = 'update_postimage'(new row). - Deletes: A delete produces one row with
_pg_change_type = 'delete'.
These are the same change events as Delta Change Data Feed, so the same downstream patterns apply.
Operational behavior
- Naming collisions: If two source tables would map to the same destination name (for example,
sales.usersandmarketing.usersboth mapping tolb_users_history), CDF writes the first tolb_users_historyand auto-suffixes the second tolb_users_history_1. You can rename either destination table in Unity Catalog and the feed continues to work. - Schema-level scope: When you start CDF on a Lakebase schema, every current and future table in that schema is included. Empty tables are skipped — a table must have at least one row to appear in the destination.
- Dropped source tables: If you drop a table in Lakebase, the destination Delta table in Unity Catalog is preserved.
Build downstream pipelines
Lakebase CDF is designed for downstream pipelines that react to operational changes. The patterns below show three ways to consume the feed, ordered from simplest to most flexible.
Example scenario. An ecommerce app records orders in a Postgres orders table, each row carrying an item_id and quantity. The logistics team needs live inventory levels. With CDF, every change to orders is stored in the lb_orders_history Delta table in Unity Catalog. Downstream pipelines read that change feed and update an inventory_levels table whenever an order is placed, edited, or canceled.
Compute current inventory with a materialized view
The simplest pattern is a SQL materialized view over the history table. The MV refreshes incrementally as new change events arrive, and downstream consumers query it like any other table.
CREATE MATERIALIZED VIEW inventory_levels AS
SELECT
  item_id,
  SUM(
    CASE
      -- New orders (and the "new half" of updates) decrement inventory
      WHEN _pg_change_type IN ('insert', 'update_postimage') THEN -quantity
      -- Cancellations (and the "old half" of updates) restore inventory
      WHEN _pg_change_type IN ('delete', 'update_preimage') THEN quantity
      ELSE 0
    END
  ) AS current_inventory,
  MAX(_timestamp) AS last_transaction_ts,
  MAX(_pg_lsn) AS last_lsn
FROM lb_orders_history
GROUP BY item_id;
The two rows produced for every update cancel each other except for the net change, so the running sum stays correct as orders are edited.
Stream changes with Spark Declarative Pipelines
For a structured medallion architecture, use Lakeflow pipelines to declare bronze, silver, and gold tables. Lakeflow pipelines run them as a connected pipeline with checkpoints and dependency management handled for you.
import dlt
from pyspark.sql import functions as F

@dlt.table
def inventory_adjustments():
    return (
        spark.readStream.table("<catalog>.<schema>.lb_orders_history")
        .withColumn(
            "delta",
            F.when(F.col("_pg_change_type").isin("insert", "update_postimage"), -F.col("quantity"))
             .when(F.col("_pg_change_type").isin("delete", "update_preimage"), F.col("quantity"))
             .otherwise(0),
        )
        .select("item_id", "delta", "_timestamp")
    )

@dlt.expect_or_drop("non_negative_stock", "on_hand >= 0")
@dlt.table
def inventory_levels():
    return (
        spark.read.table("LIVE.inventory_adjustments")
        .groupBy("item_id")
        .agg(F.sum("delta").alias("on_hand"))
    )
inventory_adjustments reads lb_orders_history incrementally with readStream and produces a per-event delta. inventory_levels aggregates by item_id to compute current stock. The expectation drops rows that would push stock negative, signaling a bug upstream.
For a full end-to-end walkthrough, see Tutorial: Build an ETL pipeline using change data capture.
Custom processing with Spark Structured Streaming
When you need full control — for example, custom merges, side effects, or multiple sinks — read the history table directly with Spark Structured Streaming and use foreachBatch to write to your destination.
from pyspark.sql import functions as F
from delta.tables import DeltaTable

def update_inventory(batch_df, batch_id):
    deltas = (
        batch_df
        .withColumn(
            "delta",
            F.when(F.col("_pg_change_type").isin("insert", "update_postimage"), -F.col("quantity"))
             .when(F.col("_pg_change_type").isin("delete", "update_preimage"), F.col("quantity"))
             .otherwise(0),
        )
        .groupBy("item_id")
        .agg(F.sum("delta").alias("delta"))
    )

    target = DeltaTable.forName(spark, "<catalog>.<schema>.inventory_levels")
    (target.alias("t")
        .merge(deltas.alias("s"), "t.item_id = s.item_id")
        .whenMatchedUpdate(set={"on_hand": F.expr("t.on_hand + s.delta")})
        .whenNotMatchedInsert(values={"item_id": "s.item_id", "on_hand": "s.delta"})
        .execute())

(spark.readStream.table("<catalog>.<schema>.lb_orders_history")
    .writeStream
    .foreachBatch(update_inventory)
    .option("checkpointLocation", "/Volumes/<catalog>/<schema>/checkpoints/inventory_levels")
    .start())
Each microbatch aggregates the change events by item_id and merges the net deltas into inventory_levels.
Incremental by design. Each lb_<table_name>_history table is an append-only Delta table. Every source change is recorded as a new row with _pg_change_type marking the operation. Databricks SQL materialized views, Lakeflow pipelines flows, and Spark Structured Streaming jobs all process new rows incrementally from the Delta transaction log, so downstream pipelines only do work proportional to what changed. You do not need to enable Delta Change Data Feed on the history table because change semantics are already encoded in the row data.
Data type mapping
CDF supports most standard PostgreSQL primitive types. Types without a direct Delta equivalent are stored as STRING.
PostgreSQL type | Databricks Delta type | Notes |
|---|---|---|
BOOLEAN | BOOLEAN | |
INT, SMALLINT, BIGINT | INT, SMALLINT, BIGINT | |
TEXT, VARCHAR, CHAR | STRING | |
JSONB | STRING | Stored as a JSON string. |
ENUM | STRING | Stored as the enum label. |
NUMERIC / DECIMAL | DECIMAL or STRING | Uses source precision/scale when possible. Performs lossless rescaling for incompatible precision/scale values. Falls back to STRING when precision exceeds 38 or when precision/scale are undefined (unbounded NUMERIC). All NUMERIC/DECIMAL columns are nullable because NaN values are mapped to NULL. See PostgreSQL numeric types. |
DATE | DATE | |
TIMESTAMP | TIMESTAMP_NTZ | |
TIMESTAMPTZ | TIMESTAMP | |
FLOAT, DOUBLE | FLOAT, DOUBLE |
Types stored as STRING:
- Geography/Geometry (PostGIS): Types from the PostGIS extension (for example,
geometry,geography). - Vector (pgvector): The
vectortype from the pgvector extension. - Composite/struct types: Custom types defined with
CREATE TYPE ... AS (field_name type, ...). These are row-like types with named fields. - Map: Map-like key-value types such as hstore (from the
hstoreextension). Postgres has no built-in map type.hstoreis the common way to store key-value pairs in a column.
Managing schema changes
- Renaming a table in Postgres (for example,
ALTER TABLE users RENAME TO customers) lets the feed continue. The destination Delta table name does not change — it stayslb_users_history. - Schema changes (adding a column, dropping a column, or changing a column's data type) trigger a re-snapshot of the affected table. CDF re-reads the entire table from Postgres and rewrites it to the destination Delta table.
Disable Lakebase CDF
Disabling CDF stops the feed for all Lakebase schemas in the project.
- In your Databricks workspace, open Lakebase Postgres from the app switcher (top right).
- Select your Lakebase project and the branch where you configured CDF.
- Open Branch overview by clicking the branch name in the top breadcrumb, then click the Lakebase CDF tab.
- Click Disable. In the confirmation dialog, review the warning that changes will stop flowing to Delta tables, then click Disable again to confirm.
Disabling CDF does not restart your compute.
Limitations and troubleshooting
You can see per-table status (snapshotting, skipped, or streaming) in the Lakebase CDF tab, or by running this in Lakebase:
SELECT * FROM wal2delta.tables;
Common reasons a table does not appear in the feed:
REPLICA IDENTITY FULLnot set: RunALTER TABLE <table_name> REPLICA IDENTITY FULL;for the table. See Step 1: Set replica identity full.- Partitioned tables: Lakebase partitioned tables are not supported. A schema that contains partitioned tables causes those tables to fail.
- Empty tables: A table with zero rows is skipped until at least one row exists.
Next steps
- Build incremental ETL with Spark Declarative Pipelines. See Tutorial: Build an ETL pipeline using change data capture for a full walkthrough.
- Query the bronze layer with Databricks SQL. See Get started with data warehousing using Databricks SQL.
- Audit history with time travel queries on the destination Delta tables.