Manage branches
Create and manage branches to support different development workflows, testing scenarios, and production environments. Branches allow you to work with isolated database environments without affecting production.
About branch management permissions:
- To create, delete, or update branches, you need CAN MANAGE permission on the project. See Manage project permissions.
- To create databases or roles within a branch, or to view and list branches and branch resources, you need CAN USE or CAN MANAGE permission on the project.
- To learn about how branching works, including parent-child relationships, copy-on-write storage, and branch strategies, see Database branches.
Understanding branches
Branch overview
A branch in Lakebase Postgres is an independent database environment that shares storage with its parent branch through copy-on-write. Branches enable you to:
- Create isolated development and testing environments
- Test applications against realistic data sets
- Implement database development workflows
Branch types and strategies
When creating a branch, you can choose from several options depending on your specific needs. Each option creates a branch with different data characteristics and use cases.
Option | Description |
|---|---|
Branch data and schema | Creates a branch from the latest state of your parent branch. Ideal for development, testing with current data, and feature branches. |
Branch data and schema from a past point in time | Creates a branch from a specific point in time within your restore window. Useful for point-in-time recovery, historical analysis, and querying data at a point in time. Use the date picker to select the desired point in time. |
Branch expiration
Branch expiration allows you to set automatic deletion timestamps on branches. When a branch reaches its expiration time, it is automatically deleted. This feature helps manage temporary branches and reduce storage costs.
Why use branch expiration
Branch expiration is ideal for temporary branches that have predictable lifespans:
- CI/CD environments: Test branches that should clean up after pipeline completion.
- Feature development: Time-boxed feature branches with known deadlines.
- Automated testing: Ephemeral test environments created by scripts.
- Development workflows: Temporary environments that don't need to persist indefinitely.
Without automatic expiration, these branches accumulate over time, increasing storage costs and project clutter.
Example expiration durations: CI/CD pipelines (2-4 hours), demos (24-48 hours), feature development (1-7 days), long-term testing (30 days).
How branch expiration works
Branch expiration uses a time-to-live (TTL) model. When you set an expiration on a branch, you're defining how long the branch should exist before automatic deletion.
When you set an expiration timestamp on a branch:
- The system stores both the expiration timestamp (the scheduled date and time when the branch will be deleted) and the TTL interval (the duration between creation or update and expiration)
- A background process monitors branches and deletes them after their expiration time is reached
- If you reset a branch from its parent, the TTL countdown restarts using the original interval
Branch deletion is permanent and cannot be recovered. All associated data and compute resources are also deleted. Verify expiration times carefully before setting them.
Branch expiration restrictions
To maintain system integrity, expiration timestamps cannot be added to:
- Protected branches: Cannot expire protected branches or protect branches with expiration.
- Default branches: Cannot expire default branches or set expiring branches as default.
- Parent branches: Cannot expire branches that have children or create children from expiring branches.
When a branch expires and is deleted, all associated compute resources are also deleted. Ensure any critical workloads are migrated before expiration.
Maximum expiration period
The maximum expiration period is 30 days from the current time. If you need a branch to persist longer than 30 days, you can update the expiration timestamp before it expires to extend its lifetime.
Create and manage branches
Create a branch
To create a branch:
- UI
- Python SDK
- Java SDK
- CLI
- curl
- Navigate to your project's Branches page in the Lakebase App.
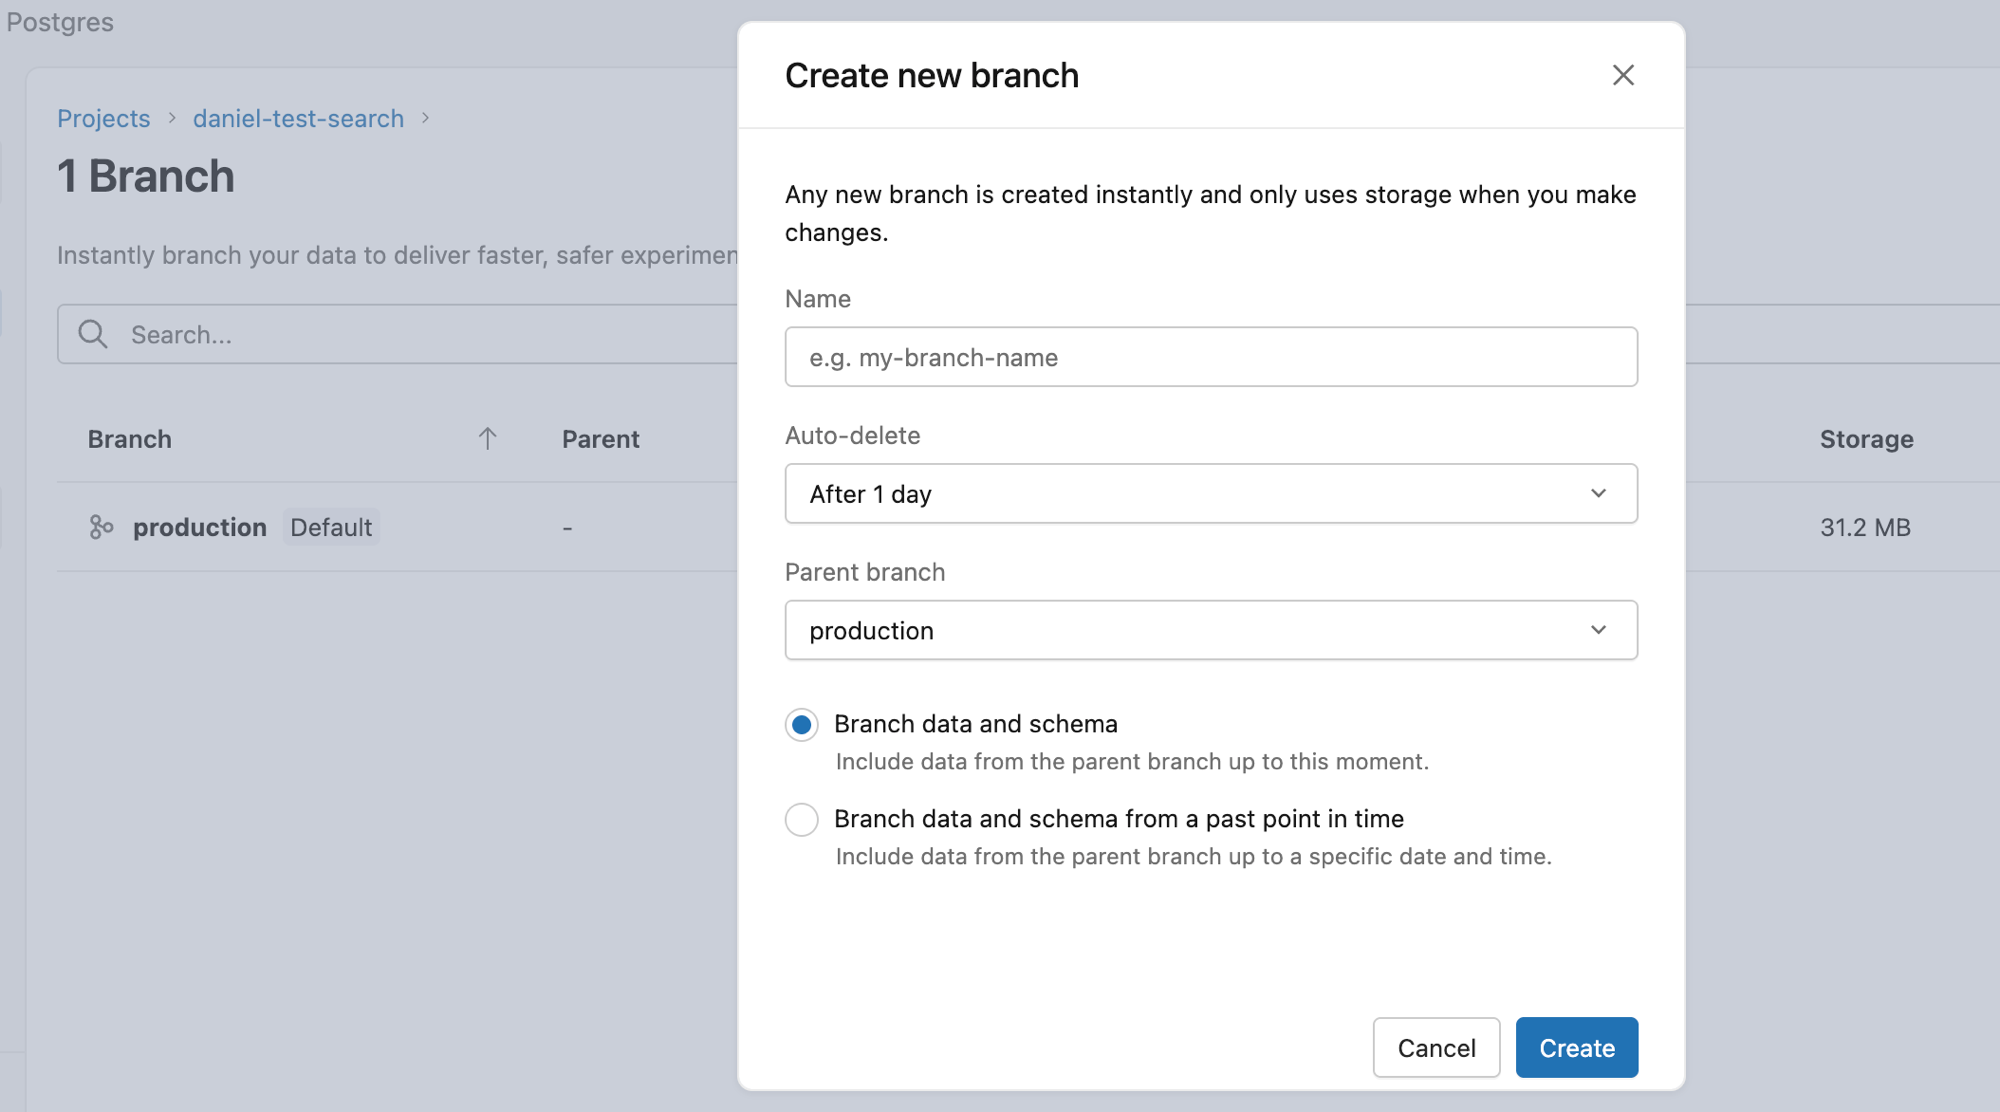
- Click Create branch and configure your branch options:
- Enter a branch name (required)
- Select a branch option (Branch data and schema or Branch data and schema from a past point in time)
- Optionally, set an expiration using the Auto-delete dropdown: choose a preset (After 1 hour, After 1 day, or After 7 days), a custom value (up to 30 days), or Never for no expiration. See Branch expiration for details.
- Click Create to create the branch.
Specify an expiration policy using one of the following options in BranchSpec:
ttl: ADurationobject (example:Duration(seconds=604800)for 7 days)expire_time: A specific expirationdatetimeno_expiry=True: For branches that should never expire
from databricks.sdk import WorkspaceClient
from databricks.sdk.service.postgres import Branch, BranchSpec, Duration

w = WorkspaceClient()

# Create branch with 7-day expiration
branch_spec = BranchSpec(
    ttl=Duration(seconds=604800),  # 7 days
    source_branch="projects/my-project/branches/production"
)

branch = Branch(spec=branch_spec)

result = w.postgres.create_branch(
    parent="projects/my-project",
    branch=branch,
    branch_id="development"
).wait()

print(f"Branch created: {result.name}")
print(f"Expires: {result.status.expire_time}")
To create a permanent branch without expiration, set no_expiry=True in the BranchSpec:
# Create a permanent branch (no expiration)
branch_spec = BranchSpec(
    source_branch="projects/my-project/branches/production",
    no_expiry=True
)

branch = Branch(spec=branch_spec)

result = w.postgres.create_branch(
    parent="projects/my-project",
    branch=branch,
    branch_id="staging"
).wait()

print(f"Branch created: {result.name}")
Specify an expiration policy using one of the following options in BranchSpec:
setTtl(Duration): Acom.google.protobuf.Durationobject (example:Duration.newBuilder().setSeconds(604800L).build()for 7 days)setExpireTime(Timestamp): A specific expirationcom.google.protobuf.TimestampsetNoExpiry(true): For branches that should never expire
import com.databricks.sdk.WorkspaceClient;
import com.databricks.sdk.service.postgres.*;
import com.google.protobuf.Duration;

WorkspaceClient w = new WorkspaceClient();

// Create branch with 7-day expiration
BranchSpec branchSpec = new BranchSpec()
    .setTtl(Duration.newBuilder().setSeconds(604800L).build())  // 7 days
    .setSourceBranch("projects/my-project/branches/production");

Branch branch = new Branch().setSpec(branchSpec);

Branch result = w.postgres().createBranch(
    new CreateBranchRequest()
        .setParent("projects/my-project")
        .setBranch(branch)
        .setBranchId("development")
).waitForCompletion();

System.out.println("Branch created: " + result.getName());
System.out.println("Expires: " + result.getStatus().getExpireTime());
To create a permanent branch without expiration, set no_expiry=true in the BranchSpec:
// Create a permanent branch (no expiration)
BranchSpec branchSpec = new BranchSpec()
    .setSourceBranch("projects/my-project/branches/production")
    .setNoExpiry(true);

Branch branch = new Branch().setSpec(branchSpec);

Branch result = w.postgres().createBranch(
    new CreateBranchRequest()
        .setParent("projects/my-project")
        .setBranch(branch)
        .setBranchId("staging")
).waitForCompletion();

System.out.println("Branch created: " + result.getName());
Specify an expiration policy using one of the following fields in the spec JSON:
ttl: Duration string (example:"604800s"for 7 days)expire_time: ISO 8601 timestamp (example:"2025-01-15T10:30:00Z")no_expiry: true: For branches that should never expire
# Create a branch with 7-day expiration
databricks postgres create-branch projects/my-project development \
  --json '{
    "spec": {
      "source_branch": "projects/my-project/branches/production",
      "ttl": "604800s"
    }
  }'

# Create a permanent branch (no expiration)
databricks postgres create-branch projects/my-project staging \
  --json '{
    "spec": {
      "source_branch": "projects/my-project/branches/production",
      "no_expiry": true
    }
  }'
Specify an expiration policy using one of the following fields in the request body JSON:
ttl: Duration string (example:"604800s"for 7 days)expire_time: ISO 8601 timestamp (example:"2025-01-15T10:30:00Z")no_expiry: true: For branches that should never expire
# Create a branch with 7-day expiration
curl -X POST "$WORKSPACE/api/2.0/postgres/projects/my-project/branches?branch_id=development" \
  -H "Authorization: Bearer ${DATABRICKS_TOKEN}" \
  -H "Content-Type: application/json" \
  -d '{
    "spec": {
      "source_branch": "projects/my-project/branches/production",
      "ttl": "604800s"
    }
  }' | jq

# Create a permanent branch (no expiration)
curl -X POST "$WORKSPACE/api/2.0/postgres/projects/my-project/branches?branch_id=staging" \
  -H "Authorization: Bearer ${DATABRICKS_TOKEN}" \
  -H "Content-Type: application/json" \
  -d '{
    "spec": {
      "source_branch": "projects/my-project/branches/production",
      "no_expiry": true
    }
  }' | jq
View branches
View in UI
To view all branches in your Lakebase project, select your project in the Lakebase App and navigate to Branches in the left navigation.
The branches table displays key information about each branch:
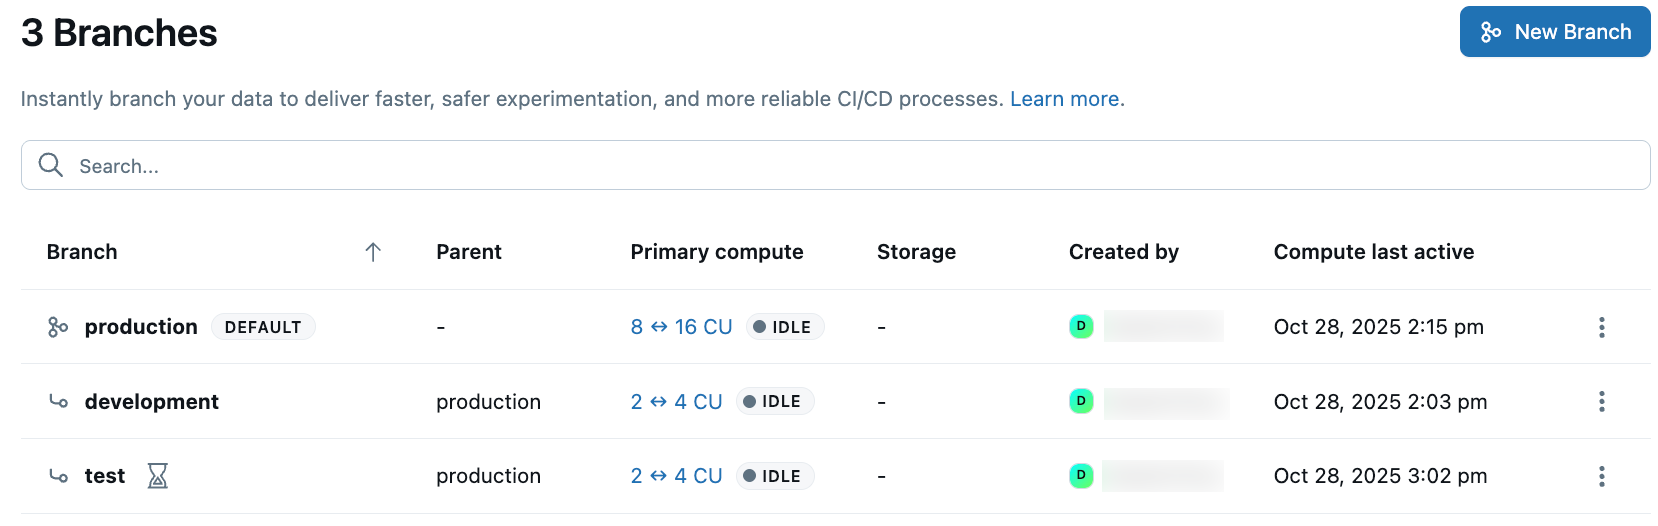
The branches page shows a comprehensive table with information about each branch in your project:
Column | Description |
|---|---|
Branch | The branch name. The default branch shows a "DEFAULT" label. |
Parent | Indicates the parent branch from which this branch was created, helping you track your branch hierarchy. |
Active time | Number of hours the branch's compute has been active. |
Primary compute | Shows the current compute size and status (such as IDLE or ACTIVE) for the branch's compute. |
Data size | The size of the branch's data. Doesn't include history. |
Created by | The user or service that created the branch. |
Last active | Shows when the branch's compute was last active. |
Click any branch in the table to view the branch overview page, which displays detailed information about the selected branch:
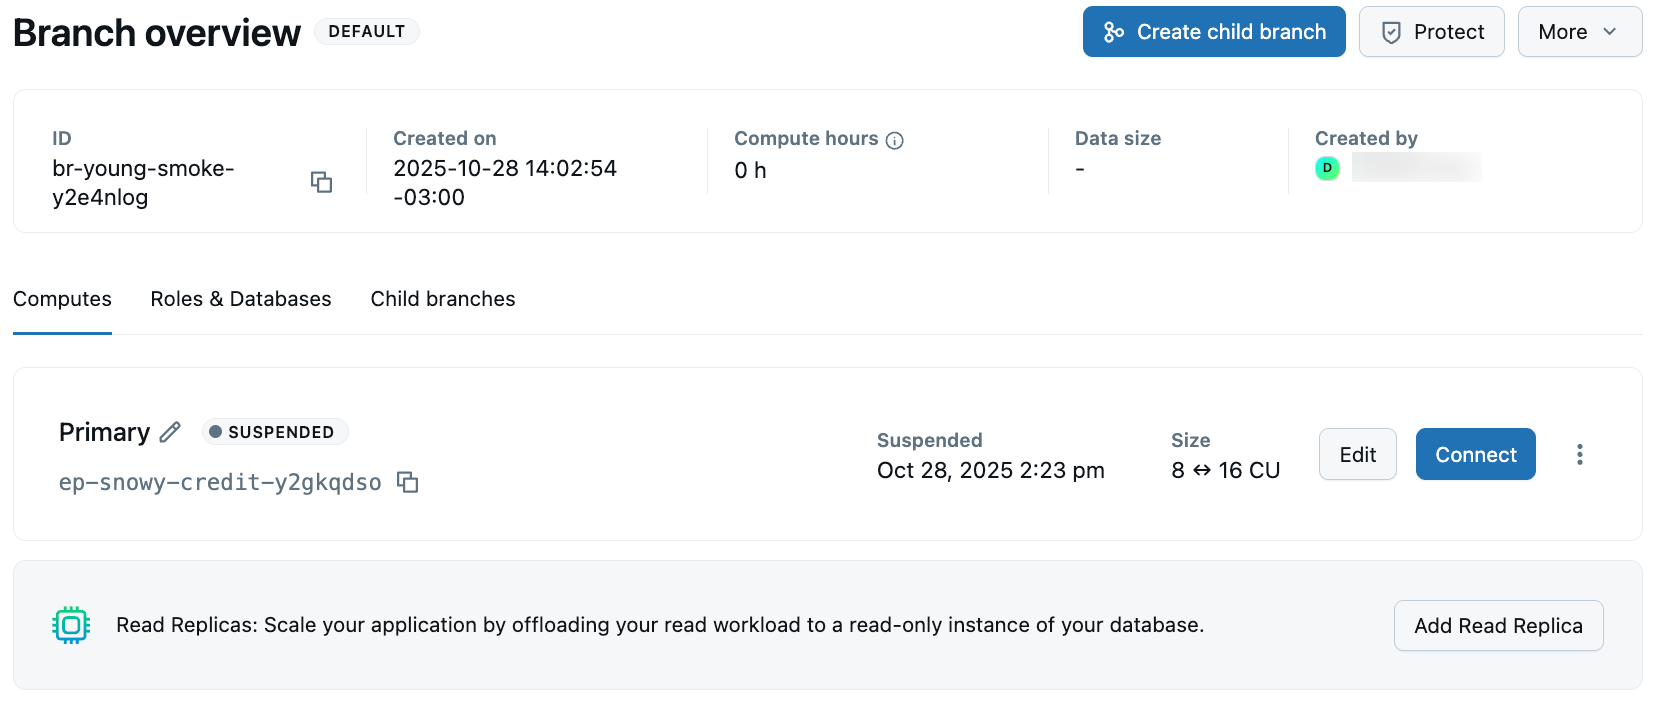
The branch overview page displays detailed information at the top, including key metrics and metadata:
Field | Description |
|---|---|
ID | The unique branch identifier (with br- prefix) |
Created on | The date and time when the branch was created |
Compute hours | Total compute hours used by the branch |
Active hours | Compute hours used since a specific date |
Data size | The size of the branch's data (doesn't include history) |
Created by | The user who created the branch |
The branch overview page includes several tabs for managing different aspects of the branch:
Tab | Description |
|---|---|
Computes | View and manage the primary compute for the branch. See Manage computes. |
Roles & Databases | Manage database roles and databases associated with the branch. See Manage databases and Manage roles. |
Child branches | View any branches that were created from this branch |
Get a branch programmatically
To get details about a specific branch using the Postgres API:
- Python SDK
- Java SDK
- CLI
- curl
from databricks.sdk import WorkspaceClient

w = WorkspaceClient()

# Get branch details
branch = w.postgres.get_branch(
    name="projects/my-project/branches/development"
)

print(f"Branch: {branch.name}")
print(f"Protected: {branch.status.is_protected}")
print(f"Default: {branch.status.default}")
print(f"State: {branch.status.current_state}")
print(f"Size: {branch.status.logical_size_bytes} bytes")
import com.databricks.sdk.WorkspaceClient;
import com.databricks.sdk.service.postgres.Branch;

WorkspaceClient w = new WorkspaceClient();

// Get branch details
Branch branch = w.postgres().getBranch("projects/my-project/branches/development");

System.out.println("Branch: " + branch.getName());
System.out.println("Protected: " + branch.getStatus().getIsProtected());
System.out.println("Default: " + branch.getStatus().getDefault());
System.out.println("State: " + branch.getStatus().getCurrentState());
System.out.println("Size: " + branch.getStatus().getLogicalSizeBytes() + " bytes");
# Get branch details
databricks postgres get-branch projects/my-project/branches/development --output json | jq
curl "$WORKSPACE/api/2.0/postgres/projects/my-project/branches/development" \
  -H "Authorization: Bearer ${DATABRICKS_TOKEN}" | jq
List programmatically
To list all branches in a project using the Postgres API:
- Python SDK
- Java SDK
- CLI
- curl
from databricks.sdk import WorkspaceClient

w = WorkspaceClient()

# List all branches in a project
project_name = "projects/my-project"
branches = list(w.postgres.list_branches(parent=project_name))

for branch in branches:
    print(f"Branch: {branch.name}")
    print(f"  Default: {branch.status.default}")
    print(f"  Protected: {branch.status.is_protected}")
import com.databricks.sdk.WorkspaceClient;
import com.databricks.sdk.service.postgres.*;

WorkspaceClient w = new WorkspaceClient();

// List all branches in a project
String projectName = "projects/my-project";

for (Branch branch : w.postgres().listBranches(projectName)) {
    System.out.println("Branch: " + branch.getName());
    System.out.println("  Default: " + branch.getStatus().getDefault());
    System.out.println("  Protected: " + branch.getStatus().getIsProtected());
}
# List all branches in a project
databricks postgres list-branches projects/my-project --output json | jq
curl "$WORKSPACE/api/2.0/postgres/projects/my-project/branches" \
  -H "Authorization: Bearer ${DATABRICKS_TOKEN}" \
  -H "Content-Type: application/json" | jq
Compare branch schemas
Review schema differences between a child branch and its parent branch before merging changes. Schema diff shows a side-by-side SQL DDL comparison that highlights added, removed, or modified database objects such as tables, columns, indexes, and constraints.
To compare schemas between branches:
- Navigate to a child branch overview page in the Lakebase App.
- In the Parent branch section, click Schema diff.
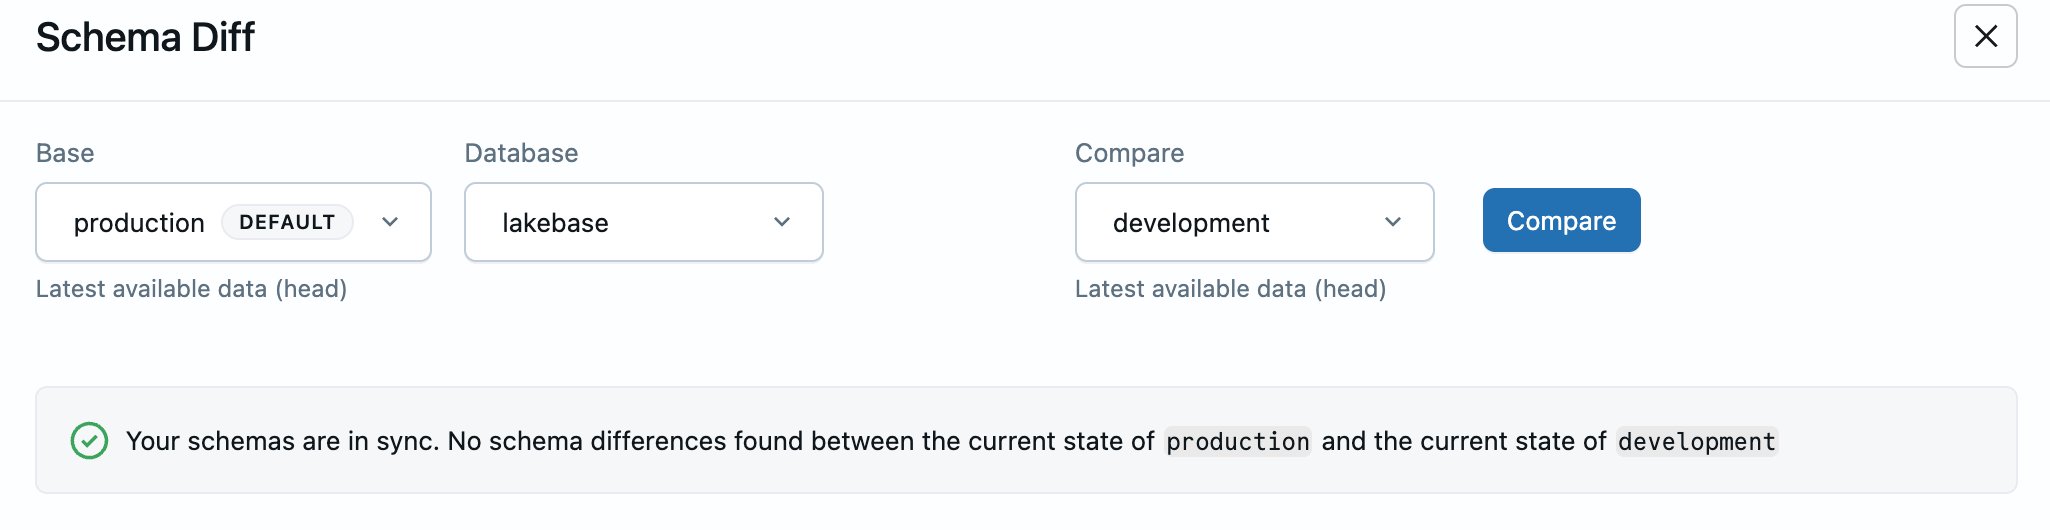
- In the Schema Diff dialog:
- Base: Select the base branch for comparison (defaults to parent branch).
- Database: Select the database to compare.
- Compare: Select the branch to compare against base (defaults to current child branch).
- Click Compare.
Understand the diff results
When schemas differ, the diff view displays a side-by-side comparison of SQL DDL statements:
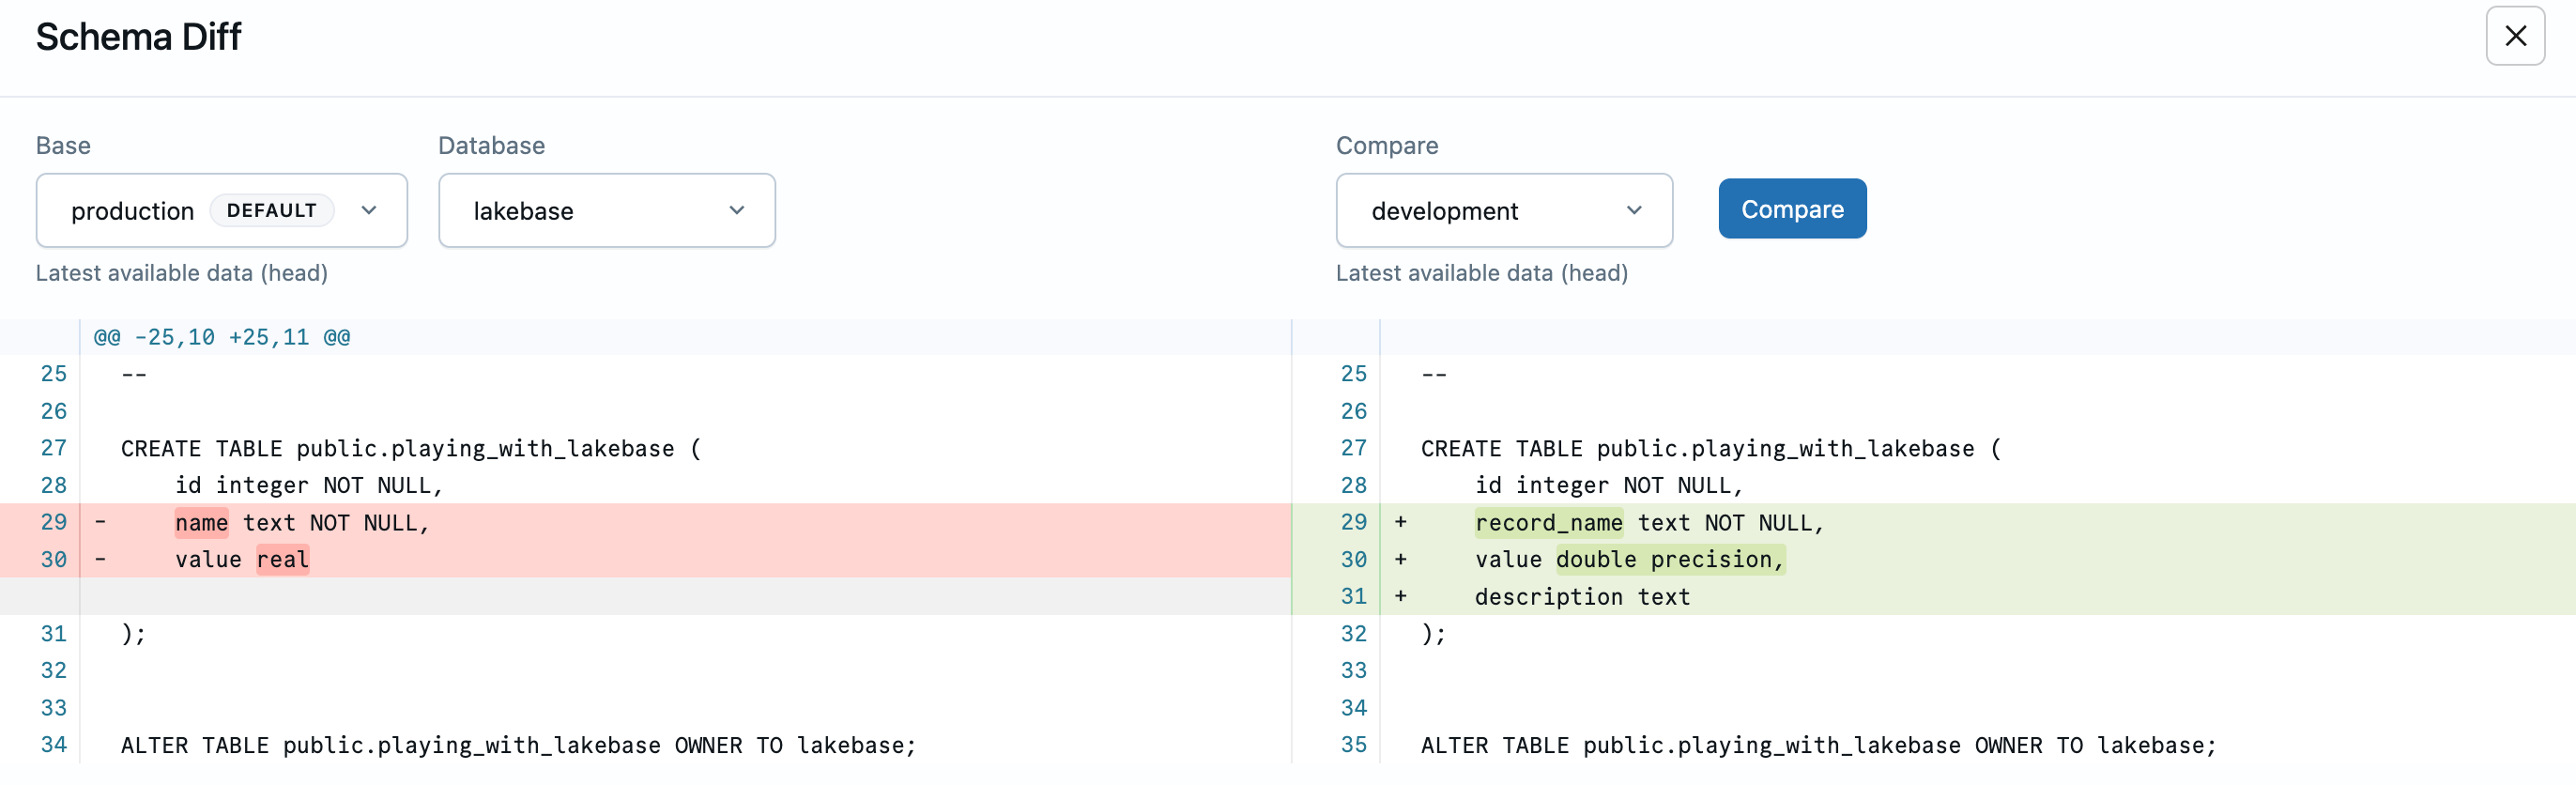
Red lines show what was removed or changed from the base branch, green lines show what was added or changed in the compare branch. The diff captures changes to table definitions, columns, constraints, indexes, and other database objects.
If no differences exist between the selected branches, you see a success message confirming the schemas are in sync:
Use schema diff for pre-merge validation, development tracking, drift detection, and change documentation. To see schema diff in a complete development workflow, see Tutorial: Branch-based development workflow.
Schema diff compares database schema (DDL) only, not data content. Comparison uses the latest available data (head) from both branches.
Update branch settings
Rename a branch
Renaming a branch is not currently supported from the UI or API. The Rename branch option appears in the branch ![]() menu in the UI but is disabled.
menu in the UI but is disabled.
Set as default
Each Lakebase project is created with a default branch called production, but you can designate any branch as the default. The default branch is exempt from the concurrently active compute limit, ensuring it remains available at all times.
Setting a branch as default is not supported using the API.
To set a branch as default:
- Navigate to your project's Branches page in the Lakebase App.
- Click the
 menu next to the branch you want to set as default.
 - Select Set as default and confirm the operation.
Set as protected
Protected branches help you safeguard critical branches from accidental modifications or deletions. Protected branches cannot be deleted, reset, or archived due to inactivity. Projects with protected branches and their associated computes also cannot be deleted.
To set a branch as protected:
- UI
- Python SDK
- Java SDK
- CLI
- curl
- Navigate to Branches in the Lakebase App and select the branch you want to protect.
- Click Protect and confirm your selection.

Your branch is now designated as protected, as indicated by the shield icon that appears next to the branch name.
from databricks.sdk import WorkspaceClient
from databricks.sdk.service.postgres import Branch, BranchSpec, FieldMask

w = WorkspaceClient()

# Set a branch as protected
branch_name = "projects/my-project/branches/production"

updated_spec = BranchSpec(is_protected=True)
updated_branch = Branch(name=branch_name, spec=updated_spec)
update_mask = FieldMask(field_mask=["spec.is_protected"])

update_op = w.postgres.update_branch(
    name=branch_name,
    branch=updated_branch,
    update_mask=update_mask
)

# Wait for the update to complete
result = update_op.wait()
print(f"Branch {result.name} is now protected: {result.status.is_protected}")
To remove protection, set is_protected=False in the BranchSpec.
import com.databricks.sdk.WorkspaceClient;
import com.databricks.sdk.service.postgres.*;
import com.google.protobuf.FieldMask;

WorkspaceClient w = new WorkspaceClient();

// Set a branch as protected
String branchName = "projects/my-project/branches/production";

BranchSpec updatedSpec = new BranchSpec().setIsProtected(true);
Branch updatedBranch = new Branch()
    .setName(branchName)
    .setSpec(updatedSpec);
FieldMask updateMask = FieldMask.newBuilder()
    .addPaths("spec.is_protected")
    .build();

Branch result = w.postgres().updateBranch(
    new UpdateBranchRequest()
        .setName(branchName)
        .setBranch(updatedBranch)
        .setUpdateMask(updateMask)
).waitForCompletion();

System.out.println("Branch " + result.getName() + " is now protected: " +
    result.getStatus().getIsProtected());
To remove protection, set setIsProtected(false) in the BranchSpec.
# Set a branch as protected
databricks postgres update-branch projects/my-project/branches/production spec.is_protected \
  --json '{
    "spec": {
      "is_protected": true
    }
  }'
To remove protection, set "is_protected": false in the JSON.
curl -X PATCH "$WORKSPACE/api/2.0/postgres/projects/my-project/branches/production?update_mask=spec.is_protected" \
  -H "Authorization: Bearer ${DATABRICKS_TOKEN}" \
  -H "Content-Type: application/json" \
  -d '{
    "name": "projects/my-project/branches/production",
    "spec": {
      "is_protected": true
    }
  }' | jq
To remove protection, set "is_protected": false in the request body.
For complete details about protected branches, including password management for child branches, see Protected branches.
Update expiration
You can set an expiration timestamp when creating a branch or update it later.
When creating a branch
- Navigate to your project's Branches page in the Lakebase App.
- Click Create branch, enter a branch name (required), configure your branch options, and select an Auto-delete option (a preset, a custom value up to 30 days, or Never for no expiration).
- Click Create.
Update branch expiration
To update or remove an expiration timestamp on an existing branch:
- UI
- Python SDK
- Java SDK
- CLI
- curl
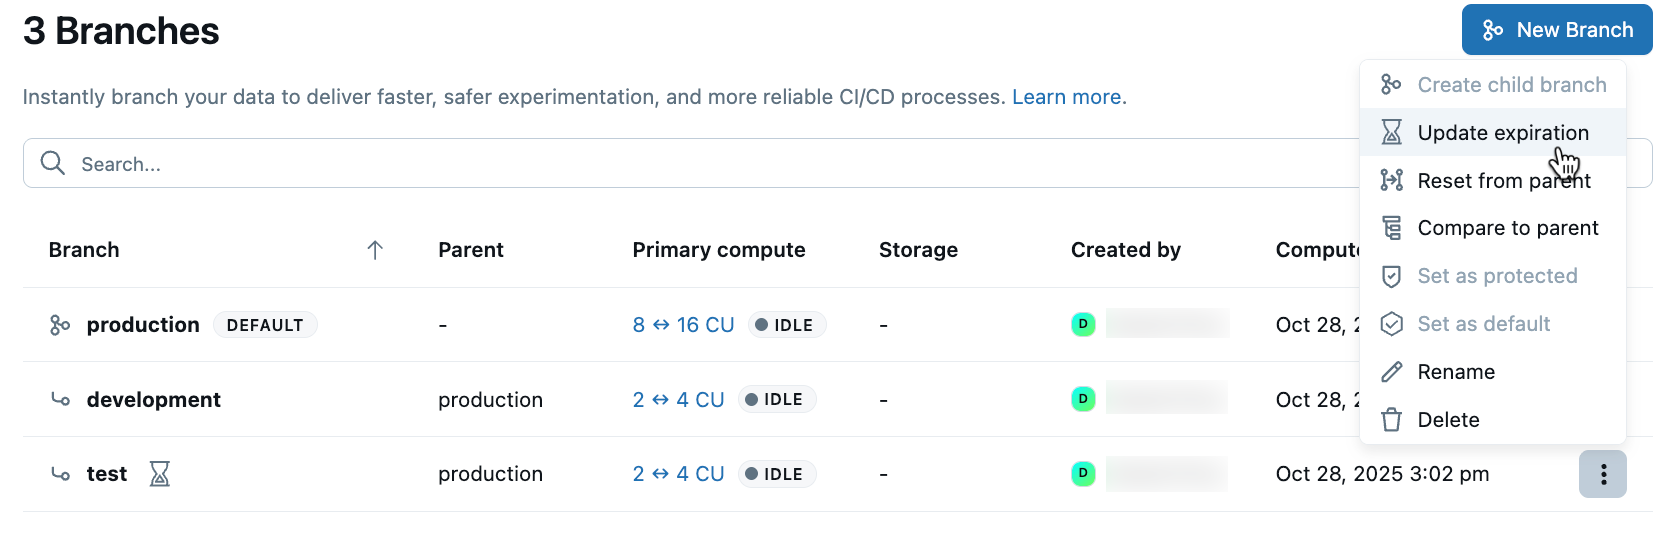
- Navigate to your project's Branches page in the Lakebase App.
- Click the menu next to the branch and select Update expiration.
- Select a new date and time or uncheck Expire branch on to remove the expiration, then click Save.
from databricks.sdk import WorkspaceClient
from databricks.sdk.service.postgres import Branch, BranchSpec, Duration, FieldMask

w = WorkspaceClient()

# Update branch expiration to 14 days
branch_name = "projects/my-project/branches/development"

branch_spec = BranchSpec(
    is_protected=False,
    ttl=Duration(seconds=1209600)  # 14 days
)
branch = Branch(
    name=branch_name,
    spec=branch_spec
)

result = w.postgres.update_branch(
    name=branch_name,
    branch=branch,
    update_mask=FieldMask(field_mask=["spec.is_protected", "spec.expiration"])
).wait()

print(f"Updated expiration: {result.status.expire_time}")
To remove expiration, set no_expiry=True in the BranchSpec and include "spec.expiration" in the update mask.
import com.databricks.sdk.WorkspaceClient;
import com.databricks.sdk.service.postgres.*;
import com.google.protobuf.Duration;
import com.google.protobuf.FieldMask;

WorkspaceClient w = new WorkspaceClient();

// Update branch expiration to 14 days
String branchName = "projects/my-project/branches/development";

BranchSpec branchSpec = new BranchSpec()
    .setIsProtected(false)
    .setTtl(Duration.newBuilder().setSeconds(1209600L).build());  // 14 days

Branch branch = new Branch()
    .setName(branchName)
    .setSpec(branchSpec);

Branch result = w.postgres().updateBranch(
    new UpdateBranchRequest()
        .setName(branchName)
        .setBranch(branch)
        .setUpdateMask(FieldMask.newBuilder()
            .addPaths("spec.is_protected")
            .addPaths("spec.expiration")
            .build())
).waitForCompletion();

System.out.println("Updated expiration: " + result.getStatus().getExpireTime());
To remove expiration, set setNoExpiry(true) in the BranchSpec and include "spec.expiration" in the update mask.
# Update branch expiration to 14 days
databricks postgres update-branch projects/my-project/branches/development spec.is_protected,spec.expiration \
  --json '{
    "spec": {
      "is_protected": false,
      "ttl": "1209600s"
    }
  }'
To remove expiration, set "no_expiry": true in the JSON.
# Update branch expiration to 14 days
curl -X PATCH "$WORKSPACE/api/2.0/postgres/projects/my-project/branches/development?update_mask=spec.is_protected,spec.expiration" \
  -H "Authorization: Bearer ${DATABRICKS_TOKEN}" \
  -H "Content-Type: application/json" \
  -d '{
    "name": "projects/my-project/branches/development",
    "spec": {
      "is_protected": false,
      "ttl": "1209600s"
    }
  }' | jq
To remove expiration, set "no_expiry": true in the request body.
View branch expiration
To check if a branch has an expiration set, navigate to your project's Branches page and click on the desired branch. The expiration information is displayed in the branch details.
Reset branch from parent
You can reset a branch to instantly update it with the latest schema and data from its parent branch. This helps you recover from issues, start on new feature development, or keep the different branches in your environment in sync.
Example scenario
When working with branches, you might find yourself in a situation where you need to update your working branch to the latest data from your parent branch.
For example, let's say you have two child branches staging and development forked from your production branch. You've been working on the development branch and find it's now too far out of date with production.
You have no schema changes in development to consider or preserve; you just want a quick refresh of the data. You can perform a clean, instant reset to the latest data from the parent in a single operation, saving you the complication of manually creating and restoring branches.
How Reset from parent works
When you reset a branch to its parent, the data and schema is completely replaced with the latest data and schema from its parent.
Key points:
- You can only reset a branch to the latest data from its parent. Point-in-time resets based on timestamp are possible using point-in-time restore, a similar feature with some differences: point-in-time restore creates a new branch and is intended more for data recovery than development workflow.
- This reset is a complete overwrite, not a refresh or a merge. Any local changes made to the child branch are lost during this reset.
- Existing connections are temporarily interrupted during the reset. However, your connection details don't change. All connections are re-established as soon as the reset is done.
- Root branches (like your project's
productionbranch) can't be reset because they have no parent branch to reset to.
Reset a branch from its parent
To reset a branch to its parent:
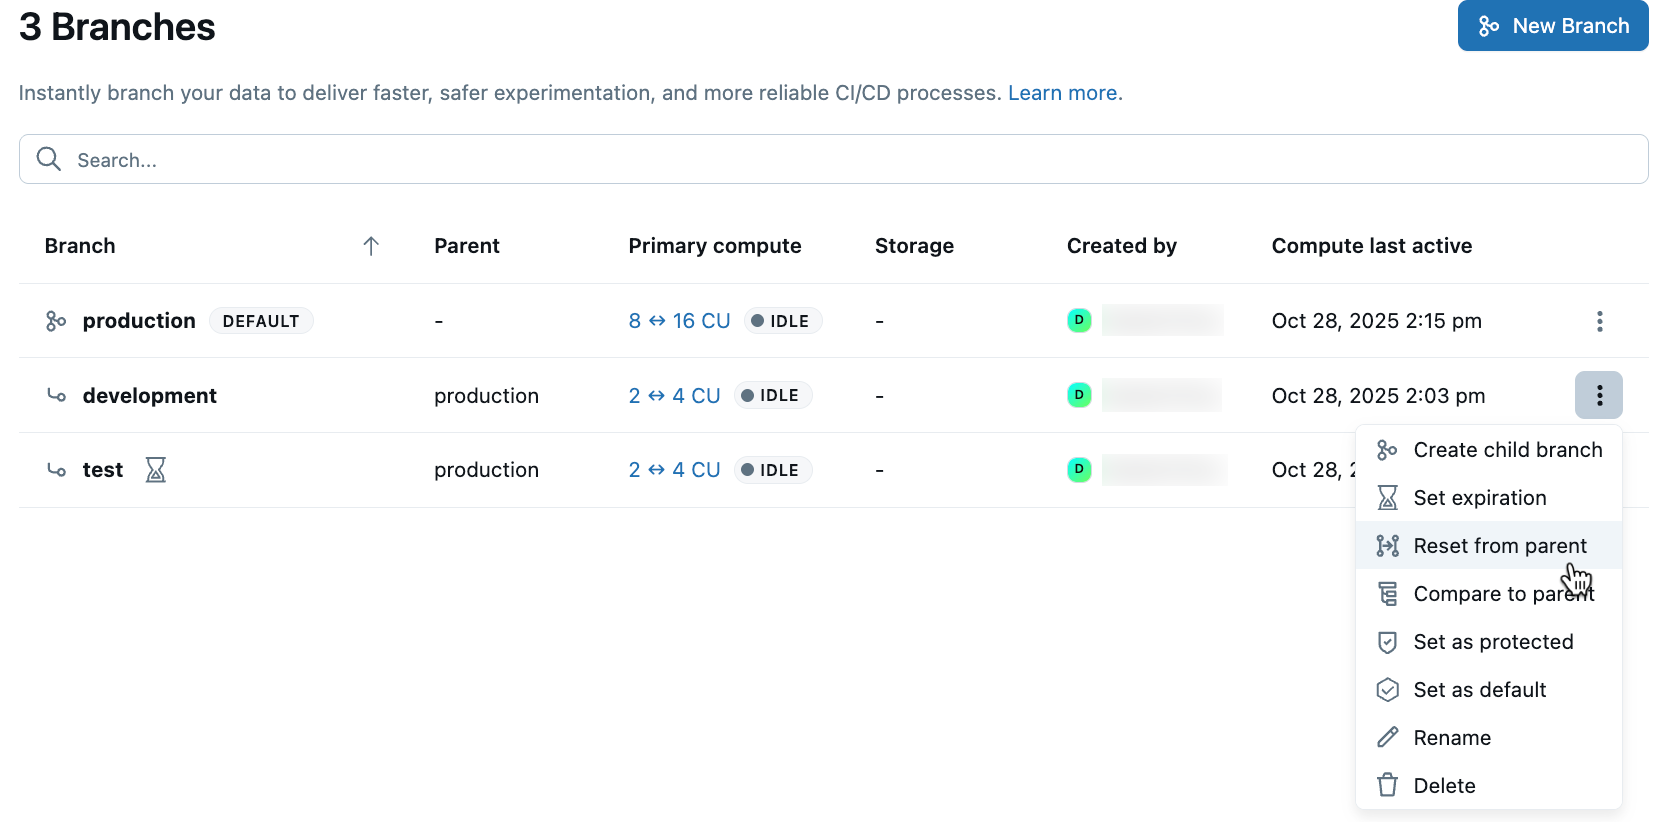
- Navigate to your project's Branches page in the Lakebase App.
- Click the menu next to the branch you want to reset and select Reset from parent.
- Confirm the reset operation.
If the branch has child branches of its own, resetting is blocked. You must delete the child branches first before you can reset the parent branch.
Delete a branch
Deleting a branch is a permanent action that cannot be undone. Deleting a branch also removes:
- All databases that belong to the branch
- All roles associated with the branch
- The compute resources associated with the branch
- All data and changes specific to that branch
You cannot delete a branch that has child branches. The child branches must be deleted first.
To delete a branch:
- UI
- Python SDK
- Java SDK
- CLI
- curl
- Navigate to your project's Branches page in the Lakebase App.
- Click the menu next to the branch you want to delete and select Delete branch.
- Enter the branch name to confirm deletion and click Delete.
from databricks.sdk import WorkspaceClient

w = WorkspaceClient()

# Delete branch
w.postgres.delete_branch(
    name="projects/my-project/branches/development"
).wait()

print("Branch deleted")
The delete operation is asynchronous. The .wait() method blocks until the deletion is complete. All branch resources (databases, roles, computes, and data) will be permanently deleted.
import com.databricks.sdk.WorkspaceClient;

WorkspaceClient w = new WorkspaceClient();

// Delete branch
w.postgres().deleteBranch("projects/my-project/branches/development")
    .waitForCompletion();

System.out.println("Branch deleted");
The delete operation is asynchronous. The waitForCompletion() method blocks until the deletion is complete. All branch resources (databases, roles, computes, and data) will be permanently deleted.
# Delete a branch
databricks postgres delete-branch projects/my-project/branches/development
This command returns immediately. The branch and all its resources will be permanently deleted.
curl -X DELETE "$WORKSPACE/api/2.0/postgres/projects/my-project/branches/development" \
  -H "Authorization: Bearer ${DATABRICKS_TOKEN}" | jq
Response:
{
  "name": "projects/my-project/branches/development/operations/...",
  "done": true,
  "response": {
    "@type": "type.googleapis.com/google.protobuf.Empty"
  }
}
Unarchived branches limit
The unarchived branches limit caps how many branches can remain in an active (unarchived) state at the same time. When branches are inactive for an extended period, they may be automatically archived to optimize resource usage. The limit is 10 unarchived branches per project.
Archived branches can be unarchived when needed, but the total number of active unarchived branches cannot exceed this limit.
Important: Protected branches and the default branch are exempt from automatic archiving and remain available at all times.