Manage computes
A compute is a virtualized service that runs Postgres for your Lakebase projects. Each branch has one primary (read-write) compute. A compute is required to connect to a branch and access its data. For an overview of how computes and endpoints relate, see Computes and endpoints.
Understanding computes
Compute overview
Compute resources provide the processing power and memory needed to execute queries, manage connections, and handle database operations. Each project has a primary read-write compute for its default branch.
To connect to a database in a branch, you must use a compute associated with that branch. Larger computes consume more compute hours over the same period of active time than smaller computes.
Compute identifiers
Each compute has three identifiers, accessible from the Get ID menu on the Computes tab:
Identifier | Source | Example | Used in |
|---|---|---|---|
Name | The endpoint ID, set to |
| API resource path ( |
UID | System-generated |
| Connection hostname |
Resource name | Full API path |
| API calls |
The hostname in your connection string uses the UID, not the compute name.
Compute sizing
Available compute sizes
Lakebase Postgres supports the following compute sizes:
- Autoscale computes: 0.5 CU to 64 CU (0.5, then integer increments: 1, 2, 3... 64)
- Larger fixed-size computes: 65 CU to 112 CU
The Lakebase App displays a subset of commonly used sizes. Using the Postgres API, Terraform, Databricks Asset Bundles, or the Databricks SDK, you can set any integer CU value: 1–64 for autoscaling computes, and 65–112 for larger fixed-size computes.
What's in a Compute Unit?
Each Compute Unit (CU) allocates approximately 2 GB of RAM to the database instance, along with all associated CPU and local SSD resources. Scaling up increases these resources linearly. Postgres distributes the allocated memory across multiple components:
- Database caches
- Worker memory
- Other processes with fixed memory requirements
Performance varies based on data size and query complexity. Before scaling, test and optimize queries. Storage scales automatically.
Lakebase Provisioned vs Autoscaling: In Lakebase Provisioned, each Compute Unit allocated approximately 16 GB of RAM. In Lakebase Autoscaling, each CU allocates 2 GB of RAM. This change provides more granular scaling options and cost control.
Compute specifications
Compute Units | RAM | Max Connections |
|---|---|---|
0.5 CU | ~1 GB | 105 |
1 CU | ~2 GB | 218 |
2 CU | ~4 GB | 443 |
3 CU | ~6 GB | 668 |
4 CU | ~8 GB | 894 |
5 CU | ~10 GB | 1119 |
6 CU | ~12 GB | 1344 |
7 CU | ~14 GB | 1570 |
8 CU | ~16 GB | 1795 |
9 CU | ~18 GB | 2020 |
10 CU | ~20 GB | 2246 |
12 CU | ~24 GB | 2696 |
14 CU | ~28 GB | 3147 |
16 CU | ~32 GB | 3597 |
24 CU | ~48 GB | 3993 |
28 CU | ~56 GB | 3993 |
32 CU | ~64 GB | 3993 |
36 CU | ~72 GB | 3993 |
40 CU | ~80 GB | 3993 |
44 CU | ~88 GB | 3993 |
48 CU | ~96 GB | 3993 |
52 CU | ~104 GB | 3993 |
56 CU | ~112 GB | 3993 |
60 CU | ~120 GB | 3993 |
64 CU | ~128 GB | 3993 |
72 CU | ~144 GB | 3993 |
80 CU | ~160 GB | 3993 |
88 CU | ~176 GB | 3993 |
96 CU | ~192 GB | 3993 |
104 CU | ~208 GB | 3993 |
112 CU | ~224 GB | 3993 |
Connection limits for autoscaling computes: When autoscaling is enabled, the maximum number of connections is determined by the smaller of your maximum CU and 8× your minimum CU. For example, if you configure autoscaling between 2-8 CU, your connection limit is 1,795 (the limit for 8 CU).
Read replica connection limits: Read replica compute connection limits are synchronized with your primary read-write compute settings. See Manage read replicas for details.
Some connections are reserved for system and administrative use. For this reason, SHOW max_connections may show a higher value than the Max Connections shown in the table above or in the Edit compute drawer in the Lakebase App. The values in the table and drawer reflect the actual number of connections available for direct use, while SHOW max_connections includes reserved connections.
Sizing guidance
When selecting a compute size, consider these factors:
Factor | Recommendation |
|---|---|
Query complexity | Complex analytical queries benefit from larger compute sizes |
Concurrent connections | More connections require additional CPU and memory |
Data volume | Larger datasets may need more memory for optimal performance |
Response time | Critical applications may require larger computes for consistent performance |
Optimal sizing strategy
Select a compute size based on your data requirements:
- Full dataset in memory: Choose a compute size that can hold your entire dataset in memory for best performance
- Working set in memory: For large datasets, ensure your frequently accessed data fits in memory
- Connection limits: Select a size that supports your anticipated maximum concurrent connections
Autoscaling
Lakebase supports both fixed-size and autoscaling compute configurations. Autoscaling dynamically adjusts compute resources based on workload demand, optimizing both performance and cost.
Configuration Type | Description |
|---|---|
Fixed size (0.5-64 CU) | Select a fixed compute size that doesn't scale with workload demand. Available for computes from 0.5 CU to 64 CU |
Autoscaling (0.5-64 CU) | Use a slider to specify minimum and maximum compute sizes. Lakebase scales up and down within these boundaries based on current load. Available for computes up to 64 CU (128 GB) |
Larger fixed-size computes (80-112 CU) | Select a larger fixed-size compute of up to 112 CU. These larger computes are available as fixed sizes only and do not support autoscaling |
Autoscaling limit: Autoscaling is supported for computes up to 64 CU (128 GB). For workloads requiring more than 64 CU, larger fixed-size computes of 80, 96, or 112 CU are available.
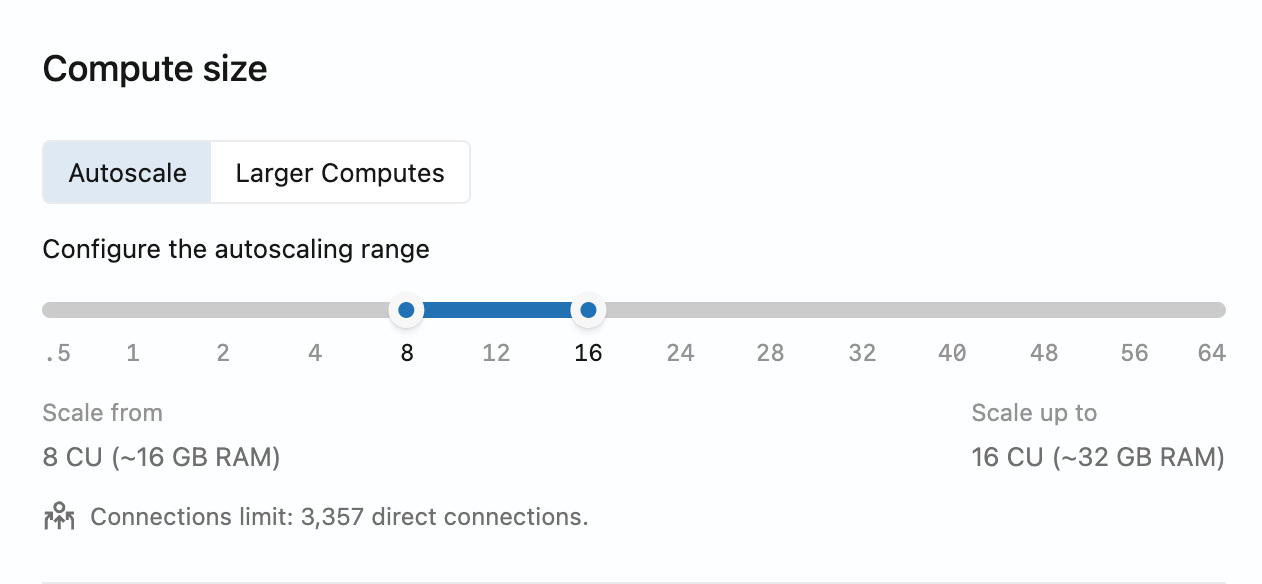
Configuring autoscaling
To enable or adjust autoscaling for a compute, edit the compute and use the slider to set minimum and maximum compute sizes.
For an overview of how autoscaling works, see Autoscaling.
Autoscaling considerations
For optimal autoscaling performance:
- Set your minimum compute size large enough to cache your working set in memory
- Consider that poor performance may occur until the compute scales up and caches your data
- Your connection limits are based on the smaller of your maximum CU and 8× your minimum CU
Autoscaling range constraints: The difference between your maximum and minimum compute sizes cannot exceed 16 CU (that is, max - min ≤ 16 CU). For example, you can configure autoscaling from 8 to 24 CU, or from 48 to 64 CU, but not from 0.5 to 32 CU (which would be a 31.5 CU range). The slider in the Lakebase App enforces this constraint automatically. For workloads requiring more than 64 CU, use larger fixed-size computes up to 112 CU.
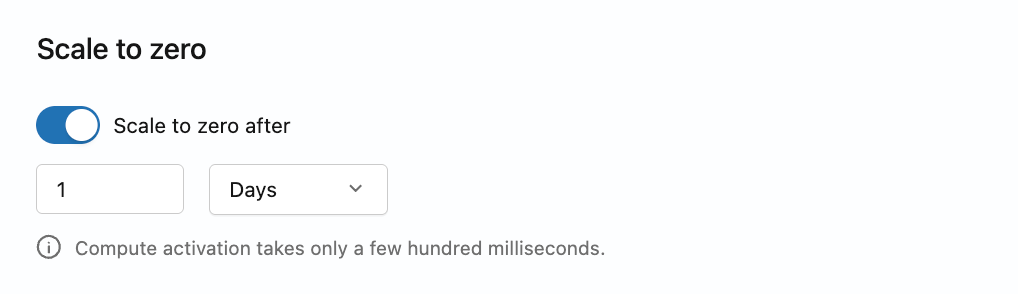
Scale to zero
Lakebase's scale-to-zero feature automatically transitions a compute into an idle state after a period of inactivity, reducing costs for databases that aren't continuously active.
Configuration | Description |
|---|---|
Scale to zero enabled | Compute automatically suspends after inactivity to reduce costs |
Scale to zero disabled | Maintain an "always-active" compute that eliminates startup latency |
For an overview of how scale to zero works, see Scale to zero. To configure scale to zero for a compute, see Configure scale to zero.
Create and manage computes
View computes
View in UI
To view the computes for a branch, navigate to your project's Branches page in the Lakebase App and select a branch to view its Computes tab.
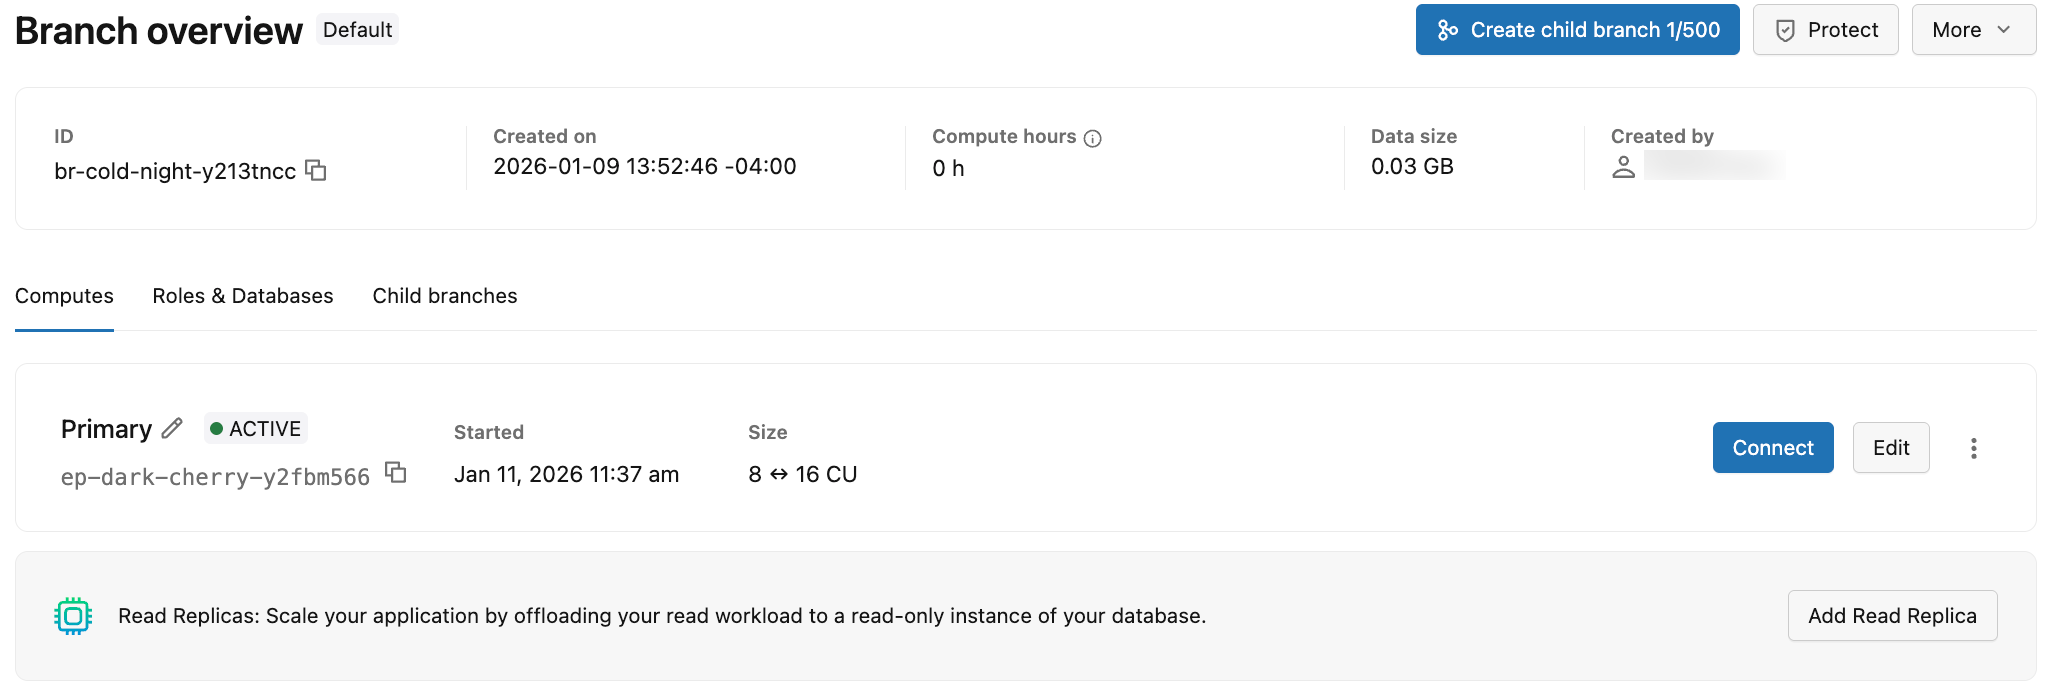
The Computes tab displays information about all computes associated with the branch. The information shown on the Computes tab is outlined in the following table.
Detail | Description |
|---|---|
Compute type | The compute type is either Primary (read-write) or Read Replica (read only). A branch can have a single Primary (read-write) and multiple Read Replica (read only) computes. |
Status | Current status: Active or Suspended (when the compute has been suspended due to scale to zero). Shows the date and time the compute was suspended. |
UID | The system-generated unique identifier for the compute, which starts with an |
Size | The compute size in compute units (CU). Shows a single CU value (for example, 8 CU) for fixed-size computes. Shows a range (for example, 8-16) for computes with autoscaling enabled. |
Last active | The date and time when the compute was last active. |
For each compute, you can:
- Click Connect to open a connection dialog with connection details for the branch associated with the compute. The dialog includes a Connection pooling toggle for native Postgres password roles. See Connect to your database and Use connection pooling.
- Click Edit to modify the compute size (fixed or autoscaling range) and configure scale-to-zero settings. See Edit a compute.
- Click the menu icon to access additional options:
- Monitor activity: View compute activity and performance metrics. See Monitor your database.
- Restart compute: Restart the compute to resolve connection issues or apply configuration changes. See Restart a compute.
To add a read replica compute to the branch, click Add Read Replica. Read replicas are read-only computes that enable horizontal scaling by letting you offload read workload from your primary compute. See Read replicas and Manage read replicas.
Get a compute programmatically
To get details about a specific compute using the Postgres API:
- Python SDK
- Java SDK
- CLI
- curl
from databricks.sdk import WorkspaceClient

w = WorkspaceClient()

# Get endpoint details
endpoint = w.postgres.get_endpoint(
    name="projects/my-project/branches/production/endpoints/my-compute"
)

print(f"Endpoint: {endpoint.name}")
print(f"Type: {endpoint.status.endpoint_type}")
print(f"State: {endpoint.status.current_state}")
print(f"Host: {endpoint.status.hosts.host}")
print(f"Min CU: {endpoint.status.autoscaling_limit_min_cu}")
print(f"Max CU: {endpoint.status.autoscaling_limit_max_cu}")
In the SDK, access the host via endpoint.status.hosts.host (not endpoint.status.host).
import com.databricks.sdk.WorkspaceClient;
import com.databricks.sdk.service.postgres.Endpoint;

WorkspaceClient w = new WorkspaceClient();

// Get endpoint details
Endpoint endpoint = w.postgres().getEndpoint(
    "projects/my-project/branches/production/endpoints/my-compute"
);

System.out.println("Endpoint: " + endpoint.getName());
System.out.println("Type: " + endpoint.getStatus().getEndpointType());
System.out.println("State: " + endpoint.getStatus().getCurrentState());
System.out.println("Host: " + endpoint.getStatus().getHosts().getHost());
System.out.println("Min CU: " + endpoint.getStatus().getAutoscalingLimitMinCu());
System.out.println("Max CU: " + endpoint.getStatus().getAutoscalingLimitMaxCu());
# Get endpoint details
databricks postgres get-endpoint projects/my-project/branches/production/endpoints/my-compute --output json | jq
curl "$WORKSPACE/api/2.0/postgres/projects/my-project/branches/production/endpoints/my-compute" \
  -H "Authorization: Bearer ${DATABRICKS_TOKEN}" | jq
List computes programmatically
To list all computes and read replicas for a branch using the Postgres API:
- Python SDK
- Java SDK
- CLI
- curl
from databricks.sdk import WorkspaceClient

w = WorkspaceClient()

# List all endpoints for a branch
endpoints = list(w.postgres.list_endpoints(
    parent="projects/my-project/branches/production"
))

for endpoint in endpoints:
    print(f"Endpoint: {endpoint.name}")
    print(f"  Type: {endpoint.status.endpoint_type}")
    print(f"  State: {endpoint.status.current_state}")
    print(f"  Host: {endpoint.status.hosts.host}")
    print(f"  CU Range: {endpoint.status.autoscaling_limit_min_cu}-{endpoint.status.autoscaling_limit_max_cu}")
    print()
In the SDK, access the host via endpoint.status.hosts.host (not endpoint.status.host).
import com.databricks.sdk.WorkspaceClient;
import com.databricks.sdk.service.postgres.*;

WorkspaceClient w = new WorkspaceClient();

// List all endpoints for a branch
for (Endpoint endpoint : w.postgres().listEndpoints("projects/my-project/branches/production")) {
    System.out.println("Endpoint: " + endpoint.getName());
    System.out.println("  Type: " + endpoint.getStatus().getEndpointType());
    System.out.println("  State: " + endpoint.getStatus().getCurrentState());
    System.out.println("  Host: " + endpoint.getStatus().getHosts().getHost());
    System.out.println("  CU Range: " + endpoint.getStatus().getAutoscalingLimitMinCu() +
        "-" + endpoint.getStatus().getAutoscalingLimitMaxCu());
    System.out.println();
}
# List endpoints for a branch
databricks postgres list-endpoints projects/my-project/branches/production --output json | jq
curl "$WORKSPACE/api/2.0/postgres/projects/my-project/branches/production/endpoints" \
  -H "Authorization: Bearer ${DATABRICKS_TOKEN}" | jq
Typical branch configurations:
- 1 endpoint: Primary read-write compute only
- 2+ endpoints: Primary compute plus one or more read replicas
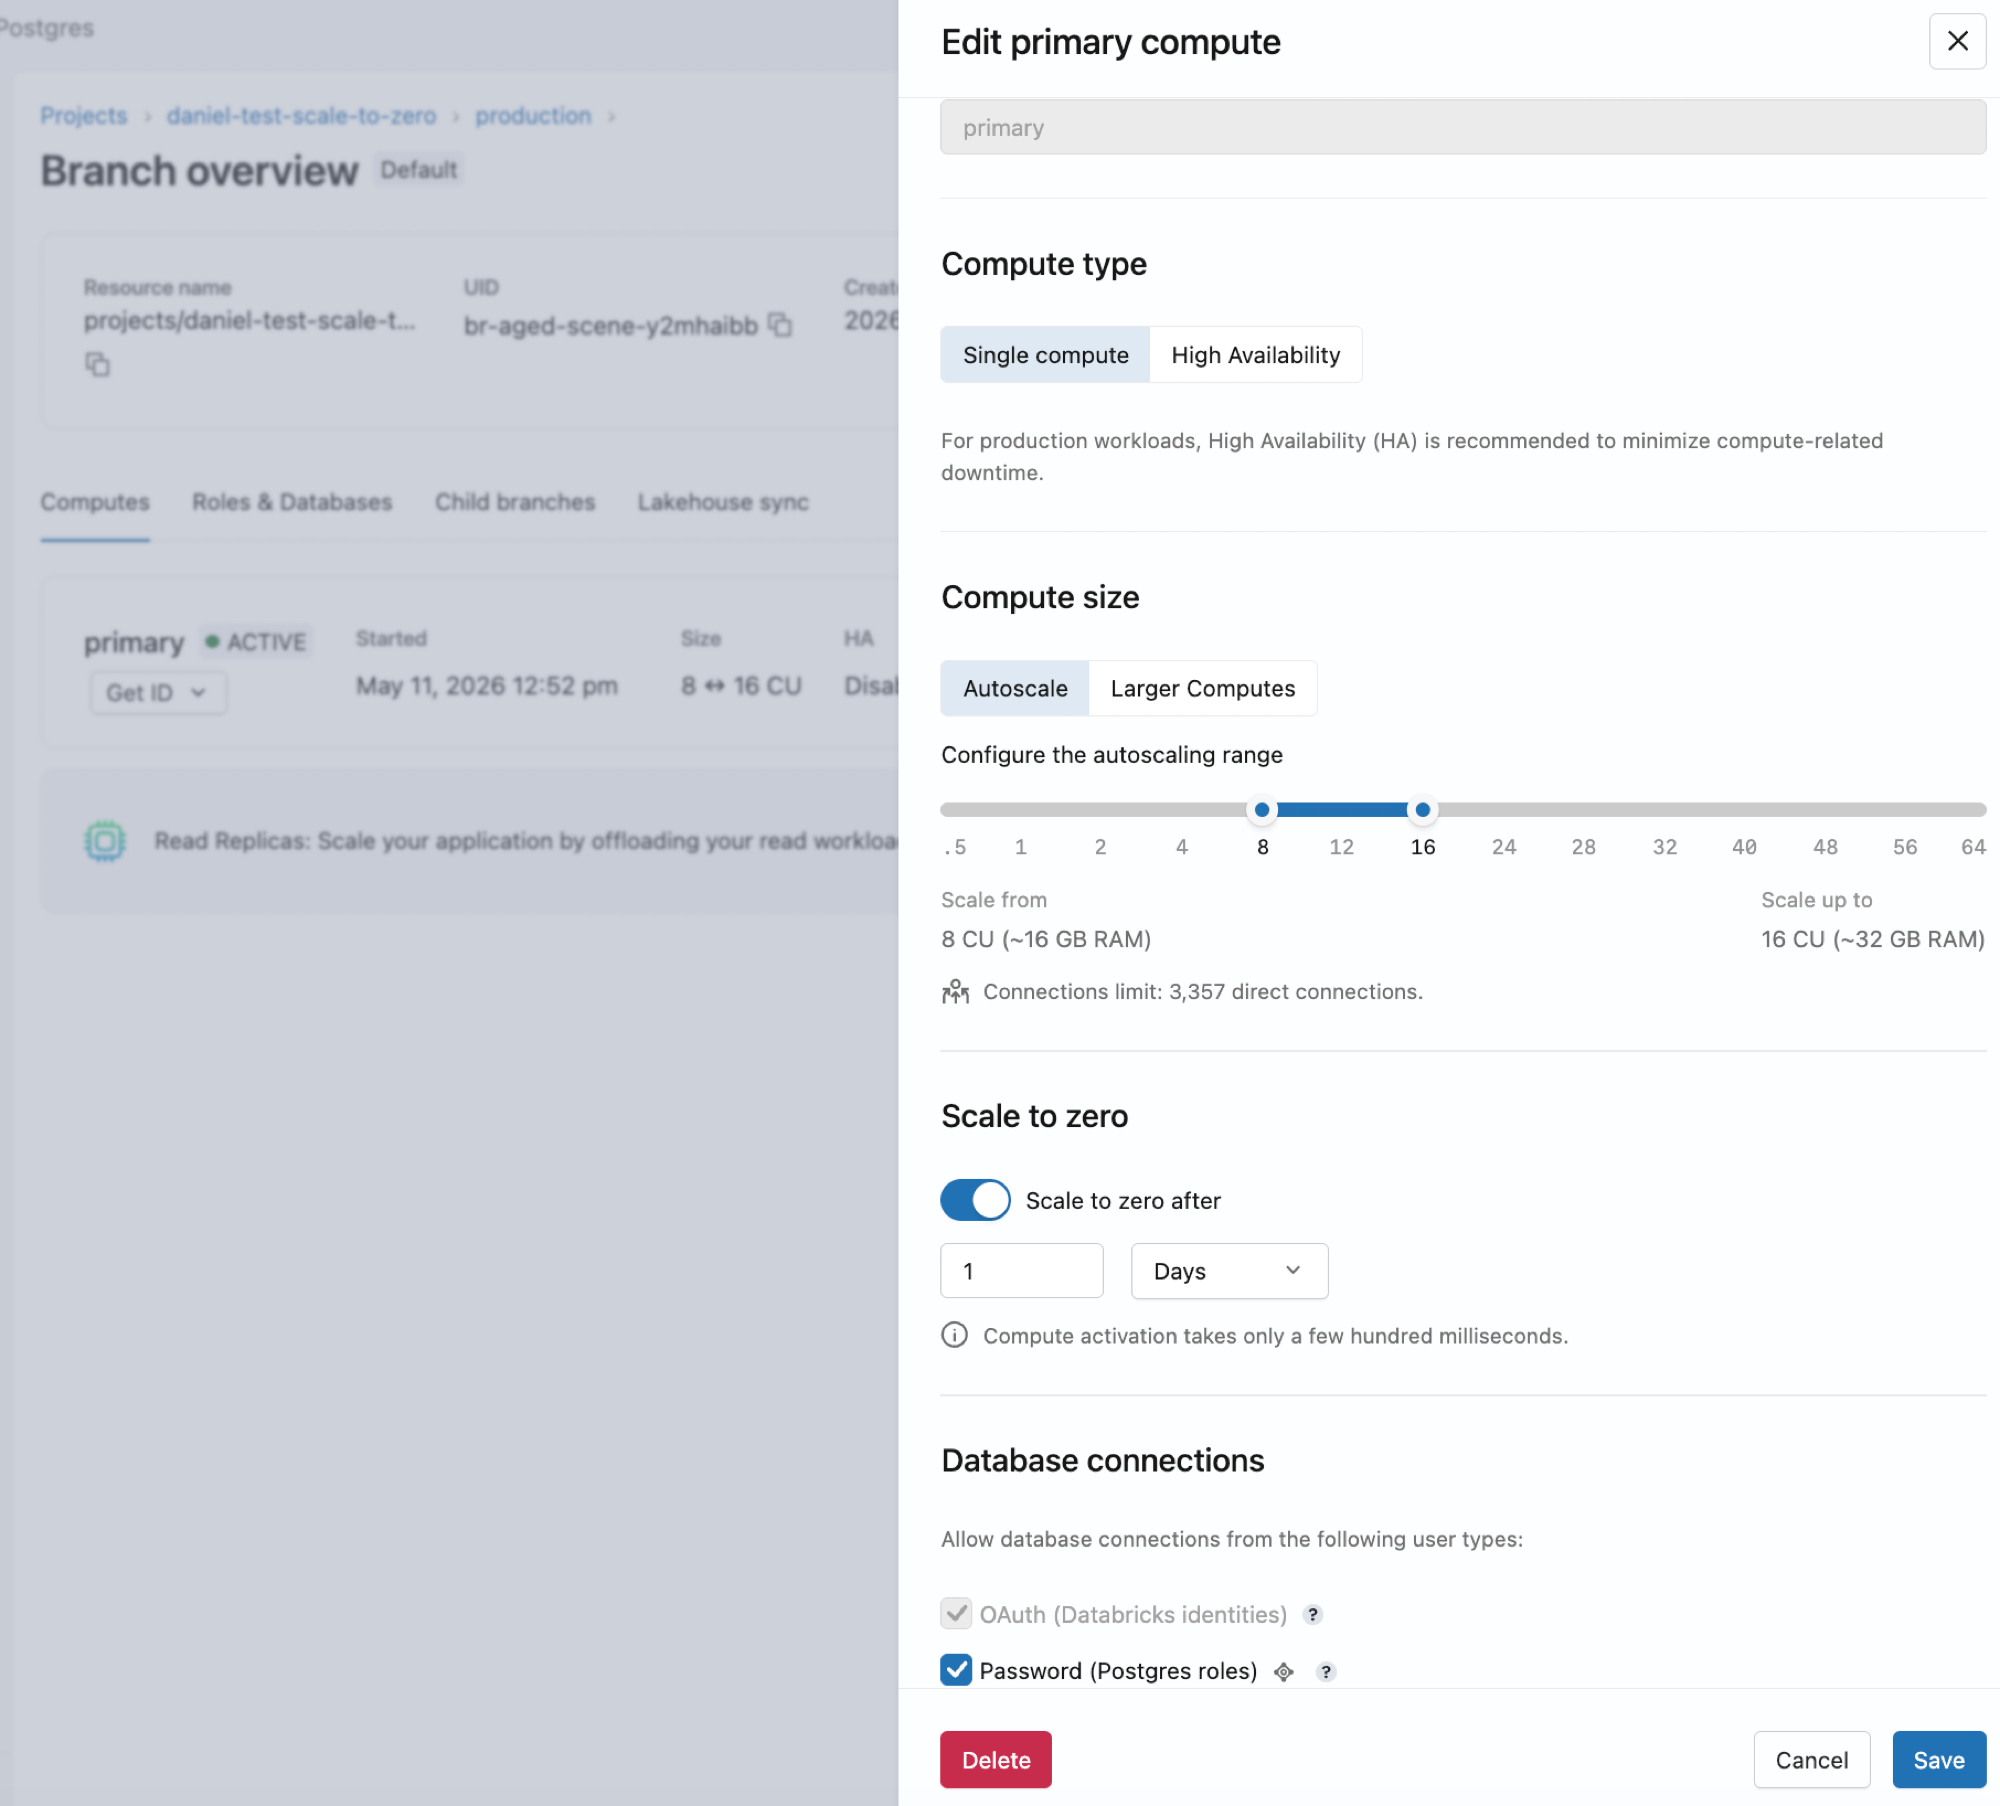
Edit a compute
You can edit a compute to change its size, autoscaling configuration, or scale-to-zero settings. Compute names are read-only and cannot be renamed.
To edit a compute:
- UI
- Python SDK
- Java SDK
- CLI
- curl
- Go to your branch's Computes tab in the Lakebase App.
- Click Edit for the compute, adjust your settings, and click Save.
from databricks.sdk import WorkspaceClient
from databricks.sdk.service.postgres import Endpoint, EndpointSpec, EndpointType, FieldMask

w = WorkspaceClient()

# Update a single field (max CU)
endpoint_spec = EndpointSpec(endpoint_type=EndpointType.ENDPOINT_TYPE_READ_WRITE, autoscaling_limit_max_cu=6.0)
endpoint = Endpoint(
    name="projects/my-project/branches/production/endpoints/my-compute",
    spec=endpoint_spec
)

result = w.postgres.update_endpoint(
    name="projects/my-project/branches/production/endpoints/my-compute",
    endpoint=endpoint,
    update_mask=FieldMask(field_mask=["spec.autoscaling_limit_max_cu"])
).wait()

print(f"Updated max CU: {result.status.autoscaling_limit_max_cu}")
To update multiple fields, include them in both the spec and the update mask:
# Update multiple fields (min and max CU)
endpoint_spec = EndpointSpec(
    endpoint_type=EndpointType.ENDPOINT_TYPE_READ_WRITE,
    autoscaling_limit_min_cu=1.0,
    autoscaling_limit_max_cu=8.0
)
endpoint = Endpoint(
    name="projects/my-project/branches/production/endpoints/my-compute",
    spec=endpoint_spec
)

result = w.postgres.update_endpoint(
    name="projects/my-project/branches/production/endpoints/my-compute",
    endpoint=endpoint,
    update_mask=FieldMask(field_mask=[
        "spec.autoscaling_limit_min_cu",
        "spec.autoscaling_limit_max_cu"
    ])
).wait()

print(f"Updated min CU: {result.status.autoscaling_limit_min_cu}")
print(f"Updated max CU: {result.status.autoscaling_limit_max_cu}")
import com.databricks.sdk.WorkspaceClient;
import com.databricks.sdk.service.postgres.*;
import com.google.protobuf.FieldMask;

WorkspaceClient w = new WorkspaceClient();

// Update a single field (max CU)
EndpointSpec endpointSpec = new EndpointSpec()
    .setAutoscalingLimitMaxCu(6.0);

FieldMask updateMask = FieldMask.newBuilder()
    .addPaths("spec.autoscaling_limit_max_cu")
    .build();

w.postgres().updateEndpoint(
    new UpdateEndpointRequest()
        .setName("projects/my-project/branches/production/endpoints/my-compute")
        .setEndpoint(new Endpoint().setSpec(endpointSpec))
        .setUpdateMask(updateMask)
);

System.out.println("Update initiated");
To update multiple fields, include them in both the spec and the update mask:
// Update multiple fields (min and max CU)
EndpointSpec endpointSpec = new EndpointSpec()
    .setAutoscalingLimitMinCu(1.0)
    .setAutoscalingLimitMaxCu(8.0);

FieldMask updateMask = FieldMask.newBuilder()
    .addPaths("spec.autoscaling_limit_min_cu")
    .addPaths("spec.autoscaling_limit_max_cu")
    .build();

w.postgres().updateEndpoint(
    new UpdateEndpointRequest()
        .setName("projects/my-project/branches/production/endpoints/my-compute")
        .setEndpoint(new Endpoint().setSpec(endpointSpec))
        .setUpdateMask(updateMask)
);

System.out.println("Update initiated");
# Update a single field (max CU)
databricks postgres update-endpoint projects/my-project/branches/production/endpoints/my-compute spec.autoscaling_limit_max_cu \
  --json '{
    "spec": {
      "autoscaling_limit_max_cu": 6.0
    }
  }'

# Update multiple fields (min and max CU)
databricks postgres update-endpoint projects/my-project/branches/production/endpoints/my-compute "spec.autoscaling_limit_min_cu,spec.autoscaling_limit_max_cu" \
  --json '{
    "spec": {
      "autoscaling_limit_min_cu": 1.0,
      "autoscaling_limit_max_cu": 8.0
    }
  }'
# Update a single field (max CU)
curl -X PATCH "$WORKSPACE/api/2.0/postgres/projects/my-project/branches/production/endpoints/my-compute?update_mask=spec.autoscaling_limit_max_cu" \
  -H "Authorization: Bearer ${DATABRICKS_TOKEN}" \
  -H "Content-Type: application/json" \
  -d '{
    "name": "projects/my-project/branches/production/endpoints/my-compute",
    "spec": {
      "autoscaling_limit_max_cu": 6.0
    }
  }' | jq

# Update multiple fields (min and max CU)
curl -X PATCH "$WORKSPACE/api/2.0/postgres/projects/my-project/branches/production/endpoints/my-compute?update_mask=spec.autoscaling_limit_min_cu,spec.autoscaling_limit_max_cu" \
  -H "Authorization: Bearer ${DATABRICKS_TOKEN}" \
  -H "Content-Type: application/json" \
  -d '{
    "name": "projects/my-project/branches/production/endpoints/my-compute",
    "spec": {
      "autoscaling_limit_min_cu": 1.0,
      "autoscaling_limit_max_cu": 8.0
    }
  }' | jq
Changes to compute settings take immediate effect and may cause brief connection interruptions during restart.
Configure scale to zero
To configure scale to zero, include spec.suspension in the update mask. Set suspend_timeout_duration (60s–604800s) to define the inactivity timeout, or no_suspension: true to disable it. Don't set both. Setting no_suspension: false is invalid and returns an error. By default, the production branch has scale to zero enabled with a 24-hour timeout.
- UI
- Python SDK
- Java SDK
- CLI
- curl
- Go to your branch's Computes tab in the Lakebase App.
- Click Edit for the compute, then enable or disable the scale-to-zero setting. When enabled, configure the inactivity timeout between 60 seconds and 7 days.
- Click Save.
from databricks.sdk import WorkspaceClient
from databricks.sdk.service.postgres import Endpoint, EndpointSpec, EndpointType, FieldMask
from google.protobuf.duration_pb2 import Duration

w = WorkspaceClient()
endpoint_name = "projects/my-project/branches/production/endpoints/my-compute"

# Disable scale to zero (compute stays active indefinitely)
endpoint_spec = EndpointSpec(
    endpoint_type=EndpointType.ENDPOINT_TYPE_READ_WRITE,
    no_suspension=True
)
w.postgres.update_endpoint(
    name=endpoint_name,
    endpoint=Endpoint(name=endpoint_name, spec=endpoint_spec),
    update_mask=FieldMask(field_mask=["spec.suspension"])
).wait()

# Enable scale to zero with a 5-minute inactivity timeout (60s–604800s)
endpoint_spec = EndpointSpec(
    endpoint_type=EndpointType.ENDPOINT_TYPE_READ_WRITE,
    suspend_timeout_duration=Duration(seconds=300)
)
w.postgres.update_endpoint(
    name=endpoint_name,
    endpoint=Endpoint(name=endpoint_name, spec=endpoint_spec),
    update_mask=FieldMask(field_mask=["spec.suspension"])
).wait()
import com.databricks.sdk.WorkspaceClient;
import com.databricks.sdk.service.postgres.*;
import com.google.protobuf.Duration;
import com.google.protobuf.FieldMask;

WorkspaceClient w = new WorkspaceClient();
String endpointName = "projects/my-project/branches/production/endpoints/my-compute";

FieldMask updateMask = FieldMask.newBuilder()
    .addPaths("spec.suspension")
    .build();

// Disable scale to zero (compute stays active indefinitely)
EndpointSpec noSuspensionSpec = new EndpointSpec()
    .setNoSuspension(true);
w.postgres().updateEndpoint(
    new UpdateEndpointRequest()
        .setName(endpointName)
        .setEndpoint(new Endpoint().setSpec(noSuspensionSpec))
        .setUpdateMask(updateMask)
);

// Enable scale to zero with a 5-minute inactivity timeout (60s–604800s)
EndpointSpec timeoutSpec = new EndpointSpec()
    .setSuspendTimeoutDuration(
        Duration.newBuilder().setSeconds(300).build()
    );
w.postgres().updateEndpoint(
    new UpdateEndpointRequest()
        .setName(endpointName)
        .setEndpoint(new Endpoint().setSpec(timeoutSpec))
        .setUpdateMask(updateMask)
);
# Disable scale to zero (compute stays active indefinitely)
databricks postgres update-endpoint \
  projects/my-project/branches/production/endpoints/my-compute \
  spec.suspension \
  --json '{
    "spec": {
      "no_suspension": true
    }
  }'

# Enable scale to zero with a 5-minute inactivity timeout (60s–604800s)
databricks postgres update-endpoint \
  projects/my-project/branches/production/endpoints/my-compute \
  spec.suspension \
  --json '{
    "spec": {
      "suspend_timeout_duration": "300s"
    }
  }'
# Disable scale to zero (compute stays active indefinitely)
curl -X PATCH "$WORKSPACE/api/2.0/postgres/projects/my-project/branches/production/endpoints/my-compute?update_mask=spec.suspension" \
  -H "Authorization: Bearer ${DATABRICKS_TOKEN}" \
  -H "Content-Type: application/json" \
  -d '{
    "name": "projects/my-project/branches/production/endpoints/my-compute",
    "spec": {
      "no_suspension": true
    }
  }' | jq

# Enable scale to zero with a 5-minute inactivity timeout (60s–604800s)
curl -X PATCH "$WORKSPACE/api/2.0/postgres/projects/my-project/branches/production/endpoints/my-compute?update_mask=spec.suspension" \
  -H "Authorization: Bearer ${DATABRICKS_TOKEN}" \
  -H "Content-Type: application/json" \
  -d '{
    "name": "projects/my-project/branches/production/endpoints/my-compute",
    "spec": {
      "suspend_timeout_duration": "300s"
    }
  }' | jq
Disable or enable a compute
Disabling a compute suspends it and blocks all new connections. Unlike scale to zero, a disabled compute cannot be woken by a connection attempt or from the Lakebase App. To re-enable it, use the API.
- Python SDK
- CLI
- curl
from databricks.sdk import WorkspaceClient
from databricks.sdk.service.postgres import Endpoint, EndpointSpec, EndpointType, FieldMask

w = WorkspaceClient()
endpoint_name = "projects/my-project/branches/production/endpoints/my-compute"

# Disable a compute (blocks all connections)
endpoint_spec = EndpointSpec(
    endpoint_type=EndpointType.ENDPOINT_TYPE_READ_WRITE,
    disabled=True
)
w.postgres.update_endpoint(
    name=endpoint_name,
    endpoint=Endpoint(name=endpoint_name, spec=endpoint_spec),
    update_mask=FieldMask(field_mask=["spec.disabled"])
).wait()

# Re-enable a compute
endpoint_spec = EndpointSpec(
    endpoint_type=EndpointType.ENDPOINT_TYPE_READ_WRITE,
    disabled=False
)
w.postgres.update_endpoint(
    name=endpoint_name,
    endpoint=Endpoint(name=endpoint_name, spec=endpoint_spec),
    update_mask=FieldMask(field_mask=["spec.disabled"])
).wait()
To check whether a compute is currently disabled, read the value from the endpoint's status. You set the value on spec.disabled, but you read it back from status.disabled:
endpoint = w.postgres.get_endpoint(
    name="projects/my-project/branches/production/endpoints/my-compute"
)
print(endpoint.status.disabled)  # True = disabled, False or None = enabled
# Disable a compute (blocks all connections)
databricks postgres update-endpoint \
  projects/my-project/branches/production/endpoints/my-compute \
  spec.disabled \
  --json '{
    "spec": {
      "disabled": true
    }
  }'

# Re-enable a compute
databricks postgres update-endpoint \
  projects/my-project/branches/production/endpoints/my-compute \
  spec.disabled \
  --json '{
    "spec": {
      "disabled": false
    }
  }'
To check whether a compute is currently disabled, read status.disabled from the endpoint:
databricks postgres get-endpoint projects/my-project/branches/production/endpoints/my-compute --output json | jq '.status.disabled'
# Disable a compute (blocks all connections)
curl -X PATCH "$WORKSPACE/api/2.0/postgres/projects/my-project/branches/production/endpoints/my-compute?update_mask=spec.disabled" \
  -H "Authorization: Bearer ${DATABRICKS_TOKEN}" \
  -H "Content-Type: application/json" \
  -d '{
    "name": "projects/my-project/branches/production/endpoints/my-compute",
    "spec": {
      "disabled": true
    }
  }' | jq

# Re-enable a compute
curl -X PATCH "$WORKSPACE/api/2.0/postgres/projects/my-project/branches/production/endpoints/my-compute?update_mask=spec.disabled" \
  -H "Authorization: Bearer ${DATABRICKS_TOKEN}" \
  -H "Content-Type: application/json" \
  -d '{
    "name": "projects/my-project/branches/production/endpoints/my-compute",
    "spec": {
      "disabled": false
    }
  }' | jq
To check whether a compute is currently disabled, read status.disabled from the endpoint:
curl "$WORKSPACE/api/2.0/postgres/projects/my-project/branches/production/endpoints/my-compute" \
  -H "Authorization: Bearer ${DATABRICKS_TOKEN}" | jq '.status.disabled'
After you re-enable a compute, new connection attempts may fail until the compute finishes restarting.
Restart a compute
Restart a compute to apply updates, resolve performance issues, or pick up configuration changes.
To restart a compute:
- Go to your branch's Computes tab in the Lakebase App.
- Click the
 menu for the compute, select Restart, and confirm the operation.
Restarting a compute interrupts any active connections. Configure your applications to reconnect automatically to avoid prolonged interruptions.