Manage high availability
This guide covers enabling and managing high availability for your Lakebase endpoints. For background on how high availability works and how secondary compute instances differ from standalone read replicas, see High availability.
Enable high availability
To enable high availability, set the compute type and HA configuration in the UI or configure the endpoint's EndpointGroupSpec via the API.
Prerequisites
- Scale to zero must be disabled. In the UI, set Scale to zero to Off in the edit compute drawer. Via the API, set
no_suspension: truein the endpoint spec (usespec.suspensionas the update mask).
- UI
- Python SDK
- CLI
- curl
After creating a project, click the primary compute link from the project dashboard to open the edit compute drawer.

Set Compute type to High availability, then choose a Configuration under High availability:
- 2 (1 primary, 1 secondary),
- 3 (1 primary, 2 secondaries),
- or 4 (1 primary, 3 secondaries) total compute instances.
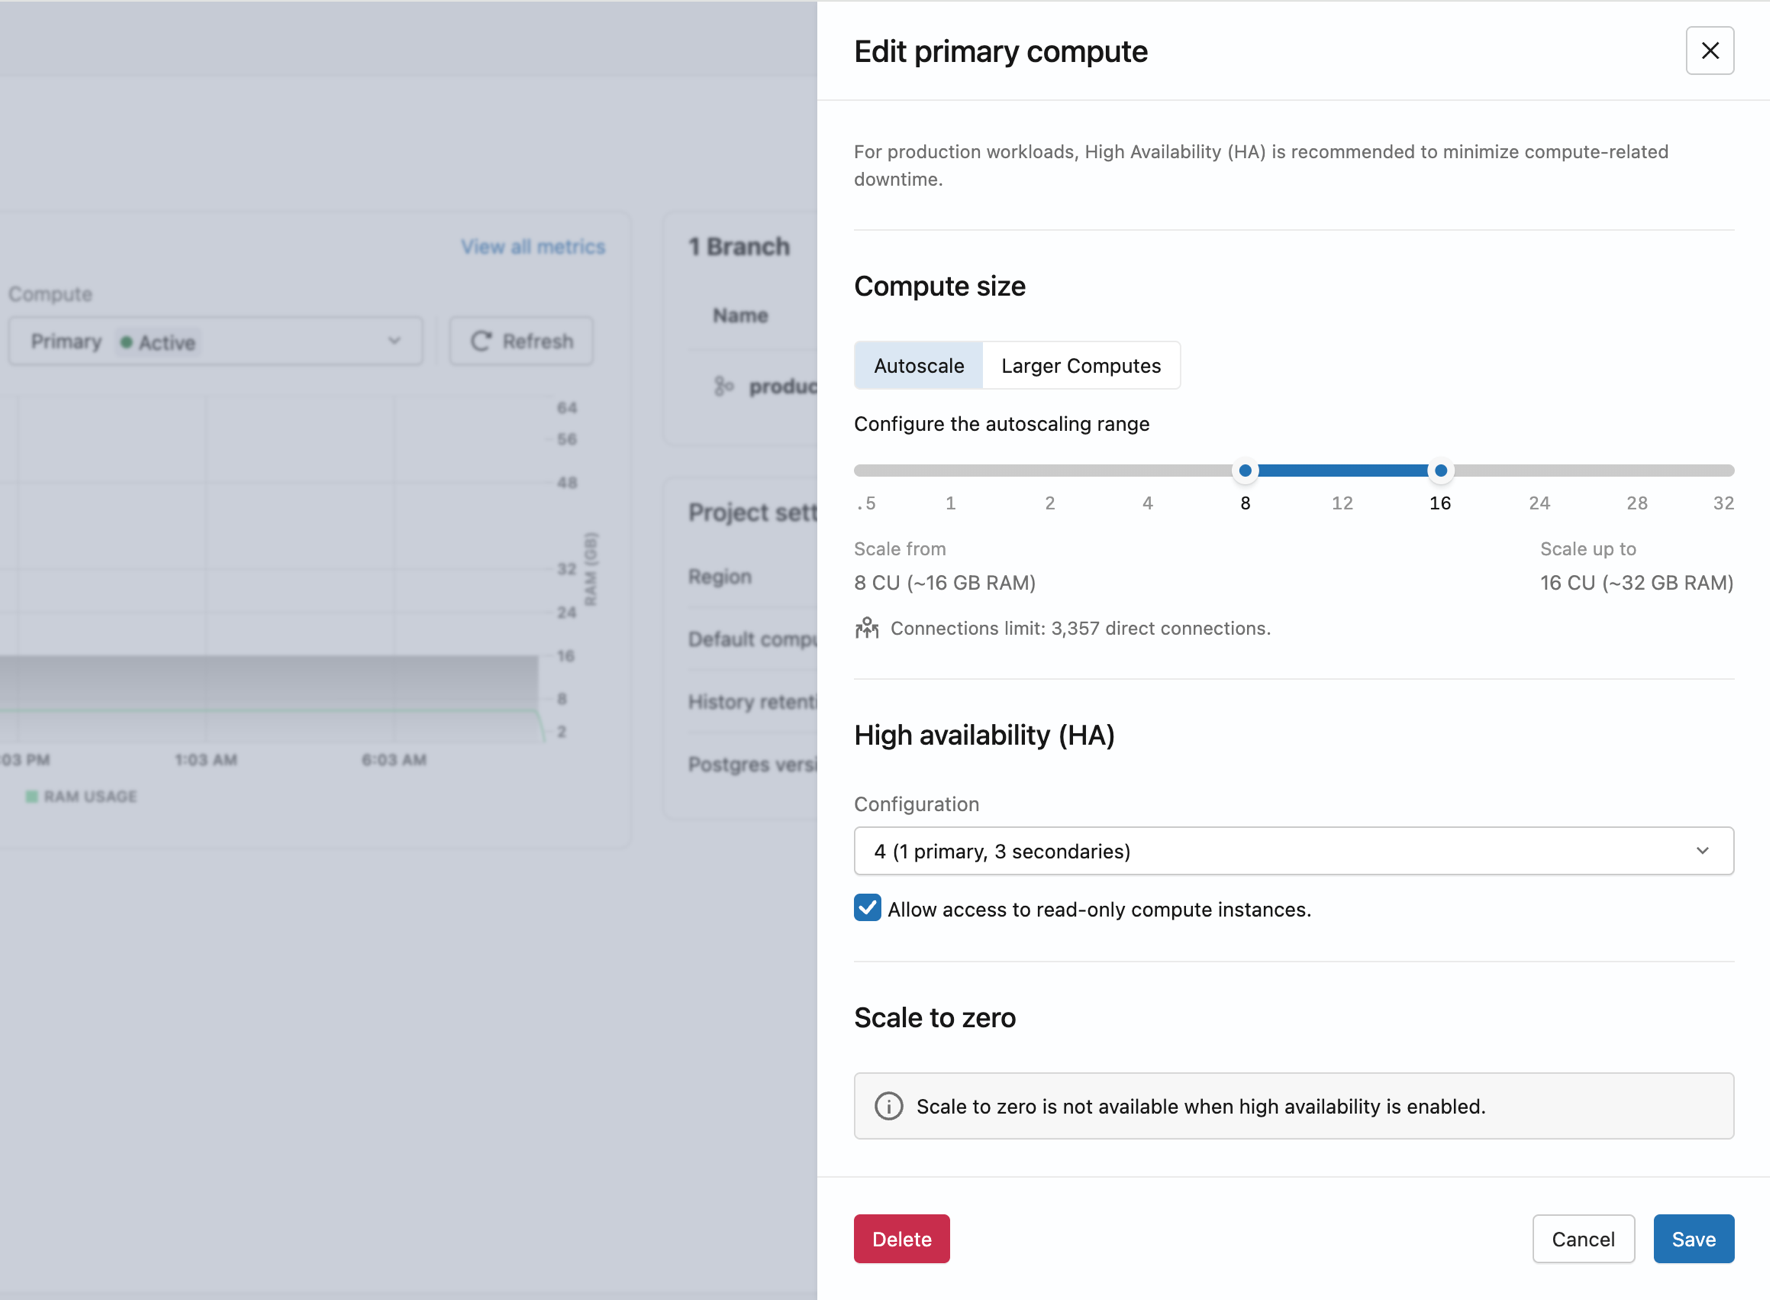
Lakebase provisions secondary compute instances in different availability zones. Once all compute instances are active, the endpoint has automatic failover.
from databricks.sdk import WorkspaceClient
from databricks.sdk.service.postgres import (
    Endpoint, EndpointSpec, EndpointType, EndpointGroupSpec, FieldMask
)

w = WorkspaceClient()

endpoint_name = "projects/my-project/branches/production/endpoints/my-endpoint"

result = w.postgres.update_endpoint(
    name=endpoint_name,
    endpoint=Endpoint(
        name=endpoint_name,
        spec=EndpointSpec(
            endpoint_type=EndpointType.ENDPOINT_TYPE_READ_WRITE,
            no_suspension=True,
            group=EndpointGroupSpec(
                min=2,
                max=2,
                enable_readable_secondaries=True
            )
        )
    ),
    update_mask=FieldMask(field_mask=["spec.group", "spec.suspension"])
).wait()

print(f"Group size: {result.status.group.max}")
print(f"Host: {result.status.hosts.host}")
print(f"Read-only host: {result.status.hosts.read_only_host}")
databricks postgres update-endpoint \
  projects/my-project/branches/production/endpoints/my-endpoint \
  "spec.group,spec.suspension" \
  --json '{
    "spec": {
      "no_suspension": true,
      "group": {
        "min": 2,
        "max": 2,
        "enable_readable_secondaries": true
      }
    }
  }'
curl -X PATCH "$DATABRICKS_HOST/api/2.0/postgres/projects/my-project/branches/production/endpoints/my-endpoint?update_mask=spec.group,spec.suspension" \
  -H "Authorization: Bearer $DATABRICKS_TOKEN" \
  -H "Content-Type: application/json" \
  -d '{
    "name": "projects/my-project/branches/production/endpoints/my-endpoint",
    "spec": {
      "no_suspension": true,
      "group": {
        "min": 2,
        "max": 2,
        "enable_readable_secondaries": true
      }
    }
  }' | jq
Configure read-only access to secondary compute instances
Allow access to read-only compute instances controls whether secondary compute instances serve read traffic via the -ro connection string.
- UI
- Python SDK
- CLI
- curl
- On the Computes tab, click Edit on the primary compute.
- Under High availability, check or uncheck Allow access to read-only compute instances.
- Click Save.
from databricks.sdk import WorkspaceClient
from databricks.sdk.service.postgres import (
    Endpoint, EndpointSpec, EndpointType, EndpointGroupSpec, FieldMask
)

w = WorkspaceClient()

endpoint_name = "projects/my-project/branches/production/endpoints/my-endpoint"

# Get current group size first
current = w.postgres.get_endpoint(name=endpoint_name)
current_size = current.status.group.max

w.postgres.update_endpoint(
    name=endpoint_name,
    endpoint=Endpoint(
        name=endpoint_name,
        spec=EndpointSpec(
            endpoint_type=EndpointType.ENDPOINT_TYPE_READ_WRITE,
            group=EndpointGroupSpec(
                min=current_size,
                max=current_size,
                enable_readable_secondaries=True  # set False to disable
            )
        )
    ),
    update_mask=FieldMask(field_mask=["spec.group.enable_readable_secondaries"])
).wait()
# Replace 2 with your current group size
databricks postgres update-endpoint \
  projects/my-project/branches/production/endpoints/my-endpoint \
  "spec.group.enable_readable_secondaries" \
  --json '{
    "spec": {
      "group": {
        "min": 2,
        "max": 2,
        "enable_readable_secondaries": true
      }
    }
  }'
# Replace 2 with your current group size
curl -X PATCH "$DATABRICKS_HOST/api/2.0/postgres/projects/my-project/branches/production/endpoints/my-endpoint?update_mask=spec.group.enable_readable_secondaries" \
  -H "Authorization: Bearer $DATABRICKS_TOKEN" \
  -H "Content-Type: application/json" \
  -d '{
    "name": "projects/my-project/branches/production/endpoints/my-endpoint",
    "spec": {
      "group": {
        "min": 2,
        "max": 2,
        "enable_readable_secondaries": true
      }
    }
  }' | jq
With only one secondary compute instance and read access enabled, all read traffic on the -ro connection string is interrupted during a failover until a replacement is added. For resilient read access, configure two or more secondary compute instances with read access enabled.
Change the number of secondary compute instances
- UI
- Python SDK
- CLI
- curl
- On the Computes tab, click Edit on the primary compute.
- Under High availability, choose a new Compute configuration from the dropdown (2, 3, or 4 total compute instances).
- Click Save.
To disable high availability, set Compute type back to Single compute. This removes all secondary compute instances and your endpoint returns to a single-compute configuration.
from databricks.sdk import WorkspaceClient
from databricks.sdk.service.postgres import (
    Endpoint, EndpointSpec, EndpointType, EndpointGroupSpec, FieldMask
)

w = WorkspaceClient()

endpoint_name = "projects/my-project/branches/production/endpoints/my-endpoint"

# Scale to 3 compute instances (1 primary + 2 secondaries)
w.postgres.update_endpoint(
    name=endpoint_name,
    endpoint=Endpoint(
        name=endpoint_name,
        spec=EndpointSpec(
            endpoint_type=EndpointType.ENDPOINT_TYPE_READ_WRITE,
            group=EndpointGroupSpec(min=3, max=3)
        )
    ),
    update_mask=FieldMask(field_mask=["spec.group.min", "spec.group.max"])
).wait()
# Scale to 3 compute instances (1 primary + 2 secondaries)
databricks postgres update-endpoint \
  projects/my-project/branches/production/endpoints/my-endpoint \
  "spec.group.min,spec.group.max" \
  --json '{
    "spec": {
      "group": { "min": 3, "max": 3 }
    }
  }'
curl -X PATCH "$DATABRICKS_HOST/api/2.0/postgres/projects/my-project/branches/production/endpoints/my-endpoint?update_mask=spec.group.min,spec.group.max" \
  -H "Authorization: Bearer $DATABRICKS_TOKEN" \
  -H "Content-Type: application/json" \
  -d '{
    "name": "projects/my-project/branches/production/endpoints/my-endpoint",
    "spec": {
      "group": { "min": 3, "max": 3 }
    }
  }' | jq
View high availability status and roles
The Computes tab shows every compute instance in your high availability configuration with its current role, status, and access level.
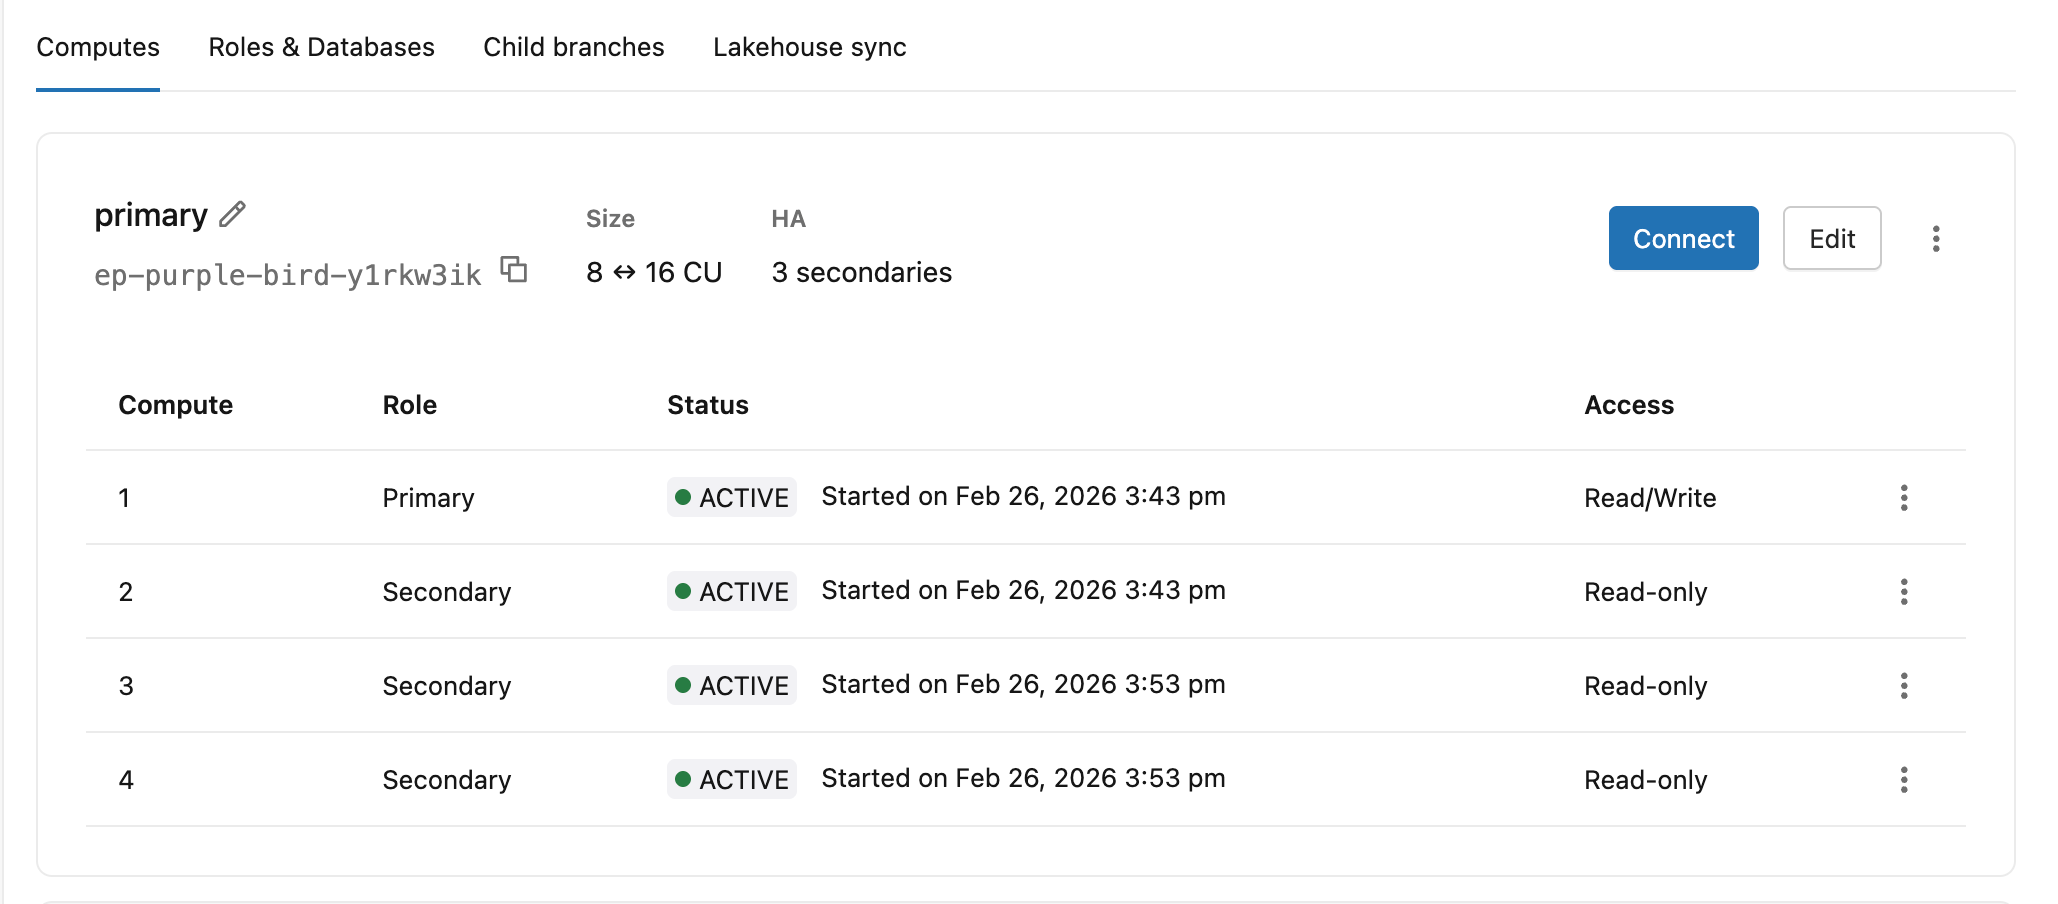
Column | Values |
|---|---|
Role | Primary, Secondary |
Status | Starting, Active |
Access | Read/Write (primary), Read-only (secondary compute instance with access enabled), Disabled (secondary compute instance without read access) |
The primary compute header also shows the endpoint ID, autoscaling range, and secondary count (e.g. 8 ↔ 16 CU · 3 secondaries).
Obtain connection strings
- UI
- Python SDK
- CLI
- curl
Click Connect on the primary compute to open the connection details dialog. The Compute dropdown lists both connection options for your high availability endpoint.
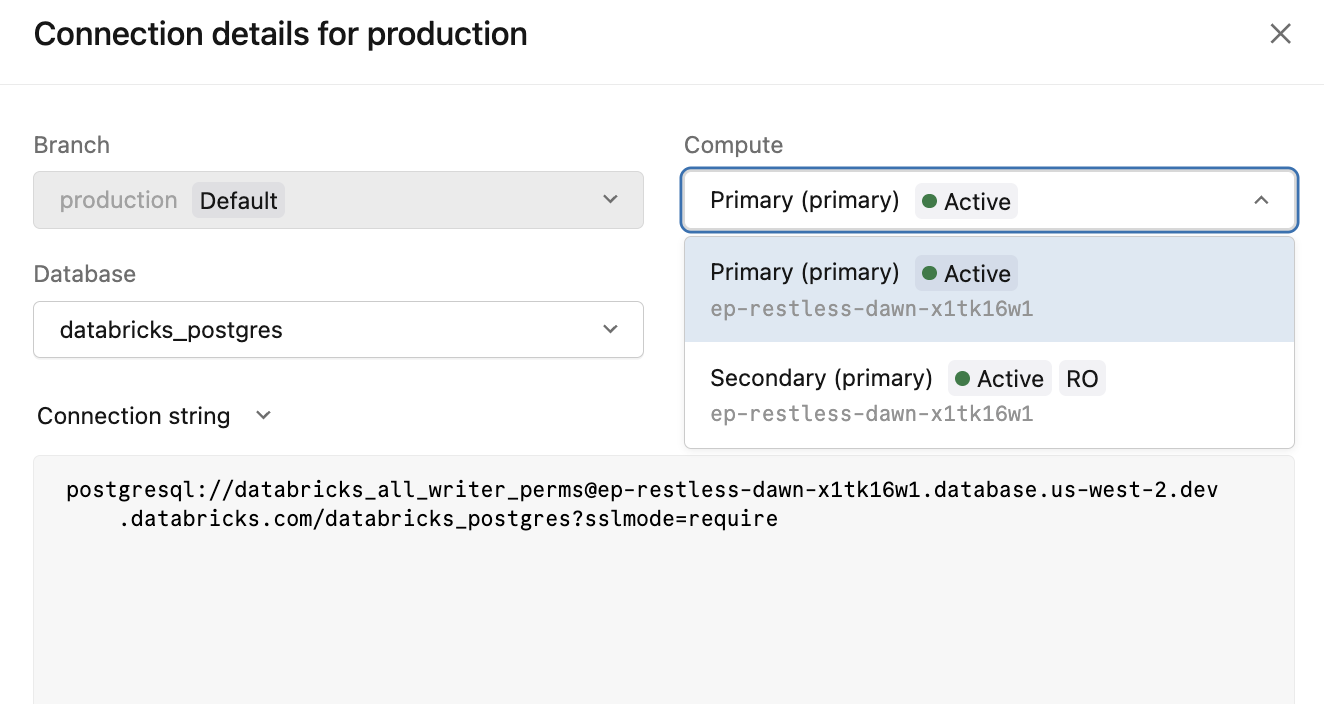
Compute option | Connection string | Use for |
|---|---|---|
|
| All writes and read/write connections |
|
| Read offload to secondary compute instances |
The -ro connection string is only available when Allow access to read-only compute instances is enabled.
from databricks.sdk import WorkspaceClient

w = WorkspaceClient()

endpoint = w.postgres.get_endpoint(
    name="projects/my-project/branches/production/endpoints/my-endpoint"
)

print(f"Read/write host: {endpoint.status.hosts.host}")
print(f"Read-only host:  {endpoint.status.hosts.read_only_host}")
databricks postgres get-endpoint \
  projects/my-project/branches/production/endpoints/my-endpoint \
  -o json | jq '{rw_host: .status.hosts.host, ro_host: .status.hosts.read_only_host}'
curl -X GET "$DATABRICKS_HOST/api/2.0/postgres/projects/my-project/branches/production/endpoints/my-endpoint" \
  -H "Authorization: Bearer $DATABRICKS_TOKEN" \
  | jq '{rw_host: .status.hosts.host, ro_host: .status.hosts.read_only_host}'
For complete connection string reference, see Connection strings.
Additional resources
- High availability — concepts, failover behavior, and best practices
- Read replicas — standalone read replicas for additional read capacity without high availability
- Connection strings