Serve lakehouse data with synced tables
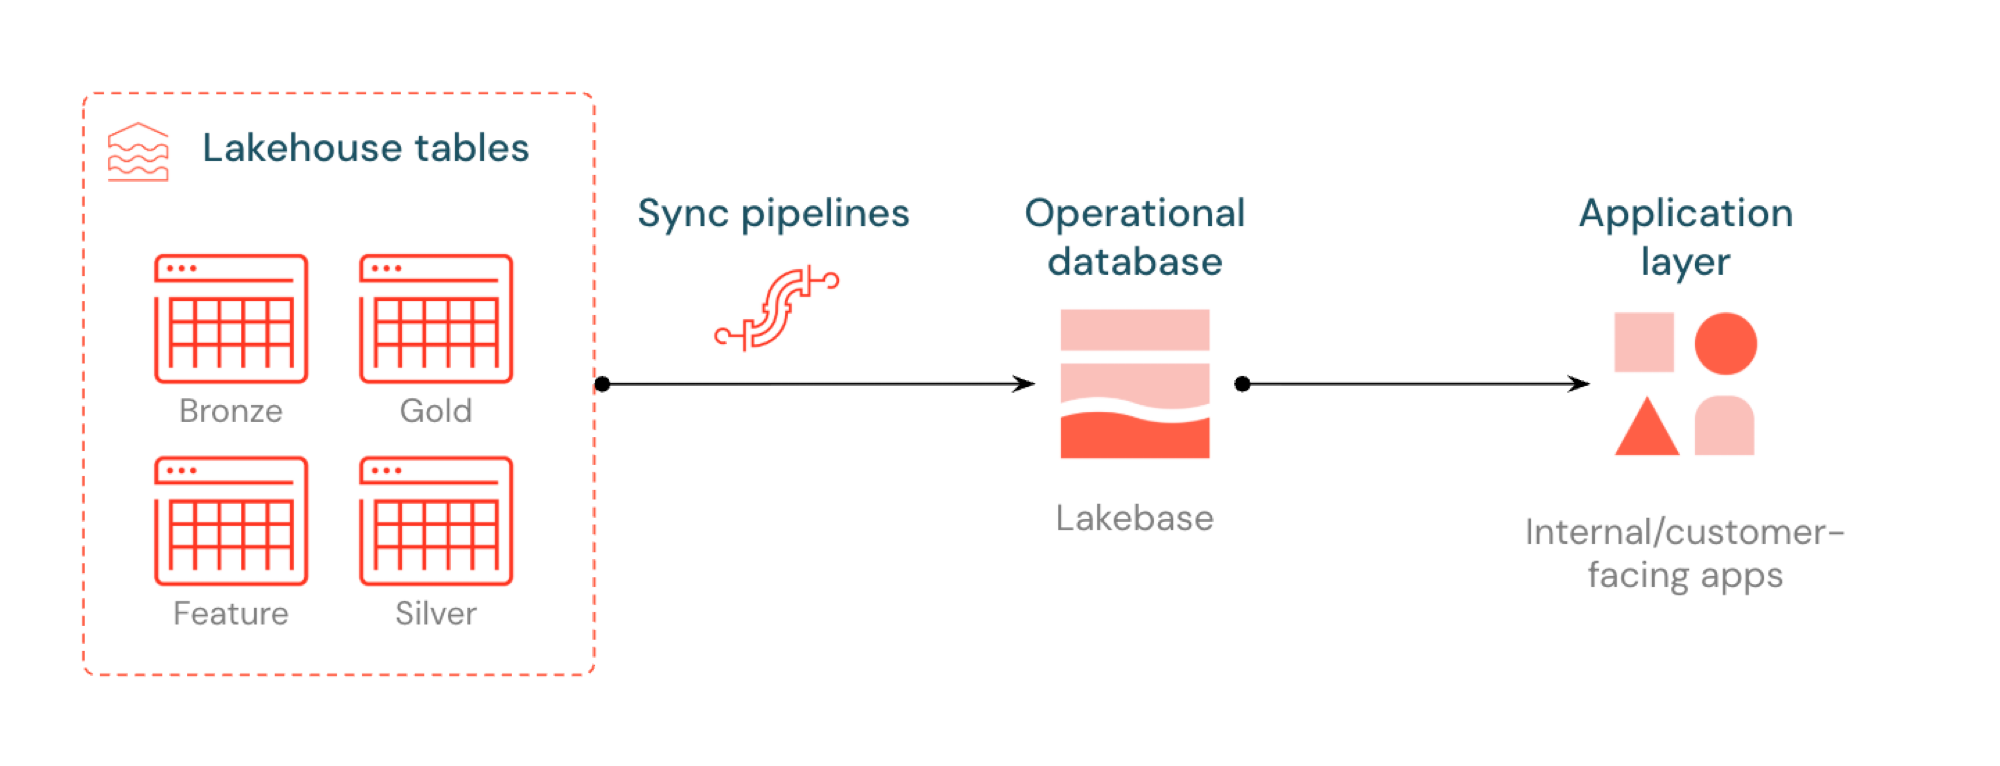
Synced tables let you serve lakehouse data through Lakebase Postgres. Unity Catalog tables sync into Postgres so applications can query lakehouse data directly with low latency. This process is commonly known as reverse ETL. The lakehouse is optimized for analytics and enrichment, while Lakebase is designed for operational workloads that require fast lookup-style queries and transactional consistency.
What are synced tables?
Synced tables let you serve analytics-grade data from Unity Catalog through Lakebase Postgres, making it available to applications that need low-latency queries and full ACID transactions. They bridge the gap between analytical storage and operational systems by keeping your data ready to serve in real-time applications.
Supported sources
Synced tables support the following Unity Catalog source types:
- Managed and external Delta tables
- Managed and external Iceberg tables
- Views and materialized views
How it works
Databricks synced tables create a managed copy of your Unity Catalog data in Lakebase. When you create a synced table, you get:
- A synced table in Unity Catalog that references the sync pipeline
- A Postgres table in Lakebase (read-only, queryable by your applications)
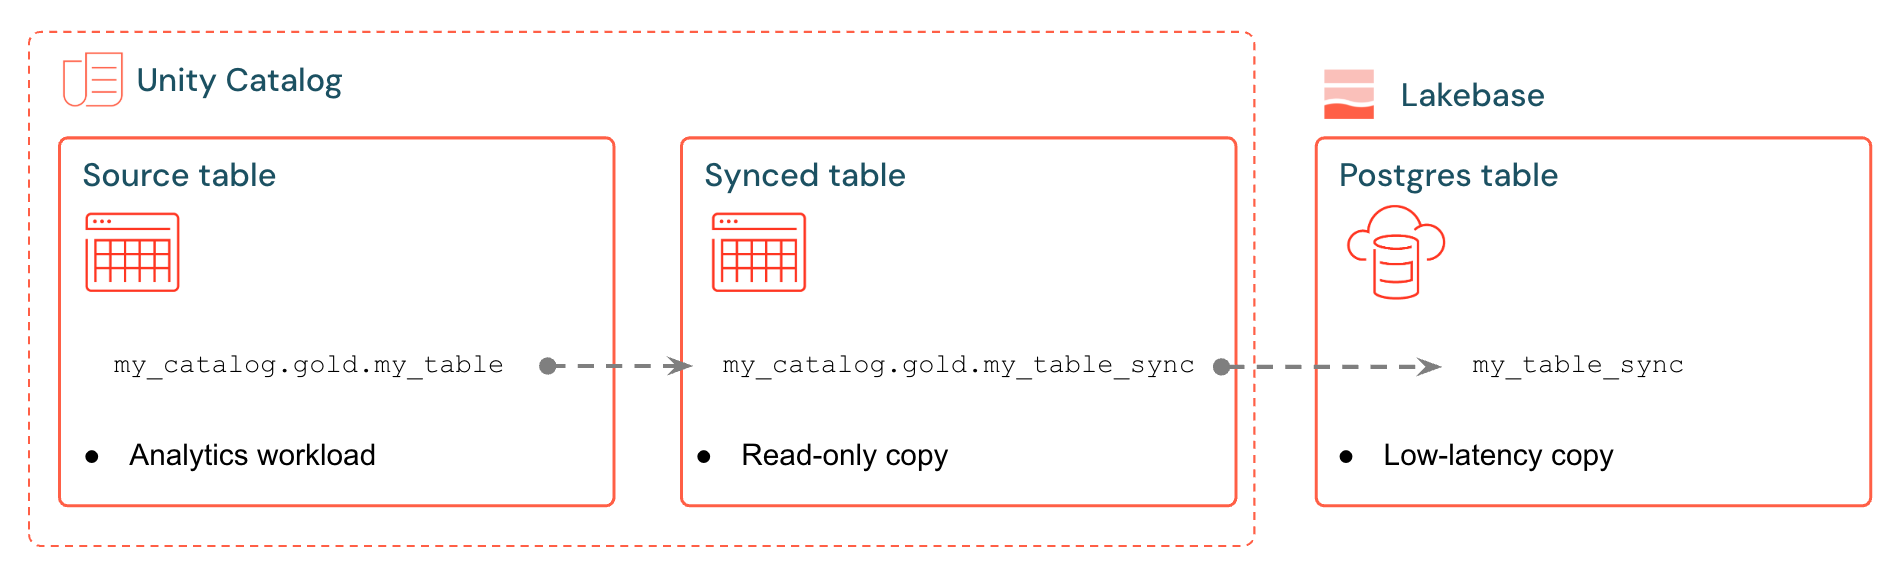
For example, you can sync gold tables, engineered features, or ML outputs from analytics.gold.user_profiles into a new synced table analytics.gold.user_profiles_synced. In Postgres, the Unity Catalog schema name becomes the Postgres schema name, so this appears as gold.user_profiles_synced:
SELECT * FROM gold.user_profiles_synced WHERE user_id = 12345;
Applications connect with standard Postgres drivers and query the synced data alongside their own operational state.
While it's possible to modify a synced table directly in Postgres, Databricks strictly recommends running only read queries to protect data integrity with the source. For supported operations on synced tables, see Operations allowed on synced tables in Postgres.
Sync pipelines use managed Lakeflow pipelines to continuously update both the Unity Catalog synced table and the Postgres table with changes from the source table. Each sync can use up to 16 connections to your Lakebase database.
Lakebase Postgres supports up to 1,000 concurrent connections with transactional guarantees, so applications can read enriched data while also handling inserts, updates, and deletes in the same database.
Sync modes
Choose the right sync mode based on your application needs:
Mode | Description | When to use | Performance |
|---|---|---|---|
Snapshot | One-time copy of all data | Source changes >10% of rows per cycle, or source doesn't support CDF (views, Iceberg tables) | 10x more efficient if modifying >10% of source data |
Triggered | Scheduled updates that run on demand or at intervals | Source rows change on a known cadence. Inserts, updates, and deletes are propagated each refresh. | Good cost/lag balance. Expensive if run <5min intervals |
Continuous | Real-time streaming with seconds of latency | Changes must appear in Lakebase in near real time | Lowest lag, highest cost. Minimum 15-second intervals |
Triggered and Continuous modes require Change Data Feed (CDF) to be enabled on your source table. If CDF isn't enabled, you'll see a warning in the UI with the exact ALTER TABLE command to run. For more details on Change Data Feed, see Use Delta Lake change data feed on Databricks.
Sources that do not support CDF (such as views, materialized views, and Iceberg tables) can only be synced in Snapshot mode. For Snapshot mode, the source must support SELECT *.
Example use cases
You can use synced tables for data-serving use cases like:
- Personalization engines that serve fresh user profiles to Databricks Apps
- Applications that serve model predictions or feature values computed in the lakehouse
- Customer-facing dashboards that serve KPIs in real time
- Fraud detection services that serve risk scores for immediate action
- Support tools that serve enriched customer records from lakehouse data
Create a synced table
Prerequisites
You need:
- A Databricks workspace with Lakebase enabled.
- A Lakebase project (see Create a project).
- A Unity Catalog table to sync.
- Permissions to create synced tables. You need USE_SCHEMA and CREATE_TABLE on any schema you use.
For Triggered or Continuous modes, Change Data Feed must be enabled on your source table:
ALTER TABLE your_catalog.your_schema.your_table
SET TBLPROPERTIES (delta.enableChangeDataFeed = true)
For capacity planning and data type compatibility, see Data types and compatibility and Capacity planning.
- UI
- CLI
- Python SDK
- Java SDK
- curl
-
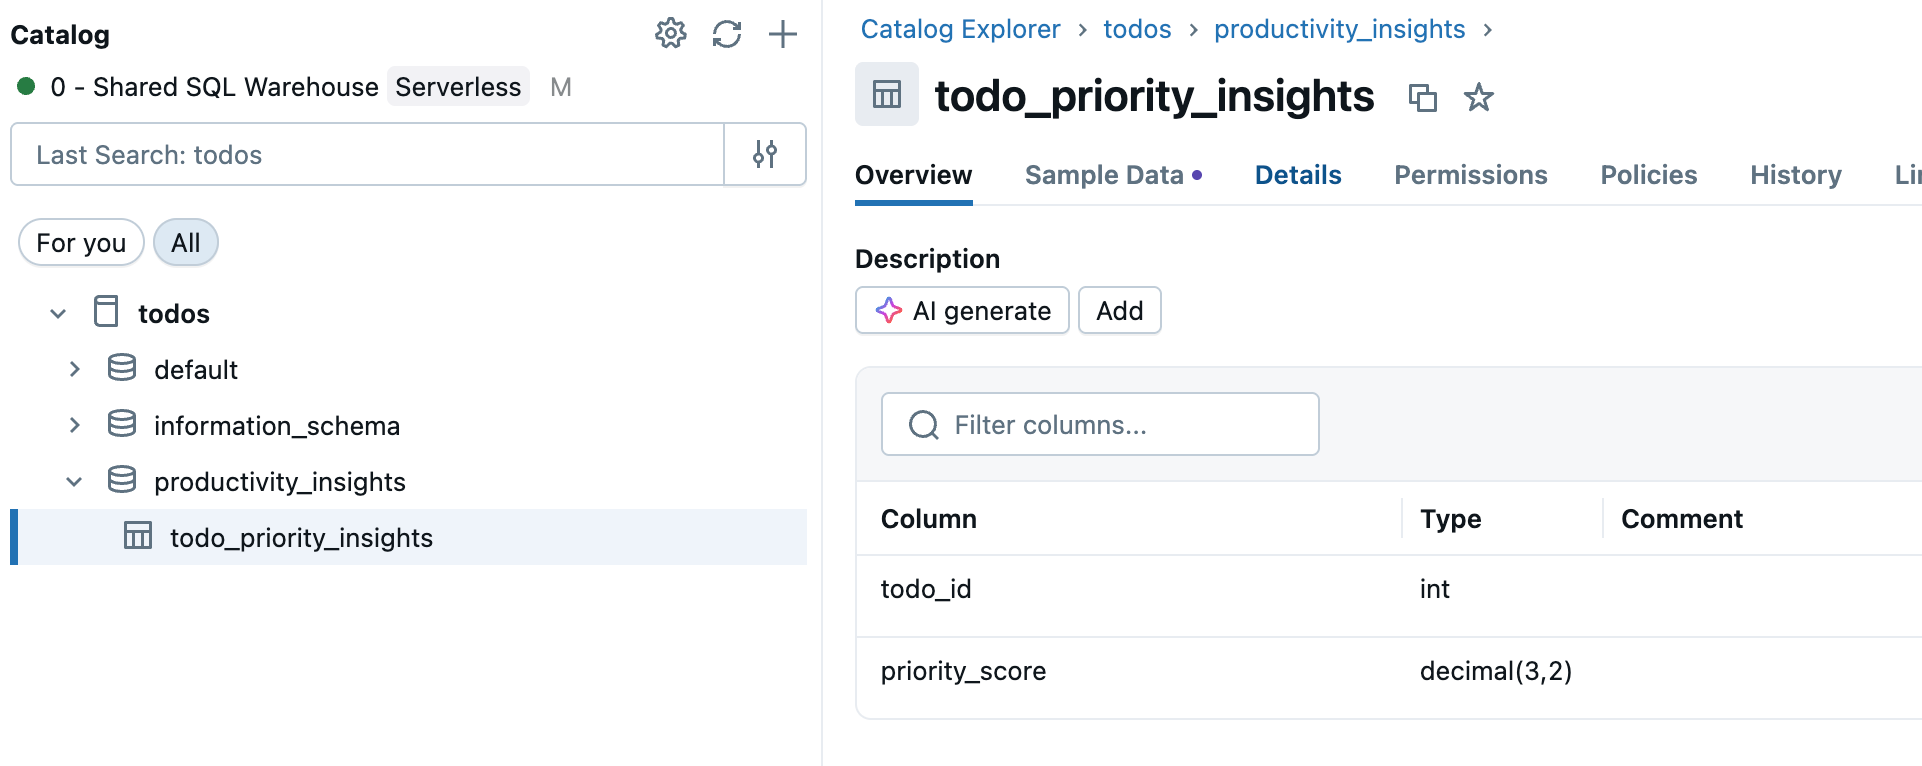
Go to Catalog in the workspace sidebar and select the Unity Catalog table you want to sync.
-
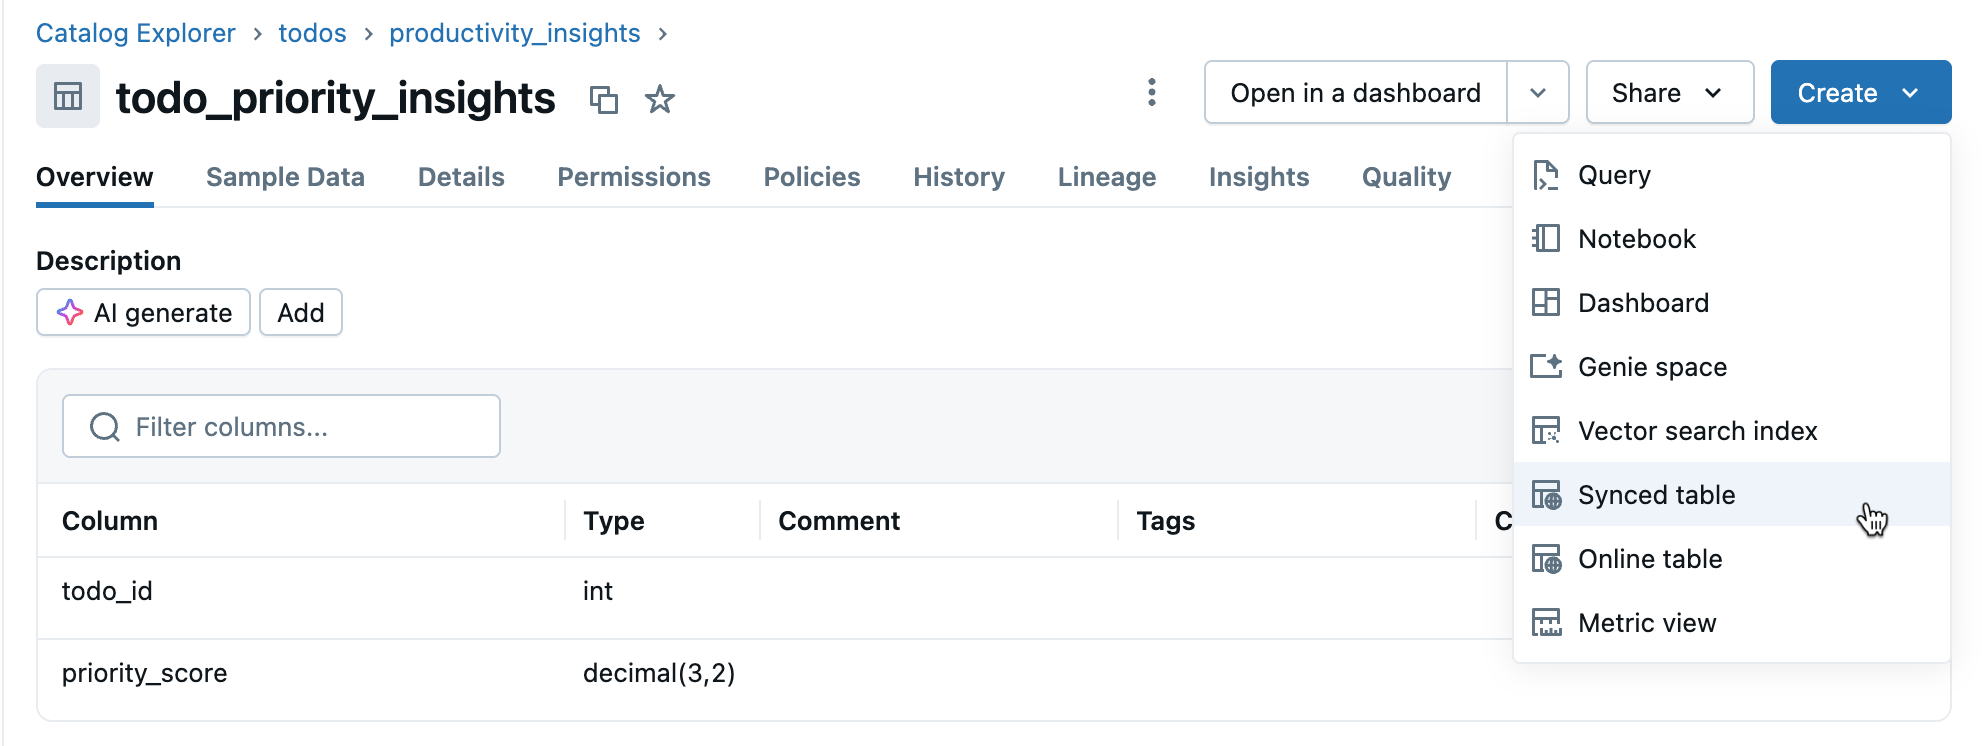
Click Create > Synced table from the table details view.
-
In the Create synced table dialog:
The catalog and schema lists only include Unity Catalog schemas where the current user has USE_SCHEMA and CREATE_TABLE privileges. If you don't see a schema you expect, confirm your permissions with your catalog admin.
-
Table name: Enter a name for your synced table (it is created in the same catalog and schema as your source table). This creates both a Unity Catalog synced table and a Postgres table you can query.
-
Database type: Choose Lakebase Serverless (Autoscaling).
-
Sync mode: Choose Snapshot, Triggered, or Continuous based on your needs (see sync modes above).
-
Configure your project, branch, and database selections.
-
Verify the Primary key is correct (usually auto-detected).
importantColumns in the primary key are not nullable in the synced table. Rows with nulls in primary key columns are excluded from the sync.
-
(Optional) If two rows can share the same primary key in the source table, select a Timeseries key to configure deduplication. When a timeseries key is specified, the synced table contains only the row with the latest timeseries key value for each primary key. For the failure mode without a timeseries key, see Duplicate keys.
If you chose Triggered or Continuous mode and haven't enabled Change Data Feed yet, you'll see a warning with the exact command to run. For data type compatibility questions, see Data types and compatibility.
Click Create to create the synced table.
-
-
Monitor the synced table in Catalog. The Overview tab shows sync status, configuration, pipeline status, and last sync timestamp. Use Sync now for manual refresh.
databricks postgres create-synced-table my-catalog.sales.orders \
  --json '{
    "spec": {
      "source_table_full_name": "main.sales.orders",
      "branch": "projects/my-project/branches/production",
      "primary_key_columns": ["order_id"],
      "scheduling_policy": "SNAPSHOT",
      "postgres_database": "mydb",
      "create_database_objects_if_missing": true
    }
  }'
The SYNCED_TABLE_ID positional argument uses the format catalog.schema.table. In Postgres, the table {table} is created in schema {schema}, inside the database you set with postgres_database (here, mydb). The command waits for the operation to complete by default. For all available options, see databricks postgres create-synced-table.
from databricks.sdk import WorkspaceClient
from databricks.sdk.service.postgres import (
    SyncedTable,
    SyncedTableSyncedTableSpec,
    SyncedTableSyncedTableSpecSyncedTableSchedulingPolicy,
)

w = WorkspaceClient()

synced_table = w.postgres.create_synced_table(
    synced_table=SyncedTable(spec=SyncedTableSyncedTableSpec(
        source_table_full_name="main.sales.orders",
        branch="projects/my-project/branches/production",
        primary_key_columns=["order_id"],
        scheduling_policy=SyncedTableSyncedTableSpecSyncedTableSchedulingPolicy.SNAPSHOT,
        postgres_database="mydb",
        create_database_objects_if_missing=True,
    )),
    synced_table_id="my-catalog.sales.orders",
).wait()

print(f"Synced table created: {synced_table.name}")
The synced_table_id uses the format catalog.schema.table and becomes the Unity Catalog synced table name. In Postgres, the table {table} is created in schema {schema}, inside the database you set with postgres_database (here, mydb).
import com.databricks.sdk.WorkspaceClient;
import com.databricks.sdk.service.postgres.*;
import java.util.List;

WorkspaceClient w = new WorkspaceClient();

SyncedTable syncedTable = w.postgres().createSyncedTable(
    new CreateSyncedTableRequest()
        .setSyncedTableId("my-catalog.sales.orders")
        .setSyncedTable(new SyncedTable()
            .setSpec(new SyncedTableSyncedTableSpec()
                .setSourceTableFullName("main.sales.orders")
                .setBranch("projects/my-project/branches/production")
                .setPrimaryKeyColumns(List.of("order_id"))
                .setSchedulingPolicy(SyncedTableSyncedTableSpecSyncedTableSchedulingPolicy.SNAPSHOT)
                .setPostgresDatabase("mydb")
                .setCreateDatabaseObjectsIfMissing(true))))
    .waitForCompletion();

System.out.println("Synced table created: " + syncedTable.getName());
curl -X POST "https://your-workspace.cloud.databricks.com/api/2.0/postgres/synced_tables?synced_table_id=my-catalog.sales.orders" \
  -H "Authorization: Bearer ${DATABRICKS_TOKEN}" \
  -H "Content-Type: application/json" \
  -d '{
    "spec": {
      "source_table_full_name": "main.sales.orders",
      "branch": "projects/my-project/branches/production",
      "primary_key_columns": ["order_id"],
      "scheduling_policy": "SNAPSHOT",
      "postgres_database": "mydb",
      "create_database_objects_if_missing": true
    }
  }'
This returns a long-running operation. Poll the returned name field until done: true. See Long-running operations. For authentication setup, see Authentication.
Schedule or trigger subsequent syncs
The initial snapshot runs automatically on creation. For Snapshot and Triggered modes, subsequent syncs must be triggered explicitly. Continuous mode is self-managing.
Database Table Sync pipeline task
The Database Table Sync pipeline task in Lakeflow Jobs runs a synced table's pipeline as a workflow step. Configure the job with a table update trigger or a schedule.
Trigger on source table updates
Fires the job when the source Unity Catalog table is updated. With Triggered mode, only new changes are applied incrementally, giving near-real-time freshness without the always-on cost of Continuous mode.
- In the sidebar, click Workflows.
- Click Create job or open an existing job.
- On the Tasks tab, click + Add another task type.
- Under Ingestion and Transformation, select Database Table Sync pipeline.
- In the Pipeline field, select the pipeline associated with your synced table.
- Under Schedules & Triggers, click Add trigger.
- Select Table update as the trigger type.
- Under Tables, select the source Unity Catalog table to monitor.
- Click Save.
Trigger on a schedule
Runs the sync at a fixed cadence. Well-suited for Snapshot mode, where a nightly or weekly full refresh is typically the most efficient pattern.
- Follow steps 1–5 above to add a Database Table Sync pipeline task to a job.
- Under Schedules & Triggers, click Add trigger.
- Select Scheduled as the trigger type.
- Set your cron schedule and timezone, then click Save.
Check sync status
To check the current state and last sync time of a synced table:
- UI
- Python SDK
- Java SDK
- curl
In Catalog, navigate to your synced table and select the Overview tab. It shows the current sync state, pipeline status, and last sync timestamp.
from databricks.sdk import WorkspaceClient

w = WorkspaceClient()

table = w.postgres.get_synced_table("synced_tables/my-catalog.sales.orders")
print(f"State: {table.status.detailed_state}")
print(f"Last sync: {table.status.last_sync_time}")
print(f"Message: {table.status.message}")
import com.databricks.sdk.WorkspaceClient;
import com.databricks.sdk.service.postgres.SyncedTable;

WorkspaceClient w = new WorkspaceClient();

SyncedTable table = w.postgres().getSyncedTable("synced_tables/my-catalog.sales.orders");
System.out.println("State: " + table.getStatus().getDetailedState());
System.out.println("Last sync: " + table.getStatus().getLastSyncTime());
System.out.println("Message: " + table.getStatus().getMessage());
curl "https://your-workspace.cloud.databricks.com/api/2.0/postgres/synced_tables/my-catalog.sales.orders" \
  -H "Authorization: Bearer ${DATABRICKS_TOKEN}"
Data types and compatibility
Unity Catalog data types are mapped to Postgres types when creating synced tables. Complex types (ARRAY, MAP, STRUCT) are stored as JSONB in Postgres.
Source column type | Postgres column type |
|---|---|
BIGINT | BIGINT |
BINARY | BYTEA |
BOOLEAN | BOOLEAN |
DATE | DATE |
DECIMAL(p,s) | NUMERIC |
DOUBLE | DOUBLE PRECISION |
FLOAT | REAL |
INT | INTEGER |
INTERVAL | INTERVAL |
SMALLINT | SMALLINT |
STRING | TEXT |
TIMESTAMP | TIMESTAMP WITH TIME ZONE |
TIMESTAMP_NTZ | TIMESTAMP WITHOUT TIME ZONE |
TINYINT | SMALLINT |
ARRAY<elementType> | JSONB |
MAP<keyType,valueType> | JSONB |
STRUCT<fieldName:fieldType[, ...]> | JSONB |
GEOGRAPHY, GEOMETRY, VARIANT, and OBJECT types are not supported.
Handle invalid characters
Certain characters like null bytes (0x00) are allowed in Unity Catalog STRING, ARRAY, MAP, or STRUCT columns but not supported in Postgres TEXT or JSONB columns. This can cause sync failures with errors like:
ERROR: invalid byte sequence for encoding "UTF8": 0x00
ERROR: unsupported Unicode escape sequence DETAIL: \u0000 cannot be converted to text
- The first error occurs when a null byte appears in a top-level string column, which maps directly to Postgres
TEXT. - The second error occurs when a null byte appears in a string nested inside a complex type (
STRUCT,ARRAY, orMAP), which is serialized asJSONB. During serialization, all strings are cast to PostgresTEXT, where\u0000is disallowed.
Solutions:
-
Sanitize string fields: Remove unsupported characters before syncing. For null bytes in STRING columns:
SQLSELECT REPLACE(column_name, CAST(CHAR(0) AS STRING), '') AS cleaned_column FROM your_table -
Convert to BINARY: For STRING columns where preserving raw bytes is necessary, convert to BINARY type.
Capacity planning
When planning your synced tables implementation, consider these resource requirements:
- Connection usage: Each synced table uses up to 16 connections to your Lakebase database, which count toward the instance's connection limit.
- Size quota: Total logical data across all synced tables has a 16 TB quota. Contact Databricks Support if you need a larger quota. Individual tables don't have a quota, but Databricks recommends not exceeding 1 TB for tables requiring refreshes.
- Full-refresh size: When triggering a full-refresh, the old version in Postgres is not deleted until the new sync completes. Both versions temporarily count toward the logical database size quota during the refresh.
- Tables per source: A single source table can have up to 20 synced tables.
- Naming requirements: Database, schema, and table names may only contain alphanumeric characters and underscores (
[A-Za-z0-9_]+). - Source identifier guidance: Avoid using uppercase letters or special characters in column or table names in the source Unity Catalog table. If you keep them, you must quote those identifiers when referencing them in Postgres.
- Schema evolution: Only additive schema changes (like adding columns) are supported for Triggered and Continuous modes.
- Duplicate keys: If two rows have the same primary key in the source table, the sync pipeline fails unless you configure deduplication using a timeseries key.
- API idempotency: Synced table APIs are idempotent, so retry on transient errors to ensure timely operations.
- Update rate: For Lakebase Autoscaling the sync pipeline supports Continuous and Triggered writes at approximately 150 rows per second per Capacity Unit (CU) and Snapshot writes at up to 2,000 rows per second per CU.
Operations allowed on synced tables in Postgres
Databricks recommends performing only the following operations in Postgres for synced tables to prevent accidental overwrites or data inconsistencies:
- Read-only queries
- Creating indexes
- Dropping the table (to free up space after removing the synced table from Unity Catalog)
While it's possible to modify synced tables in Postgres in other ways, it interferes with the synchronization pipeline.
Ownership and permissions
A synced table is owned by the internal databricks_writer_<dbid> role, not by the user who created it, because the sync pipeline manages it (see Postgres roles). Owner-only commands, such as configuring row-level security, can't be run directly on a synced table.
This is an exception to the general Postgres rule, where objects you create yourself are owned by your Databricks identity if its login exists as a role in Postgres. The pipeline creates synced tables on your behalf.
Access for the user who creates a synced table
When you create a synced table, your Databricks identity is automatically granted access to use it. No databricks_superuser action is required. Your identity is granted the following privileges on the synced table:
Object | Privileges | Purpose |
|---|---|---|
Synced table |
| Read or clear the table |
Schema |
| Use the schema and create objects such as indexes |
You aren't granted INSERT or UPDATE. The pipeline owns the table's data, so direct writes are overwritten on the next refresh. DELETE and TRUNCATE only clear the table. The next refresh repopulates the table from the source.
This access is derived from your Unity Catalog permissions on the synced table and is managed in Unity Catalog. To change it, update the user's Unity Catalog permissions. You can't REVOKE it from a Databricks identity directly in Postgres.
This access is tied to the identity that created the synced table. Changing the pipeline's Run as identity doesn't reassign it. To use a different owning identity, re-create the synced table under that identity.
Manage synced table access
After a synced table is created, the databricks_superuser can read a synced table from Postgres. The databricks_superuser has pg_read_all_data, which lets this role read from all tables. It also has the pg_write_all_data privilege, which lets this role write to all tables. This means that a databricks_superuser can also write to a synced table in Postgres. Lakebase supports this writing behavior in case you need to make urgent changes in your target table. However, Databricks recommends making fixes in your source table instead.
-
The
databricks_superusercan also grant these privileges to other users:PostgreSQLGRANT USAGE ON SCHEMA synced_table_schema TO user;PostgreSQLGRANT SELECT ON synced_table_name TO user; -
The
databricks_superusercan revoke these privileges:PostgreSQLREVOKE USAGE ON SCHEMA synced_table_schema FROM user;PostgreSQLREVOKE {SELECT | INSERT | UPDATE | DELETE} ON synced_table_name FROM user;
Manage synced table operations
The databricks_superuser can manage which users are authorized to perform specific operations on a synced table. The supported operations for synced tables are:
CREATE INDEXALTER INDEXDROP INDEXDROP TABLE
All other DDL operations are denied for synced tables.
To grant these privileges to additional users, the databricks_superuser must first create an extension on databricks_auth:
CREATE EXTENSION IF NOT EXISTS databricks_auth;
Then the databricks_superuser can add a user to manage a synced table:
SELECT databricks_synced_table_add_manager('"synced_table_schema"."synced_table"'::regclass, '[user]');
The databricks_superuser can remove a user from managing a synced table:
SELECT databricks_synced_table_remove_manager('[table]', '[user]');
The databricks_superuser can view all managers:
SELECT * FROM databricks_synced_table_managers;
Delete a synced table
Deleting a synced table from Unity Catalog also drops the corresponding Postgres table.
- UI
- Python SDK
- Java SDK
- curl
In Catalog, find your synced table, click the ![]() menu, and select Delete.
menu, and select Delete.
from databricks.sdk import WorkspaceClient

w = WorkspaceClient()

w.postgres.delete_synced_table("synced_tables/my-catalog.sales.orders").wait()
import com.databricks.sdk.WorkspaceClient;

WorkspaceClient w = new WorkspaceClient();

w.postgres().deleteSyncedTable("synced_tables/my-catalog.sales.orders").waitForCompletion();
curl -X DELETE "https://your-workspace.cloud.databricks.com/api/2.0/postgres/synced_tables/my-catalog.sales.orders" \
  -H "Authorization: Bearer ${DATABRICKS_TOKEN}"
Learn more
Task | Description |
|---|---|
Set up a Lakebase project | |
Learn connection options for Lakebase | |
Make your Lakebase data visible in Unity Catalog for unified governance and cross-source queries | |
Understand governance and permissions |
Catalog integration
- Catalog duplication: Creating a synced table in a standard catalog targeting a Postgres database that is also registered as a separate database catalog causes the synced table to appear in Unity Catalog under both the standard and the database catalogs.
Other options
For syncing data into non-Databricks systems, see Partner Connect reverse ETL solutions such as Census or Hightouch.