Publish to the Power BI service from Databricks
Publish data from Databricks to Microsoft Power BI service, a cloud-based business analytics platform that enables users to connect to, visualize, and analyze data. You can publish Databricks tables and schemas to Power BI semantic models directly from the Databricks UI, or manually connect to Databricks as a data source from the Power BI service.
When you integrate Databricks as a data source with the Power BI service, you bring Databricks’ scalable data processing and performance to all users.
If you want to connect Power BI Desktop to Databricks, see Connect Power BI Desktop to Databricks.
The Databricks connector for Power BI supports the Arrow Database Connectivity (ADBC) driver. Learn more here.
Requirements
-
Your data must be in Unity Catalog, and your compute must be Unity Catalog enabled. Hive metastore is not currently supported.
-
You must have a Power BI Premium license (Premium capacity, Premium Per User (PPU), or Microsoft Fabric capacity).
-
You must enable Read Write for the XMLA Endpoint in your Power BI capacity. Follow this link for instructions.
-
If you are authenticating using machine-to-machine (M2M) OAuth, ensure you have set up a Databricks service principal. See Configure service principals on Databricks for Power BI.
-
If users want to edit semantic models in the Power BI Service after publishing, you must enable Users can edit data models in Power BI service (preview) in the workspace settings. You can also edit the Semantic Model using Tabular Editor by making a connection using the XMLA endpoint.
-
If your Power BI workspace uses a private link, you must update the dataset's datasource credentials manually in Power BI.
-
A Databricks SQL warehouse.
Publish Databricks tables to a Power BI semantic model
When using Databricks as a data source with the Power BI service, you can create Power BI semantic models from tables or schemas directly from the Databricks UI.
-
Sign in to your Databricks workspace and click
 Catalog in the sidebar to open Catalog Explorer.
 -
Select an SQL warehouse compute resource from the drop-down list at the top left, under the Catalog label.
-
Open a catalog and select the schema or tables to be published. Do not select from a hive metastore or the samples catalog.
-
On the upper right, click Use with BI tools for a schema or Open in a dashboard for a table.
-
Select Publish to Power BI workspace.
-
In the Connect to partner dialog, click Connect to Microsoft Entra ID to authenticate.
-
Databricks requires the following permissions to be granted to the registered Entra ID app, Databricks Dataset Publishing Integration:
-
Content.Create -
Dataset.ReadWrite.All -
Workspace.Read.All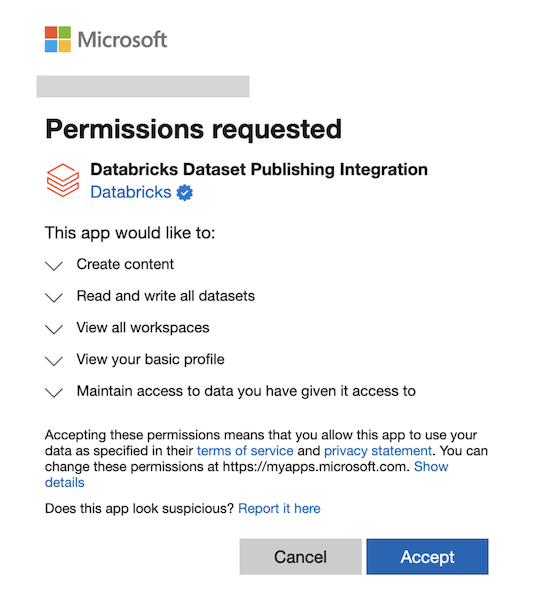
For more information, see Microsoft Entra Permissions.
-
-
If you can't accept these permissions, your organization might require Entra Admin approval for these permissions. See Review admin consent requests for instructions.
-
If there is a "Need admin approval" message, your Power BI Global admin might need to turn on Admin consent requests before you can proceed. See Grant permissions when Admin consent is disabled.
-
-
In the Power BI workspaces field, select the Power BI workspace.
-
In Dataset Mode, select either DirectQuery or Import.
-
In Authentication Method in Power BI, select OAuth or PAT (Personal Access Token).
Databricks recommends using OAuth since it allows for fine-grained access control and user-level auditing. OAuth credentials might need to be configured on the Power BI semantic model settings page under Data source credentials. If you select Personal Access Token (PAT), a PAT is created on your behalf to allow Power BI to access the semantic model.
Single-use refresh tokens are enabled by default for user-to-machine (U2M) OAuth. To configure these settings, see Single-use refresh tokens.
If you want to authenticate using M2M OAuth, you can configure this on the Power BI service after publishing. See Set up M2M OAuth.
-
In Dataset Name, select Publish as a new data set or Use an existing data set.
When you choose Use an existing dataset, the following is true:
- If the semantic model exists, it is not overwritten. Updates only append new records in a given schema.
- If the selected table is not part of the existing semantic model, it's added.
- If the table was already in your semantic model and new columns were added after the last update, those columns are automatically added.
- You can choose a different storage model for the new table to create a composite semantic model.
If you have an existing semantic model that you want update while you keep existing data connections in place, choose Use an existing dataset. If you want to create a new one with a new semantic model, choose Publish as new data set.
- If the semantic model exists, it is not overwritten. Updates only append new records in a given schema.
-
Click Publish to Power BI.
-
It might take 10 to 20 seconds for the semantic model to publish. When publishing is complete, click Open Power BI to open your Power BI semantic model in a new tab.
Manually connect to Databricks as a data source
Instead of using the Databricks UI to publish to a Power BI semantic model, you can manually connect to Databricks as a data source from Power BI service.
-
From the Power BI service sidebar, click Create.
-
Click Get Data.
-
Search for and select the "Databricks" tile.
-
Enter your Databricks SQL warehouse Server Hostname and HTTP Path.
-
Optionally, specify Advanced options configurations.
Connecting directly to a Lakehouse//RT warehouse from the Power BI service isn't supported. Instead, connect through an on-premises data gateway, see Connect to a Lakehouse//RT warehouse.
-
Make sure to set a unique Connection name.
-
Choose your authentication type:
- Databricks Client Credentials: Authenticate with a Databricks service principal (machine-to-machine OAuth). Enter the service principal's client ID and client secret. See Configure service principals on Databricks for Power BI.
- Personal Access Token: Enter your Databricks personal access token.
- OAuth (OIDC): Click Sign in and complete the authentication process.
- Service Principal: Authenticate with a Microsoft Entra ID service principal. Enter the service principal credentials.
-
Select a Privacy Level.
-
Choose if this connection can be used with on-premise data gateways and VNet data gateways.
-
Click Next to create your connection.
-
Select which tables to import to your Power BI reports.
Features and notes
- When publishing a schema containing multiple tables, all tables with columns are published. Tables with no columns are not published.
- Comments on a table's columns in Databricks are copied to the descriptions of corresponding columns in Power BI.
- Foreign key relationships are preserved in the published dataset. However, Power BI only supports one active relationship path between any two tables. When multiple paths are present in the schema in Databricks, some of the corresponding relationships in Power BI are set to inactive. You can later change which relationships are active or inactive in the data model view in Power BI.
- When using OAuth or an on-premises data gateway, credentials might need to be configured under “Data source credentials” on the Power BI dataset settings page.
- Currently, users can only publish directly to Power BI workspaces in their home tenant. Publishing in tenants where they are guest users is not supported.
Grant permissions when Admin consent is disabled
When admin consent is disabled, users are unable to request approval for applications requiring permissions. This might occur if user consent is blocked or limited to verified publishers in the Microsoft Entra admin center, and admin consent requests are not permitted.
To allow users to request permission to publish to the Power BI service, you must be either a Global Admin or a Cloud Application Admin to enable and approve consent requests.
Step 1: Turn on Admin consent requests
A Global Admin or Cloud Application Admin must first enable admin consent requests:
- In the Microsoft Entra admin center, navigate to Consent and permissions.
- Click Admin consent settings from the sidebar.
- Toggle Admin consent requests to Yes.
- (Optional) To designate reviewers who can help evaluate consent requests, select Add users under Reviewers. Note that while reviewers can evaluate requests, only a Global Administrator can grant final admin consent.
- Configure Consent requests expire after (days) to set how long consent requests remain valid before expiring.
- Users can now submit consent requests for the Power BI service.
Step 2: Approve consent request from user
After a user submits a consent request, a Global Admin or a Cloud Application Admin must approve the request:
- In the Microsoft Entra admin center, click Admin consent requests on the sidebar.
- Select the Databricks Dataset Publishing Integration request.
- Click Review permissions and consent.
- Sign in with your Microsoft Entra ID and click Accept.
The user requesting access to Power BI can now publish to the Power BI service.
Set up M2M OAuth
After you publish to the Power BI service from Databricks, you can configure M2M OAuth on the Power BI service. Make sure you have a service principal set up on Databricks. See Configure service principals on Databricks for Power BI.
You can configure M2M OAuth from a semantic model or a service gateway.
Use a semantic model for M2M OAuth
Configure your Databricks connection for M2M OAuth on the Power BI service using a semantic model. For more about semantic models, see Semantic models in the Power BI service.
To configure credentials:
- In Power BI, navigate to the workspace that contains the semantic model.
- Click More options (horizontal kebab menu) > Settings.
- Navigate to Data source credentials and click Edit Credentials.
- In Authentication method, choose Basic.
- In User name, enter your service principal application ID.
- In Password, enter your service principal secret.
- Select the appropriate privacy level setting for your data source.
- If you want to enable SSO, enable the last option.
- Click Sign in.
Use a service gateway for M2M OAuth
You can configure your Databricks connection for M2M OAuth on the Power BI service from a Power BI VNet or on-premises data gateway. Databricks client credentials for an on-premises gateway require Power BI gateway v3000.270.10 or above. For more about Power BI gateways, see the official Microsoft site.
Power BI does not fully support VNet data gateways in its REST APIs. Therefore, you must manually update data source connections to use Databricks Client Credentials in the UI.
To configure credentials:
- In Power BI, click the gear icon in the upper-right to access settings.
- Click Manage connections and gateways.
- Click + New to create a new connection.
- Select either On-premises or Virtual network. The required credentials are the same for both gateways.
- In Gateway cluster name, select your appropriate gateway.
- In Connection name, enter your connection name.
- In Connection type, select Azure Databricks.
- In Server Hostname, enter the Databricks SQL warehouse hostname.
- In HTTP Path, enter the SQL warehouse HTTP path.
- Under Authentication, specify your authentication credentials.
- In Authentication method, select Databricks Client Credentials.
- In Databricks Client ID, enter your service principal Client ID.
- In Databricks Client Secret, enter the service principal client secret.
- In Privacy level, select Organizational.
- Click Create.