Model exclusive access
Exclusive access is a pattern that makes data access opt-in rather than ambient. With regular Unity Catalog permissions, permissions follow the user: a user accumulates permissions over time and carries them everywhere, so their access is the sum of the permissions they have been granted directly and the permissions they inherit from all the groups they are a member of. The exclusive access pattern lets customers model access to sensitive data as requiring a deliberate action — a user must actively assume a role to reach the data, rather than having standing access to it. This prevents them from accessing the data as their own identity and from mixing data across use cases, clinical trials, projects, or clients.
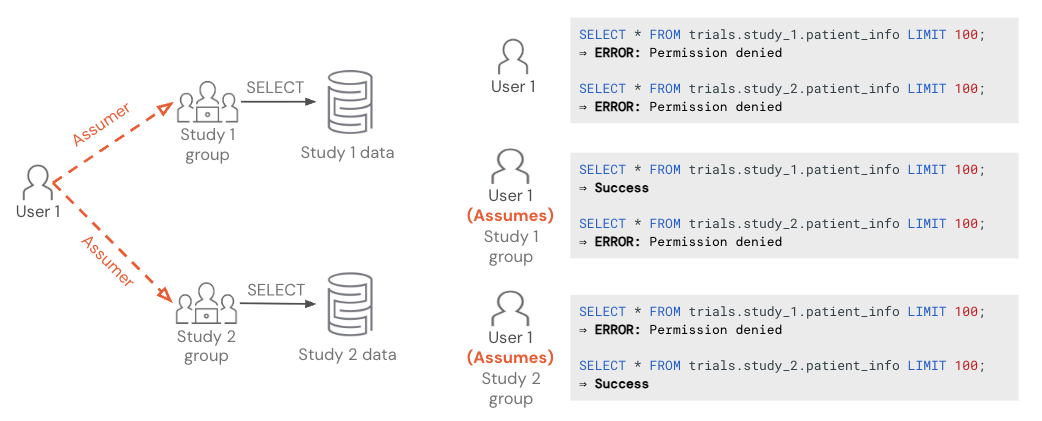
To help describe this pattern, we use two terms for the distinct identities involved. These are explanatory labels, not formal Databricks terminology:
- Access role: a group with no members that holds permissions on the sensitive data. Users assume this role to access the data. The access role must stay empty: any member of the access role inherits its permissions directly and can reach the sensitive data without assuming the role, which defeats exclusive access. In Databricks, an access role is implemented as a group.
- Member group: a group whose members are the users allowed to assume the access role. Granting Assume on the access role to the member group lets all of its members assume the role. A member group is a convenience, not a requirement — you can also grant Assume directly to individual users or service principals. It saves you from managing Assume grants one principal at a time.
Once configured, users assume the access role through any of the supported methods: the role switcher, dedicated access mode clusters assigned to a group, the CLI, the API, or third-party BI tools. See Switch roles.
Databricks supports two approaches for creating the access role. Select the one that best fits how your organization manages identities:
- Account-local access role: Create a Databricks account-local group as the access role. Best when creating a group in Databricks is simpler than creating a new identity provider group (for example, when identity provider changes require an IT ticket or internal review).
- Access role synced from your identity provider: Use an empty identity provider group as the access role, synced to Databricks via SCIM. Best when you already manage groups in your identity provider and prefer to keep all group lifecycle there.
Requirements
- A Unity Catalog-enabled workspace.
- Account administrator or workspace administrator permissions to create groups and grant Assume.
Approach 1: Account-local access role
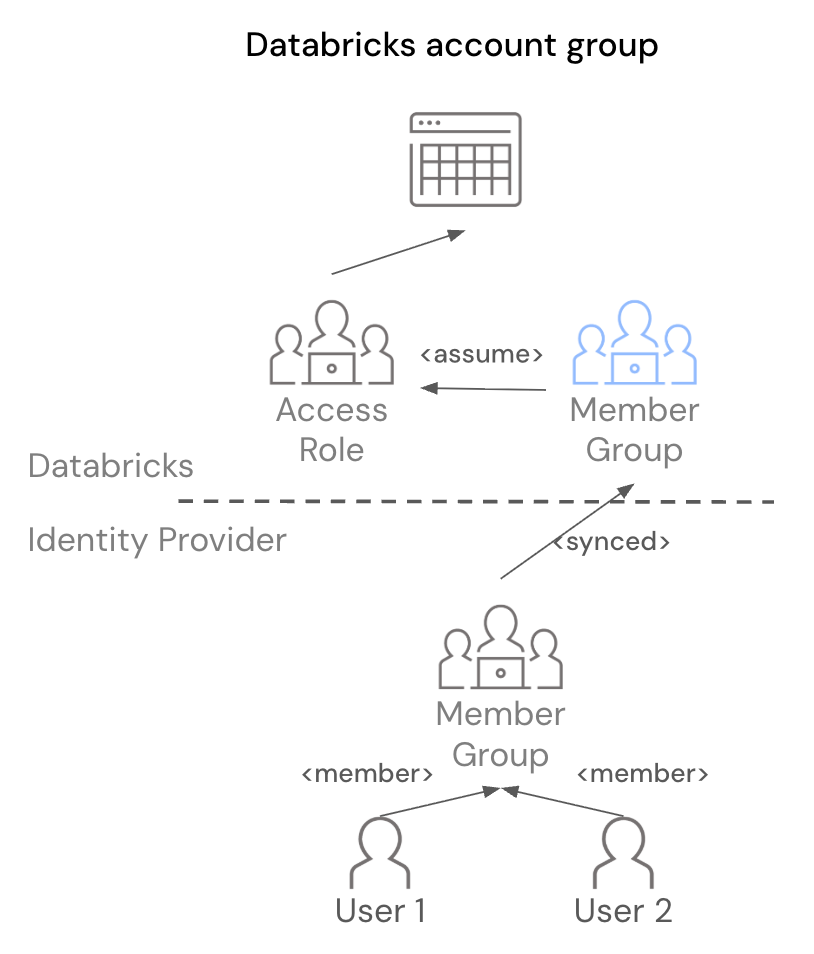
In this approach, the access role is a Databricks account-local group managed entirely within Databricks. The member group can be any group with permission to assume the access role: typically a group synced from your identity provider containing the users allowed to access sensitive data.
Step 1: Create the access role and assign it to your workspace
Create an account-level group with no members to serve as the access role. Databricks recommends using a consistent naming prefix (such as role-) to distinguish access roles from regular groups. For example, if your member group for allowed users is clinical-trial-1-ds, you might name the access role role-clinical-trial-1-ds.
To create the access role:
- Account console
- Account Groups API
- As an account administrator, log in to the account console.
- In the sidebar, click User management.
- On the Groups tab, click Add group.
- Enter a name for the access role. Do not add members.
- Click Confirm.
databricks api post /api/2.0/account/scim/v2/Groups --json '{
  "displayName": "<access-role-name>"
}'
After creating the access role, assign it to the workspaces where it should be available. See Assign a group to a workspace.
Step 2: Grant access to data and workspace assets
Grant the access role permissions on your sensitive data and workspace assets using standard Databricks tooling:
- Unity Catalog securables: Use
GRANTstatements or the Catalog Explorer to grant UC privileges to the access role. - Workspace assets: Use access control lists (ACLs) to grant the access role permissions on notebooks, jobs, SQL warehouses, and other workspace objects.
For example, to grant the access role permission to read a Unity Catalog table:
GRANT USE SCHEMA ON <catalog>.<schema> TO `<access-role-name>`;
GRANT SELECT ON TABLE <catalog>.<schema>.<table> TO `<access-role-name>`;
Step 3: Grant Assume permission
Grant the users, service principals, or member groups that should be able to assume this role the Assume permission. See Manage permissions on a group.
Step 4: Users assume the role
Users who have Assume permission on the access role can assume it. See Switch roles for the available methods.
Approach 2: Access role synced from your identity provider
Use this approach to manage the access role in your identity provider and sync it to Databricks using SCIM, rather than creating a separate Databricks-managed access role. Both the access role and the member group originate in your identity provider.
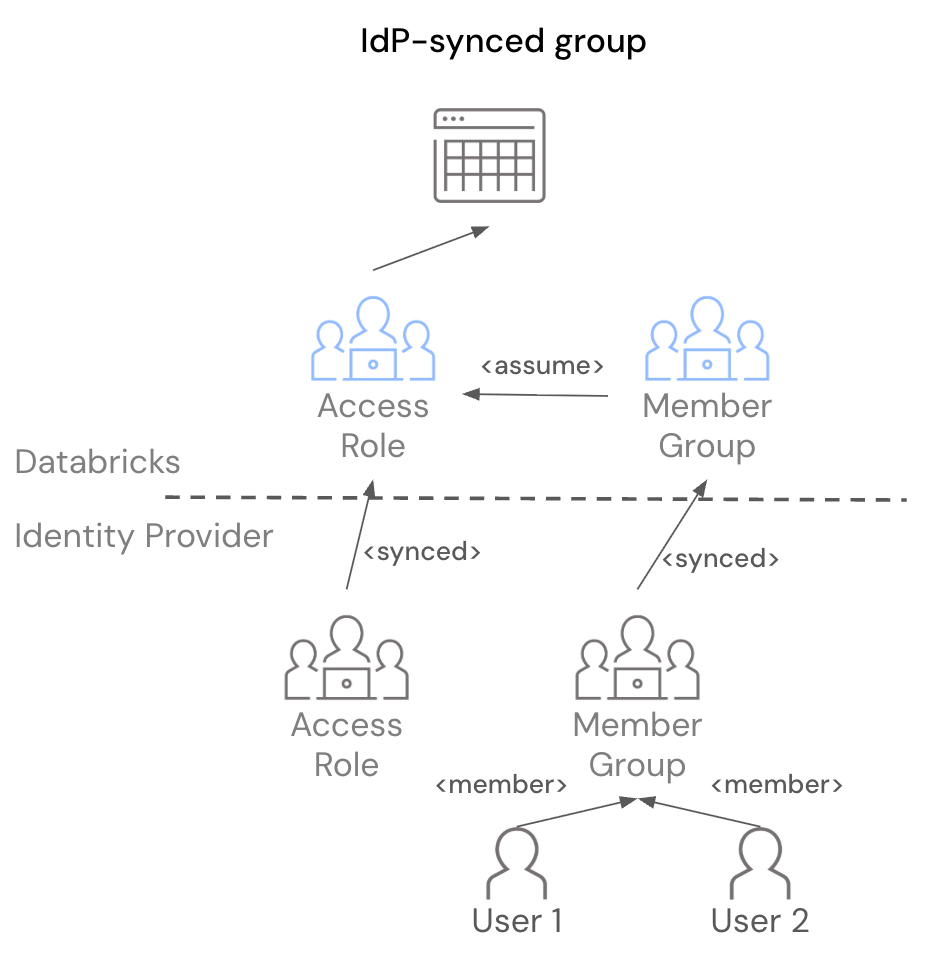
In this approach:
- The access role is an empty identity provider group synced to Databricks and granted permissions on the sensitive data.
- The member group is an existing identity provider group whose members are the users allowed to assume the access role. You grant the member group Assume on the access role, so all of its members automatically inherit Assume.
The access role must remain empty in your identity provider. Members added to the access role in your identity provider are synced to Databricks and inherit the role's permissions directly, which means they can access the sensitive data without needing to assume the role. This breaks the exclusive access model.
Step 1: Set up groups in your identity provider
How you set up the groups depends on whether you are starting fresh or repurposing an existing identity provider group that already has permissions in Databricks.
- Fresh setup
- Repurpose existing
In your identity provider:
- Create an empty group to serve as the access role. For example:
role-clinical-trial-1-ds. - Identify or create the member group whose members should be able to assume the access role. For example:
clinical-trial-1-ds. - Sync both groups to Databricks using your SCIM connector. See Sync users and groups from your identity provider using SCIM.
Use this variant if you already have a group synced from your identity provider whose members have been granted permissions to the sensitive data in Databricks. Repurposing the existing group as the access role avoids re-granting all of its permissions to a new group.
In your identity provider:
- Create a new identity provider group to serve as the member group. For example, if your existing group is
clinical-trial-1-ds, createclinical-trial-1-ds-members. - Move all members of the existing identity provider group into the new member group.
- The existing identity provider group is now empty in your identity provider and becomes the access role. Because it retains its existing Databricks permissions, you can skip Step 3 below.
- Sync both groups to Databricks using your SCIM connector. See Sync users and groups from your identity provider using SCIM.
Step 2: Assign both groups to your workspace
Assign both the access role and the member group to the workspaces where they should be available. See Assign a group to a workspace.
Step 3: Grant access to data and workspace assets
If you repurposed an existing identity provider group in Step 1, the access role already has its Databricks permissions and you can skip this step.
Grant the access role permissions on your sensitive data and workspace assets, following the same steps as Approach 1, Step 2.
Step 4: Grant Assume permission to the member group
Grant the member group the Assume permission on the access role. All members of the member group automatically inherit Assume. See Manage permissions on a group.
Step 5: Users assume the role
Members of the member group can assume the access role. See Switch roles for the available methods.
Next steps
-
- Manage permissions on a group
- Grant or revoke Assume on the access role using the UI or API.
-
- Switch roles
- Use the role switcher, dedicated access mode clusters, the CLI, the API, or third-party BI tools.
-
- Workspace asset sharing controls
- Prevent users assuming the access role from sharing workspace assets the role owns.
-
- Role-based access control (RBAC) limitations
- Understand which Databricks features are not supported when assuming a role, plus other constraints such as gaps in the workspace SCIM API for group management.