Configure inbound Private Link for account-level resources
Inbound Private Link for account-level resources is in Beta. Enable Context-Based Ingress: Account Policy to get started.
This feature gives users in your AWS VPCs or on-premises networks private access to Databricks account-level resources, including the account console and account-level Genie One. Traffic routes through a VPC interface endpoint in your transit VPC instead of the public internet.
If you have multiple Databricks accounts, you can share a single inbound VPC endpoint across them by registering it in each account.
For an overview of private connectivity at Databricks, see Private Link concepts.
With inbound Private Link to account-level resources:
- Configure private access: Configure inbound Private Link connections to the Databricks web application and REST API.
- Enforce private connectivity: Configure private connectivity from users to Databricks.
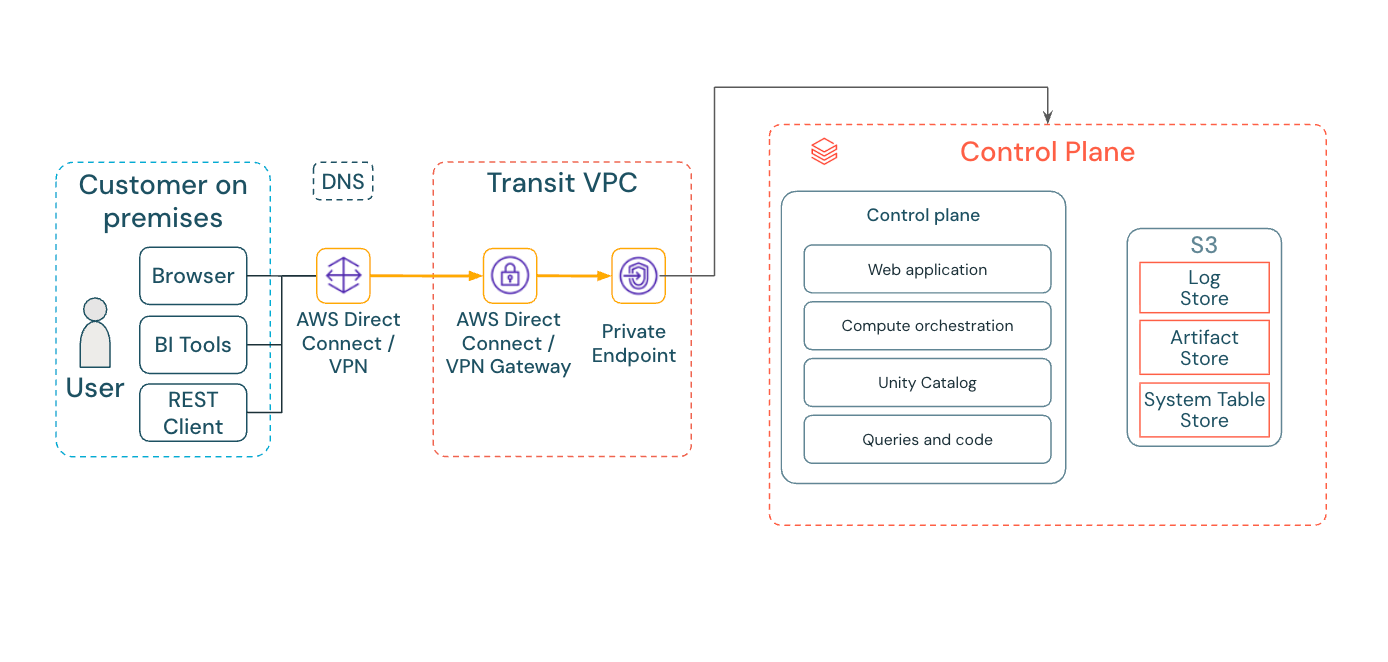
The following diagram shows how inbound Private Link routes user traffic from your transit VPC to Databricks account-level resources through a VPC interface endpoint, instead of over the public internet.
Requirements
- Your Databricks account is on the Enterprise plan.
- You must have all necessary AWS permissions to create new VPC endpoints.
- To establish an inbound Private Link connection for accessing the account-level resource from your on-premises network, connect your on-premises network to an AWS VPC using Direct Connect or VPN.
- Allow network traffic from all relevant address spaces within your local network to connect to your VPC endpoint using TCP port 443.
Configure inbound Private Link
Create VPC endpoints
For account-level private access, you can reuse any General Access VPC endpoint you've already created for inbound Private Link to your workspaces (see Configure inbound PrivateLink for workspaces). This VPC endpoint can live in any region.
To create inbound VPC endpoints in the AWS Management Console:
- Go to the VPC endpoints section of the AWS Management Console.
- In the upper right, set the region to the same region as your transit VPC region.
- Click Create Endpoint.
- When naming the endpoint, Databricks recommends including
general-access, such asdatabricks-general-access-vpce. - Under Type, select Endpoint services that use NLBs and GWLBs.
- In the service name field, paste the service name. Use the table in PrivateLink VPC endpoint services to find the regional service names. Copy the one labeled General Access (including REST API).
- Click Verify service and check that Service name verified appears in a green box. If you encounter an error that states "Service name could not be verified", verify that the regions of your VPC, subnets, and new VPC endpoint are correctly matched.
- In VPC, select your transit VPC.
- In Subnets, select a subnet.
- In the Security groups section, select a security group that allows inbound traffic on port 443 from the IP ranges that need to access the account-level resources.
- Click Create endpoint.
Register VPC endpoints
After you create your VPC endpoints in the AWS Management Console, register them with Databricks.
-
Go to the Databricks account console.
-
Click Security in the sidebar.
-
Click Private endpoints from the vertical navigation.
-
Click Register a private endpoint.
-
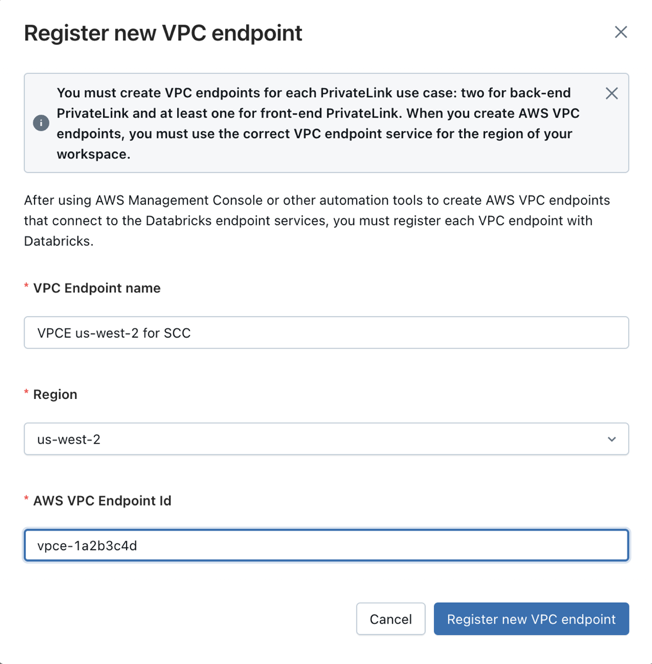
Enter a descriptive name for your VPC endpoint registration.
- A naming convention that includes the purpose is recommended, such as
VPCE for General Access.
- A naming convention that includes the purpose is recommended, such as
-
Select the appropriate region. The region must match the region of the AWS VPC endpoint you're registering.
-
Paste the AWS VPC endpoint ID in the AWS VPC endpoint ID field.
-
Click Register new VPC endpoint.
If you have multiple Databricks accounts, you can register the AWS VPC endpoint in each account.
Configure private access policy with context-based ingress
Once you've registered your General Access VPC endpoint, you must configure a private access policy for your account-level resources using context-based ingress. See Context-based ingress control for more details.
-
In the account console, click Security in the sidebar.
-
Click Context-based ingress & egress control in the sidebar.
-
Under Account level policy, click account-policy.
-
Under Private Network Access, define your private access policy. By default, no registered endpoints are allowed.
- If you would like to allowlist specific registered endpoints while denying all other endpoints, add an allow rule.
- Select the identities and workspace destinations you would like to allow access to (by default, all identities and destinations are allowed).
- Then select source type = Selected private endpoints, and select the General Access VPC endpoint(s) you registered. A General Access endpoint in any region can serve any account-level resource.
- Click Confirm.
- You can also add Deny rules in your policy, which define exceptions to your allow rules.
- If you would like to allowlist all registered endpoints, check Allow access from all private endpoints. By default, this option only includes the first 200 registered VPC endpoints. If your policy requires more than 200 endpoints, contact your account team for an increase.
- If you would like to allowlist specific registered endpoints while denying all other endpoints, add an allow rule.
-
Test your ingress policy in Dry run mode first, before switching it to Enforced.
-
Save your network policy. Context-based ingress policy updates take under 10 minutes to take effect.
There is only one network policy shared across all account-level resources. If you want to configure different policies for different account-level resources, you can do so by adding multiple allow rules to different destinations.
Configure DNS for inbound Private Link
After creating and registering your inbound VPC endpoint, configure DNS to route user requests through your private network to the VPC endpoint's private IP address.
Account-level resources have two valid URLs: your custom URL (for example, <my-custom-account-name>.databricks.com) and accounts.cloud.databricks.com.
If your users have access to the public internet, you only need to route your custom URL to your VPC endpoint to enable inbound Private Link to your account-level resources. However, if your users cannot access the public internet, you also need to route accounts.cloud.databricks.com to enable private unified login (see Configure inbound Private Link with unified login).
For comprehensive DNS configuration instructions, including Route 53 setup, conditional forwarding patterns, and troubleshooting guidance, see Configure DNS for AWS inbound Private Link.
Verify DNS resolution
After configuring DNS, verify that the account-level resource URLs you routed resolve to a private IP address, not a public IP address. These private IPs may differ from the IPs shown below.
Custom URL:
nslookup <my-custom-account-name>.databricks.com
Expected output:
<my-custom-account-name>.databricks.com
Address: 10.176.10.182
accounts.cloud.databricks.com:
nslookup accounts.cloud.databricks.com
Expected output:
accounts.cloud.databricks.com
Address: 10.176.10.182
Disable public access (optional)
Completing Private Link setup doesn't automatically block public internet access to your account-level resources. Public and private access are independent settings. To enforce private-only connectivity, restrict public network access with the account-level context-based ingress policy (see Manage account context-based ingress policies) or account IP access lists (see Configure IP access lists for the account console).
Next steps
-
- Private Link concepts
- Concepts and architecture for private connectivity on Databricks: AWS PrivateLink, Azure Private Link, and GCP Private Service Connect.
-
- Configure inbound PrivateLink for workspaces
- Learn how to configure Private Link for inbound connections.
-
- Context-based ingress control
- This article explains how context-based ingress control lets you control who can reach your Databricks workspace endpoints based on identity, network source, and API scope.