Create AI Search endpoints and indexes
AI Search indexes provide real-time similarity search over a Delta table, and AI Search endpoints serve those indexes for querying. This article describes how to create both. For an introduction to AI Search, see Databricks AI Search.
You can create and manage AI Search components, like an AI Search endpoint and AI Search indices, using the UI, the Python SDK, or the REST API.
For example notebooks illustrating how to create and query AI Search endpoints, see AI Search example notebooks. For reference information, see the Python SDK reference.
Databricks AI Search was formerly known as Databricks Vector Search.
Requirements
- Unity Catalog enabled workspace.
- Serverless compute enabled. For instructions, see Connect to serverless compute.
- For standard endpoints, the source table must have Change Data Feed enabled. See Use change data feed on Databricks.
- To create an AI Search index, you must have CREATE TABLE privileges on the catalog schema where the index will be created.
- To query an index that is owned by another user, you must have additional privileges. See How to query an AI Search index.
Permission to create and manage AI Search endpoints is configured using access control lists. See AI Search endpoint ACLs.
Installation
To use the AI Search SDK, you must install it in your notebook. Use the following code to install the package:
%pip install databricks-ai-search
dbutils.library.restartPython()
Then use the following command to import AISearchClient:
from databricks.ai_search.client import AISearchClient
For information about authentication, see Data protection and authentication.
Create an AI Search endpoint
You can create an AI Search endpoint using the Databricks UI, Python SDK, or the API.
Create an AI Search endpoint using the UI
Follow these steps to create an AI Search endpoint using the UI.
-
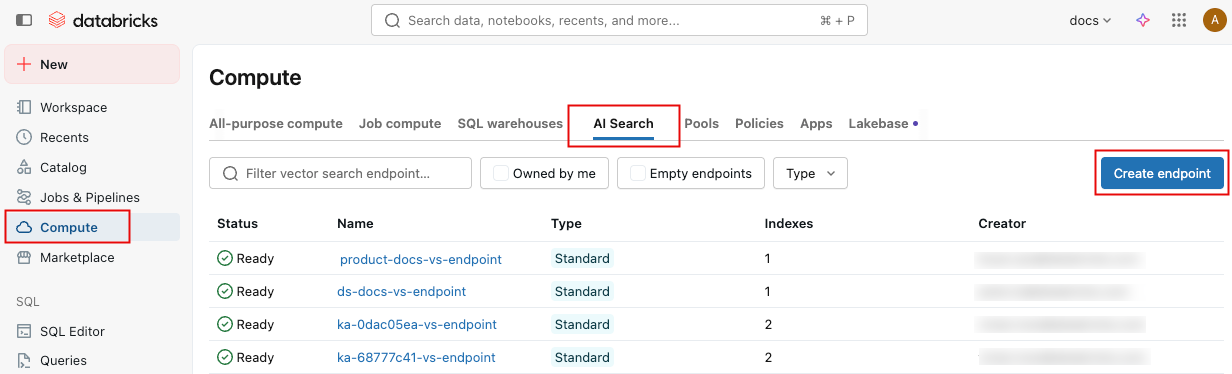
In the left sidebar, click Compute.
-
Click the AI Search tab and click Create endpoint.
-
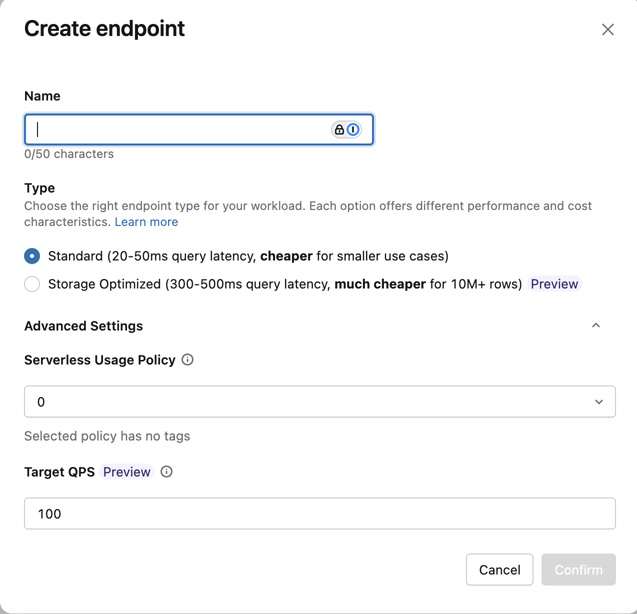
The Create endpoint form opens. Enter a name for this endpoint.
-
In the Type field, select Standard or Storage Optimized. See Endpoint options.
-
(Optional) Under Advanced settings, select a usage policy. See AI Search usage policies.
-
Click Confirm.
Create an AI Search endpoint using the Python SDK
The following example uses the create_endpoint() SDK function to create an AI Search endpoint.
# The following line automatically generates a PAT Token for authentication
client = AISearchClient()

# The following line uses the service principal token for authentication
# client = AISearchClient(service_principal_client_id=<CLIENT_ID>,service_principal_client_secret=<CLIENT_SECRET>)

client.create_endpoint(
    name="vector_search_endpoint_name",
    endpoint_type="STANDARD" # or "STORAGE_OPTIMIZED"
)
Create an AI Search endpoint using the REST API
See the REST API reference documentation: POST /api/2.0/vector-search/endpoints.
Create a vector search endpoint using Declarative Automation Bundles
You can define a vector search endpoint as a resource in Declarative Automation Bundles to manage it as code alongside your jobs, pipelines, and other workspace assets. For an overview of bundles, see What are Declarative Automation Bundles?.
Defining vector search endpoints in a bundle is only supported with the direct deployment engine and requires Databricks CLI version 1.1.0 or later.
The following example defines a standard vector search endpoint:
resources:
  vector_search_endpoints:
    my_vector_search_endpoint:
      name: my_vector_search_endpoint
      endpoint_type: STANDARD
For the full list of supported fields, including endpoint_type, budget_policy_id, min_qps, and permissions, see vector_search_endpoint.
Create an endpoint with a target QPS for high-throughput workloads
For high-throughput workloads, you can create an endpoint with a target QPS. This feature is available for standard endpoints only.
To set a target QPS, use the target_qps parameter. See Scale endpoint throughput with high QPS.
Setting target_qps provisions additional capacity, which increases the cost of the endpoint. You are charged for this additional capacity regardless of actual query traffic. Throughput scaling is best-effort and not guaranteed.
client.create_endpoint(
    name="vector_search_endpoint_name",
    endpoint_type="STANDARD",
    target_qps=500,  # target QPS for high-throughput workloads
)
To change the target QPS on an existing endpoint, use update_endpoint().
from databricks.ai_search.client import AISearchClient

client = AISearchClient()

# Set or update target QPS
response = client.update_endpoint(name="vector_search_endpoint_name", target_qps=500)

# Check scaling status
scaling_info = response.get("endpoint", {}).get("scaling_info", {})
print(f"State: {scaling_info.get('state')}")  # SCALING_CHANGE_IN_PROGRESS or SCALING_CHANGE_APPLIED
After updating target QPS, sync your indexes to apply the new configuration.
(Optional) Create and configure an endpoint to serve the embedding model
If you choose to have Databricks compute the embeddings, you can use a pre-configured Foundation Model APIs endpoint or create a model serving endpoint to serve the embedding model of your choice. See Pay-per-token Foundation Model APIs or Create foundation model serving endpoints for instructions. For example notebooks, see AI Search example notebooks.
When you configure an embedding endpoint, Databricks recommends that you remove the default selection of Scale to zero. Serving endpoints can take a couple of minutes to warm up, and the initial query on an index with a scaled down endpoint might timeout.
The AI Search index initialization might time out if the embedding endpoint isn't configured appropriately for the dataset. You should only use CPU endpoints for small datasets and tests. For larger datasets, use a GPU endpoint for optimal performance.
Create an AI Search index
You can create an AI Search index using the UI, the Python SDK, or the REST API. The UI is the simplest approach.
There are two types of indexes:
- Delta Sync Index automatically syncs with a source Delta Table, automatically and incrementally updating the index as the underlying data in the Delta Table changes.
- Direct Vector Access Index supports direct read and write of vectors and metadata. The user is responsible for updating this table using the REST API or the Python SDK. This type of index cannot be created using the UI. You must use the REST API or the SDK.
Delta Sync Indexes support the following search modes:
- Vector search (ANN or hybrid): Requires embedding columns. Supports both standard and storage-optimized endpoints. You can also use
query_type="FULL_TEXT"for keyword search on these indexes. - Dedicated full-text search index (Beta): A Delta Sync Index created without any embedding columns, for keyword-only search. Available only on storage-optimized endpoints using triggered sync mode. See Create a full-text search index.
The column name _id is reserved. If your source table has a column named _id, rename it before creating an AI Search index.
Create index using the UI
-
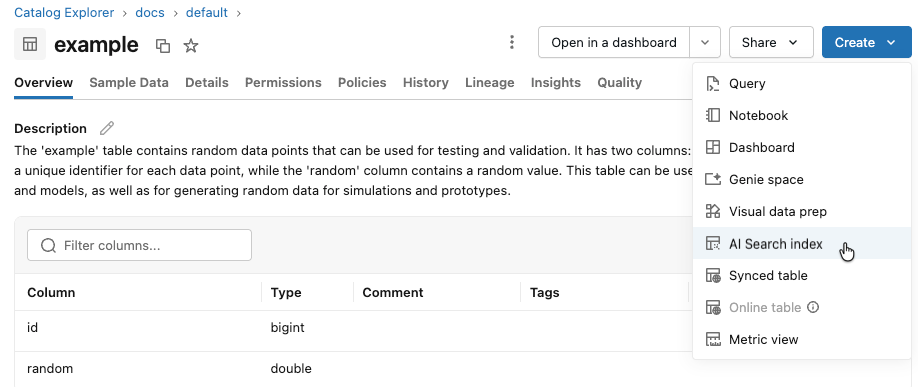
In the left sidebar, click Catalog to open the Catalog Explorer UI.
-
Navigate to the Delta table you want to use.
-
Click the Create button at the upper-right, and select Vector search index from the drop-down menu.
-
Use the selectors in the dialog to configure the index.
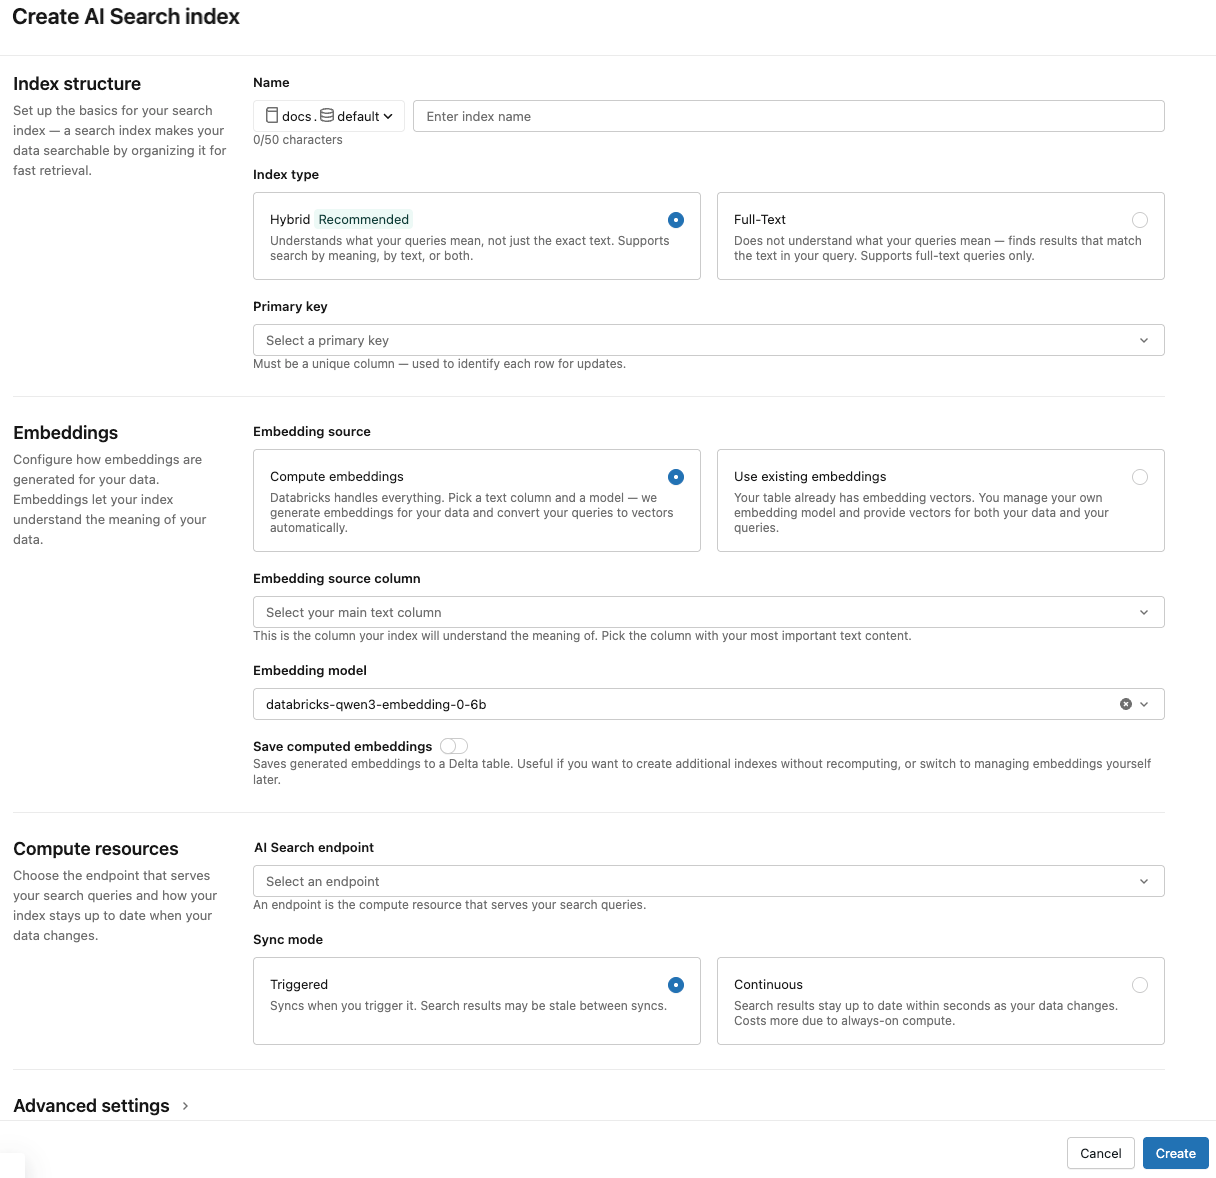
Index structure
Name: Name to use for the online table in Unity Catalog. The name requires a three-level namespace,
<catalog>.<schema>.<name>. Names cannot contain spaces, periods, forward slashes, or control characters.Index type: Select Hybrid to support both semantic (vector) and keyword search on the same index. Select Full-Text for keyword-only search without embeddings. See Create a full-text search index (Beta) for full-text index requirements.
Primary key: Column to use as a primary key.
Embeddings
Embedding source: Indicate if you want Databricks to compute embeddings for a text column in the Delta table (Compute embeddings), or if your Delta table contains precomputed embeddings (Use existing embeddings).
-
If you selected Compute embeddings, select the column that you want embeddings computed for. A Databricks-managed embedding model is selected by default. To use a different model, expand Advanced settings and choose from the Embedding model dropdown. Only text columns are supported.
-
For production applications using standard endpoints, Databricks recommends using the foundation model
databricks-qwen3-embedding-0-6bwith a provisioned throughput serving endpoint. -
For production applications using storage-optimized endpoints with Databricks-hosted models, use the model name directly (for example,
databricks-qwen3-embedding-0-6b) as the embedding model endpoint. Storage optimized endpoints useai_querywith batch inference at ingestion time, providing high throughput for the embedding job. If you prefer to use a provisioned throughput endpoint for querying, specify it in themodel_endpoint_name_for_queryfield when you create the index.
-
-
If you selected Use existing embeddings, select the column that contains the precomputed embeddings and the embedding dimension. The format of the precomputed embedding column should be
array[float]. For storage-optimized endpoints, the embedding dimension must be evenly divisible by 16.
Save computed embeddings: Toggle this setting to save the generated embeddings to a Unity Catalog table. For more information, see Save generated embedding table.
Compute resources
Vector Search endpoint: Select the vector search endpoint to store the index.
Sync mode: Continuous keeps the index in sync with seconds of latency. However, it has a higher cost associated with it since a compute cluster is provisioned to run the continuous sync streaming pipeline.
- For standard endpoints, both Continuous and Triggered perform incremental updates, so only data that has changed since the last sync is processed.
- For storage-optimized endpoints, every sync partially rebuilds the index. For managed indexes on subsequent syncs, any generated embeddings where the source row has not changed are reused and do not need to be recomputed. See Storage-optimized endpoints limitations.
With Triggered sync mode, you use the Python SDK or the REST API to start the sync. See Update a Delta Sync Index.
For storage-optimized endpoints, only Triggered sync mode is supported.
Advanced settings
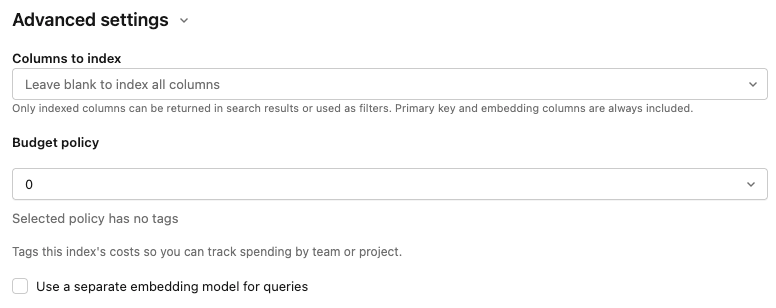
The Advanced settings section is collapsed by default. Most users can accept the defaults. Expand it to fine-tune any of the following:
Embedding model: Override the default embedding model. The default Databricks-hosted model works for most workspaces. Change it here if you need a different one or if you don't have access to the default.
Columns to index: Select the columns to include in the index. If you leave this field blank, all columns from the source table are indexed. The primary key and embedding columns are always included. Only indexed columns can be returned in search results or used as filters.
Usage policy: Apply a usage policy to tag the index's costs for tracking by team or project. See AI Search usage policies.
Use a separate embedding model for queries: If you selected Compute embeddings, select this option to specify a separate embedding model serving endpoint for querying the index. This can be useful if you need a high-throughput endpoint for ingestion but a lower-latency endpoint for querying. The model specified in the Embedding model field is always used for ingestion and is also used for querying unless you specify a different model here.
-
-
When you have finished configuring the index, click Create.
Create index using the Python SDK
The following example creates a Delta Sync Index with embeddings computed by Databricks. For details, see the Python SDK reference.
This example also shows the optional parameter model_endpoint_name_for_query, which specifies a separate embedding model serving endpoint to be used for querying the index.
client = AISearchClient()

index = client.create_delta_sync_index(
  endpoint_name="vector_search_demo_endpoint",
  source_table_name="vector_search_demo.vector_search.en_wiki",
  index_name="vector_search_demo.vector_search.en_wiki_index",
  pipeline_type="TRIGGERED",
  primary_key="id",
  embedding_source_column="text",
  embedding_model_endpoint_name="e5-small-v2", # This model is used for ingestion, and is also used for querying unless model_endpoint_name_for_query is specified.
  model_endpoint_name_for_query="e5-mini-v2"   # Optional. If specified, used only for querying the index.
)
The following example creates a Delta Sync Index with self-managed embeddings.
client = AISearchClient()

index = client.create_delta_sync_index(
  endpoint_name="vector_search_demo_endpoint",
  source_table_name="vector_search_demo.vector_search.en_wiki",
  index_name="vector_search_demo.vector_search.en_wiki_index",
  pipeline_type="TRIGGERED",
  primary_key="id",
  embedding_dimension=1024,
  embedding_vector_column="text_vector"
)
By default, all columns from the source table are synced with the index. To select a subset of columns to sync, use columns_to_sync. The primary key and embedding columns are always included in the index.
To sync only the primary key and the embedding column, you must specify them in columns_to_sync as shown:
index = client.create_delta_sync_index(
  ...
  columns_to_sync=["id", "text_vector"] # to sync only the primary key and the embedding column
)
To sync additional columns, specify them as shown. You do not need to include the primary key and the embedding column, as they are always synced.
index = client.create_delta_sync_index(
  ...
  columns_to_sync=["revisionId", "text"] # to sync the `revisionId` and `text` columns in addition to the primary key and embedding column.
)
Create a full-text search index (Beta)
Full-text search index creation is available as part of the Vector Search: Full-Text Search beta on storage-optimized endpoints only. To use it, enable the Vector Search: Full-Text Search Public Preview. Contact your account team or see Manage Databricks previews to enable previews.
A full-text search index enables keyword-based search on text columns without requiring vector embeddings. This is useful when you want to search for exact terms, identifiers, or keywords rather than semantic similarity.
During sync, Databricks detects the dominant language for each text column and uses a language-specific analyzer. Supported languages are English, Chinese, Japanese, Korean, German, French, Spanish, Italian, Portuguese, and Russian.
Full-text search indexes have the following requirements:
- Must use a storage-optimized endpoint. Standard endpoints are not supported.
- Must use Triggered sync mode. Continuous sync is not supported.
- The parameters
embedding_source_column,embedding_vector_column, andembedding_dimensionare not supported.
The following example creates a full-text search index using the Python SDK.
client = AISearchClient()

index = client.create_delta_sync_index(
  endpoint_name="storage_optimized_endpoint",
  source_table_name="catalog.schema.source_table",
  index_name="catalog.schema.full_text_index",
  pipeline_type="TRIGGERED",
  primary_key="id",
  columns_to_sync=["id", "text", "metadata_column"],
  index_subtype="FULL_TEXT"
)
After creating the index, trigger a sync to populate it:
index.sync()
To query the full-text index, use query_type="FULL_TEXT". See Query an AI Search index for details.
results = index.similarity_search(
  query_text="search terms",
  columns=["id", "text"],
  num_results=10,
  query_type="FULL_TEXT"
)
The following example creates a Direct Vector Access Index.
client = AISearchClient()

index = client.create_direct_access_index(
  endpoint_name="storage_endpoint",
  index_name=f"{catalog_name}.{schema_name}.{index_name}",
  primary_key="id",
  embedding_dimension=1024,
  embedding_vector_column="text_vector",
  schema={
    "id": "int",
    "field2": "string",
    "field3": "float",
    "text_vector": "array<float>"}
)
Create index using the REST API
See the REST API reference documentation: POST /api/2.0/vector-search/indexes.
Save generated embedding table
If Databricks generates the embeddings, you can save the generated embeddings to a table in Unity Catalog. This table is created in the same schema as the vector index and is linked from the vector index page.
The name of the table is the name of the AI Search index, appended by _writeback_table. The name is not editable.
You can access and query the table like any other table in Unity Catalog. However, you should not drop or modify the table, as it is not intended to be manually updated. The table is deleted automatically if the index is deleted.
Update an AI Search index
Update a Delta Sync Index
Indexes created with Continuous sync mode automatically update when the source Delta table changes. If you are using Triggered sync mode, you can start the sync using the UI, the Python SDK, or the REST API.
- Databricks UI
- Python SDK
- REST API
-
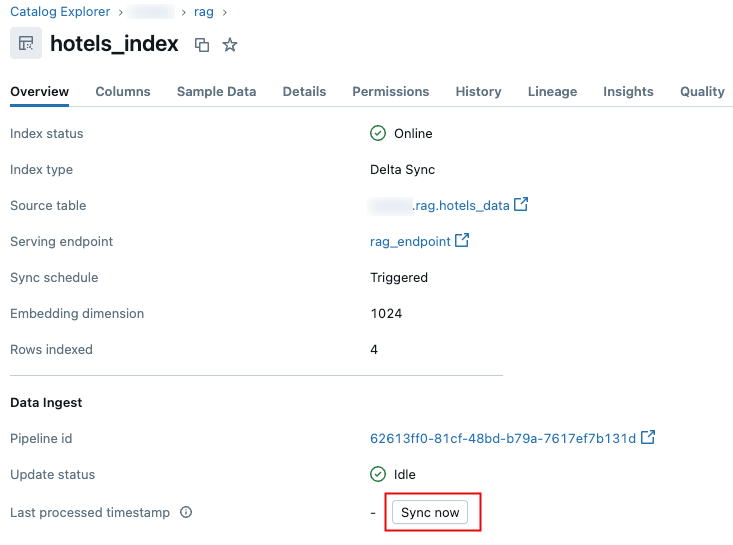
In Catalog Explorer, navigate to the AI Search index.
-
On the Overview tab, in the Data Ingest section, click Sync now.
 .
.
For details, see the Python SDK reference.
client = AISearchClient()
index = client.get_index(index_name="vector_search_demo.vector_search.en_wiki_index")

index.sync()
See the REST API reference documentation: POST /api/2.0/vector-search/indexes/{index_name}/sync.
Update a Direct Vector Access Index
You can use the Python SDK or the REST API to insert, update, or delete data from a Direct Vector Access Index.
- Python SDK
- REST API
For details, see the Python SDK reference.
index.upsert([
    {
        "id": 1,
        "field2": "value2",
        "field3": 3.0,
        "text_vector": [1.0] * 1024
    },
    {
        "id": 2,
        "field2": "value2",
        "field3": 3.0,
        "text_vector": [1.1] * 1024
    }
])
See the REST API reference documentation: POST /api/2.0/vector-search/indexes.
For production applications, Databricks recommends using service principals instead of personal access tokens. Performance can be improved by up to 100 msec per query.
The following code example illustrates how to update an index using a service principal.
export SP_CLIENT_ID=...
export SP_CLIENT_SECRET=...
export INDEX_NAME=...
export WORKSPACE_URL=https://...
export WORKSPACE_ID=...

# Set authorization details to generate OAuth token
export AUTHORIZATION_DETAILS='{"type":"unity_catalog_permission","securable_type":"table","securable_object_name":"'"$INDEX_NAME"'","operation": "WriteVectorIndex"}'

# Generate OAuth token
export TOKEN=$(curl -X POST --url $WORKSPACE_URL/oidc/v1/token -u "$SP_CLIENT_ID:$SP_CLIENT_SECRET" --data 'grant_type=client_credentials' --data 'scope=all-apis' --data-urlencode 'authorization_details=['"$AUTHORIZATION_DETAILS"']' | jq .access_token | tr -d '"')

# Get index URL
export INDEX_URL=$(curl -X GET -H 'Content-Type: application/json' -H "Authorization: Bearer $TOKEN" --url $WORKSPACE_URL/api/2.0/vector-search/indexes/$INDEX_NAME | jq -r '.status.index_url' | tr -d '"')

# Upsert data into AI Search index.
curl -X POST -H 'Content-Type: application/json' -H "Authorization: Bearer $TOKEN" --url https://$INDEX_URL/upsert-data --data '{"inputs_json": "[...]"}'

# Delete data from AI Search index
curl -X DELETE -H 'Content-Type: application/json' -H "Authorization: Bearer $TOKEN" --url https://$INDEX_URL/delete-data --data '{"primary_keys": [...]}'
The following code example illustrates how to update an index using a personal access token (PAT).
export TOKEN=...
export INDEX_NAME=...
export WORKSPACE_URL=https://...

# Upsert data into AI Search index.
curl -X POST -H 'Content-Type: application/json' -H "Authorization: Bearer $TOKEN" --url $WORKSPACE_URL/api/2.0/vector-search/indexes/$INDEX_NAME/upsert-data --data '{"inputs_json": "..."}'

# Delete data from AI Search index
curl -X DELETE -H 'Content-Type: application/json' -H "Authorization: Bearer $TOKEN" --url $WORKSPACE_URL/api/2.0/vector-search/indexes/$INDEX_NAME/delete-data --data '{"primary_keys": [...]}'
How to make schema changes with no downtime
Schema changes to the source table are not supported unless you rebuild the index. This includes modifying existing columns and adding new columns. The index schema is fixed at creation time, so any schema changes require creating a new index to take effect.
Follow these steps to rebuild and deploy the index with no downtime:
- Perform the schema change on your source table.
- Create a new index using the updated schema.
- After the new index is ready, switch traffic to the new index.
- Delete the original index.