Manage instance profiles in Databricks
This article explains how to manage access and update instance profiles in Databricks.
Manage access to instance profiles
Users with permissions to deploy clusters can deploy clusters with any of their assigned instance profiles. All users with access to the cluster gain the permissions as defined by the instance profile. See Instance profiles.
SQL warehouses use a single instance profile for each workspace. See Enable data access configuration. You can then use Hive metastore table access control for fine-grained permissions.
Note
Hive metastore table access control is a legacy data governance model. Databricks recommends that you use Unity Catalog instead for its simplicity and account-centered governance model. You can upgrade the tables managed by the Hive metastore to the Unity Catalog metastore.
Manage access to instance profiles using the admin settings page
As a workspace admin, go to the admin settings page.
Click the Instance Profiles tab.
Select the instance profile you want to update.
In the dropdown below the instance profile details, select or enter the user, group, or service principal:
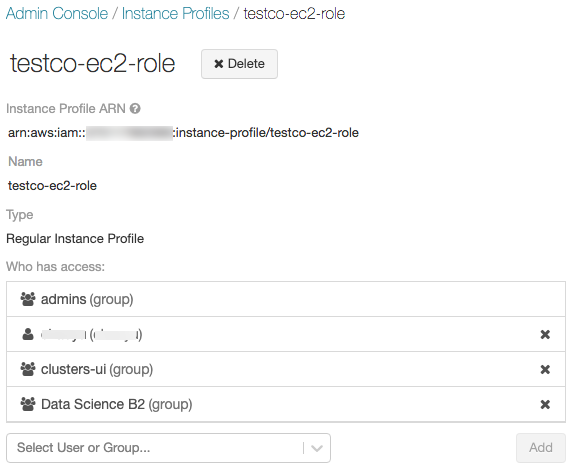
Click Add.
Alternatively, you can assign the instance profiles directly to groups:
As a workspace admin, go to the admin settings page.
Click on the Identity and access tab.
Next to Groups, click Manage.
Select the group you want to update.
On the Instance Profiles tab, click + Add Instance Profiles to group.
On the Add Instance Profiles dialog, click the down arrow to display a drop-down list of instance profiles, and select the ones you want to add.
Click the down arrow to hide the drop-down list.
Click Add.
Manage access to instance profiles using the API
Workspace admins can manage access to instance profiles using workspace-level SCIM APIs for users, service principals, and groups.
For example, to grant a group access to an instance profile, use the following pattern:
curl --netrc -X PATCH \
https://<databricks-instance>/api/2.0/preview/scim/v2/Groups/<group-id> \
--header 'Content-type: application/scim+json' \
--data @update-group.json \
| jq .
update-group.json:
{
  "schemas": [ "urn:ietf:params:scim:api:messages:2.0:PatchOp" ],
  "Operations": [
    {
      {
          "op": "add",
          "path": "roles",
          "value": "<instance-profile-role-arn>"
      }
    }
  ]
}
Replace:
<group-id>with the ID of the group.<instance-profile-role-arn>with the Amazon Resource Name (ARN) of the instance profile role, for examplearn:aws:iam::123456789012:instance-profile/my-role.
For the full API references, see Workspace Groups API, Workspace Users API, and Workspace Service Principals API.
Edit instance profile role ARN
For instance profiles that you’ve already created, you can later edit them but only to specify a different IAM role ARN. This step is required for Databricks SQL Serverless to work with an instance profile whose role name (the text after the last slash in the role ARN) and the instance profile name (the text after the last slash in the instance profile ARN) do not match. For related information, see Enable serverless SQL warehouses.
Go to the admin settings page.
Click the Security tab.
Click Manage next to Instance profiles.
Click the name of your instance profile that you want to edit.
Click Edit. A dialog appears.
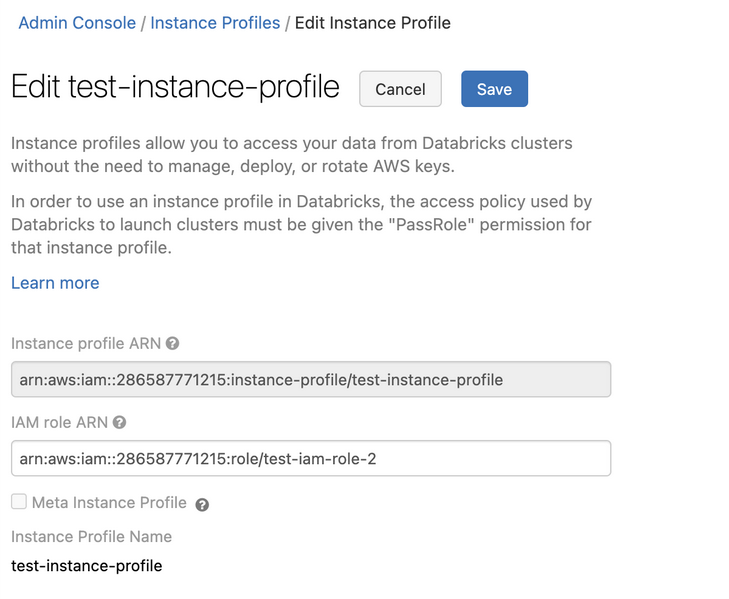
Edit the IAM role ARN field and paste in the role ARN associated with your instance profile. As an admin, you can get this value from the AWS console.
Click Save.