AI エージェントを作成して Databricks Apps にデプロイする
AIエージェントを構築し、Databricks Appsを使用してデプロイします。Databricks Apps を使用すると、エージェントのコード、サーバー構成、およびデプロイ ワークフローを完全に制御できます。このアプローチは、カスタムサーバー動作、Gitベースのバージョン管理、またはローカルIDE開発が必要な場合に理想的です。
エージェントがDatabricksホスト型ツールのみを使用し、ツール呼び出し間でカスタムロジックを必要としない場合は、Supervisor API (Beta)を使用して、Databricksにエージェントループを管理させることができます。
すべての会話型エージェントテンプレートには、組み込みのチャット UI (上記に示すように) が含まれており、追加の設定は不要です。チャット UI は、ストリーミング応答、Markdownレンダリング、Databricks認証、およびオプションの永続チャット履歴をサポートしています。
要件
ワークスペースでDatabricks Apps有効にします。 Databricks Appsワークスペースと開発環境をセットアップするを参照してください。
ステップ 1. エージェントアプリテンプレートをクローンします。
Databricksアプリテンプレートリポジトリから、事前構築済みエージェントテンプレートを使用して開始します。
このチュートリアルでは、agent-openai-agents-sdk テンプレートを使用します。これには以下が含まれます。
- OpenAI Agent SDKを使用して作成されたエージェント
- 会話型REST APIとインタラクティブチャットUIを備えたエージェントアプリケーションのスターターコード
- MLflow を使用してエージェントを評価するコード
テンプレートを設定するには、次のいずれかのパスを選択してください:
- Workspace UI
- Clone from GitHub
ワークスペースUIを使用してアプリテンプレートをインストールします。これによりアプリがインストールされ、ワークスペース内のコンピュートリソースにデプロイされます。その後、アプリケーションファイルをローカル環境に同期して、さらなる開発を行うことができます。
-
Databricksワークスペースで、 + 新規 > アプリ をクリックします。
-
「エージェント」 > 「カスタムエージェント (OpenAI SDK)」をクリックします。
-
openai-agents-templateという名前で新しいMLflowエクスペリメントを作成し、残りのセットアップを完了してテンプレートをインストールします。 -
アプリを作成したら、アプリのURLをクリックしてチャットUIを開きます。
アプリを作成した後、カスタマイズするためにソースコードをローカルマシンにダウンロードしてください:
-
ファイルを同期 の下にある最初のコマンドをコピーしてください。

-
ローカルターミナルで、コピーしたコマンドを実行します。
ローカル環境から開始するには、エージェントテンプレートリポジトリをクローンし、agent-openai-agents-sdkディレクトリを開きます。
git clone https://github.com/databricks/app-templates.git
cd app-templates/agent-openai-agents-sdk
ステップ2: エージェントアプリケーションを理解する
エージェントテンプレートは、これらの主要コンポーネントを備えた本番運用対応のアーキテクチャを示しています。各コンポーネントの詳細については、以下のセクションを開いてください:

各コンポーネントの詳細については、次のセクションをご覧ください。
 組み込みチャット UI
エージェントテンプレートは、チャットアプリテンプレートをフロントエンドとして自動的にフェッチおよび実行します。このチャットUIは、同じDatabricks Appsデプロイにバンドルされ、エージェントとともに提供されるため、追加の設定は不要です。
プロジェクトでチャット UI を直接カスタマイズできます。永続的なチャット履歴とユーザーフィードバック収集を有効にする方法など、チャットアプリの機能の詳細については、Databricks Apps を使用してチャット UI を構築および共有するを参照してください。
 MLflow AgentServer
組み込みのトレーシングと可観測性でエージェントリクエストを処理する非同期 FastAPI サーバー。AgentServer は、エージェントをクエリするための /responses エンドポイントを提供し、リクエストルーティング、ロギング、エラー処理を自動的に管理します。

ResponsesAgent インターフェース
ResponsesAgent インターフェースDatabricks では、エージェントを構築するために MLflow ResponsesAgent を使用することをお勧めします。ResponsesAgentを使用すると、任意のサードパーティ製フレームワークでエージェントを構築し、Databricks AI機能と統合して、堅牢なログ記録、トレース、評価、デプロイ、およびモニタリング機能を実現できます。

ResponsesAgent を作成する方法については、MLflow ドキュメント - Model Serving 用 ResponsesAgent の例を参照してください。
ResponsesAgent 次のような利点があります:
-
高度なエージェント機能
- マルチエージェントのサポート。
- ストリーミング出力 : 出力を小さなチャンクでストリームします。
- **包括的なツール呼び出しメッセージ履歴**: 品質と会話管理を向上させるため、中間ツール呼び出しメッセージを含む複数のメッセージを返します。
- ツール呼び出し確認のサポート
- 長時間実行ツールのサポート。
-
効率化された開発、デプロイ、モニタリング
- あらゆるフレームワークを使用してエージェントを作成する :
ResponsesAgentインターフェースを使用して既存のエージェントをラップすると、AI Playground、Agent Evaluation、およびAgentモニタリングとのすぐに利用できる互換性が得られます。 - 型付きオーサリングインターフェース :型付きPythonクラスを使用してエージェントコードを記述すると、IDEやノートブックのオートコンプリートを活用できます。
- 自動トレース : MLflowは、評価と表示を容易にするために、ストリームされた応答をトレースで自動的に集計します。
- OpenAI
Responsesスキーマと互換性があります。詳細については、「OpenAI: レスポンスとChatCompletion」 を参照してください。
- あらゆるフレームワークを使用してエージェントを作成する :
 OpenAI Agents SDK
このテンプレートでは、会話管理とツールオーケストレーションのエージェントフレームワークとしてOpenAI Agents SDKを使用します。任意のフレームワークを使用してエージェントを作成できます。重要なのは、エージェントをMLflow ResponsesAgentインターフェースでラップすることです。
 MCP (Model Context Protocol) サーバー
このテンプレートはDatabricks MCPサーバーに接続し、エージェントがツールとデータソースにアクセスできるようにします。Databricksにおけるモデルコンテキストプロトコル (MCP) を参照してください。
AIコーディングアシスタントを活用したエージェントの開発
Databricksは、エージェントを作成するためにClaude、Cursor、CopilotなどのAIコーディングアシスタントを使用することをお勧めします。提供されているエージェントスキルと、/.claude/skills および AGENTS.md ファイルを使用して、AIアシスタントがプロジェクト構造、利用可能なツール、ベストプラクティスを理解できるようにします。エージェントはこれらのファイルを自動的に読み取り、Databricks Appsを開発およびデプロイできます。
ステップ 3. エージェントにツールを追加します。
データベースのクエリ、ドキュメントの検索、外部 APIs の呼び出しなどの機能をエージェントに与えるには、MCP サーバーに接続します。エージェントテンプレートには、デフォルトの MCP サーバー接続が含まれています。さらにツールを追加するには、エージェントコードで追加の MCP サーバーを構成し、databricks.yml で必要な権限を付与します。
サポートされているツールタイプとコード例については、「エージェントをツールに接続する」を参照してください。
ローカルのPython関数ツールを定義します
外部データソースやAPIsを必要としない操作では、エージェントコードに直接ツールを定義します。これらのツールはエージェントと同じプロセスで実行され、データの変換、計算、またはユーティリティ操作に役立ちます。
- OpenAI Agents SDK
- LangGraph
OpenAI Agents SDK の @function_tool デコレーターを使用します。
from agents import Agent, function_tool

@function_tool
def get_current_time() -> str:
    """Get the current date and time."""
    from datetime import datetime
    return datetime.now().isoformat()

agent = Agent(
    name="My agent",
    instructions="You are a helpful assistant.",
    model="databricks-claude-sonnet-4-5",
    tools=[get_current_time],
)
LangChainの@toolデコレーターを使用します:
from langchain_core.tools import tool
from langgraph.prebuilt import create_react_agent
from databricks_langchain import ChatDatabricks

@tool
def get_current_time() -> str:
    """Get the current date and time."""
    from datetime import datetime
    return datetime.now().isoformat()

agent = create_react_agent(
    ChatDatabricks(endpoint="databricks-claude-sonnet-4-5"),
    tools=[get_current_time],
)
ローカル関数ツールは、エージェントプロセス内で実行されるため、databricks.ymlでのリソース付与は必要ありません。
ステップ4. Unity AI Gatewayを使用してDatabricks AppsでエージェントからのLLM使用状況を管理します
エージェントのLLM呼び出しをUnity AI Gateway (ベータ版)を介してルーティングすることで、どのプロバイダーが応答しても、すべてのリクエストが同じ制御下で管理されます。リクエストパスにゲートウェイを配置すると、エージェントコードを変更したり、プロバイダーの認証情報をローテーションしたりすることなく、権限を一元化し、アプリごとのコストを割り当て、モデルをスワップし、トラフィックを検査または再生できます。
ベータ版
この機能はベータ版です。ワークスペース管理者は、 プレビュー ページからこの機能へのアクセスを制御できます。Databricksのプレビューを管理するを参照してください。
-
ワークスペースでUnity AI Gatewayを有効にします。Unity AI Gatewayはベータ期間中オプトインです。アカウント管理者は、ゲートウェイエンドポイントを作成またはクエリする前に、アカウントコンソールの [プレビュー] ページから有効にする必要があります。Databricks プレビューの管理を参照してください。
-
エージェントをUnity AI Gatewayエンドポイントに向けます。エージェントコードで、Unity AI Gatewayエンドポイント名を
model引数として渡し、Databricks LLMクライアントでuse_ai_gateway=Trueを設定します。クライアントはゲートウェイ経由でトラフィックをルーティングし、認証を自動的に処理します。
- OpenAI
- LangGraph
from agents import Agent, set_default_openai_api, set_default_openai_client
from databricks_openai import AsyncDatabricksOpenAI

set_default_openai_client(AsyncDatabricksOpenAI(use_ai_gateway=True))
set_default_openai_api("chat_completions")

agent = Agent(
    name="Agent",
    instructions="You are a helpful assistant.",
    model="<ai-gateway-endpoint>",
)
from databricks_langchain import ChatDatabricks

llm = ChatDatabricks(
    model="<ai-gateway-endpoint>",
    use_ai_gateway=True,
)
追加のAPIサーフェス(OpenAI Responses API、Anthropic Messages API、Google Gemini)およびRESTの例については、モデルサービスをクエリするを参照してください。
高度なオーサリングのトピック
ストリーミング応答
ストリーミング応答
ストリーミングを使用すると、エージェントは完全な応答を待たずに、リアルタイムのチャンクで応答を送信できます。ResponsesAgentでストリーミングを実装するには、一連のデルタイベントを発行し、その後に最終完了イベントを発行します。
- デルタイベントの出力 :同じ
item_idを使用して複数のoutput_text.deltaイベントを送信し、リアルタイムでテキストチャンクをストリーム配信します。 - 完了イベントで終了 :最終出力テキスト全体を含むデルタイベントと同じ
item_idで、最終的なresponse.output_item.doneイベントを送信します。
各Deltaイベントは、テキストのチャンクをクライアントにストリームします。最終的な完了イベントには完全な応答テキストが含まれており、Databricksに次の処理を行うよう指示します。
- MLflowトレースを使用してエージェントの出力をトレースする
- Unity AI Gateway推論テーブルでストリーム応答を集約します。
- AI Playground UI ですべての出力を表示する
ストリーミングエラーのプロパゲーション
Databricksは、databricks_output.errorの下で最後のトークンを使用してストリーミング中に発生したエラーを伝播します。このエラーを適切に処理し、表示するかどうかは、呼び出し元のクライアント次第です。
{
  "delta": …,
  "databricks_output": {
    "trace": {...},
    "error": {
      "error_code": BAD_REQUEST,
      "message": "TimeoutException: Tool XYZ failed to execute."
    }
  }
}
カスタムの入力と出力
カスタム入力と出力
一部のシナリオでは、client_typeやsession_idのような追加のエージェント入力、または将来のやり取りのためにチャット履歴に含めるべきではない取得ソースリンクのような出力が必要となる場合があります。
これらのシナリオの場合、MLflow ResponsesAgentはフィールドcustom_inputsとcustom_outputsをネイティブにサポートします。上記のフレームワーク例では、request.custom_inputsを介してカスタム入力にアクセスできます。
The Agent Evaluation review app does not support rendering traces for agents with additional input fields.
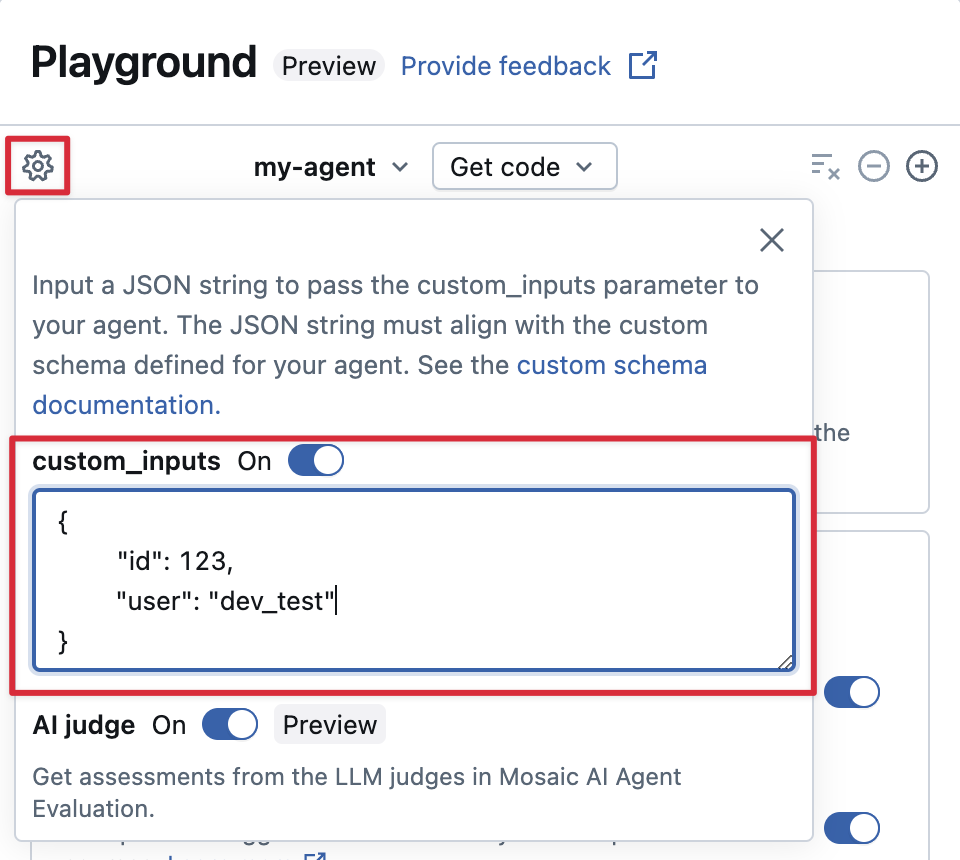
AI Playground とレビュー アプリで custom_inputs を提供します
エージェントが custom_inputs フィールドを使用して追加の入力を受け入れる場合は、AI Playground と レビューアプリの両方でこれらの入力を手動で提供できます。
-
AI PlaygroundまたはAgent Review Appで、歯車アイコン
 を選択します。
 -
custom_inputs を有効にします。
-
エージェントに定義されている入力スキーマに一致する JSON オブジェクトを指定します。
ステップ 5: エージェントアプリをローカルで実行します。
ローカル環境を設定する:
-
uv(Pythonパッケージマネージャー)、nvm(Nodeバージョンマネージャー)、およびDatabricks CLIをインストールします。-
Node 20 LTSを使用するには、以下を実行してください:
Bashnvm use 20
-
agent-openai-agents-sdkフォルダーにディレクトリを変更します。 -
提供されているクイックスタートスクリプトを実行して、依存関係をインストールし、環境を設定して、アプリを起動します。
Bashuv run quickstart
uv run start-app
ブラウザーで http://localhost:8000 にアクセスして組み込みチャット UI を開き、エージェントとのチャットを開始します。
ステップ 6: 認証を構成する
エージェントが Databricks リソースにアクセスするには認証が必要です。Databricks Apps は、アプリケーション認証(サービスプリンシパル)とユーザー認証(ユーザー代理)の 2 種類の認証方法を提供しています。ワークスペース UI を介して、または databricks.yml で宣言型自動化バンドルを使用して宣言的に、いずれかを構成できます。エージェントテンプレートには databricks.yml が付属しているため、テンプレートから開始するとそのパスがデフォルトになります。
すべてのサポートされているリソースタイプ、権限の値、およびエンドツーエンドのdatabricks.ymlウォークスルーを含む完全なリファレンスについては、AIエージェントの認証を参照してください。
- App authorization (default)
- User authorization
アプリの認可では、Databricksがアプリ用に自動的に作成するサービスプリンシパルを使用します。すべてのユーザーが同じ権限を共有します。
エージェントが使用するすべてのリソースを databricks.yml の resources.apps.<app>.resources で宣言します。サービスプリンシパルに宣言された権限を付与するためにバンドルをデプロイします:
resources:
  apps:
    agent_openai_agents_sdk:
      name: 'agent-openai-agents-sdk'
      source_code_path: ./
      config:
        command: ['uv', 'run', 'start-app']
        env:
          - name: MLFLOW_TRACKING_URI
            value: 'databricks'
          - name: MLFLOW_REGISTRY_URI
            value: 'databricks-uc'
          - name: MLFLOW_EXPERIMENT_ID
            value_from: 'experiment'
      resources:
        - name: 'experiment'
          experiment:
            experiment_id: '<experiment-id>'
            permission: 'CAN_EDIT'
        - name: 'llm'
          serving_endpoint:
            name: 'databricks-claude-sonnet-4-5'
            permission: 'CAN_QUERY'
databricks bundle deploy
databricks bundle run agent_openai_agents_sdk
リソースタイプ の完全なリストについては、アプリの認証を参照してください。
ユーザー認可を使用すると、エージェントは各ユーザーの個別のアクセス許可で動作できます。ユーザーごとのアクセス制御や監査証跡が必要な場合に使用します。
このコードをエージェントに追加します:
from agent_server.utils import get_user_workspace_client

# In your agent code (inside @invoke or @stream)
user_workspace = get_user_workspace_client()

# Access resources with the user's permissions
response = user_workspace.serving_endpoints.query(name="my-endpoint", inputs=inputs)
アプリの起動中ではなく、@invokeまたは@stream関数内でget_user_workspace_client()を初期化してください。ユーザー資格情報は、リクエストの処理時にのみ存在します。
エージェントがユーザーに代わって呼び出せる Databricks APIs を構成するには、databricks.yml のアプリにある user_api_scopes の下にスコープを追加します。
resources:
  apps:
    agent_openai_agents_sdk:
      name: 'agent-openai-agents-sdk'
      source_code_path: ./
      user_api_scopes:
        - sql
        - genie
        - model-serving
databricks bundle deploy
databricks bundle run agent_openai_agents_sdk
利用可能なスコープと完全なセットアップ手順については、ユーザー認証を参照してください。
ステップ7: エージェントを評価する
テンプレートにはエージェント評価コードが含まれています。情報については、agent_server/evaluate_agent.pyを参照してください。ターミナルで以下を実行して、エージェントの応答の関連性と安全性を評価します。
uv run agent-evaluate
ステップ8. エージェントをDatabricks Appsにデプロイする
認証を構成した後、Databricksにエージェントをデプロイします。エージェントテンプレートは、デプロイにDatabricks Asset Bundles (DAB)を使用します。テンプレート内のdatabricks.ymlファイルは、アプリの構成とリソースのアクセス許可を定義します。Databricks CLIがインストールされ、構成されていることを確認してください。
ステップ1でワークスペースUIからアプリを作成した場合は、デプロイする前にdatabricks bundle deployment bind agent_openai_agents_sdk <app-name> --auto-approveを実行して、既存のアプリをバンドルにバインドします。そうしないと、databricks bundle deployは「同じ名前のアプリが既に存在します」というエラーで失敗します。
-
デプロイする前に、バンドル構成を検証してエラーを捕捉します:
Bashdatabricks bundle validate -
バンドルをデプロイします。これにより、コードがアップロードされ、
databricks.ymlで定義されているリソース (MLflow エクスペリメント、サービング エンドポイントなど) が構成されます:Bashdatabricks bundle deploy -
アプリを開始または再起動:
Bashdatabricks bundle run agent_openai_agents_sdk
bundle deploy ファイルをアップロードし、リソースを構成するのみです。新しいコードでアプリを起動または再起動するには、bundle run が必要です。
今後の更新には、databricks bundle deploy を実行してから databricks bundle run agent_openai_agents_sdk を実行して再デプロイします。
ステップ9: デプロイされたエージェントをクエリする
次の例では、 OAuthを使用したクイックcurlリクエストを使用しています。 Databricks Appsでは、パーソナル アクセストークン (PAT) はサポートされていません。
Databricks OpenAI クライアントと REST API を含むクエリメソッドの完全なリストについては、「Databricks にデプロイされたエージェントをクエリする」を参照してください。
Databricks CLIを使用してOAuthトークンを生成します:
databricks auth login --host <https://host.databricks.com>
databricks auth token
トークンを使用してエージェントをクエリします:
curl -X POST <app-url.databricksapps.com>/responses \
   -H "Authorization: Bearer <oauth token>" \
   -H "Content-Type: application/json" \
   -d '{ "input": [{ "role": "user", "content": "hi" }], "stream": true }'
Databricks機能との互換性を確保するためにモデルシグネチャを理解する
Databricks では、MLflow モデルシグネチャ を使用して、エージェントの入力スキーマと出力スキーマを定義します。 AI Playground などの製品機能は、エージェントがサポートされている一連のモデルシグネチャのいずれかを持っていることを前提としています。
ResponsesAgent インターフェースを使用してエージェントを作成する推奨アプローチに従うと、MLflow は Databricks 製品機能と互換性のあるエージェントのシグネチャを自動的に推論します。
制限事項
- 中規模および大規模のコンピュートサイズのみがサポートされています。Databricksアプリのコンピュートリソースを構成するを参照してください。
- MLflow Review App Chat UI は、現在、Databricks Apps にデプロイされたエージェントをサポートしていません。既存のトレースを評価するには、デプロイ方法に関係なく機能する ラベリングセッションを使用します。Databricks は、レビューとフィードバックのサポートを チャットボットテンプレートに直接組み込んでいます。
次のステップ
エージェントが開発で動作したら、本番運用に移行してください。推奨されるシーケンスについては、Databricks Apps エージェントを本番運用化するを参照してください。CI/CD、ロードテスト、そして Unity AI Gateway です。