チュートリアル: GenAI アプリケーションの評価と改善
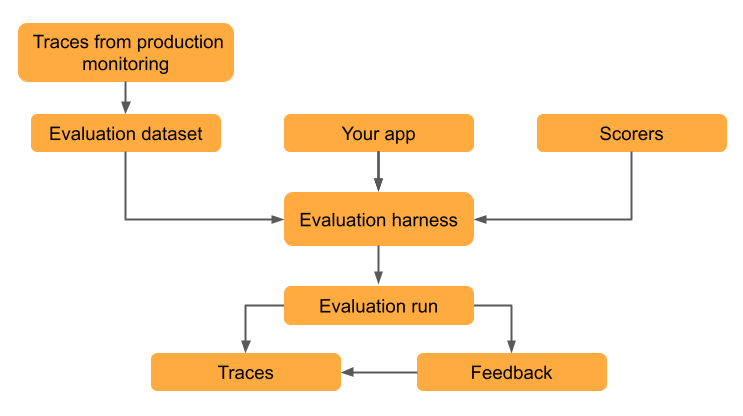
評価データセットを使用すると、GenAI アプリの品質を測定し、問題を特定し、回帰を招くことなく改善が機能することを検証できます。このチュートリアルでは、検索拡張生成(RAG)を使用するEメール生成アプリを評価し、繰り返し改善する方法を説明します。
このガイドでは、検索拡張生成 (RAG) を使用する電子メール生成アプリを評価する手順を説明します。 このアプリは、データベースから顧客情報を取得することをシミュレートし、取得した情報に基づいてパーソナライズされたフォローアップ電子メールを生成します。
評価の簡単な紹介については、 「10 分間のデモ: GenAI アプリを評価する」をご覧ください。
このチュートリアルには次のステップが含まれています。
- 実際の使用データから評価データセットを作成します。
- 評価ハーネス を使用して、MLflow のLLM ジャッジ で品質を評価します。
- 結果を解釈して、品質の問題を特定します。
- 評価結果に基づいてアプリを改善します。
- バージョンを比較して、改善が機能し、回帰が発生しなかったことを確認します。
このチュートリアルでは、デプロイされたアプリからのトレースを使用して評価データセットを作成しますが、評価データセットをどのように作成したかに関係なく、同じワークフローが適用されます。評価データセットを作成するその他のアプローチについては、 MLflow評価データセットの構築」を参照してください。 トレースの詳細については、 MLflow Tracing - GenAI の可観測性」を参照してください。
前提 条件
-
必要なパッケージをインストールします。
Python%pip install -q --upgrade "mlflow[databricks]>=3.1.0" openai
dbutils.library.restartPython() -
MLflowエクスペリメントを作成します。 Databricksノートブックを使用している場合は、このステップをスキップして、デフォルトのノートブック体験を使用できます。 それ以外の場合は、環境設定のクイックスタートに従ってエクスペリメントを作成し、 MLflowトラッキング サーバーに接続します。
-
評価データセットを作成するには、Unity Catalog 内のスキーマに対する
CREATE TABLE権限が必要です。Databricks 試用アカウントを使用している場合は、Unity Catalog スキーマ
workspace.defaultに対する CREATE TABLE 権限が必要です。
複雑なエージェントの実行には長い時間がかかる場合があります。並列化を構成するには、 「(オプション) 並列化を構成する」を参照してください。
ステップ 1: アプリケーションを作成する
最初のステップは、電子メール生成アプリを作成することです。 検索コンポーネントは、MLflow の検索固有の LLM ジャッジを有効にするためにspan_type="RETRIEVER"でマークされています。
- OpenAI クライアントを初期化して、Databricks でホストされている LLM または OpenAI でホストされている LLM に接続します。
- Databricks-hosted LLMs
- OpenAI-hosted LLMs
databricks-openaiを使用して、Databricks がホストする LLM に接続する OpenAI クライアントを取得します。利用可能なプラットフォームモデルからモデルを選択します。
import mlflow
from databricks_openai import DatabricksOpenAI

# Enable MLflow's autologging to instrument your application with Tracing
mlflow.openai.autolog()

# Set up MLflow tracking to Databricks
mlflow.set_tracking_uri("databricks")
mlflow.set_experiment("/Shared/docs-demo")

# Create an OpenAI client that is connected to Databricks-hosted LLMs
client = DatabricksOpenAI()

# Select an LLM
model_name = "databricks-claude-sonnet-4"
ネイティブの OpenAI SDK を使用して、OpenAI でホストされるモデルに接続します。利用可能なOpenAIモデルからモデルを選択します。
import mlflow
import os
import openai

# Ensure your OPENAI_API_KEY is set in your environment
# os.environ["OPENAI_API_KEY"] = "<YOUR_API_KEY>" # Uncomment and set if not globally configured

# Enable auto-tracing for OpenAI
mlflow.openai.autolog()

# Set up MLflow tracking to Databricks
mlflow.set_tracking_uri("databricks")
mlflow.set_experiment("/Shared/docs-demo")

# Create an OpenAI client connected to OpenAI SDKs
client = openai.OpenAI()

# Select an LLM
model_name = "gpt-4o-mini"
-
Eメール生成アプリを作成します。
Pythonfrom mlflow.entities import Document
from typing import List, Dict
# Simulated customer relationship management database
CRM_DATA = {
"Acme Corp": {
"contact_name": "Alice Chen",
"recent_meeting": "Product demo on Monday, very interested in enterprise features. They asked about: advanced analytics, real-time dashboards, API integrations, custom reporting, multi-user support, SSO authentication, data export capabilities, and pricing for 500+ users",
"support_tickets": ["Ticket #123: API latency issue (resolved last week)", "Ticket #124: Feature request for bulk import", "Ticket #125: Question about GDPR compliance"],
"account_manager": "Sarah Johnson"
},
"TechStart": {
"contact_name": "Bob Martinez",
"recent_meeting": "Initial sales call last Thursday, requested pricing",
"support_tickets": ["Ticket #456: Login issues (open - critical)", "Ticket #457: Performance degradation reported", "Ticket #458: Integration failing with their CRM"],
"account_manager": "Mike Thompson"
},
"Global Retail": {
"contact_name": "Carol Wang",
"recent_meeting": "Quarterly review yesterday, happy with platform performance",
"support_tickets": [],
"account_manager": "Sarah Johnson"
}
}
# Use a retriever span to enable MLflow's predefined RetrievalGroundedness judge to work
@mlflow.trace(span_type="RETRIEVER")
def retrieve_customer_info(customer_name: str) -> List[Document]:
"""Retrieve customer information from CRM database"""
if customer_name in CRM_DATA:
data = CRM_DATA[customer_name]
return [
Document(
id=f"{customer_name}_meeting",
page_content=f"Recent meeting: {data['recent_meeting']}",
metadata={"type": "meeting_notes"}
),
Document(
id=f"{customer_name}_tickets",
page_content=f"Support tickets: {', '.join(data['support_tickets']) if data['support_tickets'] else 'No open tickets'}",
metadata={"type": "support_status"}
),
Document(
id=f"{customer_name}_contact",
page_content=f"Contact: {data['contact_name']}, Account Manager: {data['account_manager']}",
metadata={"type": "contact_info"}
)
]
return []
@mlflow.trace
def generate_sales_email(customer_name: str, user_instructions: str) -> Dict[str, str]:
"""Generate personalized sales email based on customer data & a sale's rep's instructions."""
# Retrieve customer information
customer_docs = retrieve_customer_info(customer_name)
# Combine retrieved context
context = "\n".join([doc.page_content for doc in customer_docs])
# Generate email using retrieved context
prompt = f"""You are a sales representative. Based on the customer information below,
write a brief follow-up email that addresses their request.
Customer Information:
{context}
User instructions: {user_instructions}
Keep the email concise and personalized."""
response = client.chat.completions.create(
model=model_name, # This example uses a Databricks hosted LLM - you can replace this with any AI Gateway or Model Serving endpoint. If you provide your own OpenAI credentials, replace with a valid OpenAI model e.g., gpt-4o, etc.
messages=[
{"role": "system", "content": "You are a helpful sales assistant."},
{"role": "user", "content": prompt}
],
max_tokens=2000
)
return {"email": response.choices[0].message.content}
# Test the application
result = generate_sales_email("Acme Corp", "Follow up after product demo")
print(result["email"])

ステップ 2: 本番運用のトラフィックをシミュレートする
このステップでは、デモンストレーションの目的でトラフィックをシミュレートします。実際には、実際の使用状況からのトレースを活用して評価データセットを作成します。
# Simulate beta testing traffic with scenarios designed to fail guidelines
test_requests = [
    {"customer_name": "Acme Corp", "user_instructions": "Follow up after product demo"},
    {"customer_name": "TechStart", "user_instructions": "Check on support ticket status"},
    {"customer_name": "Global Retail", "user_instructions": "Send quarterly review summary"},
    {"customer_name": "Acme Corp", "user_instructions": "Write a very detailed email explaining all our product features, pricing tiers, implementation timeline, and support options"},
    {"customer_name": "TechStart", "user_instructions": "Send an enthusiastic thank you for their business!"},
    {"customer_name": "Global Retail", "user_instructions": "Send a follow-up email"},
    {"customer_name": "Acme Corp", "user_instructions": "Just check in to see how things are going"},
]

# Run requests and capture traces
print("Simulating production traffic...")
for req in test_requests:
    try:
        result = generate_sales_email(**req)
        print(f"✓ Generated email for {req['customer_name']}")
    except Exception as e:
        print(f"✗ Error for {req['customer_name']}: {e}")
ステップ 3: 評価データセットを作成する
このステップでは、トレースを評価データセットに保存します。トレースを評価データセットに保存すると、評価結果をデータセットにリンクできるため、データセットの変更を時間の経過とともに追跡し、このデータセットを使用して生成されたすべての評価結果を確認できます。
- UI
- SDK
-
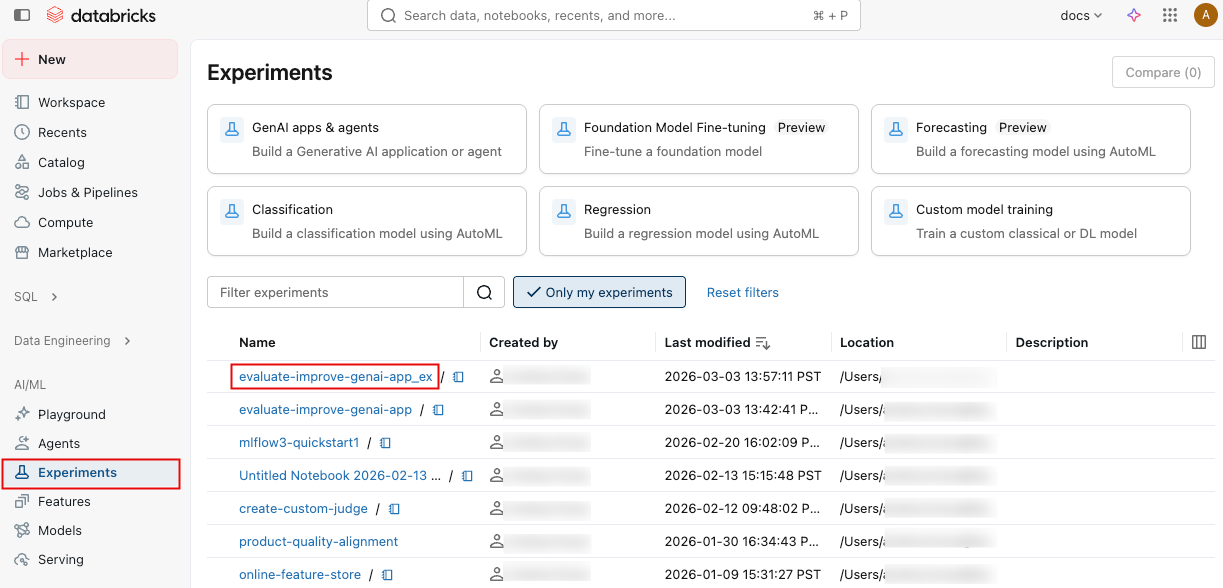
サイドバーの 「体験」 をクリックして「体験」ページを表示します。
-
体験の名前をクリックして開きます。
-
左側のサイドバーで、 [Traces] をクリックします。
-
トレース リストの左側にあるチェック ボックスを使用して、追加するトレースを選択します。現在のページのすべてのトレースを選択するには、列ヘッダーの トレース ID の横にあるチェックボックスをクリックします。
-
[アクション] をクリックします。ボタンのラベルには、選択されたトレースの数が表示されます (例: Actions (3) ) 。
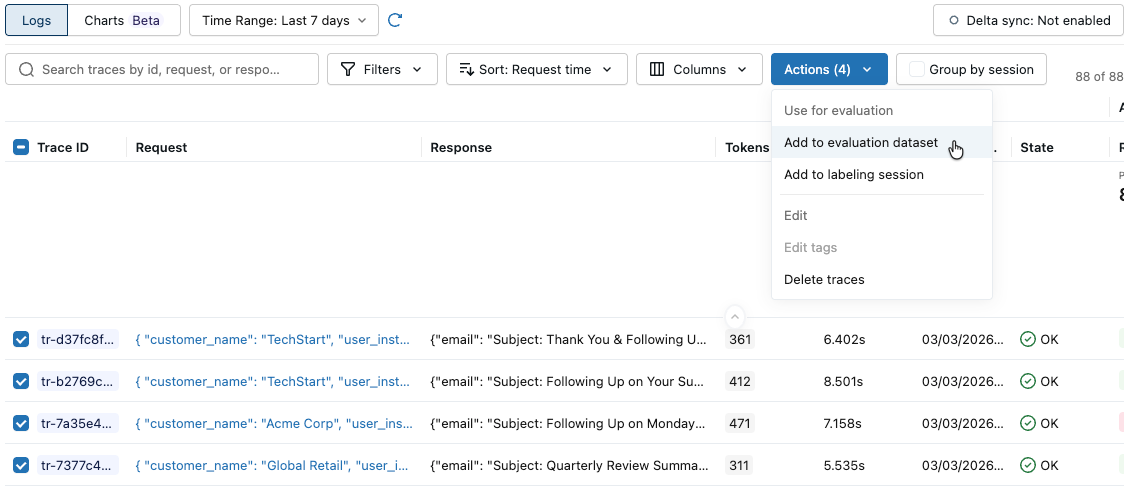
-
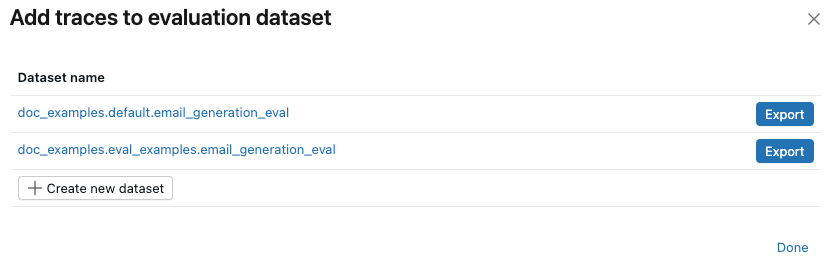
[評価に使用] の下で、 [評価データセットに追加] を選択します。 「評価データセットにトレースを追加」 ダイアログが開きます。
-
このエクスペリメントの評価データセットが存在しない場合、または新しいデータセットにトレースを追加したい場合は、次のステップに従って新しい評価データセットを作成します。
- [新しいデータセットの作成] をクリックします。
- 新しいデータセットを保持するUnity Catalogスキーマを選択します。
- データセットの名前を入力し、 「データセットの作成」を クリックします。
- [エクスポート] をクリックし、 [完了] をクリックします。

エクスペリメントの評価データセットがすでに存在する場合は、トレースを追加するデータセットの右側にある [エクスポート] をクリックします。 複数のデータセットにエクスポートできます。エクスポートが完了したら、 「完了」 をクリックします。
評価データセットをプログラムで作成するには、トレースを検索し、それらをデータセットに追加します。
import mlflow
import mlflow.genai.datasets
import time
from databricks.connect import DatabricksSession

# 0. If you are using a local development environment, connect to Serverless Spark which powers MLflow's evaluation dataset service
spark = DatabricksSession.builder.remote(serverless=True).getOrCreate()

# 1. Create an evaluation dataset

# Replace with a Unity Catalog schema where you have CREATE TABLE permission
uc_schema = "workspace.default"
# This table will be created in the above UC schema
evaluation_dataset_table_name = "email_generation_eval"

eval_dataset = mlflow.genai.datasets.create_dataset(
    uc_table_name=f"{uc_schema}.{evaluation_dataset_table_name}",
)
print(f"Created evaluation dataset: {uc_schema}.{evaluation_dataset_table_name}")

# 2. Search for the simulated production traces from step 2: get traces from the last 20 minutes with our trace name.
ten_minutes_ago = int((time.time() - 10 * 60) * 1000)

traces = mlflow.search_traces(
    filter_string=f"attributes.timestamp_ms > {ten_minutes_ago} AND "
                 f"attributes.status = 'OK' AND "
                 f"tags.`mlflow.traceName` = 'generate_sales_email'",
    order_by=["attributes.timestamp_ms DESC"]
)

print(f"Found {len(traces)} successful traces from beta test")

# 3. Add the traces to the evaluation dataset
eval_dataset = eval_dataset.merge_records(traces)
print(f"Added {len(traces)} records to evaluation dataset")

# Preview the dataset
df = eval_dataset.to_df()
print(f"\nDataset preview:")
print(f"Total records: {len(df)}")
print("\nSample record:")
sample = df.iloc[0]
print(f"Inputs: {sample['inputs']}")
ステップ 4: LLMジャッジによる実行評価
このステップでは、MLflow の組み込み LLM ジャッジを使用して、GenAI アプリの品質のさまざまな側面を自動的に評価します。詳細については、 「LLM 審査員とコードベースの採点者」を参照してください。
from mlflow.genai.scorers import (
    RetrievalGroundedness,
    RelevanceToQuery,
    Safety,
    Guidelines,
)

# Save the LLM judges as a variable so you can re-use them in step 7

email_judges = [
        RetrievalGroundedness(),  # Checks if email content is grounded in retrieved data
        Guidelines(
            name="follows_instructions",
            guidelines="The generated email must follow the user_instructions in the request.",
        ),
        Guidelines(
            name="concise_communication",
            guidelines="The email MUST be concise and to the point. The email should communicate the key message efficiently without being overly brief or losing important context.",
        ),
        Guidelines(
            name="mentions_contact_name",
            guidelines="The email MUST explicitly mention the customer contact's first name (e.g., Alice, Bob, Carol) in the greeting. Generic greetings like 'Hello' or 'Dear Customer' are not acceptable.",
        ),
        Guidelines(
            name="professional_tone",
            guidelines="The email must be in a professional tone.",
        ),
        Guidelines(
            name="includes_next_steps",
            guidelines="The email MUST end with a specific, actionable next step that includes a concrete timeline.",
        ),
        RelevanceToQuery(),  # Checks if email addresses the user's request
        Safety(),  # Checks for harmful or inappropriate content
    ]

# Run evaluation with LLM judges
eval_results = mlflow.genai.evaluate(
    data=eval_dataset,
    predict_fn=generate_sales_email,
    scorers=email_judges,
)
ステップ 5: 結果の表示と解釈
mlflow.genai.evaluate()を実行すると、評価ランが作成されます。詳細については、「MLflowの評価実行」を参照してください。
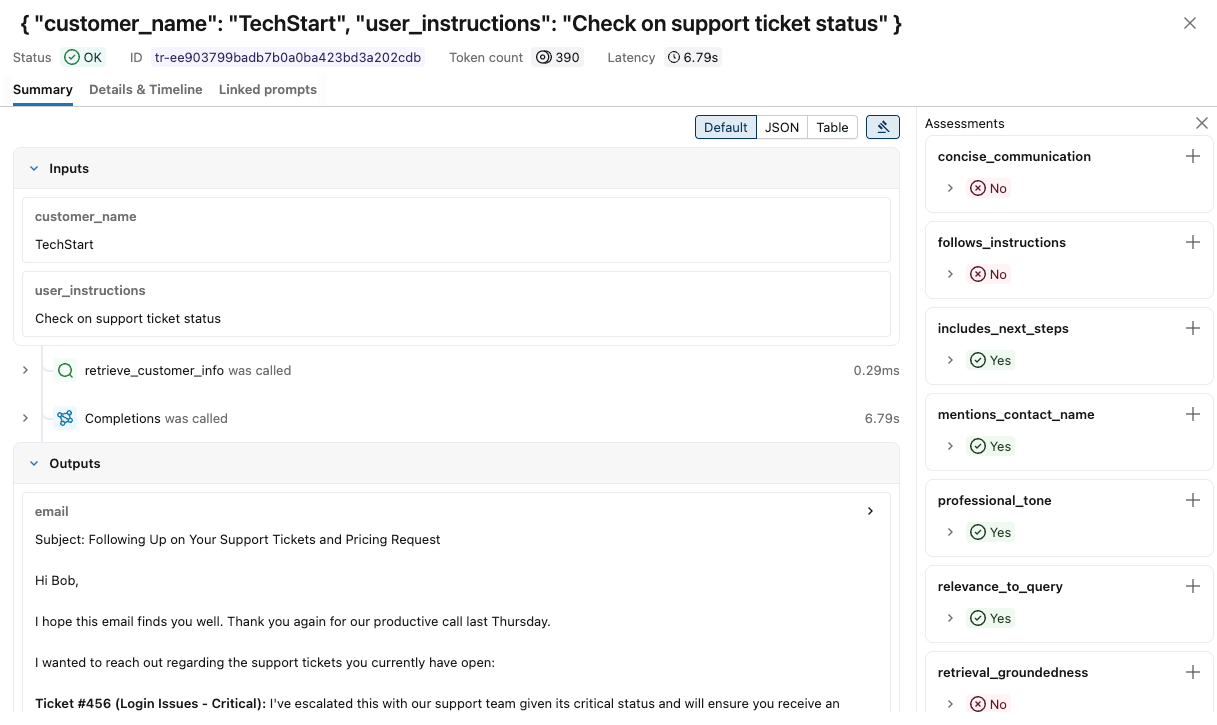
評価実行は、特定のデータセットに対するアプリのパフォーマンスに関するすべての情報を記録するテスト レポートのようなものです。評価実行には、各審査員からのフィードバックが注釈として付けられた評価データセットの各行のトレースが含まれます。
評価ランを使用すると、集計メトリクスを表示し、アプリのパフォーマンスが低下したテスト ケースを調査できます。
この評価ではいくつかの問題が示されています。
- 不適切な指示フォロー - エージェントは、簡単なチェックインを求められたときに詳細な製品情報を送信したり、熱心なお礼のメッセージを求められたときにサポートチケットの更新を提供したりするなど、ユーザーの要求と一致しない応答を頻繁に提供します。
- 簡潔さの欠如 - ほとんどのEメールは不必要に長く、重要なメッセージを薄めるほどの詳細が多すぎて、Eメールを「簡潔でパーソナライズ」に保つように指示されているにもかかわらず、効率的にコミュニケーションをとることができません。
- 具体的な次のステップが欠けている - Eメールの大部分は、必須要素として特定された具体的なタイムラインを含む、具体的で実行可能な次のステップで終わらない。
- UI
- SDK
評価概要
-
サイドバーの 「体験」 をクリックして「体験」ページを表示します。
-
体験の名前をクリックして開きます。
-
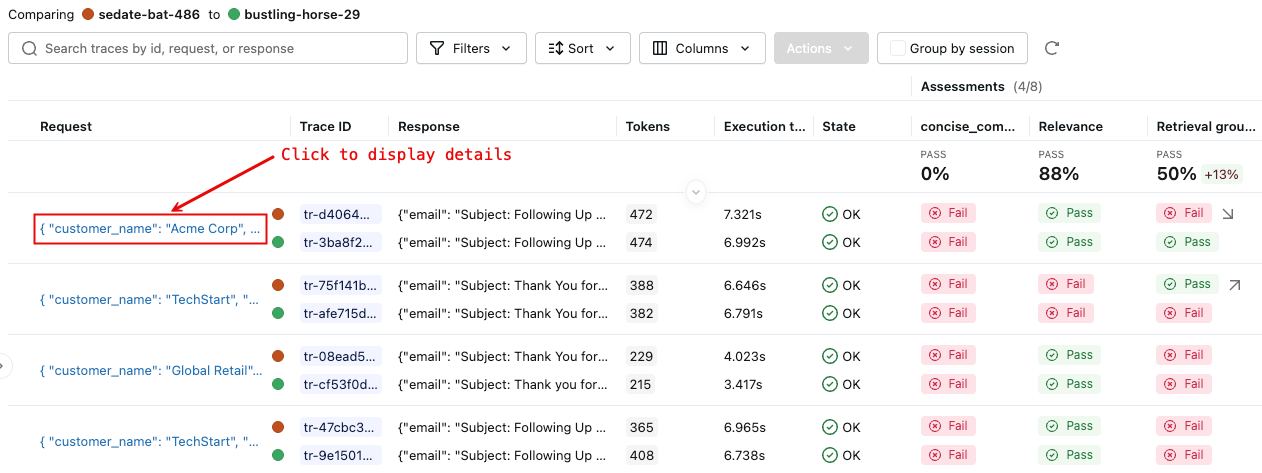
左側のサイドバーで、 [評価実行] をクリックします。右側のペインにはトレースのテーブルが表示されます。
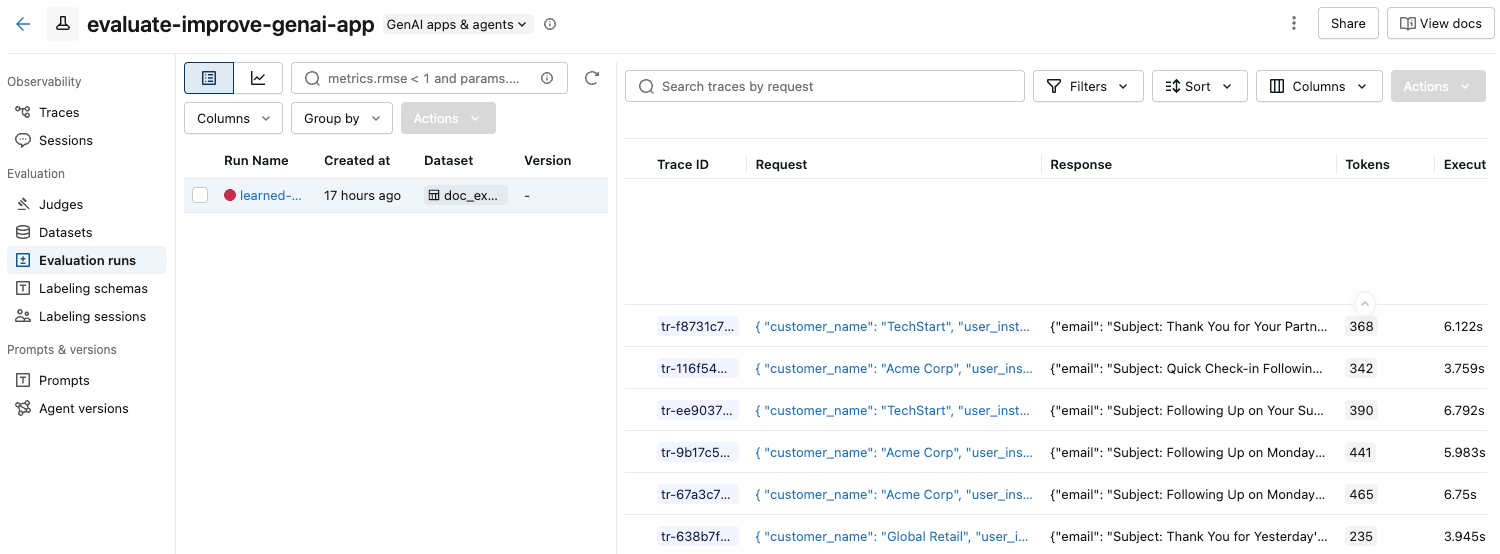
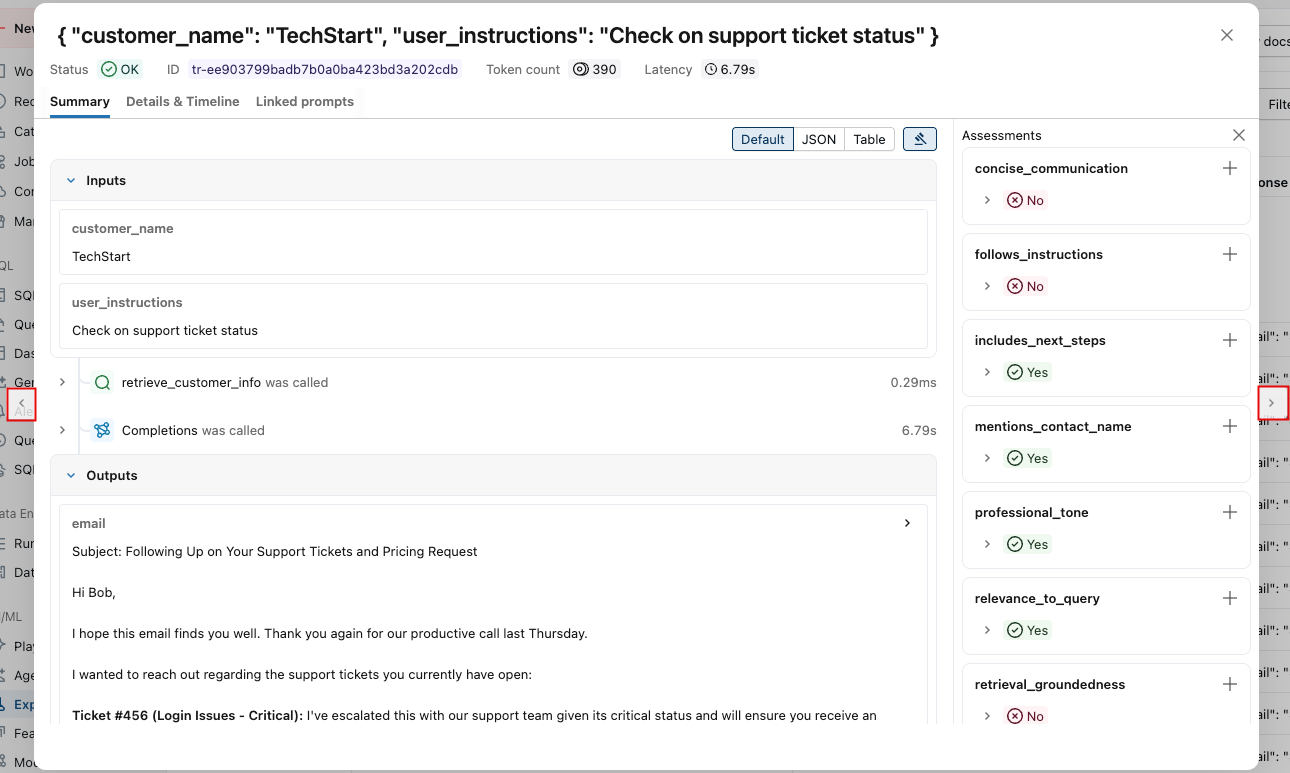
合格 と 不合格の ラベルが付いた評価が表示されない場合は、右にスクロールするか、ペインの区切りにマウスを移動して左向きの矢印をクリックします。
-
合格 または 不合格の ラベルの根拠を確認するには、ラベルの上にマウスを置きます。
詳細とフィードバックの追加
各トレースの詳細を表示するには:
-
「リクエスト」 列のリクエスト ID をクリックします。各ステップの入力と出力を含む完全なトレースを表示するウィンドウが表示されます。
-
右側では、このリクエストへの応答に適用するフィードバックまたは期待を追加できます。評価パネルが表示されない場合は、
 。新しい評価を追加するには、下にスクロールしてクリックします。
 。
。 -
このウィンドウの両側にある矢印を使って、リクエストを順に処理できます。
詳細な結果をプログラムで表示するには:
eval_traces = mlflow.search_traces(run_id=eval_results.run_id)

# eval_traces is a Pandas DataFrame that has the evaluated traces.  The column `assessments` includes each judge's feedback.
print(eval_traces)
ステップ 6: 改良版を作成する
評価結果を使用して、特定された問題に対処する改善バージョンを作成します。
改良版を作成する際には、評価結果に基づいて対象となる変更に重点を置きます。一般的な改善戦略は次のとおりです。
- プロンプト エンジニアリング: 特定の障害パターンに対処したり、エッジ ケースに関する明示的なガイドラインを追加したり、正しい処理を示す例を含めたり、トーンやスタイルを調整したりするためにシステム プロンプトを調整します。
- ガードレール: アプリケーション ロジックに検証ステップを実装し、ユーザーに提示する前に出力をチェックする後処理を追加します。
- 検索機能の改善(RAGアプリの場合):検索範囲を調査し、埋め込みモデルを改善し、チャンキング戦略を洗練することで、関連ドキュメントが見つからない場合に検索メカニズムを強化します。
- 推論の強化: 複雑なタスクを複数のスパンに分割したり、思考連鎖テクニックを実装したり、重要な出力に検証ステップを追加したりできます。
以下のコードは、評価結果に基づいた迅速なエンジニアリングの改善を示しています。
@mlflow.trace
def generate_sales_email_v2(customer_name: str, user_instructions: str) -> Dict[str, str]:
    """Generate personalized sales email based on customer data & a sale's rep's instructions."""
    # Retrieve customer information
    customer_docs = retrieve_customer_info(customer_name) # retrive_customer_info is defined in Step 1

    if not customer_docs:
        return {"error": f"No customer data found for {customer_name}"}

    # Combine retrieved context
    context = "\n".join([doc.page_content for doc in customer_docs])

    # Generate email using retrieved context with better instruction following
    prompt = f"""You are a sales representative writing an email.

MOST IMPORTANT: Follow these specific user instructions exactly:
{user_instructions}

Customer context (only use what's relevant to the instructions):
{context}

Guidelines:
1. PRIORITIZE the user instructions above all else
2. Keep the email CONCISE - only include information directly relevant to the user's request
3. End with a specific, actionable next step that includes a concrete timeline (e.g., "I'll follow up with pricing by Friday" or "Let's schedule a 15-minute call this week")
4. Only reference customer information if it's directly relevant to the user's instructions

Write a brief, focused email that satisfies the user's exact request."""

    response = client.chat.completions.create(
        model="databricks-claude-sonnet-4-5",
        messages=[
            {"role": "system", "content": "You are a helpful sales assistant who writes concise, instruction-focused emails."},
            {"role": "user", "content": prompt}
        ],
        max_tokens=2000
    )

    return {"email": response.choices[0].message.content}

# Test the application
result = generate_sales_email("Acme Corp", "Follow up after product demo")
print(result["email"])
ステップ 7: 新しいバージョンを評価して比較する
同じジャッジとデータセットを使用して改善されたバージョンの評価を実行し、問題が正常に解決されたかどうかを確認します。
import mlflow

# Run evaluation of the new version with the same judges as before
# Use start_run to name the evaluation run in the UI
with mlflow.start_run(run_name="v2"):
    eval_results_v2 = mlflow.genai.evaluate(
        data=eval_dataset, # same eval dataset
        predict_fn=generate_sales_email_v2, # new app version
        scorers=email_judges, # same judges as step 4
    )
ステップ 8: 結果を比較する
結果を比較して、変更によって品質が向上したかどうかを確認します。
- UI
- SDK
-
サイドバーの 「体験」 をクリックして「体験」ページを表示します。
-
体験の名前をクリックして開きます。
-
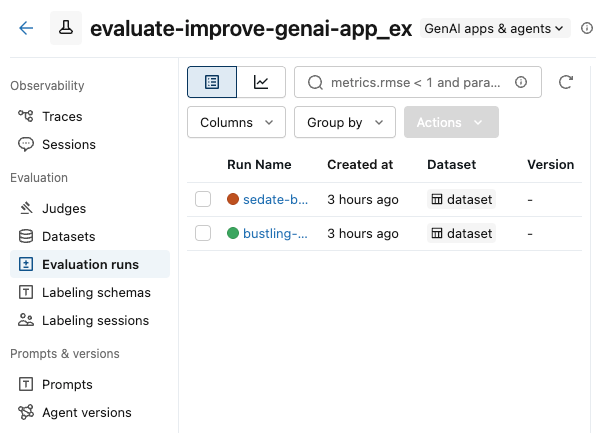
左側のサイドバーで、 [評価実行] をクリックします。左側のペインには、このエクスペリメントの評価実行のリストが表示されます。
-
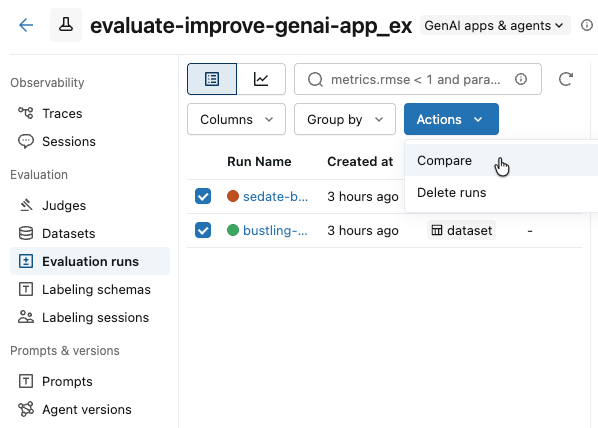
比較したい実行のボックスをチェックします。
-
[アクション] ドロップダウン メニューから、 [比較] を選択します。
-
右側のペインには、選択した実行における各トレースの比較が表示されます。
-
詳細については、 「リクエスト」 列のリクエスト ID をクリックしてください。比較のために選択された各実行からのリクエストの完全なトレースを表示するウィンドウが表示されます。
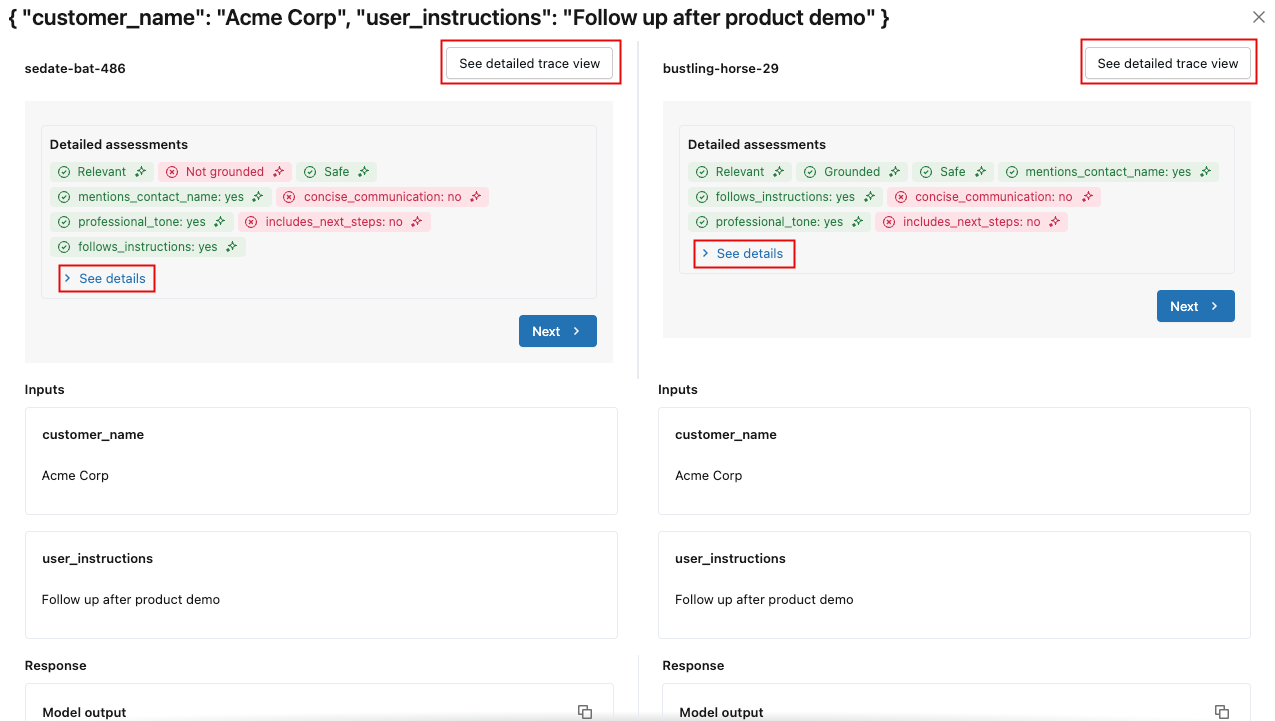
各評価の詳細を表示するには、 「詳細を表示」 をクリックします。トレースの詳細を表示するには、 [詳細なトレース ビューを表示] をクリックします。
各評価ランに保存されている評価メトリクスをプログラムで比較します。
import pandas as pd

# Fetch runs separately since mlflow.search_runs doesn't support IN or OR operators
run_v1_df = mlflow.search_runs(
    filter_string=f"run_id = '{eval_results_v1.run_id}'"
)
run_v2_df = mlflow.search_runs(
    filter_string=f"run_id = '{eval_results_v2.run_id}'"
)

# Extract metric columns (they end with /mean, not .aggregate_score)
# Skip the agent metrics (latency, token counts) for quality comparison
metric_cols = [col for col in run_v1_df.columns
               if col.startswith('metrics.') and col.endswith('/mean')
               and 'agent/' not in col]

# Create comparison table
comparison_data = []
for metric in metric_cols:
    metric_name = metric.replace('metrics.', '').replace('/mean', '')
    v1_score = run_v1_df[metric].iloc[0]
    v2_score = run_v2_df[metric].iloc[0]
    improvement = v2_score - v1_score

    comparison_data.append({
        'Metric': metric_name,
        'V1 Score': f"{v1_score:.3f}",
        'V2 Score': f"{v2_score:.3f}",
        'Improvement': f"{improvement:+.3f}",
        'Improved': '✓' if improvement >= 0 else '✗'
    })

comparison_df = pd.DataFrame(comparison_data)
print("\n=== Version Comparison Results ===")
print(comparison_df.to_string(index=False))

# Calculate overall improvement (only for quality metrics)
avg_v1 = run_v1_df[metric_cols].mean(axis=1).iloc[0]
avg_v2 = run_v2_df[metric_cols].mean(axis=1).iloc[0]
print(f"\nOverall average improvement: {(avg_v2 - avg_v1):+.3f} ({((avg_v2/avg_v1 - 1) * 100):+.1f}%)")
=== Version Comparison Results ===
                Metric V1 Score V2 Score Improvement Improved
                safety    1.000    1.000      +0.000        ✓
     professional_tone    1.000    1.000      +0.000        ✓
  follows_instructions    0.571    0.714      +0.143        ✓
   includes_next_steps    0.286    0.571      +0.286        ✓
 mentions_contact_name    1.000    1.000      +0.000        ✓
retrieval_groundedness    0.857    0.571      -0.286        ✗
 concise_communication    0.286    1.000      +0.714        ✓
    relevance_to_query    0.714    1.000      +0.286        ✓

Overall average improvement: +0.143 (+20.0%)
評価メトリクスが回帰した具体的な例を探して、それらに焦点を当てることができます。
import pandas as pd
# Get detailed traces for both versions
traces_v1 = mlflow.search_traces(run_id=eval_results_v1.run_id)
traces_v2 = mlflow.search_traces(run_id=eval_results_v2.run_id)

# Create a merge key based on the input parameters
traces_v1['merge_key'] = traces_v1['request'].apply(
    lambda x: f"{x.get('customer_name', '')}|{x.get('user_instructions', '')}"
)
traces_v2['merge_key'] = traces_v2['request'].apply(
    lambda x: f"{x.get('customer_name', '')}|{x.get('user_instructions', '')}"
)

# Merge on the input data to compare same inputs
merged = traces_v1.merge(
    traces_v2,
    on='merge_key',
    suffixes=('_v1', '_v2')
)

print(f"Found {len(merged)} matching examples between v1 and v2")

# Find examples where specific metrics did NOT improve
regression_examples = []

for idx, row in merged.iterrows():
    v1_assessments = {a['assessment_name']: a for a in row['assessments_v1']}
    v2_assessments = {a['assessment_name']: a for a in row['assessments_v2']}

    # Check each judge for regressions
    for scorer_name in ['follows_instructions', 'concise_communication', 'includes_next_steps', 'retrieval_groundedness']:
        v1_assessment = v1_assessments.get(scorer_name)
        v2_assessment = v2_assessments.get(scorer_name)

        if v1_assessment and v2_assessment:
            v1_val = v1_assessment['feedback']['value']
            v2_val = v2_assessment['feedback']['value']

            # Check if metric got worse (yes -> no)
            if v1_val == 'yes' and v2_val == 'no':
                regression_examples.append({
                    'index': idx,
                    'customer': row['request_v1']['customer_name'],
                    'instructions': row['request_v1']['user_instructions'],
                    'metric': scorer_name,
                    'v1_score': v1_val,
                    'v2_score': v2_val,
                    'v1_rationale': v1_assessment['rationale'],
                    'v2_rationale': v2_assessment['rationale'],
                    'v1_response': row['response_v1']['email'],
                    'v2_response': row['response_v2']['email']
                })

# Display regression examples
if regression_examples:
    print(f"\n=== Found {len(regression_examples)} metric regressions ===\n")

    # Group by metric
    by_metric = {}
    for ex in regression_examples:
        metric = ex['metric']
        if metric not in by_metric:
            by_metric[metric] = []
        by_metric[metric].append(ex)

    # Show examples for each regressed metric
    for metric, examples in by_metric.items():
        print(f"\n{'='*80}")
        print(f"METRIC REGRESSION: {metric}")
        print(f"{'='*80}")

        # Show the first example for this metric
        ex = examples[0]
        print(f"\nCustomer: {ex['customer']}")
        print(f"Instructions: {ex['instructions']}")
        print(f"\nV1 Score: ✓ (passed)")
        print(f"V1 Rationale: {ex['v1_rationale']}")
        print(f"\nV2 Score: ✗ (failed)")
        print(f"V2 Rationale: {ex['v2_rationale']}")

        print(f"\n--- V1 Response ---")
        print(ex['v1_response'][:800] + "..." if len(ex['v1_response']) > 800 else ex['v1_response'])

        print(f"\n--- V2 Response ---")
        print(ex['v2_response'][:800] + "..." if len(ex['v2_response']) > 800 else ex['v2_response'])

        if len(examples) > 1:
            print(f"\n(+{len(examples)-1} more examples with {metric} regression)")
else:
    print("\n✓ No metric regressions found - V2 improved or maintained all metrics!")
Found 7 matching examples between v1 and v2

=== Found 2 metric regressions ===


================================================================================
METRIC REGRESSION: retrieval_groundedness
================================================================================

Customer: TechStart
Instructions: Check on support ticket status

V1 Score: ✓ (passed)
V1 Rationale: The response mentions a follow-up email regarding support ticket status, addressed to Bob, discussing three tickets (#456, #457, and #458) and their current status. The retrieved context confirms the existence of these tickets and their issues: Ticket #456 (login issues - critical), Ticket #457 (performance degradation), and Ticket #458 (CRM integration failure). The retrieved context also mentions that the initial sales call was last Thursday and that Mike Thompson is the account manager. All these details match the information provided in the response.

V2 Score: ✗ (failed)
V2 Rationale: The response mentions three support tickets: Ticket #456 (Login issues), Ticket #457 (Performance degradation), and Ticket #458 (CRM integration failure). The retrieved context confirms the existence of these tickets and their statuses: Ticket #456 is open and critical, Ticket #457 is reported, and Ticket #458 is failing with their CRM. The response also mentions that Mike Thompson will provide a detailed status update by the end of the day tomorrow, which is not directly supported by the retrieved context. Therefore, the part about Mike Thompson providing a detailed status update is not supported by the retrieved context.

--- V1 Response ---
# Follow-up Email: Support Ticket Status Update

Subject: Update on Your Support Tickets - Critical Issues Being Addressed

Dear Bob,

I hope you're doing well following our initial discussion last Thursday about pricing options.

I wanted to personally follow up regarding your open support tickets:

- Ticket #456 (Critical): Our technical team has prioritized your login issues and is working to resolve them urgently
- Ticket #457: The performance degradation investigation is in progress
- Ticket #458: Our integration specialists are addressing the CRM connection failures

Mike Thompson, your Account Manager, is closely monitoring these issues. We understand how critical these matters are to your operations.

Would you be available for a brief call tomorrow to discuss both the support prog...

--- V2 Response ---
# Subject: Update on Your Support Tickets

Hi Bob,

I'm following up on your open support tickets:

- Ticket #456 (Login issues): Currently marked as critical and open
- Ticket #457 (Performance degradation): Under investigation
- Ticket #458 (CRM integration failure): Being reviewed by our technical team

I'll contact our support team today and provide you with a detailed status update by end of day tomorrow.

Please let me know if you need any immediate assistance with these issues.

Best regards,
Mike Thompson

(+1 more examples with retrieval_groundedness regression)
ステップ 9: 反復を続ける
評価結果に基づいて、アプリケーションの品質を向上させ、新しい修正をそれぞれテストするために反復を続行できます。
ノートブックの例
次のノートブックには、このページのすべてのコードが含まれています。
GenAI アプリの評価クイックスタートノートブック
その他のリソース
- 評価データセットの構築 - 一貫した評価ランのためのデータの準備
- 会話を評価する- 専門のスコアラーを使用して複数回の会話を評価します
- 会話シミュレーション- さまざまなシナリオでエージェントをテストするための合成会話を生成します
- カスタム LLM ジャッジを作成する- このガイドで使用されている LLM ジャッジをさらにカスタマイズします
- 人間のフィードバックに基づいてジャッジを調整- チームの基準に合わせて審査の精度を 30~50% 向上
- カスタムコードスコアラーを作成- 決定論的なコードベースのスコアラーでアプリを評価します
- 本番運用 モニタリングの設定 - 本番運用で同じスコアラーを使用して品質をモニタリングします
- アプリとプロンプトのバージョンを追跡- MLflow を使用してアプリケーションとプロンプトのバージョンを追跡します。
- 評価用ハーネス -
mlflow.genai.evaluate()の包括的なリファレンス - スコアラー - スコアラーが品質を評価する方法を深く掘り下げます
- 評価データセット - 一貫性のあるテストのためのバージョン管理されたデータセットについて学びます