自動トレース
1 行のコードを追加すると、生成AIアプリを自動的にトレース mlflow.<library>.autolog()できます。自動トレースは、 20+サポートされているライブラリとフレームワーク ですぐに使用できます。
サーバレス コンピュート クラスタでは、生成 AI トレースフレームワークの自動ログは自動的に有効になりません。 トレースする特定の統合に対して適切な mlflow.<library>.autolog() 関数を呼び出して、自動ログを明示的に有効にする必要があります。
前提 条件
Databricks では、最新の GenAI トレース機能のために MLflow 3 を推奨しています。
Databricks ノートブックで次のコマンドを実行して、使用する mlflow パッケージと統合パッケージをインストールします。この例では、OpenAI を使用しています。
- MLflow 3
- MLflow 2.x
- mlflow[databricks]>=3.1 : 生成AI 機能と Databricks 接続を備えたコア MLflow 機能。
- openai>=1.0.0: このページの 基本的な自動トレースの例 を実行する場合にのみ必要です (他の LLM プロバイダーを使用している場合は、代わりにそれぞれの SDK をインストールしてください)。
- 追加のライブラリ : 使用する統合の特定のライブラリをインストールします。
基本要件をインストールします。
%pip install --upgrade "mlflow[databricks]>=3.1" "openai>=1.0.0"
# Also install libraries you want to trace (langchain, anthropic, etc.)

dbutils.library.restartPython()
- mlflow[databricks]>=2.15.0,<3.0.0 :Databricks 接続を備えたコア MLflow 機能。
- openai>=1.0.0: このページの 基本的な自動トレースの例 を実行する場合にのみ必要です (他の LLM プロバイダーを使用している場合は、代わりにそれぞれの SDK をインストールしてください)。
- 追加のライブラリ : 使用する統合の特定のライブラリをインストールします。
基本要件をインストールします。
%pip install --upgrade "mlflow[databricks]>=2.15.0,<3.0.0" "openai>=1.0.0"
# Also install libraries you want to trace (langchain, anthropic, etc.)

dbutils.library.restartPython()
資格情報の構成
- Databricks notebook
- External environment
Databricks ノートブックで、必要な LLM API キーを設定します。
import os
os.environ["OPENAI_API_KEY"] = "your-api-key"

# Add other provider keys as needed
# os.environ["ANTHROPIC_API_KEY"] = "your-api-key"
# os.environ["MISTRAL_API_KEY"] = "your-api-key"
外部環境にいる場合は、Databricks の資格情報と LLM API キーを設定します。
export DATABRICKS_HOST="https://your-workspace.cloud.databricks.com"
export DATABRICKS_TOKEN="your-databricks-token"


# Add other provider keys as needed
#export OPENAI_API_KEY="your-openai-api-key"
# export ANTHROPIC_API_KEY="your-anthropic-api-key"
# export MISTRAL_API_KEY="your-mistral-api-key"
自動トレースの例
MLflow は、サポートされている 20 以上のフレームワークを自動的にトレースします。DatabricksインフラモデルAPIsに接続するOpenAIエージェントの自動トレースを有効にする方法は次のとおりです。
import mlflow
import os
from openai import OpenAI

# Databricks Foundation Model APIs use Databricks authentication.

mlflow.set_tracking_uri("databricks")
mlflow.set_experiment("/Shared/databricks-sdk-autolog-example")

# Enable auto-tracing for OpenAI (which will trace Databricks Foundation Model API calls)
mlflow.openai.autolog()

# Create OpenAI client configured for Databricks
client = OpenAI(
    api_key=os.environ.get("DATABRICKS_TOKEN"),
    base_url=f"{os.environ.get('DATABRICKS_HOST')}/serving-endpoints"
)

# Query Llama 4 Maverick using OpenAI client
response = client.chat.completions.create(
    model="databricks-llama-4-maverick",
    messages=[
        {"role": "system", "content": "You are a helpful assistant."},
        {"role": "user", "content": "What are the key features of MLflow Tracing?"}
    ],
    max_tokens=150,
    temperature=0.7
)

print(response.choices[0].message.content)
# Your calls to Databricks Foundation Model APIs are automatically traced!
複数のフレームワークの自動トレース
同じエージェント内の複数のフレームワークに対して自動トレースを使用できます。サポートされているすべてのフレームワークを参照してください。
次のコードは、OpenAI の直接 API 呼び出し、 LangChain チェーン、カスタムロジックを 1 つのトレースに組み合わせて、デバッグとモニタリングを容易にします。
%pip install --upgrade "langchain==0.3.7" "langchain-openai==0.2.8"
import mlflow
import openai
from mlflow.entities import SpanType
from langchain_openai import ChatOpenAI
from langchain_core.prompts import ChatPromptTemplate

# Enable auto-tracing for both OpenAI and LangChain
mlflow.openai.autolog()
mlflow.langchain.autolog()

# Create OpenAI client
client = openai.OpenAI()

@mlflow.trace(span_type=SpanType.CHAIN)
def multi_provider_workflow(query: str):
    # First, use OpenAI directly for initial processing
    analysis = client.chat.completions.create(
        model="gpt-4o-mini",
        messages=[
            {"role": "system", "content": "Analyze the query and extract key topics."},
            {"role": "user", "content": query}
        ]
    )
    topics = analysis.choices[0].message.content

    # Then use LangChain for structured processing
    llm = ChatOpenAI(model="gpt-4o-mini")
    prompt = ChatPromptTemplate.from_template(
        "Based on these topics: {topics}\nGenerate a detailed response to: {query}"
    )
    chain = prompt | llm
    response = chain.invoke({"topics": topics, "query": query})

    return response

# Run the function
result = multi_provider_workflow("Explain quantum computing")
手動トレースと自動トレースの組み合わせ
自動トレースで @mlflow.trace を使用して、次のシナリオの統合トレースを作成します。
- 1 つのワークフローで複数の LLM コール
- 異なるプロバイダーによるマルチエージェントシステム
- LLM 呼び出し間のカスタムロジック
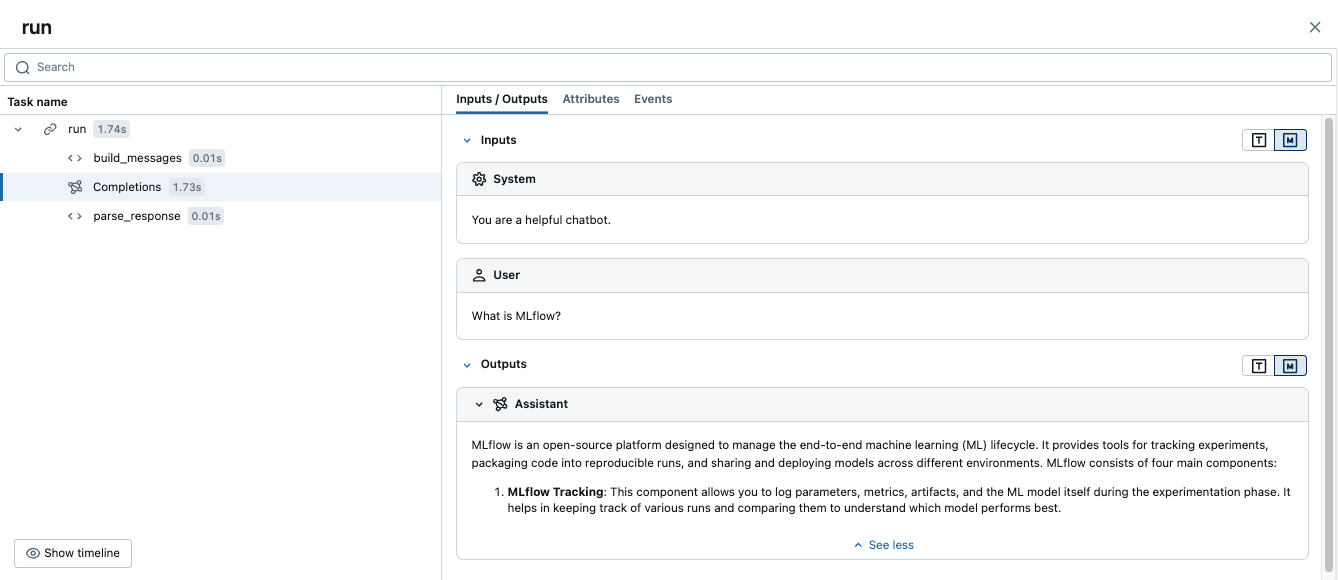
import mlflow
import openai
from mlflow.entities import SpanType

mlflow.openai.autolog()

# Create OpenAI client
client = openai.OpenAI()

@mlflow.trace(span_type=SpanType.CHAIN)
def run(question):
    messages = build_messages(question)
    # MLflow automatically generates a span for OpenAI invocation
    response = client.chat.completions.create(
        model="gpt-4o-mini",
        max_tokens=100,
        messages=messages,
    )
    return parse_response(response)


@mlflow.trace
def build_messages(question):
    return [
        {"role": "system", "content": "You are a helpful chatbot."},
        {"role": "user", "content": question},
    ]


@mlflow.trace
def parse_response(response):
    return response.choices[0].message.content


run("What is MLflow?")
このコードを実行すると、手動スパンと自動 OpenAI トレースを組み合わせた 1 つのトレースが生成されます。
高度な例:複数のLLMコール
次の例は、自動トレースが単一のワークフローで複数の LLM 呼び出しをキャプチャする方法を示しています。
このパターンは、最初にクエリを分析し、次にその分析に基づいて応答を生成するなど、アプリケーションで順次決定を行う必要がある場合に役立ちます。
import mlflow
import openai
from mlflow.entities import SpanType

# Enable auto-tracing for OpenAI
mlflow.openai.autolog()

# Create OpenAI client
client = openai.OpenAI()

@mlflow.trace(span_type=SpanType.CHAIN)
def process_user_query(query: str):
    # First LLM call: Analyze the query
    analysis = client.chat.completions.create(
        model="gpt-4o-mini",
        messages=[
            {"role": "system", "content": "Analyze the user's query and determine if it requires factual information or creative writing."},
            {"role": "user", "content": query}
        ]
    )
    analysis_result = analysis.choices[0].message.content

    # Second LLM call: Generate response based on analysis
    if "factual" in analysis_result.lower():
        # Use a different model for factual queries
        response = client.chat.completions.create(
            model="gpt-4o-mini",
            messages=[
                {"role": "system", "content": "Provide a factual, well-researched response."},
                {"role": "user", "content": query}
            ]
        )
    else:
        # Use a different model for creative queries
        response = client.chat.completions.create(
            model="gpt-4o-mini",
            messages=[
                {"role": "system", "content": "Provide a creative, engaging response."},
                {"role": "user", "content": query}
            ]
        )

    return response.choices[0].message.content

# Run the function
result = process_user_query("Tell me about the history of artificial intelligence")
これにより、次のトレースが 1 つ作成されます。
- 親スパン
process_user_query - OpenAI 呼び出し用の 2 つの子スパン
その他のリソース
- 自動トレース統合- サポートされている 20 以上のライブラリとフレームワークを参照
- デコレータを使用した手動トレース - カスタムスパンを追加して、自動トレースされたLLM呼び出しとともにビジネスロジックをキャプチャします