手動およびカスタムトレース
Automatic tracing は、1回の呼び出しで 30 以上のフレームワークをインストルメント化します。自動ログ記録がカバーしていないコード(カスタムエージェントのロジック、独自仕様のフレームワーク、正確に観測したい実行パスなど)をインストルメント化する必要がある場合は、手動トレースを使用します。エージェントが Databricks で実行されるか外部インフラストラクチャで実行されるかに関係なく、同じ APIs が機能します。
どのメソッドですか?
手法 | 使用する場合 | 自動的な親子関係 | 例外処理 |
|---|---|---|---|
Python関数全体のトレース | はい | 自動 | |
関数内のコード ブロックのトレース | はい | 自動 | |
TypeScript または JavaScript 関数のトレース | はい | 自動 | |
カスタムトレース ID、外部オブザーバビリティシステムとの統合 | いいえ — 手動 | 手動 |
前提条件
- Python
- Node.js
%pip install --upgrade "mlflow[databricks]>=3.1.0"
dbutils.library.restartPython()
npm install mlflow-tracing
Node.js 14 以降が必要です。自動OpenAIトレースを使用するには、以下もインストールします:
npm install mlflow-openai
@mlflow.trace デコレーター
@mlflow.trace デコレータは、任意の Python 関数に対してスパンを作成します。関数の名前、入力、出力、および実行時間が自動的にキャプチャされ、追加のコードなしで親子関係と例外の記録が管理されます。
import mlflow


@mlflow.trace(span_type="func", attributes={"key": "value"})
def add_1(x):
    return x + 1


@mlflow.trace(span_type="func", attributes={"key1": "value1"})
def minus_1(x):
    return x - 1


@mlflow.trace(name="Trace Test")
def trace_test(x):
    step1 = add_1(x)
    return minus_1(step1)


trace_test(4)
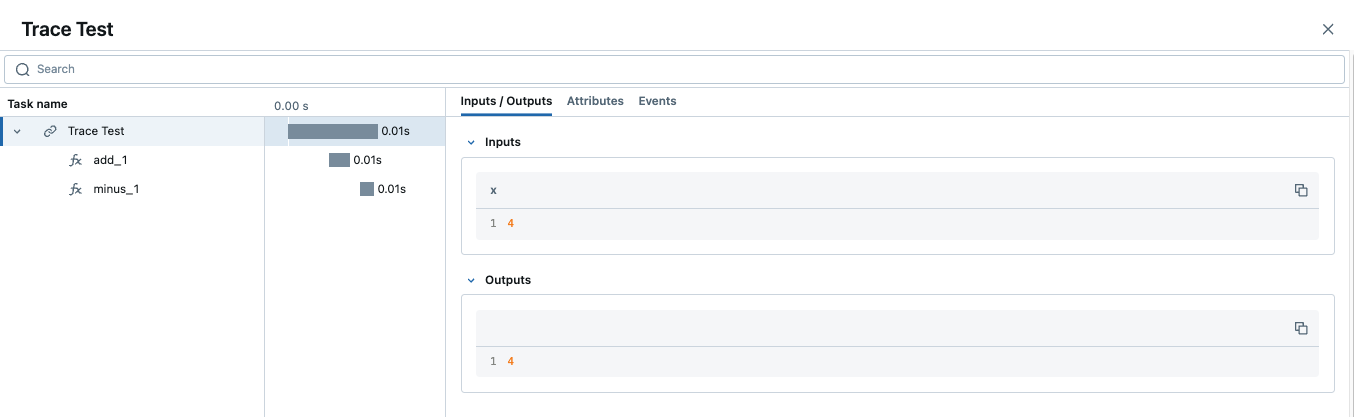
トレースに同じ名前のスパンが複数含まれている場合、MLflow は自動インクリメントされるサフィックス(_1、_2 など)を追加します。
スパンのカスタマイズ
このデコレータは、3つのオプション引数を受け入れます:
name— default スパン名 (関数名) を上書きしますspan_type— スパンタイプを設定します。組み込みの スパン タイプ またはカスタム文字列を使用します。attributes— キーと値のメタデータをスパンに追加します
関数内から属性を動的に更新するには、mlflow.get_current_active_span() を呼び出します:
from mlflow.entities import SpanType

@mlflow.trace(span_type=SpanType.LLM)
def invoke(prompt: str):
    model_id = "gpt-4o-mini"
    span = mlflow.get_current_active_span()
    span.set_attributes({"model": model_id})
    return client.invoke(messages=[{"role": "user", "content": prompt}], model=model_id)
他のデコレータでの使用
@mlflow.trace を 最も外側 のデコレータとして配置します。最初になっていない場合、内側のデコレータによる変更が反映されず、不完全なトレースが生成される可能性があります。
# Correct: @mlflow.trace is outermost
@mlflow.trace(name="my_function")
@other_decorator
def my_function(x, y):
    return x + y
トレースタグと UI プレビューの追加
トレースされた関数内で mlflow.update_current_trace() を使用して、トレース UI の Request / Response プレビュー列をカスタマイズします。同じ呼び出しでタグを添付できます。タグとメタデータの完全なワークフローについては、トレースのエンリッチ: タグ、コンテキスト、およびフィードバックを参照してください。
@mlflow.trace(name="Summarization Pipeline")
def summarize_document(document_content: str, user_instructions: str):
    mlflow.update_current_trace(tags={"environment": "production"})

    request_p = f"Doc: {document_content[:30]}... Instr: {user_instructions[:30]}..."
    mlflow.update_current_trace(request_preview=request_p)

    summary = generate_summary(document_content, user_instructions)

    mlflow.update_current_trace(response_preview=f"Summary: {summary[:50]}...")
    return summary
例外処理
トレースされた関数内で例外が発生した場合、スパンは自動的に失敗としてマークされ、例外の詳細がスパンの Events tab に記録されます。
マルチスレッド
MLflow tracing はスレッドセーフであり、defaultでトレースがスレッドごとに分離されます。複数のスレッドにまたがる1つのトレースを作成するには、メインスレッドから各ワーカーに実行コンテキストをコピーします。
import contextvars
from concurrent.futures import ThreadPoolExecutor, as_completed
import mlflow
import openai

client = openai.OpenAI()
mlflow.openai.autolog()


@mlflow.trace
def worker(question: str) -> str:
    messages = [
        {"role": "system", "content": "You are a helpful assistant."},
        {"role": "user", "content": question},
    ]
    response = client.chat.completions.create(
        model="gpt-4o-mini", messages=messages, temperature=0.1, max_tokens=100
    )
    return response.choices[0].message.content


@mlflow.trace
def main(questions: list[str]) -> list[str]:
    results = []
    with ThreadPoolExecutor(max_workers=2) as executor:
        futures = []
        for question in questions:
            ctx = contextvars.copy_context()               # copy context in main thread
            futures.append(executor.submit(ctx.run, worker, question))  # run in copy
        for future in as_completed(futures):
            results.append(future.result())
    return results


main(["What is the capital of France?", "What is the capital of Germany?"])
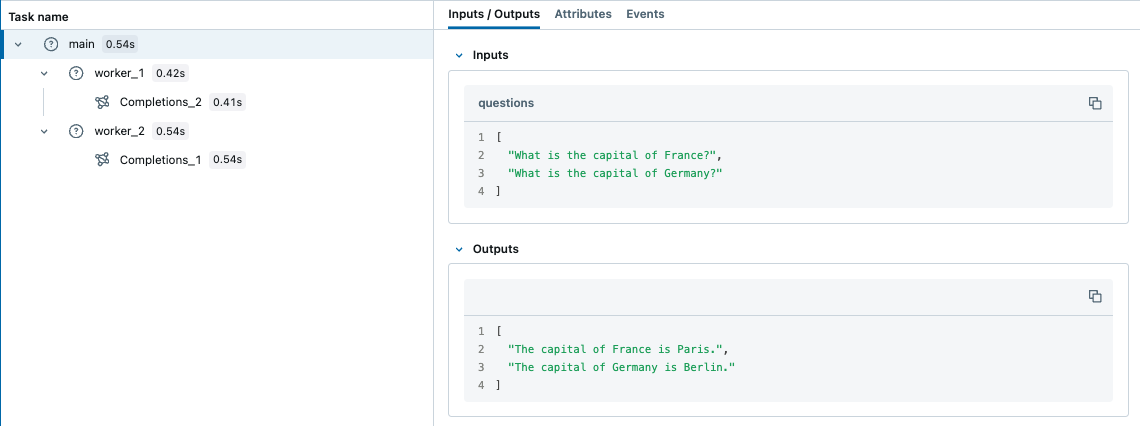
asyncio タスクはコンテキストを自動的に継承するため、async/await のコードを手動でコピーする必要はありません。
ストリーミング出力
このデコレーターは、ジェネレーターおよび非同期ジェネレーター関数をサポートしています(MLflow 2.20.2以降)。By default、MLflowはスパン出力内のリストとしてすべての生成された値を収集します。ストリームチャンクを単一の値に集計するには、output_reducerを渡します。リデューサーは反復処理が完了した後に完全なリストを受け取ります:
@mlflow.trace(output_reducer=lambda chunks: "".join(chunks))
def stream_text():
    for word in ["Hello", " ", "World", "!"]:
        yield word
# Span output: "Hello World!"
レデューサーを使用するかどうかに関係なく、デバッグのために、生のチャンクはスパンの Events tab に表示されたままになります。OpenAI の ChatCompletionChunk オブジェクトなど、チャンクがプレーン文字列ではないプロバイダー SDK ストリームの場合は、デルタを単一のレスポンスオブジェクトに蓄積するレデューサーを記述します。
本番運用の OpenAI の場合は、ストリーミングを自動的に処理するOpenAIの自動トレースを使用することをお勧めします。
サポートされている関数の種類:
関数タイプ | サポート |
|---|---|
同期 | すべてのバージョン |
非同期 | MLflow 2.16.0以上 |
ジェネレーター (同期または非同期) | MLflow 2.20.2以降 |
mlflow.start_span() コンテキストマネージャー
関数内の任意のコードブロックをトレースするには、mlflow.start_span()を使用します。デコレーターと同様に、親子関係と例外の記録を自動的に管理します。デコレーターとは異なり、返されるLiveSpanオブジェクトを介してスパンの名前、入力、および出力を設定します。
import mlflow

with mlflow.start_span(name="my_span") as span:
    x, y = 1, 2
    span.set_inputs({"x": x, "y": y})
    z = x + y
    span.set_outputs(z)
スパンイベント
SpanEvent objects record specific occurrences during a span's lifetime — with the current Timestamp, a specific Timestamp in nanoseconds, or from an exception:
from mlflow.entities import SpanEvent, SpanType
import time

with mlflow.start_span(name="pipeline_step", span_type=SpanType.CHAIN) as span:
    span.add_event(SpanEvent(
        name="validation_completed",
        attributes={"records_validated": 1000, "errors_found": 3},
    ))
    span.add_event(SpanEvent(
        name="data_checkpoint",
        timestamp=int(time.time() * 1e9),
        attributes={"checkpoint_id": "ckpt_123"},
    ))
    try:
        raise ValueError("Invalid input format")
    except Exception as e:
        # SpanEvent.from_exception captures exception.message, exception.type, exception.stacktrace
        mlflow.get_current_active_span().add_event(SpanEvent.from_exception(e))
スパンステータス
SpanStatus は、スパンが成功したか失敗したかを示します。コンテキストマネージャーは終了時にステータスを上書きします(正常終了時は OK、例外発生時は ERROR)。カスタムステータスが必要な場合は、with ブロックが閉じる前に設定してください:
from mlflow.entities import SpanStatus, SpanStatusCode, SpanType

with mlflow.start_span(name="my_span", span_type=SpanType.CHAIN) as span:
    span.set_status(SpanStatus(SpanStatusCode.OK))
    # String shortcuts also work: span.set_status("OK") or span.set_status("ERROR")
完了したスパンからのクエリーステータス:
trace = mlflow.get_trace(mlflow.get_last_active_trace_id())
for span in trace.data.spans:
    print(span.status.status_code)
RETRIEVERスパン
スパンがデータストアからドキュメントを取得する場合は、SpanType.RETRIEVERを使用します。UI がそれらを正しくレンダリングできるように、RETRIEVER スパンは Document オブジェクトのリストを出力する必要があります。
from mlflow.entities import Document, SpanType


@mlflow.trace(span_type=SpanType.RETRIEVER)
def retrieve_documents(query: str):
    span = mlflow.get_current_active_span()
    documents = [
        Document(
            page_content="The content of the document...",
            metadata={"doc_uri": "path/to/document.md", "relevance_score": 0.95},
            id="doc_123",
        ),
        Document(
            page_content="Another relevant section...",
            metadata={"doc_uri": "path/to/other.md", "relevance_score": 0.87},
        ),
    ]
    span.set_outputs(documents)
    return [doc.to_dict() for doc in documents]


retrieve_documents(query="What is ML?")
Node.js / TypeScript
mlflow-tracing npm パッケージにより、TypeScript および JavaScript エージェントに MLflow トレースがもたらされます。この API は Python のアプローチを反映しており、関数をラップする API (デコレータに相当)、ブロックトレース API (start_span に相当)、および TypeScript 5.0+ 用のクラスメソッドデコレータを備えています。
セットアップ
import * as mlflow from 'mlflow-tracing';

mlflow.init({
  trackingUri: 'databricks',
  experimentId: '<your-experiment-id>',
});
Databricks ワークスペースの AI/ML > エクスペリメント > GenAIアプリとエージェント で  アイコンをクリックして、エクスペリメント ID を見つけます。環境変数で資格情報を構成します:
export DATABRICKS_TOKEN=<personal-access-token>
export DATABRICKS_HOST=https://<workspace>.cloud.databricks.com
関数のトレース
任意の関数を mlflow.trace() でラップして、トレースされたバージョンを作成します。MLflow は、入力、出力、例外、およびレイテンシーを自動的にキャプチャします。ネストされたトレース済み呼び出しにより、呼び出し階層を反映したマルチスパンのトレースが生成されます。
const getWeather = async (city: string) => `The weather in ${city} is sunny`;
const tracedGetWeather = mlflow.trace(getWeather, { name: 'get-weather' });
const result = await tracedGetWeather('San Francisco');
クラスメソッドデコレーター(TypeScript 5.0以降)
class MyAgent {
  @mlflow.trace({ spanType: mlflow.SpanType.LLM })
  generateText(prompt: string) {
    return "It's sunny in Seattle!";
  }
}
コード ブロックのトレース
mlflow.withSpan()を使用してコードのブロックをトレースします(これはmlflow.start_span()のTypeScriptでの同等機能です)。
const result = await mlflow.withSpan(async (span: mlflow.Span) => "It's sunny in Seattle!", {
  name: 'generateText',
  spanType: mlflow.SpanType.TOOL,
  inputs: { prompt: question },
});
OpenAIの自動トレース
すべての呼び出しを自動的にトレースするには、OpenAI クライアントを tracedOpenAI でラップします:
import { OpenAI } from 'openai';
import { tracedOpenAI } from 'mlflow-openai';

const client = tracedOpenAI(new OpenAI());
const response = await client.chat.completions.create({
  model: 'gpt-4o-mini',
  messages: [{ role: 'user', content: "What's the weather in Seattle?" }],
});
完全な動作例については、GitHub の TypeScript フルスタックの例を参照してください。
自動トレースと手動トレースの組み合わせ
自動トレースと手動トレースは組み合わせることができます。エージェントで使用する各フレームワークに対して autolog() を有効にすると、MLflow はそれらの呼び出しを 1 つのトレースにキャプチャします。@mlflow.trace を追加して単一の親スパンの下にグループ化するか、自動ログで認識されない独自の内製関数(前処理/後処理、ビジネスロジック、ルーティングなど)をインストゥルメントします。
1 つのトレースで複数のフレームワークをトレースする
各フレームワークの自動ログを有効にすると、MLflow がそれらの呼び出しを 1 つの結合されたトレースにまとめます。エージェントが直接の LLM 呼び出しとオーケストレーションレイヤーを組み合わせる場合に、これを使用します。
import mlflow

mlflow.openai.autolog()
mlflow.langchain.autolog()

# All OpenAI and LangChain calls in the same execution appear in one trace
複数のフレームワークからの呼び出しを単一の親スパンの下にグループ化するには、@mlflow.trace でワークフローをラップします。
import mlflow
import openai
from langchain_openai import ChatOpenAI
from langchain_core.prompts import ChatPromptTemplate

mlflow.openai.autolog()
mlflow.langchain.autolog()

client = openai.OpenAI()

@mlflow.trace
def multi_provider_workflow(query: str):
    # Direct OpenAI call — auto-traced as a child span
    topics = client.chat.completions.create(
        model="gpt-4o-mini",
        messages=[
            {"role": "system", "content": "Extract key topics from the query."},
            {"role": "user", "content": query},
        ],
    ).choices[0].message.content

    # LangChain chain — also auto-traced as a child span
    chain = ChatPromptTemplate.from_template(
        "Topics: {topics}\nRespond to: {query}"
    ) | ChatOpenAI(model="gpt-4o-mini")
    return chain.invoke({"topics": topics, "query": query})

multi_provider_workflow("Explain quantum computing")
自動ログ記録と併せて手動スパンを追加する
独自関数に @mlflow.trace を追加して、autolog ではカバーされないロジックをキャプチャします。MLflow は、これらのスパンを自動キャプチャされたスパンとMergeして、単一のトレースにします。
import mlflow
import openai

mlflow.openai.autolog()
client = openai.OpenAI()

@mlflow.trace
def run(question):
    messages = build_messages(question)
    response = client.chat.completions.create(  # auto-traced by autolog
        model="gpt-4o-mini", max_tokens=100, messages=messages,
    )
    return parse_response(response)

@mlflow.trace
def build_messages(question):
    return [
        {"role": "system", "content": "You are a helpful chatbot."},
        {"role": "user", "content": question},
    ]

@mlflow.trace
def parse_response(response):
    return response.choices[0].message.content

run("What is MLflow?")
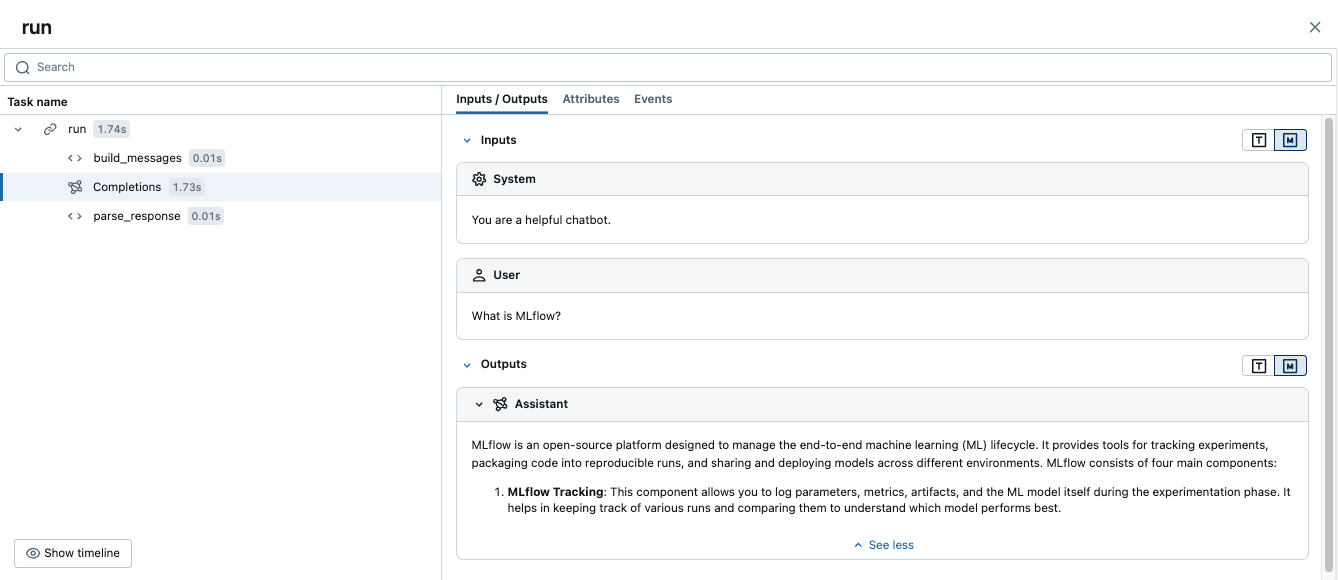
これにより、1つのトレース(runの子スパンとbuild_messagesおよびparse_responseの子を持ち、さらに自動的にキャプチャされたOpenAIスパンを含む親スパン)が生成されます。
Databricks の外部へのデプロイ
Databricks の外部にデプロイされたエージェントのトレースでも、同じインストルメンテーションが使用されます。エージェントプロセスを開始する前に次の環境変数を設定し、上記のいずれかの方法でコードをインストルメント化します。
export DATABRICKS_HOST="https://your-workspace.cloud.databricks.com"
export DATABRICKS_TOKEN="your-databricks-token"
export MLFLOW_TRACKING_URI=databricks
export MLFLOW_EXPERIMENT_NAME="/Shared/production-genai-agent"
本番運用のデプロイメントでは、完全な mlflow[databricks] よりも、軽量な mlflow-tracing パッケージ (pip install mlflow-tracing) の方が適しています。Docker、Kubernetes、および UC ストレージの設定については、Databricks の外部にデプロイされたエージェントのトレースを参照してください。
高度: 低レベルクライアント API
MlflowClient APIを使用すると、トレースのライフサイクルのあらゆる側面を直接制御できます。ほとんどのエージェントには不要です。代わりにデコレーターまたはコンテキストマネージャーを使用してください。カスタムトレースIDスキームが必要な場合や、既存のオブザーバビリティシステムと統合する必要がある場合は、クライアントAPIを使用します。
クライアント APIs は、デコレータまたは mlflow.start_span() と互換性がありません。特定のトレース内では、1 つのスタイルを一貫して使用してください。
ライフサイクル
start_traceまたはstart_spanの呼び出しには、対応するend_traceまたはend_spanが必要です。スパンが閉じられていない場合、不完全なトレースが生成されます。

識別子 | 説明 | 使用 |
|---|---|---|
| 一意のトレース識別子 | トレース内のすべてのスパンをLinkします |
| 一意のスパン識別子 | 終了するスパンを識別します |
| 親スパンの | 親子の階層を作成します |
基本的な使用方法
from mlflow import MlflowClient

client = MlflowClient()

root_span = client.start_trace(
    name="my_agent_flow",
    inputs={"user_id": "123", "action": "generate_report"},
    attributes={"environment": "production", "version": "1.0.0"},
)
request_id = root_span.request_id

data_span = client.start_span(
    name="fetch_user_data",
    request_id=request_id,
    parent_id=root_span.span_id,
    inputs={"user_id": "123"},
    attributes={"database": "users_db"},
)

client.end_span(
    request_id=data_span.request_id,
    span_id=data_span.span_id,
    outputs={"record_count": 42},
    status="OK",
)

client.end_trace(
    request_id=request_id,
    outputs={"report_url": "https://example.com/report/123"},
    status="OK",
)
エラー処理
例外が発生した場合でも、常にスパンをクローズします。再利用可能なコンテキストマネージャーにより、これが安全かつ簡潔になります。
from contextlib import contextmanager

@contextmanager
def traced_span(client, name, request_id, parent_id=None, **kwargs):
    span = client.start_span(name=name, request_id=request_id, parent_id=parent_id, **kwargs)
    try:
        yield span
    except Exception as e:
        client.end_span(request_id=span.request_id, span_id=span.span_id,
                        status="ERROR", attributes={"error": str(e)})
        raise
    else:
        client.end_span(request_id=span.request_id, span_id=span.span_id, status="OK")

# Usage
with traced_span(client, "my_operation", request_id, parent_id) as span:
    result = perform_operation()
よくある落とし穴
- スパンの終了忘れ — 常に try/finally または上記のコンテキスト マネージャー パターンを使用してください。
- 親 ID が正しくありません — 正しい
span_idがparent_idとして渡されていることを確認してください。 - ハードコーディングされたトレースID — 常に一意のIDを生成してください。
- スレッドセーフティ — クライアント APIs は default ではスレッドセーフではありません。並行処理を明示的に管理してください。
mlflow.log_metric()を使用 — これは現在のスパンではなく、MLflow ランに書き込みます。代わりにspan.set_attribute()またはspan.set_attributes()を使用してください。
カスタム OpenTelemetry インストルメンテーション
Databricksへのトレース送信を行うカスタムOTel計装では、 OTel tracing preview を使用します。続行する前に、このプレビューがワークスペースで有効になっていることを確認してください。
エージェントが事前構築済みの統合ではなく OTel SDK を直接使用する場合は、このセクションで説明するスパン属性を設定して、MLflow がスパン タイプ、入力、出力、およびトークン数を正しくレンダリングするようにします。事前構築済みの統合により、これらの属性が自動的に設定されます。
Databricks のマネージド型 MLflow の OTel 属性マッピングは、OSS MLflow のマッピングとは異なります。OSS 属性マッピングについては、MLflow のドキュメントをご覧ください。
要件
このセクションでは、OTel トレースのロケーションが指定された Unity Catalog バックアップのエクスペリメントと、ワークスペースで OTel トレーシングのプレビューが有効になっている必要があります。要件を参照してください。
スパンタイプの設定
gen_ai.operation.nameを設定して、操作の種類を識別します。MLflowはこの属性を読み取り、トレースUIに対応するMLflowスパンタイプを表示します。値はOpenTelemetry GenAI Semantic Conventionに従います。
OTel | MLflow スパン タイプ |
|---|---|
|
|
|
|
|
|
|
|
|
|
|
|
|
|
|
|
span.set_attribute("gen_ai.operation.name", "chat")
入力と出力の設定
入出力の表示が必要な各スパンに gen_ai.input.messages と gen_ai.output.messages を設定します。 ルートスパン に設定すると、トレースレベルのリクエストおよびレスポンスのプレビューも設定されます。
OTel 属性 | MLflow 属性 |
|---|---|
|
|
|
|
値はプレーン文字列または JSON シリアル化された文字列にすることができます。role および content フィールドを持つメッセージオブジェクトの JSON 配列により、MLflow UI でよりリッチなレンダリングが可能になります(「ユーザー」および「アシスタント」のバブルとしてラベル付けされます):
import json

# Plain string — displays as-is in the UI
span.set_attribute("gen_ai.input.messages", "What is the weather today?")

# JSON message array — renders with role labels in the UI
span.set_attribute("gen_ai.input.messages", json.dumps([
    {"role": "system", "content": "You are a helpful assistant."},
    {"role": "user", "content": "What is the weather today?"}
]))
span.set_attribute("gen_ai.output.messages", json.dumps([
    {"role": "assistant", "content": "It is sunny and 72°F in San Francisco."}
]))
トークン使用量の設定
UI トレースの要約にトークン数まりを表示するには、 ルート スパン に gen_ai.usage.input_tokens と gen_ai.usage.output_tokens を設定します。MLflow は、トレース レベルでカウントを集計するため、ルート スパンからこれらの値を読み取ります。
OTel | MLflow トークン フィールド |
|---|---|
| 入力トークン数 |
| 出力トークン数 |
(未設定 — 自動的に計算されます) | トークンの総数 |
root.set_attribute("gen_ai.usage.input_tokens", 150)
root.set_attribute("gen_ai.usage.output_tokens", 42)
セッションとユーザーの設定
トレースを指定したセッションまたはユーザーに関連付けるには、session.idとuser.idを設定します。MLflowは、これらをルートスパンから読み取り、トレースレベルのメタデータとして表示します。session.idを設定すると、MLflow UIでセッションtabが有効になります。
OTel 属性 | MLflow メタデータ フィールド |
|---|---|
| セッションまたは会話の識別子 |
| エージェント エンドユーザー識別子 |
span.set_attribute("session.id", "conversation-123")
span.set_attribute("user.id", "user-456")
完全な例:LLMの子スパンを持つPythonエージェント
次の例では、LLM 子スパンを持つシンプルなエージェントに 4 つの属性カテゴリすべてをまとめています。トレースを Databricks に送信するように OTLP エクスポーターがすでに設定されていることを前提としています。
import json
from opentelemetry import trace

tracer = trace.get_tracer("my-agent")

def run_agent(query: str) -> str:
    with tracer.start_as_current_span("agent-run") as root:
        # Child LLM span — set gen_ai attributes for this individual call
        with tracer.start_as_current_span("chat") as llm:
            llm.set_attribute("gen_ai.operation.name", "chat")
            messages = [
                {"role": "system", "content": "You are a helpful assistant."},
                {"role": "user", "content": query}
            ]
            response = call_llm(messages)
            llm.set_attribute("gen_ai.input.messages", json.dumps(messages))
            llm.set_attribute("gen_ai.output.messages", json.dumps([
                {"role": "assistant", "content": response}
            ]))
            llm.set_attribute("gen_ai.usage.input_tokens", 150)
            llm.set_attribute("gen_ai.usage.output_tokens", 42)

        # Root span — MLflow reads inputs, outputs, token usage, and session ID
        # from the root span to populate the trace summary in the UI.
        root.set_attribute("gen_ai.operation.name", "chat")
        root.set_attribute("session.id", "conversation-123")
        root.set_attribute("user.id", "user-456")
        root.set_attribute("gen_ai.input.messages", json.dumps([
            {"role": "user", "content": query}
        ]))
        root.set_attribute("gen_ai.output.messages", json.dumps([
            {"role": "assistant", "content": response}
        ]))
        root.set_attribute("gen_ai.usage.input_tokens", 150)
        root.set_attribute("gen_ai.usage.output_tokens", 42)
        return response
MLflow UI で検証する
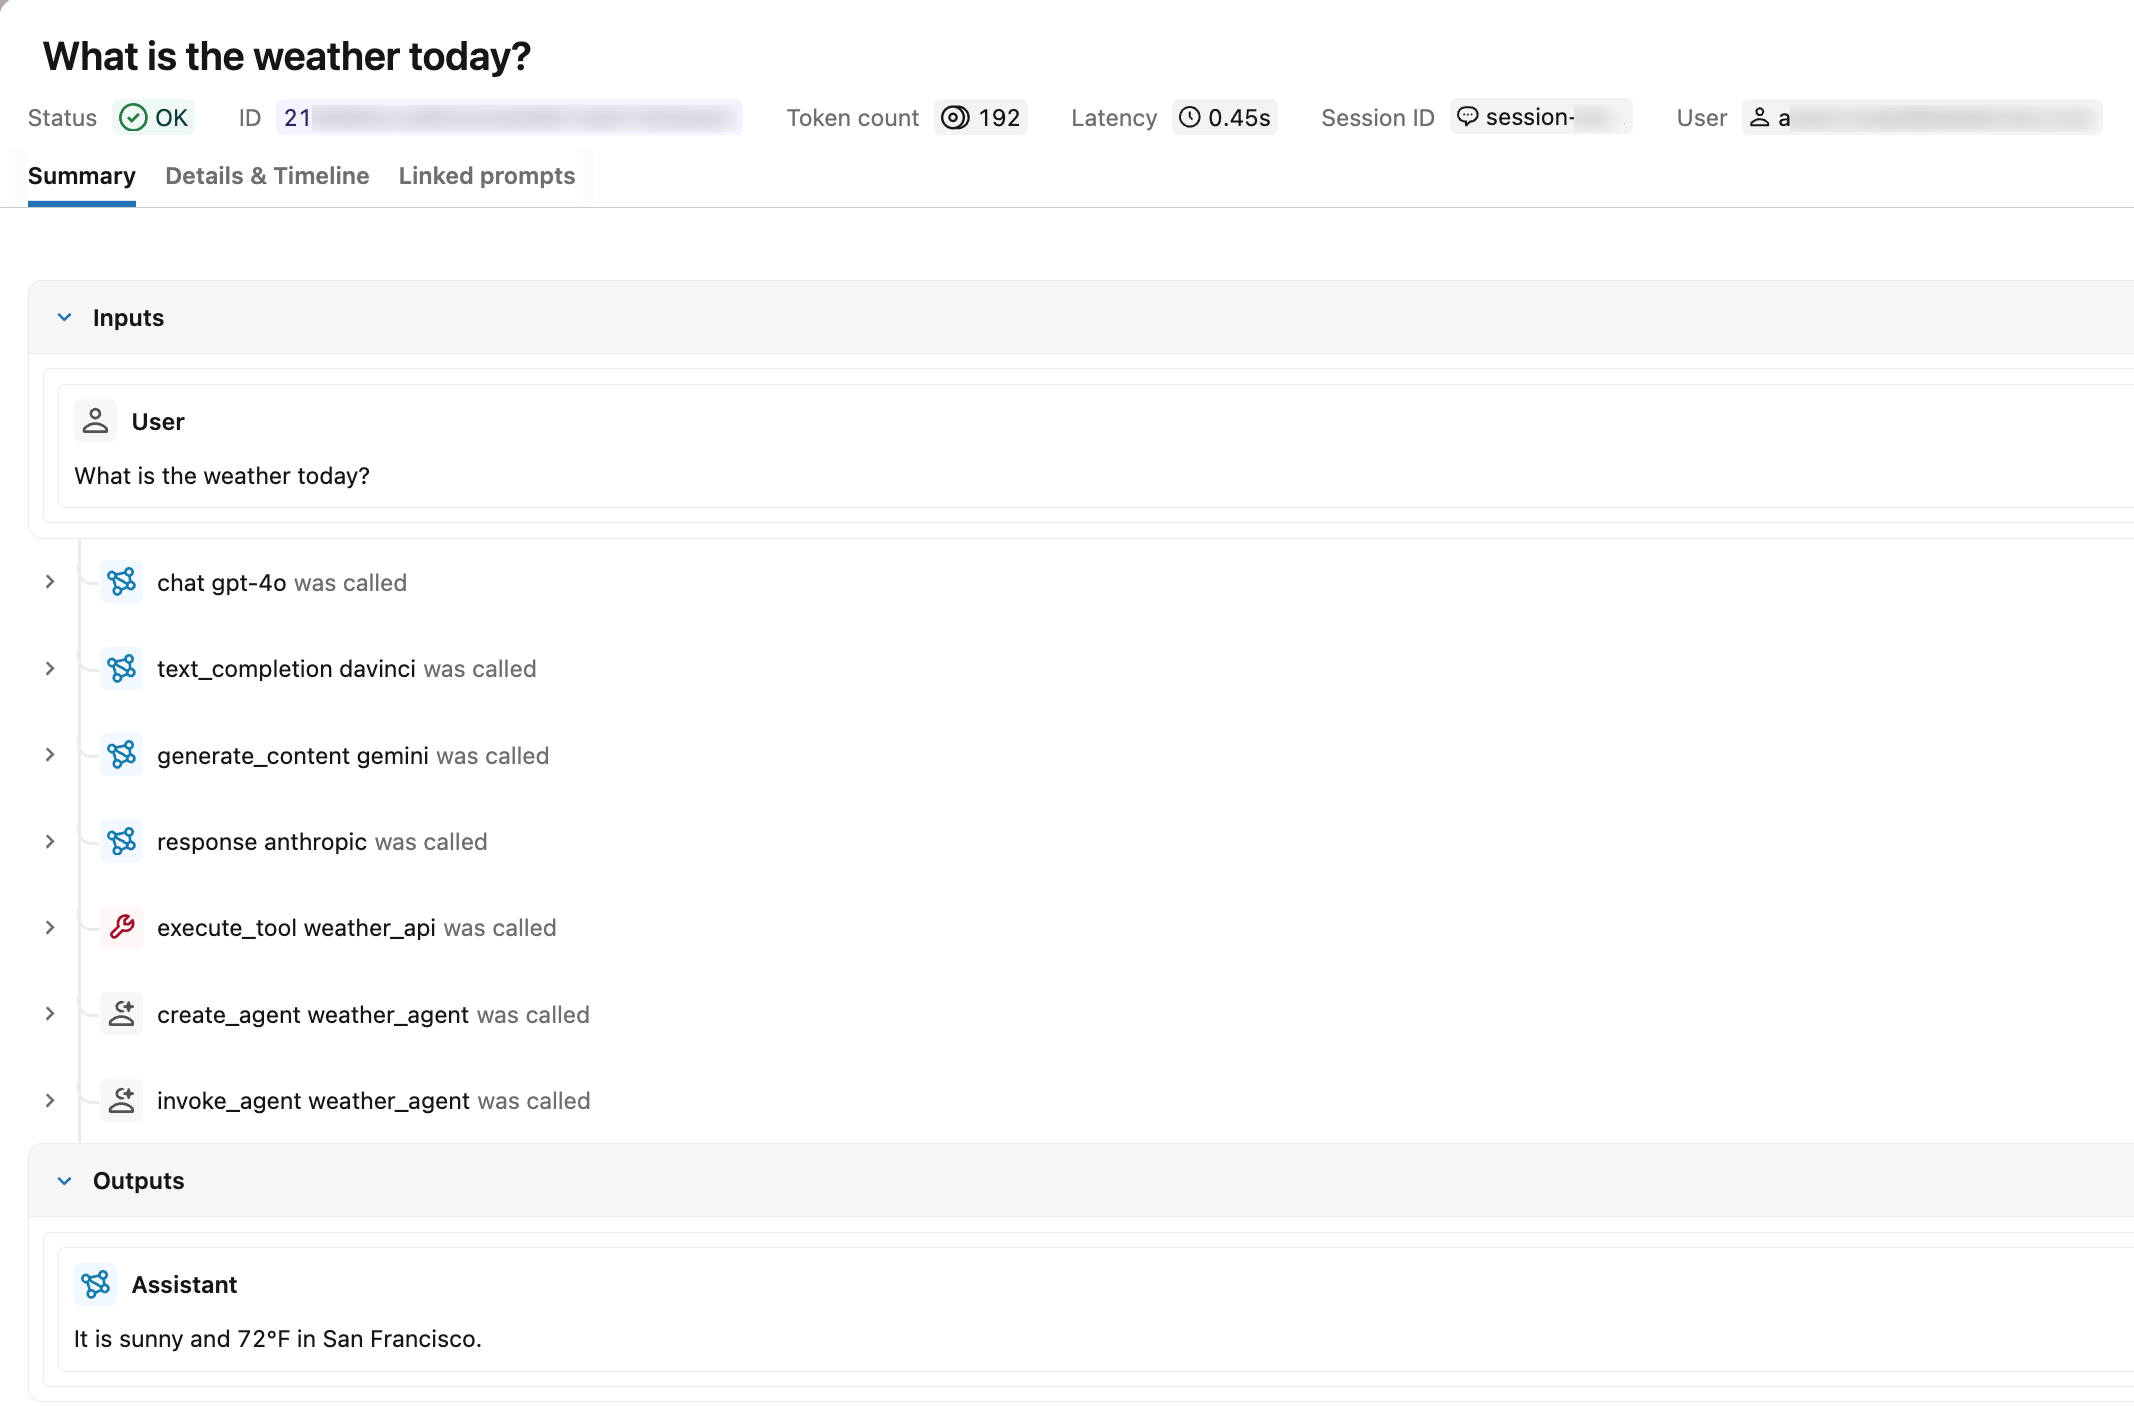
run_agent() を呼び出した後、MLflow エクスペリメントで [Traces] tab を開きます。正しくインストルメント化されたトレースには、次が表示されます:
- スパンタイプ :各スパンには、
UNKNOWNの代わりにタイプラベル(例:chat)が表示されます。 - リクエストとレスポンス :ルートスパンには、入力メッセージと出力メッセージが表示されます。
- トークン使用量 :トレースサマリーには、入力、出力、および合計トークン数が表示されます。
- Session and user : 指定されたセッション識別子のもとでトレースがセッションtabに表示され、ユーザー ID がトレースメタデータに表示されます。
OTel スパン属性によるトレースの検索
Langfuse またはカスタムの OTel インストルメント済みエージェントのいずれから Unity Catalog にトレースが取り込まれた後、mlflow.search_traces() で span.attributes.* プレフィックスを使用して、設定した OTel 属性値でフィルタリングします。プレフィックスの後の属性名は、span.set_attribute() に渡される名前と同じです。
import mlflow

# experiment_id is visible in the MLflow UI URL and experiment details panel
mlflow.set_experiment(experiment_id="<experiment-id>")

# Find traces from a specific session (set using session.id)
traces = mlflow.search_traces(
    filter_string="span.attributes.session.id = 'conversation-123'"
)

# Find traces from a specific user (set using user.id)
traces = mlflow.search_traces(
    filter_string="span.attributes.user.id = 'user-456'"
)

# Find traces from a specific model (set using gen_ai.request.model)
traces = mlflow.search_traces(
    filter_string="span.attributes.gen_ai.request.model LIKE '%gpt%'"
)

# Find traces by operation type (set using gen_ai.operation.name)
traces = mlflow.search_traces(
    filter_string="span.attributes.gen_ai.operation.name = 'chat'"
)

# Find high-token traces (set using gen_ai.usage.input_tokens)
traces = mlflow.search_traces(
    filter_string="span.attributes.gen_ai.usage.input_tokens > 1000"
)
サポートされている演算子や比較子を含む完全な filter_string 構文については、トレースへのプログラムによるアクセスを参照してください。
制限事項
カスタムOTelスパン属性は、MLflowトレースタグとして表示されません。認識されているOTelからMLflowへのマッピングの外部でspan.set_attribute()を用いて設定された属性は、以下に表示されません:
- MLflow UI の タグ 列または統合トレースビュー。
_traces_unifiedUnity Catalogテーブル。mlflow.search_traces()によって返されるtagsフィールド。
これらの属性は基盤となるスパンに保持されます。これらはトレース UI の Attributes tab に引き続き表示され、OTel スパンテーブルの <prefix>_otel_spans.attributes フィールドからクエリを実行できます。
統合トレースビューに表示される検索可能なタグをアタッチするには、MLflow タグ APIs を使用します。トレースのエンリッチ: タグ、コンテキスト、フィードバックを参照してください。
トレース データモデルのリファレンス
以下のスパン属性、スパン タイプ、およびライフサイクルの概念は、デコレーター、コンテキスト マネージャー、低レベル クライアントのいずれを使用して作成されたかに関わらず、作成するすべてのスパンに適用されます。
Span attributes
属性は、オペレーションの構成と実行コンテキストに関する知見を提供するキーと値のペアです。
プラットフォーム固有の属性を追加して、オブザーバビリティを強化できます。たとえば、スパンが接触した Unity Catalogオブジェクト、モデルサービングEndpoint、または コンピュートリソースを追加できます。
たとえば、LLM 呼び出しをラップするスパンに属性を設定します。
span.set_attributes({
    "ai.model.name": "claude-3-5-sonnet-20241022",
    "ai.model.version": "2024-10-22",
    "ai.model.provider": "anthropic",
    "ai.model.temperature": 0.7,
    "ai.model.max_tokens": 1000,
})
スパン タイプ
MLflow は、一般的な操作に対して定義済みの SpanType 値を提供します。特殊なケースでは、カスタム文字列値をスパンタイプとして渡します。
Type | 説明 |
|---|---|
| チャット モデルへのクエリー(特殊な LLM インタラクション) |
| 一連の操作 |
| エージェントの自律的な操作 |
| 検索クエリーなどのツール実行(通常はエージェントによるもの) |
| テキスト埋め込み操作 |
| ベクトルデータベースのクエリーなどのコンテキスト取得操作 |
| テキストを構造化形式に変換する解析操作 |
| 関連性によってコンテキストを並べ替えるリランキング操作 |
| 長期ストレージにコンテキストを保持するメモリ操作 |
| 他のタイプが指定されていない場合に使用される default のタイプ |
スパンの作成時にスパンタイプを割り当てます。デコレータでの span_type の設定方法については スパンのカスタマイズ を、スパンブロック用のコンテキストマネージャーについては コンテキストマネージャー を参照してください。
アクティブなトレースとスパン、完了したトレースとスパン
アクティブ なトレースとは、MLflow が現在書き込みを行っているものです。たとえば、@mlflow.trace でデコレートされた関数が実行されている場合などがこれに該当します。デコレーターが適用された関数が終了すると、トレースは 終了 しますが、新しいデータを使用して注釈を付けることは引き続き可能です。
スパンも同様のライフサイクルに従います。LiveSpan で表されるアクティブなスパンは、デコレーテッド関数または スパン コンテキスト マネージャーによって生成されます。関数の実行が終了するかコンテキスト マネージャーが閉じると、スパンが完了し、変更不可の Span になります。
アクティブまたは最近のトレースおよびスパンを扱うには、次のメソッドを使用します。
mlflow.get_active_trace_id(): 現在アクティブなトレースの ID を返します。mlflow.get_last_active_trace_id(): 最も新しく完了したトレースの ID を返します。mlflow.get_current_active_span():アクティブなスパンを返します。これを使用して変更できます。
その他のリソース
- 自動トレーシングとインテグレーション — 1 行のコードでサポートされているフレームワークをインストルメント化する
- 問題の監視と検出 — 収集したトレースの表示と分析
- OpenTelemetry トレースを Unity Catalog に保存する — 本番運用向けのガバナンスされた Unity Catalog トレースストレージ
- トレースの拡充: タグ、コンテキスト、フィードバック — トレースにタグ、ユーザー セッション ID、ユーザー フィードバックを添付する
- エージェントの品質評価 — トレースに関する評価を実行
次のステップ: トレースの拡充: タグ、コンテキスト、フィードバック