Kitchen
Learn about the on-page text elements and how to format them with Markdown in articles for Databricks docs.
For a list of image replacements, see (Kitchen) Images available as global replacements
Front matter: Metadata description and date
Front Matter is a standard format for specifying accompanying metadata for content files. Front Matter is declared at the top of each content file (above the regular content) as YAML between ---.
---
description: 'Learn about the on-page text elements and how to format them with Markdown in articles for :re[Databricks] docs.'
unlisted: true
last_update:
  date: 2025-09-18
---
Description
Required: The description metadata string appears at the top of the Markdown file in the Front Matter section. Descriptions describe the intent of the article, are 100-160 characters (including spaces), and appear in search results. You can copy your first sentence or paragraph here and trim it to fit the 160-character limit.
description: 'Learn about the on-page text elements and how to format them with Markdown in articles for <Databricks> docs.'
(~109 chars with spaces)
Date
The last_update date is when the document was last updated in YYYY-MM-DD format. It appears at the top of the Markdown file in the Front Matter section and you must update it when you make major changes to a file. It is mandatory to set this line when a new file is created.
last_update:
date: 2025-09-17
Title and headings
Required: Heading 1/page title
Guidance: Avoid H1s longer than 60 characters (including spaces). If your article requires a longer H1, put the words that best describe the article intent at the beginning of the text string. Don't cut important ideas or terms to force your H1 into 60 chars. Words that are truncated from view on the search page can still contribute to search rank.
Optional: Heading levels 2 - 3
Guidance: Avoid using heading levels deeper than Heading 3. If you need deeper heading levels, rethink your article hierarchy. You likely have more than one primary article intent, or you are burying important info in deeper headings. H1 and H2 are the most discoverable. Flatten hierarchies accordingly.
# Heading level 1 (also the title in a search result or social media post)

## Heading level 2

### Heading level 3
Heading level 2
Heading level 3
Navigation
To add or move a page in the table of contents in the left sidebar, update the YAML file in https://github.com/databricks-eng/universe-dev/tree/master/docs/web/sidebars for each cloud where you want the page to be published. Add the file to /sidebars/sidebar_<cloud>.yaml file even for unlisted pages. This is required for the doc to be accessible at all.
Do not use TOC trees or subsection TOC directives to construct a content hierarchy for the sidebar.
Paragraphs
To format paragraphs correctly, write a block of text and separate it from the text that follows with a line break. We recommend that you don't use newline symbols inside paragraphs to stack sentences without spacing between them.
A paragraph is a block of text separated from other text by a line break.

This is a new paragraph.
A paragraph is a block of text separated from other text by a line break.
This is a new paragraph.
Blockquotes (indented paragraphs)
Blockquote paragraphs are indented on both sides. You can use them to offset a quotation. Use blockquotes sparing in technical documentation.
> This paragraph is indented on both sides to offset the text from the rest of the content. You can use it for quotations. Use blockquotes sparing in technical documentation.
This paragraph is indented on both sides to offset the text from the rest of the content. You can use it for quotations. Use blockquotes sparing in technical documentation.
Lists
Use lists to make content scannable.
Lists - Bulleted (unordered lists)
Use a dash (-) at the beginning of each list item to create an unordered list.
- List item 1
- List item 2
- List item 3
- List item 1
- List item 2
- List item 3
Lists - Numbered (ordered lists)
Use 1. for list items and for sublist items to autonumber ordered lists.
Do not use #. or letters (a.) for ordered lists (previously accepted, but no longer valid).
1. List item 1
1. List item 2
1. List item 3
1. List item 4
1. List item 5
1. List item 6
- List item 1
- List item 2
- List item 3
- List item 4
- List item 5
- List item 6
Lists - Nesting sublists in numbered or bulleted lists
Items within a nested sublist list must line up under the first non-list character of the parent item.
- Numbered lists - Use three spaces per indent for nested sublist items in numbered lists.
- Bulleted lists - Use two spaces per indent for nested sublist items in bulleted lists.
Do not use letters (a.) for sublists (previously accepted, but no longer valid).
1. List item 1 level 1
   1. List item 1-1 level 2
   1. List item 1-2 level 2
1. List item 2 level 1
   1. List item 2-1 level 2
   1. List item 2-2 level 2
- List item 1 level 1
  - List item 1-1 level 2
  - List item 1-2 level 2
- List item 2 level 1
  - List item 2-1 level 2
  - List item 2-2 level 2
- List item 1 level 1
- List item 1-1 level 2
- List item 1-2 level 2
- List item 2 level 1
- List item 2-1 level 2
- List item 2-2 level 2
- List item 1 level 1
- List item 1-1 level 2
- List item 1-2 level 2
- List item 2 level 1
- List item 2-1 level 2
- List item 2-2 level 2
Lists - Ordered and unordered lists combined
Use mixed lists judiciously because they can be confusing if there is too much nesting. Don't go more than three levels deep in a list hierarchy. Deep hierarchies negatively affect readability and are harder to understand. There are very few cases in which you need to go three levels deep in a list.
1. List item 1 level 1
   1. List item 1-1 level 2
      - List item 1-1 level 3
      - List item 1-1 level 3
   1. List item 1-2 level 2
1. List item 2 level 1
   - List item 2-1 level 2
   - List item 2-2 level 2
     1. List item 2-2 level 3
     1. List item 2-2 level 3
- List item 1 level 1
- List item 1-1 level 2
- List item 1-1 level 3
- List item 1-1 level 3
- List item 1-2 level 2
- List item 1-1 level 2
- List item 2 level 1
- List item 2-1 level 2
- List item 2-2 level 2
- List item 2-2 level 3
- List item 2-2 level 3
Lists - Complex lists with subparagraphs, images, or code examples
The child item must line up under the first character of the parent item:
- For unordered lists it's two spaces.
- For ordered lists it's three spaces. See Images inside lists.
For complex lists, leave a blank line before and a blank line after groups of nested list items. For example:
This task shows how to create a job using the UI or API.
1. Click **+ Create Job**. The job detail page displays.
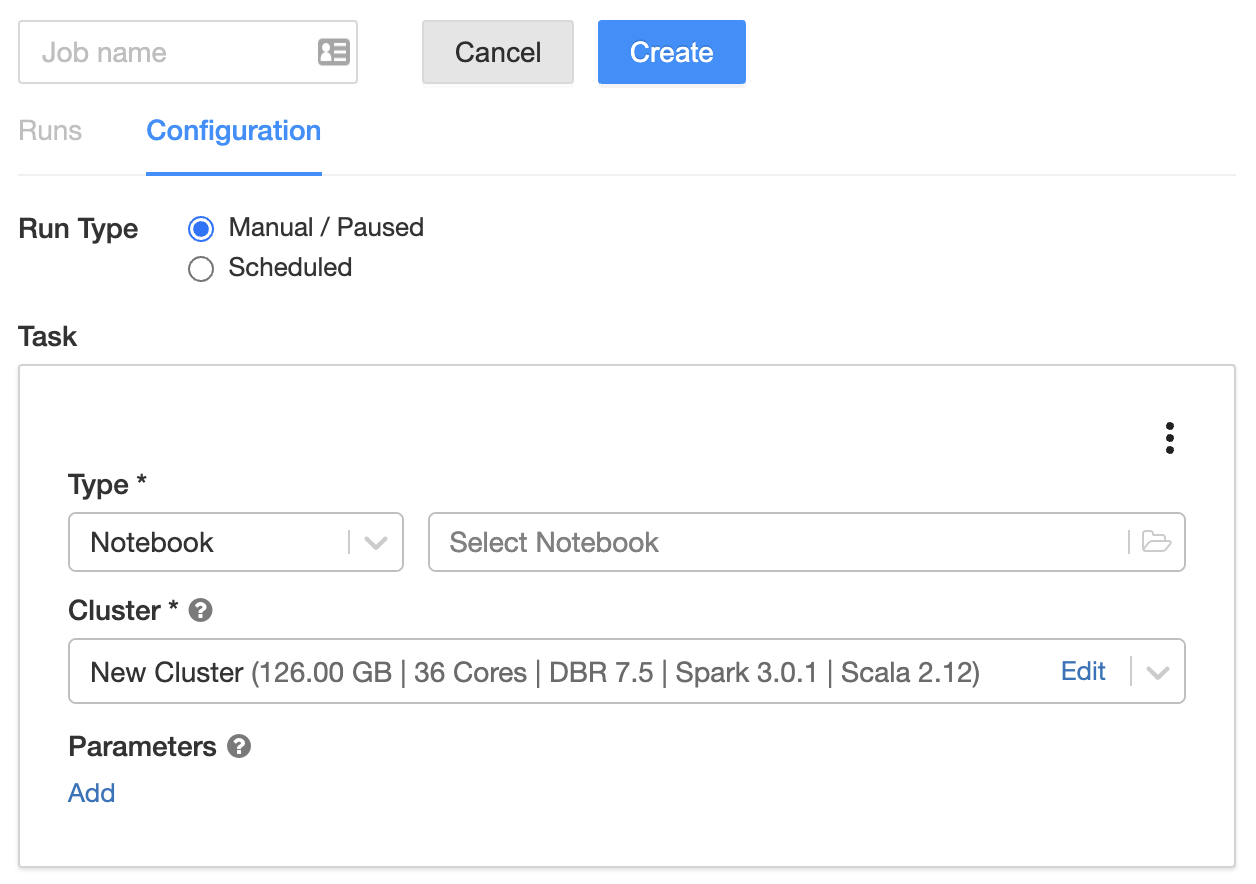
1. Enter a name in the text field with the placeholder text `Untitled`.
1. Specify the task type: click **Select Notebook**, **Set JAR**, or **Configure spark-submit**.
- **Notebook**
1. Select a notebook and click **OK**.
1. Next to **Parameters**, click **Edit**. Specify key-value pairs or a JSON string representing key-value pairs. Such parameters set the value of [widgets](/notebooks/widgets.md).
- **JAR**: Upload a JAR, specify the main class and arguments, and click **OK**. To learn more about JAR jobs, see [\_](/jobs/how-to/use-jars-in-workflows.md).
- **spark-submit**: Specify the main class, path to the library JAR, arguments, and click **Confirm**. To learn more about spark-submit, see the [Apache Spark documentation](https://spark.apache.org/docs/latest/submitting-applications.html).
:::note
The following :re[Databricks] features are not available for spark-submit jobs:
- Cluster autoscaling. To learn more about autoscaling, see [Cluster autoscaling](/compute/configure.md#autoscaling).
- [\_](/dev-tools/databricks-utils.md). If you want to use Databricks Utilities, use JAR jobs instead.
:::
The example markdown code looks like this in the build:
This task shows how to create a job using the UI or API.
-
Click + Create Job. The job detail page displays.

-
Enter a name in the text field with the placeholder text
Untitled. -
Specify the task type: click Select Notebook, Set JAR, or Configure spark-submit.
-
Notebook
- Select a notebook and click OK.
- Next to Parameters, click Edit. Specify key-value pairs or a JSON string representing key-value pairs. Such parameters set the value of widgets.
-
JAR: Upload a JAR, specify the main class and arguments, and click OK. To learn more about JAR jobs, see Create and run Scala and Java JARs on serverless compute.
-
spark-submit: Specify the main class, path to the library JAR, arguments, and click Confirm. To learn more about spark-submit, see the Apache Spark documentation.
注記The following Databricks features are not available for spark-submit jobs:
- Cluster autoscaling. To learn more about autoscaling, see Cluster autoscaling.
- Databricks Utilities (
dbutils) reference. If you want to use Databricks Utilities, use JAR jobs instead.
-
Steps in headings
For a large, complex set of tasks that a user needs to perform in a sequence (that is, a supertask), you can break up each subtask into multiple articles or separate sections within one article. Coded supertasks as follows. In an article, each Step would be an H2 (## Step:) instead of an H3 as shown here.
### Step 1: This is the first step

1. Substep 1.1
1. Substep 1.2
1. Substep 1.3

### Step 2: This is the second step

1. Substep 2.1
1. Substep 2.2
1. Substep 2.3
Step 1: This is the first step
- Substep 1.1
- Substep 1.2
- Substep 1.3
Step 2: This is the second step
- Substep 2.1
- Substep 2.2
- Substep 2.3
Links and cross-references
Links and cross-references to related information can help customers get the information they need, and enable you to keep your content focused and concise. Avoid Wikipedia-style links where the link text is a single word or features name and it's unclear to the reader where you're linking to. Provide text that introduces your link so that the user has context and understands what you're linking to and why.
External links
For external links, manually type the page title of the webpage that you're linking to for the link text and use the complete URL (that is, [title](https://www.url.com). For example:
[Ideas Portal](https://ideas.databricks.com)
[Microsoft Azure website](https://azure.microsoft.com/)
Ideas Portal Microsoft Azure website
Cross-links to other pages on the documentation website
We use relative links to cross-link to other articles on the documentation website. The path to reference another document is always relative to docs/web/docs.
Preferred method - Default link text
[\_](/<path-to-file>.md
Optional method - Custom link text
Use this method sparingly--when space is tight or you MUST use different link text.
[<custom-link-text>](/<path-to-file>.md
- For relative links, use the default link text
[\_]so that the build system can autopopulate the link text with the title from the article that you're linking to. If the article title won't work, you can enter custom link text instead. - To avoid broken links when content is moved, use the complete file path in relative links. When linking to a sibling file in the same parent directory, you could list the file (for example,
[\_](template.md)but we recommend you use the complete file path to avoid broken links. - You cannot use inline markup or a replacement in link text.
- You can't use relative links in a notebook or OpenAPI spec file. A link from a notebook or OpenAPI spec file must include the fully qualified domain name because these links are not transformed by Sphinx (for example,
https://docs.databricks.com/folder/file.html).
Example
For a link to docs/web/docs/admin/index.md, you can use either of the following syntax:
[\_](/admin/index.md)

OR

[settings page](/admin/index.md)
Cross-links to a tab item on a page on the documentation website
You can link to a specific tab item on a different page on the documentation website.
[<required-custom-link-text>](/<path-to-file>.md?language=TabItem#heading)
-
Unlike cross-linking to a page, a custom link title is required. Otherwise, the link text renders as "_".
-
If your tab item label consists of two or more words, use "+" in place of the space or
. -
headingis the anchor or title of the heading the tab item is under. You can add an anchor above the tabs to directly link users to the tab item.
<!-- Link uses the header anchor -->

[Use a SQL command to create an open recipient](/delta-sharing/create-recipient-token.md?language=SQL#create-recipient-open-bearer).
Use a SQL command to create an open recipient.
<!-- Link uses the added anchor -->

[Use a SQL command to create an open recipient](/delta-sharing/create-recipient-token.md?language=SQL#tab-link).
Use a SQL command to create an open recipient.
API viewer links
To link to the API viewer, use the relative URL without html or md appended: [Clusters API](/api/workspace/clusters)
Anchor links
To use the referenced section title as the link text, use the following syntax:
[\_](/compute/configure.md#access-mode)
Anchor on a different page
[\_](/compute/configure.md#access-mode)
Anchor on the same page
[\_](#lists)
Lists - Numbered (ordered lists)
Generated anchor rules
The format for an anchor is #section-title-with-several-words:
- Lowercase characters
- Remove punctuation
- Replace spaces with dashes
For example, if the title is 2.2 Security concerns, the anchor text is #22-security-concerns.
- You cannot reference the top-level title
#heading this way. If you need to reference the topmost level document title, reference the document itself. - Do not include special characters—
", ', :—in headings. They break when the article is converted to Microsoft Markdown. - Do not link to an autogenerated anchor for a heading that contains a replacement. Instead manually create an anchor right above the heading and reference that anchor.
Manually created anchors
Instead of referencing a section by title, you can manually specify anchors in the topic. There are two constructs:
Embedded in heading
### <a id="section1"> Embedded in heading

This goes to the [Embedded in heading](#section1) section.
Use the embedded in heading style instead of the following style where the anchor link appears on a separate line preceding the heading:
DO NOT USE the following style:

<a id="section2">
### Anchor precedes the heading

This goes to the [Preceding heading](#section2) section.
Images and alt text
The path to a static asset is relative to the /static folder. Write descriptive (friendly) filenames and alt text for images. Each alt text string in an article must be unique (70 chars including spaces is crawled for rank). You must include the folder /images with the slash in the path. Use the following Markdown syntax:

For example, to reference the image under /static/images/mlflow/sagemaker-permissions.png, you would use the following code:

Images with captions
You can include captions that appear with your image.


Images inside lists
The image must be indented so that it lines up under the first text character. For unordered lists, it's two spaces, for ordered lists it's three spaces.
- list item

- list item
1. ordered list item

- ordered list item
Comments
Comments must be separate paragraphs from what they comment on.
<!--this text is commented out-->
<!--
comments
may
also
be
multiline
-->
Inline markup
Emphasis, bold, literal.
Emphasis
text with _emphasis_ word
text with emphasis word
Bold
text with **bold** word
or
text with **bold** word
text with bold word or text with bold word
Literal
Use literals for programming language elements, filepaths, and variables.
text with `literal` word

inline literal ``with `backticks` inside`` code

`` SELECT * FROM delta.`/mnt/delta/events` ``
text with literal word
inline literal with `backticks` inside code
SELECT * FROM delta.`/mnt/delta/events`
Code blocks
Re-indent code blocks to use two spaces per tab stop, to maximize readability in HTML output. In Atom, highlight the code block and go to Edit > Lines > Auto-indent. You may need to adjust the auto-indented code block afterward. For example, align list items with the first one. See the following sections for examples of adjusting alignment in code blocks:
Use three backticks ``` before and after the block, and a <language> after the first set of backticks. Supported languages are: bash, console, ini, json, md, python, r, scala, sql, text, xml, and yaml.
The PowerShell lang is passed through to and supported by Microsoft Markdown.
    ```python
    def meta(self, match, context, next_state):
    return [], 'Meta', []
    ```
def meta(self, match, context, next_state):
return [], 'Meta', []
Code blocks often use ellipses (...) to signify that some code is omitted for brevity. However, in some cases this can cause our build system to remove syntax highlighting from code blocks where these ellipses appear. If you must use ellipses, put them inside of comments where possible. For JSON, put them inside of a string. For example:
Before:
def meta(self, match, context, next_state):
...
{
"clusters": [
{
...
}
]
}
After:
def meta(self, match, context, next_state):
  # ...
{
  "clusters": [
    {
      "..."
    }
  ]
}
Bash
databricks fs ls
echo $SPARK_HOME
Console
Use console for highlighting console or log output.
Search for the following WARN messages:
19/11/19 16:50:29 WARN TaskSchedulerImpl: Initial job has not accepted any resources; check your cluster UI to ensure that workers are registered and have sufficient resources
19/11/19 16:50:44 WARN TaskSchedulerImpl: Initial job has not accepted any resources; check your cluster UI to ensure that workers are registered and have sufficient resources
19/11/19 16:50:59 WARN TaskSchedulerImpl: Initial job has not accepted any resources; check your cluster UI to ensure that workers are registered and have sufficient resources
HTTP
POST /api/2.0/preview/scim/v2/Users HTTP/1.1
Host: example.cloud.databricks.com
Authorization: Bearer dapi48…a6138b
Content-Type: application/json

{
  "schemas":[
    "urn:ietf:params:scim:schemas:core:2.0:User"
  ],
  "userName":"example@databricks.com",
  "password":"$parkRock$",
  "groups":[
    {
      "value":"123456"
    }
  ],
  "entitlements":[
    {
      "value":"allow-cluster-create"
    }
  ]
}
Ini
# JDBC connect string for a JDBC metastore
javax.jdo.option.ConnectionURL <mssql-connection-string>

# Username to use against metastore database
javax.jdo.option.ConnectionUserName <mssql-username>

# Password to use against metastore database
javax.jdo.option.ConnectionPassword <mssql-password>

# Driver class name for a JDBC metastore
javax.jdo.option.ConnectionDriverName com.microsoft.sqlserver.jdbc.SQLServerDriver
JSON
{
  "cluster_name": "high-concurrency-cluster",
  "spark_version": "5.2.x-scala2.11",
  "node_type_id": "Standard_D3_v2",
  "spark_conf": {
    "spark.databricks.cluster.profile": "serverless",
    "spark.databricks.repl.allowedLanguages": "sql,python,r"
  },
  "custom_tags": {
    "ResourceClass": "Serverless"
  },
  "autoscale": {
    "min_workers": 1,
    "max_workers": 2
  },
  "autotermination_minutes": 10
}
Markdown
#### Reference to an anchor in the current topic

[Lists](#lists)
PowerShell
New-AzDatabricksWorkspace -Name databricks-test -ResourceGroupName testgroup -Location eastus -ManagedResourceGroupName databricks-group -Sku premium -RequireInfrastructureEncryption
Python
table_name = "PythonForeachTest"

def get_dynamodb():
  import boto3

  access_key = "<access key>"
  secret_key = "<secret key>"
  region = "<region name>"
  return boto3.resource('dynamodb',
         aws_access_key_id=access_key,
         aws_secret_access_key=secret_key,
         region_name=region)
R
library(sparklyr)
sparkR.session()
sc <- spark_connect(method = "databricks")
Scala
import org.apache.spark.sql._
import org.apache.spark.sql.cassandra._

import com.datastax.spark.connector.cql.CassandraConnectorConf
import com.datastax.spark.connector.rdd.ReadConf
import com.datastax.spark.connector._

val host = "<ip address>"
val clusterName = "<cluster name>"
val keyspace = "<keyspace>"
val tableName = "<tableName>"

spark.setCassandraConf(clusterName, CassandraConnectorConf.ConnectionHostParam.option(host))
spark.readStream.format("rate").load()
     .selectExpr("value % 10 as key")
     .groupBy("key")
     .count()
     .toDF("key", "value")
     .writeStream
     .foreachBatch
     { (batchDF: DataFrame, batchId: Long) =>

       batchDF.write       // Use Cassandra batch data source to write streaming out
              .cassandraFormat(tableName, keyspace)
              .option("cluster", clusterName)
              .mode("append")
              .save()
     }
     .outputMode("update")
     .start()
SQL
SELECT key,
       values,
       TRANSFORM(values, value -> value + 1) AS values_plus_one
FROM   nested_data
Text
Use a code block with text for highlighting text file contents. For example:
The manifest is a CSV file describing where to find the input FASTQ or BAM files:
```text
pair_id,file_path,sample_id,paired_end,read_group_id
HG001,*_R1_*.normal.fastq.bgz,HG001_normal,1,read_group_normal
HG001,*_R2_*.normal.fastq.bgz,HG001_normal,2,read_group_normal
HG001,*_R1_*.tumor.fastq.bgz,HG001_tumor,1,read_group_tumor
HG001,*_R2_*.tumor.fastq.bgz,HG001_tumor,2,read_group_tumor
```
The manifest is a CSV file describing where to find the input FASTQ or BAM files:

```text
pair_id,file_path,sample_id,paired_end,read_group_id
HG001,*_R1_*.normal.fastq.bgz,HG001_normal,1,read_group_normal
HG001,*_R2_*.normal.fastq.bgz,HG001_normal,2,read_group_normal
HG001,*_R1_*.tumor.fastq.bgz,HG001_tumor,1,read_group_tumor
HG001,*_R2_*.tumor.fastq.bgz,HG001_tumor,2,read_group_tumor
XML
<dependency>
  <groupId>org.apache.spark</groupId>
  <artifactId>spark-core_2.10</artifactId>
  <version>1.5.0</version>
  <scope>provided</scope>
</dependency>
<dependency>
  <groupId>org.apache.hadoop</groupId>
  <artifactId>hadoop-core</artifactId>
  <version>1.2.1</version>
  <scope>provided</scope>
</dependency>
YAML
YAML indentation matches the style guidelines for unordered lists.
- name: Azure Databricks Documentation
  href: /azure/azure-databricks/
- name: Overview
  items:
  - name: What is Azure Databricks?
    href: azure/azure-databricks/what-is-azure-databricks
- name: Quickstarts
  expanded: true
  items:
  - name: Create Databricks workspace - Portal
    href: azure/azure-databricks/quickstart-create-databricks-workspace-portal
  - name: Create Databricks workspace - Resource Manager template
    href: azure/azure-databricks/quickstart-create-databricks-workspace-resource-manager-template
  - name: Create Databricks workspace - Virtual network
    href: azure/azure-databricks/quickstart-create-databricks-workspace-vnet-injection
- name: Concepts
  items:
  - name: Azure Databricks concepts
    href: getting-started/concepts
- name: Azure Databricks Documentation
  href: /azure/azure-databricks/
- name: Overview
  items:
    - name: What is Azure Databricks?
      href: azure/azure-databricks/what-is-azure-databricks
- name: Quickstarts
  expanded: true
  items:
    - name: Create Databricks workspace - Portal
      href: azure/azure-databricks/quickstart-create-databricks-workspace-portal
    - name: Create Databricks workspace - Resource Manager template
      href: azure/azure-databricks/quickstart-create-databricks-workspace-resource-manager-template
    - name: Create Databricks workspace - Virtual network
      href: azure/azure-databricks/quickstart-create-databricks-workspace-vnet-injection
- name: Concepts
  items:
    - name: Azure Databricks concepts
      href: getting-started/concepts.md
Language tabs
You can use tabs to display code for different languages. The label that appears on a code tab can be any text, but we usually use the name of the language. For code and examples, see Tabs.
For usage, see [the code language tabs readme]https://github.com/databricks-eng/docs/blob/master/shared/extensions/code_language_tabs/readme.md) in the Github docs repo.
Tab syntax
Use ::::tabs to create a tabbed section with :::tab-item[Label] for each tab. Always close with ::::.
::::tabs

:::tab-item[Option 1]

Content for first tab option goes here.

:::
:::tab-item[Option 2]

Content for second tab option goes here.

:::
::::
Result:
- Option 1
- Option 2
Content for first tab option goes here.
Content for second tab option goes here.
Tables
You can define tables using list-table or GitHub Flavored Markdown (GFM) table syntax. The key differences are:
- GFM Tables are best for single-line content (multi-lines require use of
tags). GFM tables don't support non-text directives. - Use the list-table directives for complex nested structures or multi-line content.
All tables must have a header row.
In this section:
List table
Use the list-table directive for complex nested structures or multi-line content.
- Add paragraph breaks within a cell by inserting a line break and indenting the next line to align with the previous line.
- Add bullet points within a cell by adding an
-in front of each line, separating each line using a line break, and indenting each line to align with the first.
:::list-table

- - header1
  - header2
- - item1
  - item2
header1 | header2 |
|---|---|
item1 | item2 |
Example
:::list-table

- - header1
  - header2
- - list1
    - item
    - item
    - nested list:
      - item
      - item

    list2
    - item
    - item

  - Paragraph 1

    Paragraph 2

- - **Another row**
  - Another row of content

:::
header1 | header2 |
|---|---|
list1
list2
| Paragraph 1 Paragraph 2 |
Another row | Another row of content |
GitHub Flavored Markdown (GFM) table syntax
GFM Tables are best for single-line content (multi-lines require the use of
tags). GFM tables don't support non-text directives.
- Add paragraph breaks within a cell by inserting
<br><br>. Yes, two<br>s. - Add bullet points in a cell by adding
<br>-in front of each bullet item. You don't need the<br>for the first line in a cell. Instead, add a dash. If the first item in a cell is a bullet item, leave no space between the pipe at the beginning of the cell and the dash. If there's a space, the Azure PR tests return a mysterious error.
| Header 1 | Header2 |
| -------- | ------- |
| item1    | item2   |
Header 1 | Header2 |
|---|---|
item1 | item2 |
Example
| header1 | header2         |
| ------- | --------------- |
| row1    | line1<br/>line2 |
| row2    | **bolded text** |
header1 | header2 |
|---|---|
row1 | line1 line2 |
row2 | bolded text |
Include a file
Directives for Markdown include files are used to display shared content across multiple files. Shared content is stored in /docs/web/includes/. The filepath is relative to the docs/web/includes/ directory, and the included file must exist within that directory. Any included files defined inside the file will also be included.
Include Markdown content (reusable content)
To include a shared Markdown file, use the following syntax:
::include[<filepath>]
Examples
::include[preview.md]

::include[examples/deep-include-examples.md]
This feature is in Public Preview.
This feature is in Public Preview.
Isn't it convenient that we can include more content inside included content!
It is critical that there are no circular dependencies of included files.
For example, if text-1.md contains ::include[text-2.md] and text-2.md contains ::include[text-1.md], this would yield a circular dependency, resulting in build errors.
Include a code file
You can include a code file so that you can reuse a code example across multiple files. The file path is relative to the docs/web/includes/ directory and the included file must exist in that directory. You can specify the language for a syntax-highlighting language. To include a code example from a file instead of duplicating the code in multiple files, use the following syntax:
::literal-include[<filepath>]
OR
::literal-include[<filepath>]{language='<language>'}
::literal-include[code-examples/unit-testing/myfunctions.py]

::literal-include[code-examples/unit-testing/myfunctions.py]{language='python'}
Notices (Admonitions)
For information on usage, see Notes and other notices.
Generic preview notice
Directive uses the same syntax as reST. Used for preview, beta, and experimental releases and features. Unless you have a special case, use the include files defined in https://github.com/databricks-eng/universe-dev/tree/kate-gleeson_data/kitchen-universe-changes/docs/web/includes. If the notice requires additional text, copy the contents of one of the preview include files and edit.
Place the notice right under the title for the article or heading for the section that discusses the feature.
:::info[Preview]

This feature is in [Public Preview](/release-notes/release-types.md).

:::

:::info[Beta]

This feature is in [Beta](/release-notes/release-types.md).

:::
This feature is in Public Preview.
This feature is in Beta.
Public preview in specific Regions
Use the following to indicate that a feature is in preview in specific regions. In ::replace[Regions]{<Regions>}, set <Regions> to a list of regions where the feature is in preview. For example, {value='west-1 and east-2'}
:::info[Preview]

This feature is in [Public Preview](/release-notes/release-types.md) in :re[Regions].

:::

::replace[Regions]{value='<Regions>'}
This feature is in Public Preview in west-1 and east-2.
Specific notices
Use the following syntax for admonitions:
Don't put a space between ::: and the admonition title. It's always flush: :::note, not ::: note.
:::note

This is a note.

:::

:::warning

This is a warning notice. It has bullets.

- One
- Two
- Three

:::

:::important

This is an important note.

:::

:::tip

This is a tip.

:::
This is a warning notice. It has bullets.
- One
- Two
- Three
- Only bullets
- Two
- Three
This is a note.
This is a tip.
Replacements
We support the following syntax for defining text replacements:
::replace[<replacement-id>]{value='<replacement-value>'}
Where <replacement-id> is the short ID name for the replacement text and <replacement-value> is the text that you want to insert.
To use replacements and display the replacement text in content, use :re[<replacement-id>] inline where you want the replacement text to appear.
These replacements can also be defined in other Markdown files included using include directives, or inside cloud directives for different replacements per cloud.
In addition to locally-defined replacements via ::replace, you can define global replacements (affecting all Markdown files) in docs/web/config/global-replacements.yaml. Replacements can be cloud-specific or common across all clouds.
If multiple replacements with different replacement IDs (<replacement-id>) are defined for the same <replace-text>, the earliest one is used according to the following logic:
- Locally-defined replacement (prioritizing the one defined latest in the Markdown file).
- Cloud-specific global replacement in
docs/web/config/global-replacements.yaml. - Common (non-cloud-specific) global replacement in
docs/web/config/global-replacements.yaml.
It is critical that there are no circular text replacement definitions.
For example, if you were to do the following:
Replacement definitions:
::replace[aws]{value=':re[gcp]'}

::replace[gcp]{value=':re[azure]'}

::replace[azure]{value=':re[aws]'}
And then you used the following code in a file to insert a replacement: Hello, this doc should be for :re[aws]
This would yield a circular definition, resulting in build errors.
Image replacement
If you plan to use an image in more than one file, you can create a replacement link to the image. The path to a static asset is relative to the /static folder. Use the following markdown syntax for image replacements:
::replace[<image-replacement-id>]{value=''}
For example, the following code:
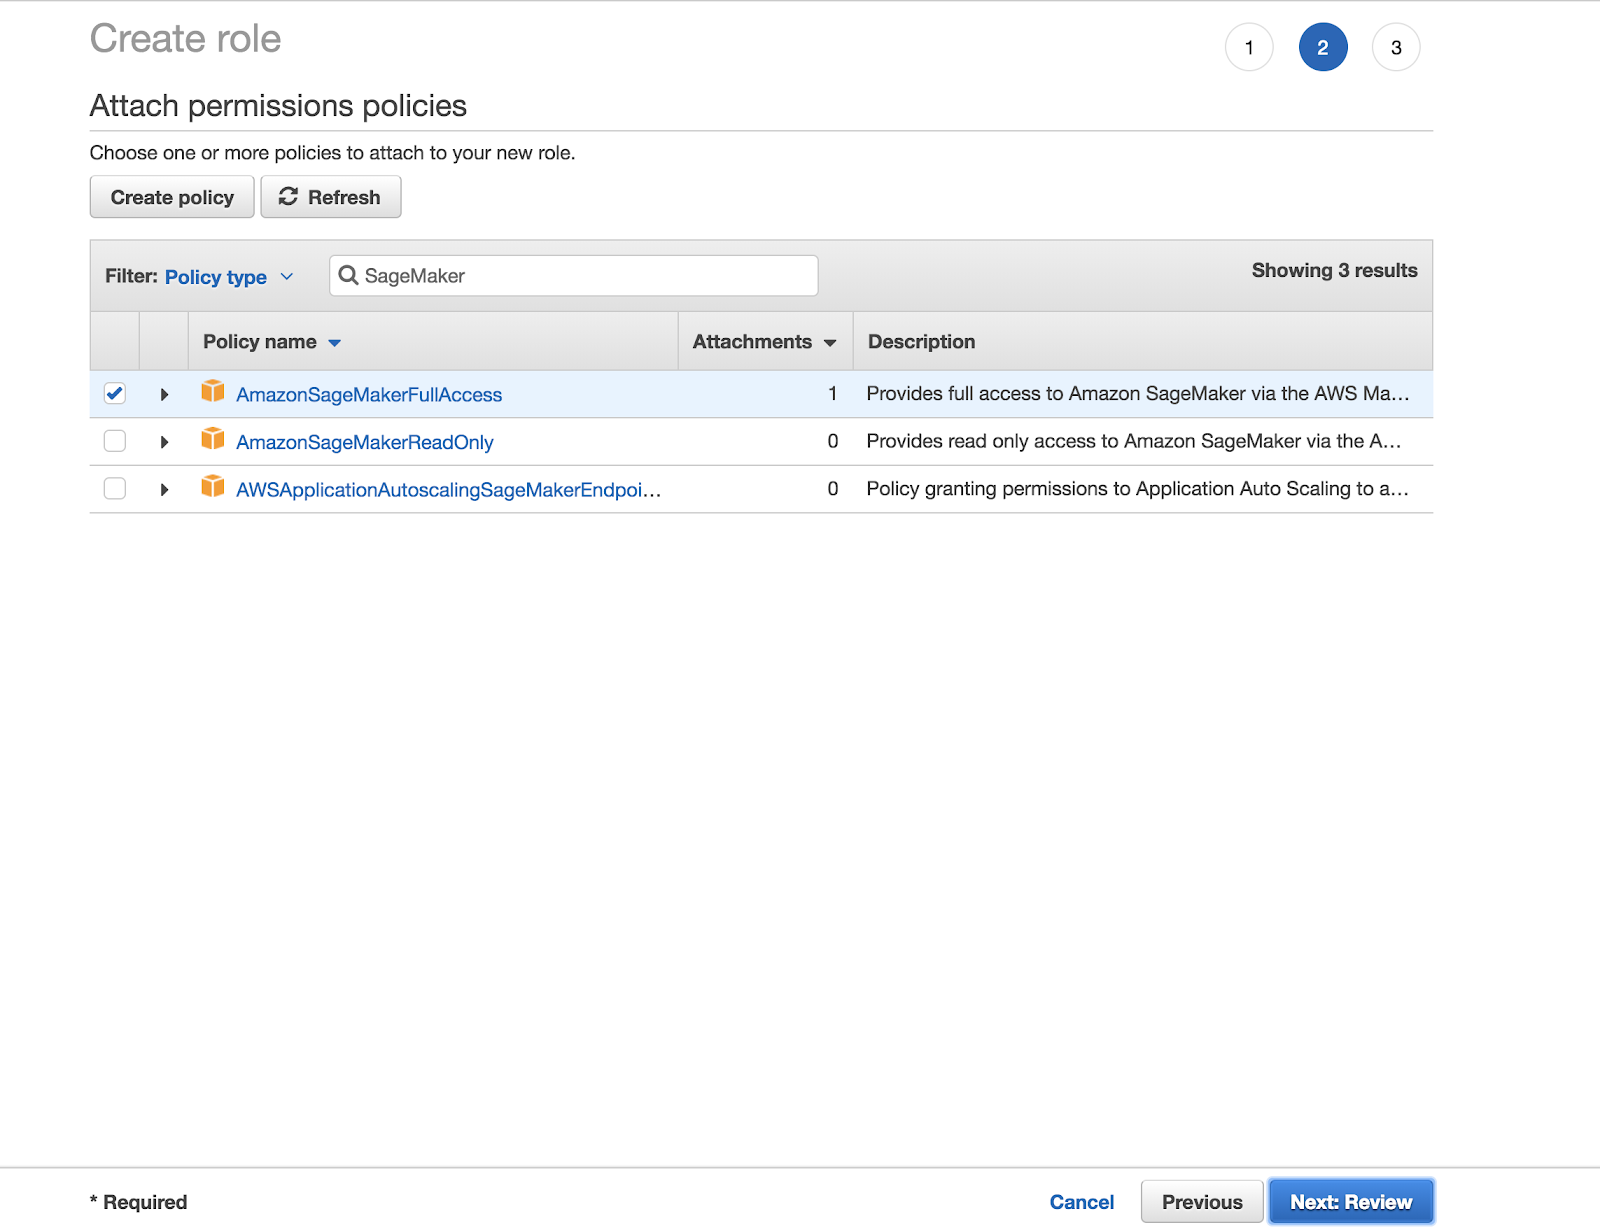
On the **Permissions** tab, click :re[inline-policy-add].
::replace[inline-policy-add]{value=''}
Looks like this:
On the Permissions tab, click ![]() .
.
For a full chart of images defined as global replacements, see (Kitchen) Images available as global replacements.
Conditional text for cloud providers
Identify content for our cloud-provider-specific doc sites by using these cloud directives:
:::aws
:::azure
:::gcp
:::aws-azure
:::aws-gcp
:::azure-gcp
Examples
:::aws

This text shows up on AWS only.

:::
Notebooks
To include notebooks, use the following Markdown syntax:
::notebook[Title]{file=<filepath>}
Where [Title] is a descriptive title that ends with notebook in sentence case, and <filepath> is relative to the docs/web/static/notebooks/source directory.
::notebook[Read JSON files notebook]{file=read-json-files.html}