Automatic tracing
Add one line of code, mlflow.<library>.autolog() to automatically trace your generative AI app. Automatic tracing works with 20+ supported libraries and frameworks out of the box.
On serverless compute clusters, autologging for genAI tracing frameworks is not automatically enabled. You must explicitly enable autologging by calling the appropriate mlflow.<library>.autolog() function for the specific integrations you want to trace.
Prerequisites
Databricks recommends MLflow 3 for the latest GenAI tracing capabilites.
Run the following in a Databricks notebook to install the mlflow package and integration package you want to use. This example uses OpenAI:
- MLflow 3
- MLflow 2.x
- mlflow[databricks]>=3.1: Core MLflow functionality with GenAI features and Databricks connectivity.
- openai>=1.0.0: Only required to run the Basic Automatic Tracing Example on this page (if using other LLM providers, install their respective SDKs instead).
- Additional libraries: Install specific libraries for the integrations you want to use.
Install the basic requirements:
%pip install --upgrade "mlflow[databricks]>=3.1" openai>=1.0.0
# Also install libraries you want to trace (langchain, anthropic, etc.)

dbutils.library.restartPython()
- mlflow[databricks]>=2.15.0,<3.0.0: Core MLflow functionality with Databricks connectivity.
- openai>=1.0.0: Only required to run the Basic Automatic Tracing Example on this page (if using other LLM providers, install their respective SDKs instead).
- Additional libraries: Install specific libraries for the integrations you want to use.
Install the basic requirements:
%pip install --upgrade "mlflow[databricks]>=2.15.0,<3.0.0" openai>=1.0.0
# Also install libraries you want to trace (langchain, anthropic, etc.)

dbutils.library.restartPython()
Configure credentials
- Databricks notebook
- External environment
In a Databricks notebook, set any necessary LLM API keys:
import os
os.environ["OPENAI_API_KEY"] = "your-api-key"

# Add other provider keys as needed
# os.environ["ANTHROPIC_API_KEY"] = "your-api-key"
# os.environ["MISTRAL_API_KEY"] = "your-api-key"
If you are in an external environment, set Databricks credentials and LLM API keys:
export DATABRICKS_HOST="https://your-workspace.cloud.databricks.com"
export DATABRICKS_TOKEN="your-databricks-token"


# Add other provider keys as needed
#export OPENAI_API_KEY="your-openai-api-key"
# export ANTHROPIC_API_KEY="your-anthropic-api-key"
# export MISTRAL_API_KEY="your-mistral-api-key"
Automatic tracing example
MLflow automatically traces 20+ supported frameworks. Here's how to enable automatic tracing for OpenAI agents connecting to Databricks Foundation Model APIs.
import mlflow
import os
from openai import OpenAI

# Databricks Foundation Model APIs use Databricks authentication.

mlflow.set_tracking_uri("databricks")
mlflow.set_experiment("/Shared/databricks-sdk-autolog-example")

# Enable auto-tracing for OpenAI (which will trace Databricks Foundation Model API calls)
mlflow.openai.autolog()

# Create OpenAI client configured for Databricks
client = OpenAI(
    api_key=os.environ.get("DATABRICKS_TOKEN"),
    base_url=f"{os.environ.get('DATABRICKS_HOST')}/serving-endpoints"
)

# Query Llama 4 Maverick using OpenAI client
response = client.chat.completions.create(
    model="databricks-llama-4-maverick",
    messages=[
        {"role": "system", "content": "You are a helpful assistant."},
        {"role": "user", "content": "What are the key features of MLflow Tracing?"}
    ],
    max_tokens=150,
    temperature=0.7
)

print(response.choices[0].message.content)
# Your calls to Databricks Foundation Model APIs are automatically traced!
Auto-trace multiple frameworks
You can use auto-tracing for multiple frameworks in the same agent. See all of the supported frameworks.
The following code combines direct OpenAI API calls, LangChain chains, and custom logic in a single trace for easy debugging and monitoring.
%pip install --upgrade langchain langchain-openai
import mlflow
import openai
from mlflow.entities import SpanType
from langchain_openai import ChatOpenAI
from langchain_core.prompts import ChatPromptTemplate

# Enable auto-tracing for both OpenAI and LangChain
mlflow.openai.autolog()
mlflow.langchain.autolog()

# Create OpenAI client
client = openai.OpenAI()

@mlflow.trace(span_type=SpanType.CHAIN)
def multi_provider_workflow(query: str):
    # First, use OpenAI directly for initial processing
    analysis = client.chat.completions.create(
        model="gpt-4o-mini",
        messages=[
            {"role": "system", "content": "Analyze the query and extract key topics."},
            {"role": "user", "content": query}
        ]
    )
    topics = analysis.choices[0].message.content

    # Then use LangChain for structured processing
    llm = ChatOpenAI(model="gpt-4o-mini")
    prompt = ChatPromptTemplate.from_template(
        "Based on these topics: {topics}\nGenerate a detailed response to: {query}"
    )
    chain = prompt | llm
    response = chain.invoke({"topics": topics, "query": query})

    return response

# Run the function
result = multi_provider_workflow("Explain quantum computing")
Combine manual and automatic tracing
Use @mlflow.trace with auto-tracing to create unified traces for the following scenarios:
- Multiple LLM calls in one workflow
- Multi-agent systems with different providers
- Custom logic between LLM calls
import mlflow
import openai
from mlflow.entities import SpanType
mlflow.openai.autolog()
# Create OpenAI client
client = openai.OpenAI()
@mlflow.trace(span_type=SpanType.CHAIN)
def run(question):
messages = build_messages(question)
# MLflow automatically generates a span for OpenAI invocation
response = client.chat.completions.create(
model="gpt-4o-mini",
max_tokens=100,
messages=messages,
)
return parse_response(response)
@mlflow.trace
def build_messages(question):
return [
{"role": "system", "content": "You are a helpful chatbot."},
{"role": "user", "content": question},
]
@mlflow.trace
def parse_response(response):
return response.choices[0].message.content
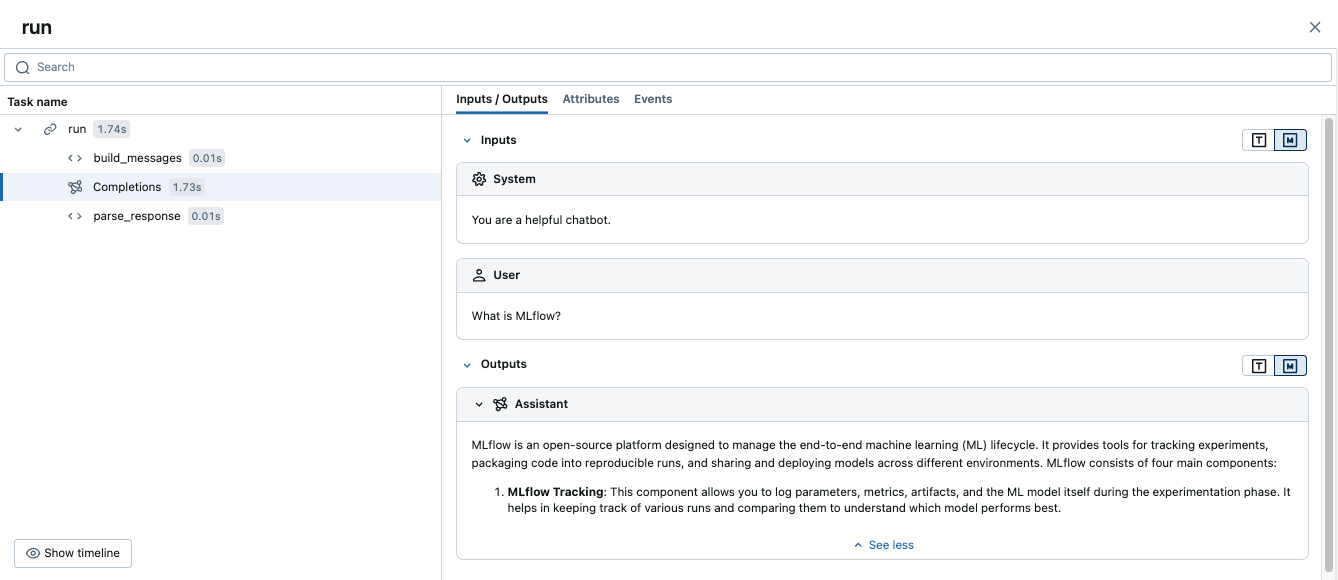
run("What is MLflow?")
Running this code generates a single trace that combines the manual spans with the automatic OpenAI tracing:
Advanced example: multiple LLM calls
The following example shows how automatic tracing captures multiple LLM calls in a single workflow.
This pattern is useful when your application needs to make sequential decisions, such as analyzing a query first and then generating a response based on that analysis.
import mlflow
import openai
from mlflow.entities import SpanType

# Enable auto-tracing for OpenAI
mlflow.openai.autolog()

# Create OpenAI client
client = openai.OpenAI()

@mlflow.trace(span_type=SpanType.CHAIN)
def process_user_query(query: str):
    # First LLM call: Analyze the query
    analysis = client.chat.completions.create(
        model="gpt-4o-mini",
        messages=[
            {"role": "system", "content": "Analyze the user's query and determine if it requires factual information or creative writing."},
            {"role": "user", "content": query}
        ]
    )
    analysis_result = analysis.choices[0].message.content

    # Second LLM call: Generate response based on analysis
    if "factual" in analysis_result.lower():
        # Use a different model for factual queries
        response = client.chat.completions.create(
            model="gpt-4o-mini",
            messages=[
                {"role": "system", "content": "Provide a factual, well-researched response."},
                {"role": "user", "content": query}
            ]
        )
    else:
        # Use a different model for creative queries
        response = client.chat.completions.create(
            model="gpt-4o-mini",
            messages=[
                {"role": "system", "content": "Provide a creative, engaging response."},
                {"role": "user", "content": query}
            ]
        )

    return response.choices[0].message.content

# Run the function
result = process_user_query("Tell me about the history of artificial intelligence")
This creates one trace with:
- Parent span for
process_user_query - Two child spans for the OpenAI calls
Next steps
- Automatic tracing integrations - Browse all 20+ supported libraries and frameworks
- Manual tracing with decorators - Add custom spans to capture business logic alongside auto-traced LLM calls