Rastreamento automático
Adicione uma linha de código para rastrear automaticamente seu aplicativo generativo xml-ph-0000@deepl.internal. mlflow.<library>.autolog() para rastrear automaticamente seu aplicativo generativo AI. O rastreamento automático funciona com mais de 20 bibliotecas e estruturas compatíveis prontas para uso.
Em serverless compute clusters, o autologging para estruturas de rastreamento genAI não é ativado automaticamente. Você deve habilitar explicitamente o registro automático chamando a função mlflow.<library>.autolog() apropriada para as integrações específicas que você deseja rastrear.
Pré-requisitos
A Databricks recomenda o MLflow 3 para obter os recursos de rastreamento GenAI mais recentes.
Execute o seguinte em um notebook Databricks para instalar o pacote mlflow e o pacote de integração que deseja usar. Este exemplo usa o OpenAI:
- MLflow 3
- MLflow 2.x
- mlflow[databricks]> =3.1: Funcionalidade principal do MLflow com recurso GenAI e conectividade Databricks.
- openai > =1.0.0 : É necessário apenas para executar o Exemplo básico de rastreamento automático nesta página (se estiver usando outros provedores de LLM, instale seus respectivos SDKs).
- Biblioteca adicional : Instale uma biblioteca específica para as integrações que o senhor deseja usar.
Instale os requisitos básicos:
%pip install --upgrade "mlflow[databricks]>=3.1" "openai>=1.0.0"
# Also install libraries you want to trace (langchain, anthropic, etc.)

dbutils.library.restartPython()
- mlflow [blocos de dados] > =2.15.0 ,\ < 3.0.0: Funcionalidade principal do MLflow com conectividade Databricks.
- openai > =1.0.0 : É necessário apenas para executar o Exemplo básico de rastreamento automático nesta página (se estiver usando outros provedores de LLM, instale seus respectivos SDKs).
- Biblioteca adicional : Instale uma biblioteca específica para as integrações que o senhor deseja usar.
Instale os requisitos básicos:
%pip install --upgrade "mlflow[databricks]>=2.15.0,<3.0.0" "openai>=1.0.0"
# Also install libraries you want to trace (langchain, anthropic, etc.)

dbutils.library.restartPython()
Configurar credenciais
- Databricks notebook
- External environment
Em um Databricks Notebook, defina qualquer tecla LLM API necessária:
import os
os.environ["OPENAI_API_KEY"] = "your-api-key"

# Add other provider keys as needed
# os.environ["ANTHROPIC_API_KEY"] = "your-api-key"
# os.environ["MISTRAL_API_KEY"] = "your-api-key"
Se o senhor estiver em um ambiente externo, defina as credenciais Databricks e a chave LLM API :
export DATABRICKS_HOST="https://your-workspace.cloud.databricks.com"
export DATABRICKS_TOKEN="your-databricks-token"


# Add other provider keys as needed
#export OPENAI_API_KEY="your-openai-api-key"
# export ANTHROPIC_API_KEY="your-anthropic-api-key"
# export MISTRAL_API_KEY="your-mistral-api-key"
Exemplo de rastreamento automático
O MLflow rastreia automaticamente mais de 20 frameworks suportados. Veja como habilitar o rastreamento automático para agentes OpenAI que se conectam às APIs de modelos do Databricks Foundation.
import mlflow
import os
from openai import OpenAI

# Databricks Foundation Model APIs use Databricks authentication.

mlflow.set_tracking_uri("databricks")
mlflow.set_experiment("/Shared/databricks-sdk-autolog-example")

# Enable auto-tracing for OpenAI (which will trace Databricks Foundation Model API calls)
mlflow.openai.autolog()

# Create OpenAI client configured for Databricks
client = OpenAI(
    api_key=os.environ.get("DATABRICKS_TOKEN"),
    base_url=f"{os.environ.get('DATABRICKS_HOST')}/serving-endpoints"
)

# Query Llama 4 Maverick using OpenAI client
response = client.chat.completions.create(
    model="databricks-llama-4-maverick",
    messages=[
        {"role": "system", "content": "You are a helpful assistant."},
        {"role": "user", "content": "What are the key features of MLflow Tracing?"}
    ],
    max_tokens=150,
    temperature=0.7
)

print(response.choices[0].message.content)
# Your calls to Databricks Foundation Model APIs are automatically traced!
Rastreie automaticamente várias estruturas
Você pode usar o rastreamento automático para várias estruturas no mesmo agente. Veja todas as estruturas suportadas.
O código a seguir combina chamadas diretas à API da OpenAI, cadeias LangChain e lógica personalizada em um único rastreamento para facilitar a depuração e o monitoramento.
%pip install --upgrade "langchain==0.3.7" "langchain-openai==0.2.8"
import mlflow
import openai
from mlflow.entities import SpanType
from langchain_openai import ChatOpenAI
from langchain_core.prompts import ChatPromptTemplate

# Enable auto-tracing for both OpenAI and LangChain
mlflow.openai.autolog()
mlflow.langchain.autolog()

# Create OpenAI client
client = openai.OpenAI()

@mlflow.trace(span_type=SpanType.CHAIN)
def multi_provider_workflow(query: str):
    # First, use OpenAI directly for initial processing
    analysis = client.chat.completions.create(
        model="gpt-4o-mini",
        messages=[
            {"role": "system", "content": "Analyze the query and extract key topics."},
            {"role": "user", "content": query}
        ]
    )
    topics = analysis.choices[0].message.content

    # Then use LangChain for structured processing
    llm = ChatOpenAI(model="gpt-4o-mini")
    prompt = ChatPromptTemplate.from_template(
        "Based on these topics: {topics}\nGenerate a detailed response to: {query}"
    )
    chain = prompt | llm
    response = chain.invoke({"topics": topics, "query": query})

    return response

# Run the function
result = multi_provider_workflow("Explain quantum computing")
Combine o rastreamento manual e automático
Use @mlflow.trace com rastreamento automático para criar rastreamentos unificados para os seguintes cenários:
- Várias chamadas LLM em um fluxo de trabalho
- Sistemas multiagentes com diferentes fornecedores
- Lógica personalizada entre as chamadas LLM
import mlflow
import openai
from mlflow.entities import SpanType
mlflow.openai.autolog()
# Create OpenAI client
client = openai.OpenAI()
@mlflow.trace(span_type=SpanType.CHAIN)
def run(question):
messages = build_messages(question)
# MLflow automatically generates a span for OpenAI invocation
response = client.chat.completions.create(
model="gpt-4o-mini",
max_tokens=100,
messages=messages,
)
return parse_response(response)
@mlflow.trace
def build_messages(question):
return [
{"role": "system", "content": "You are a helpful chatbot."},
{"role": "user", "content": question},
]
@mlflow.trace
def parse_response(response):
return response.choices[0].message.content
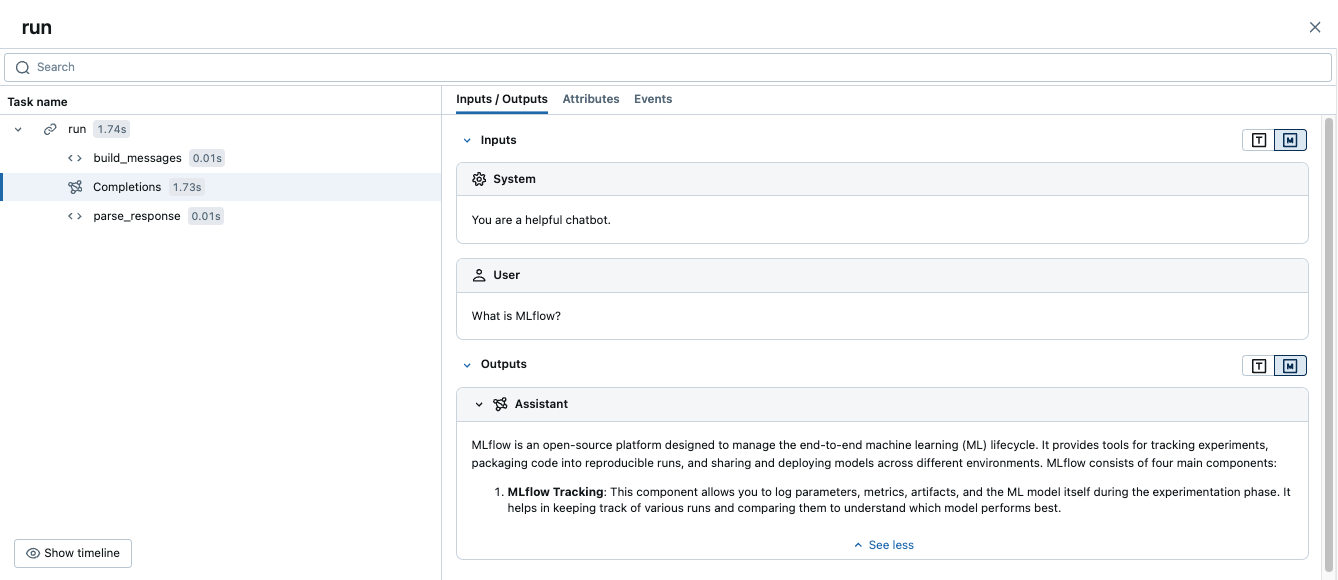
run("What is MLflow?")
A execução desse código gera um único rastreamento que combina as extensões manuais com o rastreamento automático do OpenAI:
Exemplo avançado: várias chamadas LLM
O exemplo a seguir mostra como o rastreamento automático captura várias chamadas LLM em um único fluxo de trabalho.
Esse padrão é útil quando seu aplicativo precisa tomar decisões sequenciais, como analisar uma consulta primeiro e, em seguida, gerar uma resposta com base nessa análise.
import mlflow
import openai
from mlflow.entities import SpanType

# Enable auto-tracing for OpenAI
mlflow.openai.autolog()

# Create OpenAI client
client = openai.OpenAI()

@mlflow.trace(span_type=SpanType.CHAIN)
def process_user_query(query: str):
    # First LLM call: Analyze the query
    analysis = client.chat.completions.create(
        model="gpt-4o-mini",
        messages=[
            {"role": "system", "content": "Analyze the user's query and determine if it requires factual information or creative writing."},
            {"role": "user", "content": query}
        ]
    )
    analysis_result = analysis.choices[0].message.content

    # Second LLM call: Generate response based on analysis
    if "factual" in analysis_result.lower():
        # Use a different model for factual queries
        response = client.chat.completions.create(
            model="gpt-4o-mini",
            messages=[
                {"role": "system", "content": "Provide a factual, well-researched response."},
                {"role": "user", "content": query}
            ]
        )
    else:
        # Use a different model for creative queries
        response = client.chat.completions.create(
            model="gpt-4o-mini",
            messages=[
                {"role": "system", "content": "Provide a creative, engaging response."},
                {"role": "user", "content": query}
            ]
        )

    return response.choices[0].message.content

# Run the function
result = process_user_query("Tell me about the history of artificial intelligence")
Isso cria um rastreamento com:
- Período parental para
process_user_query - Dois períodos de filhos para as chamadas OpenAI
Recursos adicionais
- Integrações de rastreamento automático - Navegue por todas as mais de 20 bibliotecas e frameworks suportados.
- Rastreamento manual com decoradores - Adicione intervalos personalizados para capturar a lógica de negócios juntamente com as chamadas LLM rastreadas automaticamente