Connect to cloud object storage using Unity Catalog
This article gives an overview of the cloud storage connections that are required to work with data using Unity Catalog, along with information about how Unity Catalog governs access to cloud storage and external cloud services.
How does Unity Catalog use cloud storage?
Databricks recommends using Unity Catalog to manage access to all data that you have stored in cloud object storage. Unity Catalog provides a suite of tools to configure secure connections to cloud object storage. These connections provide access to complete the following actions:
- Ingest raw data into a lakehouse.
- Create and read managed tables and managed volumes of unstructured data in Unity Catalog-managed cloud storage.
- Register or create external tables containing tabular data and external volumes containing unstructured data in cloud storage that is managed using your cloud provider.
- Read and write unstructured data (Unity Catalog volumes).
To be more specific, Unity Catalog uses cloud storage in two primary ways:
- Default (or “managed”) storage locations for managed tables and managed volumes (unstructured, non-tabular data) that you create in Databricks. These managed storage locations can be defined at the metastore, catalog, or schema level. You create managed storage locations in your cloud provider, but their lifecycle is fully managed by Unity Catalog.
- Storage locations where external tables and volumes are stored. These are tables and volumes whose access from Databricks is managed by Unity Catalog, but whose data lifecycle and file layout are managed using your cloud provider and other data platforms. Typically you use external tables to register large amounts of your existing data in Databricks, or if you also require write access to the data using tools outside of Databricks.
For more information about managed vs external tables and volumes, see Databricks tables and What are Unity Catalog volumes?.
Do not give non-Unity Catalog identities storage-level access to Unity Catalog managed tables or volumes. This compromises data security and governance.
Avoid granting users or service principals direct access to Amazon S3 or Cloudflare R2 buckets that are used as Unity Catalog managed storage. The only identity that should have access to data managed by Unity Catalog is the identity used by Unity Catalog. Ignoring this creates the following issues in your environment:
- Access controls established in Unity Catalog can be circumvented by users who have direct access to S3 or R2 buckets.
- Auditing, lineage, and other Unity Catalog monitoring features will not capture direct access.
- The lifecycle of data is broken. That is, modifying, deleting, or evolving tables in Databricks will break the consumers that have direct access to storage, and writes outside of Databricks could result in data corruption.
Cloud storage options supported by Unity Catalog
Unity Catalog supports the following cloud storage options for Databricks on AWS.
Cloud storage option | Description |
|---|---|
AWS S3 buckets | S3 is appropriate for most Databricks use cases. See Connect to an AWS S3 external location. |
Cloudflare R2 buckets | Cloudflare R2 is intended primarily for OpenSharing use cases in which you want to avoid data egress fees. See Connect to a Cloudflare R2 external location. |
DBFS Root | DBFS root is a legacy cloud storage location. Although Databricks recommends against storing data in DBFS root storage, your workspace might do so because of legacy practices. See Connect to a DBFS root external location (legacy). |
How does Unity Catalog govern access to cloud storage?
To manage access to the underlying cloud storage that holds tables and volumes, Unity Catalog uses a securable object called an external location, which defines a path to a cloud storage location and the credentials required to access that location. Those credentials are, in turn, defined in a Unity Catalog securable object called a storage credential. By granting and revoking access to external location securables in Unity Catalog, you control access to the data in the cloud storage location. By granting and revoking access to storage credential securables in Unity Catalog, you control the ability to create external location objects.
Overview of storage credentials
A storage credential represents an authentication and authorization mechanism for accessing data stored on your cloud tenant. For example, a storage credential is associated with an IAM role for S3 buckets, or with an R2 API token for Cloudflare R2 buckets.
Privileges granted in Unity Catalog control which users and groups can use the credential to define external locations. Permission to create and use storage credentials should be granted only to users who need to create external location objects.
Overview of external locations
An external location combines a cloud storage path with a storage credential that authorizes access to the specified path. Multiple external locations can use the same storage credential. External locations can reference storage paths in any of the supported cloud storage options.
The diagram below shows how external locations reference storage credentials and cloud storage locations.
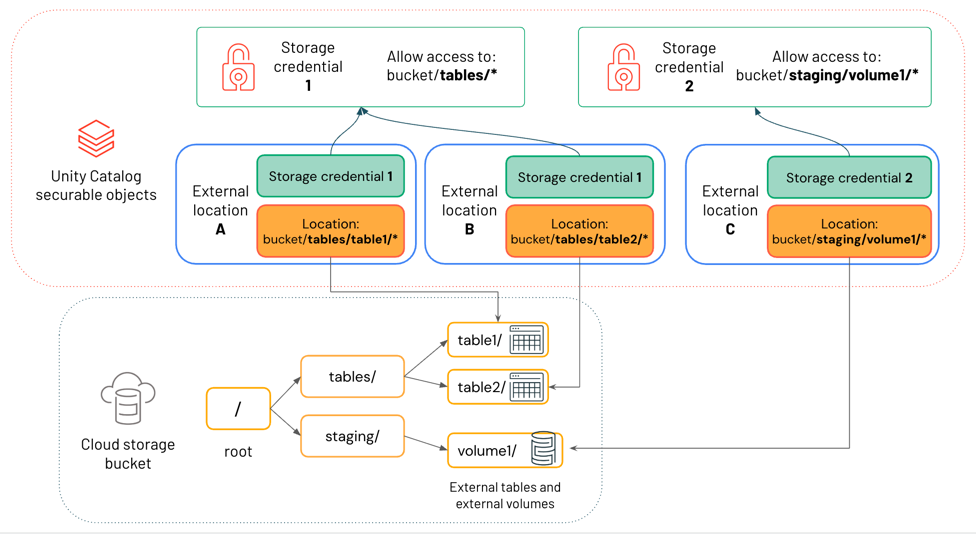
In this diagram:
- Each external location references a storage credential and a cloud storage location.
- Multiple external locations can reference the same storage credential. Storage credential 1 grants access to everything under the path
bucket/tables/*, so both External location A and External location B reference it.
External locations are used in Unity Catalog both for external data assets, like external tables and external volumes, and for managed data assets, like managed tables and managed volumes. For more information about the difference between external and managed data assets in Unity Catalog, see Databricks tables and What are Unity Catalog volumes?.
Privileges granted in Unity Catalog control which users and groups can access the cloud storage path defined by the external location. Permission to create and use external locations should be granted only to users who need to create external tables, external volumes, or managed storage locations.
To learn about best practices for using external locations, see External locations.
Using external locations when you create external tables and volumes
External tables and external volumes registered in Unity Catalog are essentially pointers to data in cloud storage that you manage outside of Databricks. When you create an external table or external volume in Unity Catalog, you must reference a cloud storage path that is included in an external location object that you have been granted adequate privileges on. For more information about the difference between external and managed data assets in Unity Catalog, see Databricks tables and What are Unity Catalog volumes?. For privileges, see Grant permissions on an external location.
Using external locations when you create managed storage
Managed tables and managed volumes are fully managed by Unity Catalog. They are stored by default in a managed storage location, which can be defined at the metastore, catalog, or schema level. When you assign a managed storage location to a metastore, catalog, or schema, you must reference an external location object, and you must have adequate privileges to use it. See Specify a managed storage location in Unity Catalog and Unity Catalog best practices.
Path-based access to data in cloud storage
Although Unity Catalog supports path-based access to external tables and external volumes using cloud storage URIs, Databricks recommends that users read and write all Unity Catalog tables using table names and access data in volumes using /Volumes paths. Volumes are the securable object that most Databricks users should use to interact directly with non-tabular data in cloud object storage. See What are Unity Catalog volumes?.
If you update external table metadata using a non-Databricks client or using path-based access from within Databricks, that metadata does not automatically sync state with Unity Catalog. Databricks recommends against such metadata updates, but if you do perform one, you must run MSCK REPAIR TABLE <table-name> SYNC METADATA to bring the schema in Unity Catalog up to date. See REPAIR TABLE.
Workflow for managing access to cloud storage in Unity Catalog
To manage access to cloud storage using Unity Catalog, you do the following:
- Create a storage credential object that contains a long-term cloud credential, such as an IAM role, with access to the cloud storage path.
- Create an external location object that references the storage path and the storage credential object.
- Reference a path that is included in the external location when you create external tables, external volumes, or default managed storage locations. This can be the exact path defined in the external location or a subpath.