Database objects in Databricks
Databricks uses two primary securable objects to store and access data.
- Tables govern access to tabular data.
- Volumes govern access to non-tabular data.
This article describes how these database objects relate to catalogs, schemas, views, and other database objects in Databricks. This article also provides a high-level introduction to how database objects work in the context of the overall platform architecture.
What are database objects in Databricks?
Database objects are entities that help you organize, access, and govern data. Databricks uses a three-tier hierarchy to organize database objects:
- Catalog: The top level container, contains schemas. See What are catalogs in Databricks?.
- Schema or database: Contains data objects. See What are schemas in Databricks?.
- Data objects that can be contained in a schema:
- Volume: a logical volume of non-tabular data in cloud object storage. See What are Unity Catalog volumes?.
- Table: a collection of data organized by rows and columns. See Databricks tables.
- View: a saved query against one or more tables. See What is a view?.
- Function: saved logic that returns a scalar value or set of rows. See SQL and Python user-defined functions (UDFs) in Unity Catalog.
- Model: a machine learning model packaged with MLflow. See Manage model lifecycle in Unity Catalog.
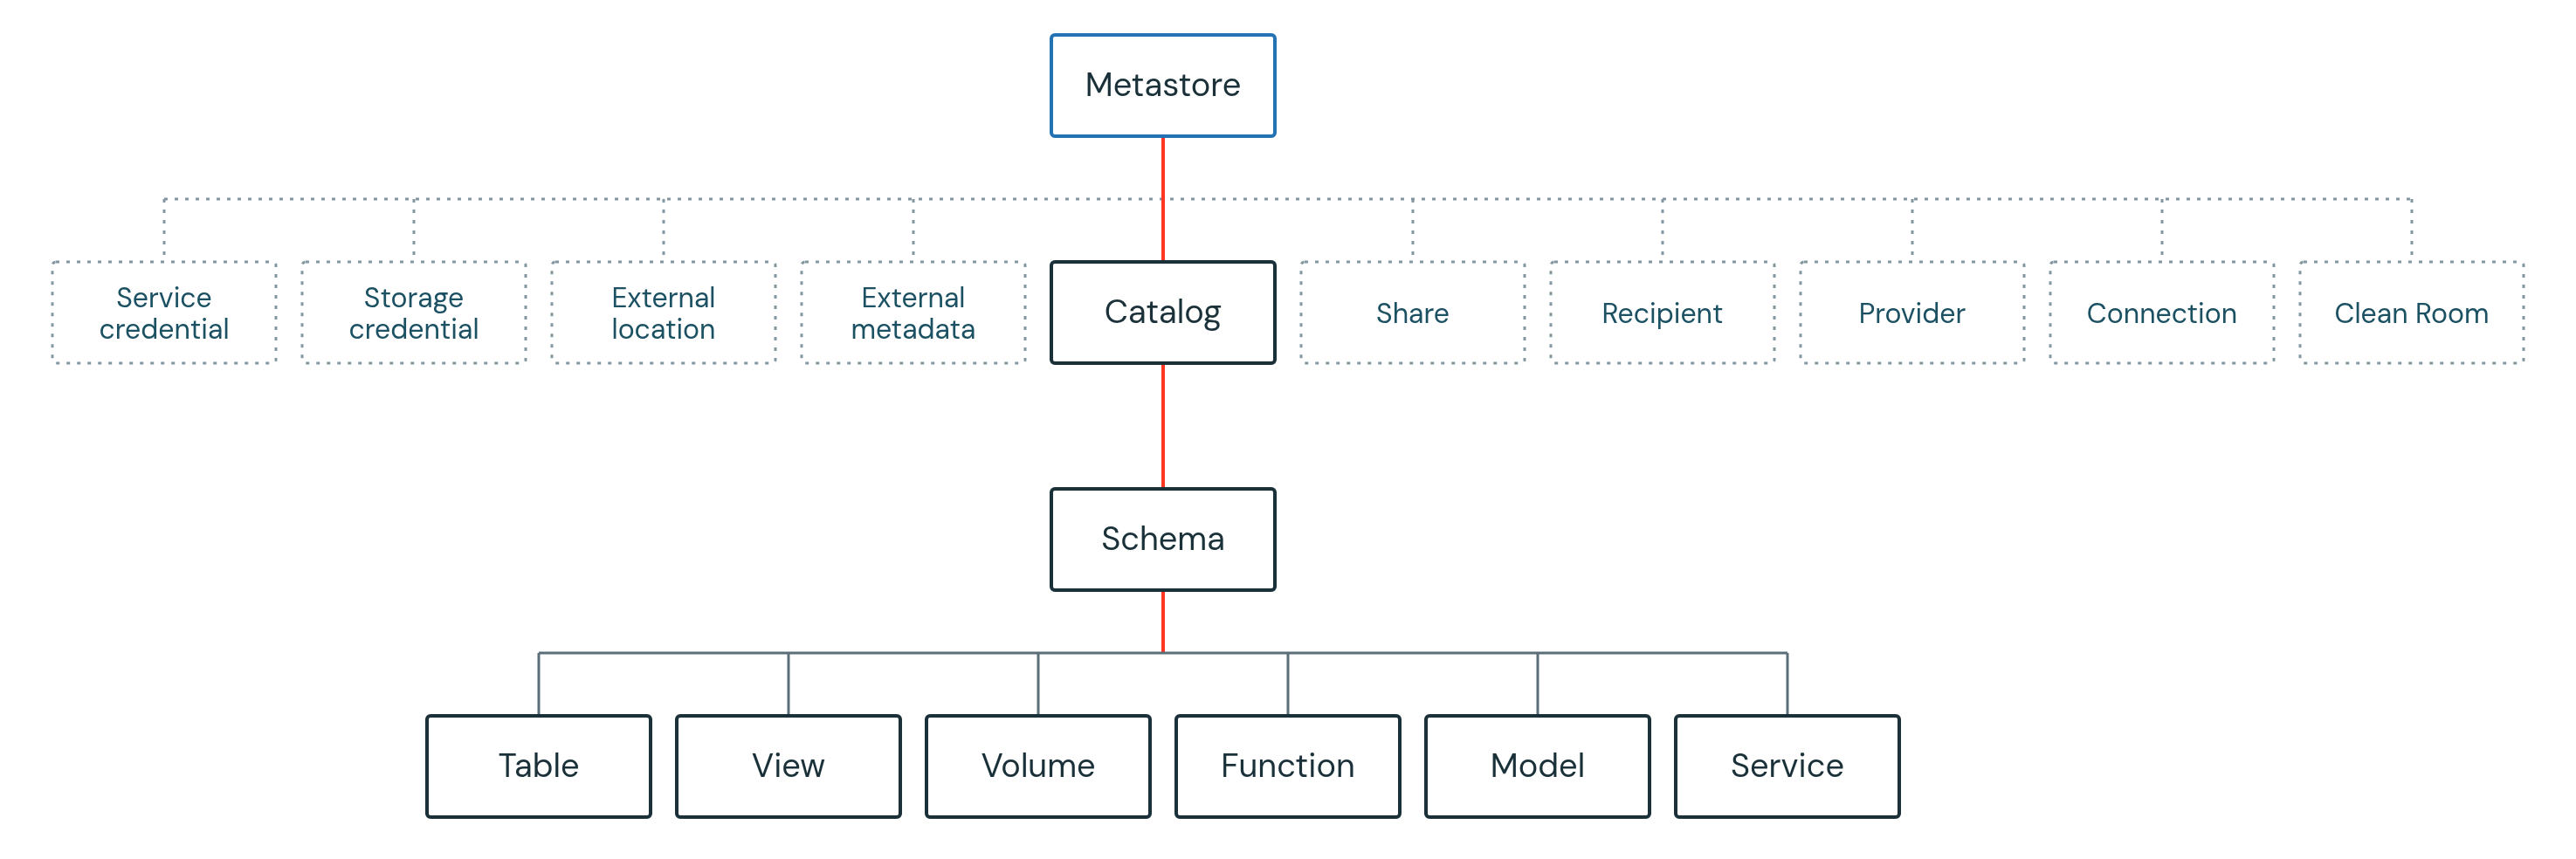
Catalogs are registered in a metastore that is managed at the account level. Only admins interact directly with the metastore. See Metastore.
Databricks provides additional assets for working with data, all of which are governable using workspace-level access controls or Unity Catalog, the Databricks data governance solution:
- Workspace-level data assets, like notebooks, jobs, and queries.
- Unity Catalog securable objects like storage credentials and OpenSharing shares, which primarily control access to storage or secure sharing.
For more information, see Database objects vs. workspace securable data assets and Unity Catalog securable credentials and infrastructure.
Managing access to database objects using Unity Catalog
You can grant and revoke access to database objects at any level in the hierarchy, including the metastore itself. Access to an object implicitly grants the same access to all children of that object, unless access is revoked.
You can use typical ANSI SQL commands to grant and revoke access to objects in Unity Catalog. You can also use Catalog Explorer for UI-driven management of data object privileges.
For more information about securing objects in Unity Catalog, see Securable objects in Unity Catalog.
Default object permissions in Unity Catalog
Depending on how your workspace was created and enabled for Unity Catalog, your users may have default permissions on automatically provisioned catalogs, including either the main catalog or the workspace catalog (<workspace-name>). For more information, see Workspace catalog privileges.
If your workspace was enabled for Unity Catalog manually, it includes a default schema named default in the main catalog that is accessible to all users in your workspace. If your workspace was enabled for Unity Catalog automatically and includes a <workspace-name> catalog, that catalog contains a schema named default that is accessible to all users in your workspace.
Database objects vs. workspace securable data assets
Databricks allows you to manage multiple data engineering, analytics, ML, and AI assets alongside your database objects. You do not register these data assets in Unity Catalog. Instead, these assets are managed at the workspace level, using control lists to govern permissions. These data assets include the following:
- Notebooks
- Dashboards
- Jobs
- Pipelines
- Workspace files
- SQL queries
- Experiments
Most data assets contain logic that interacts with database objects to query data, use functions, register models, or other common tasks. To learn more about securing workspace data assets, see Access control lists.
Access to compute is governed by access control lists. You configure compute with an access mode and can add additional cloud permissions, which control how users can access data. Databricks recommends using compute policies and restricting cluster creation privileges as a data governance best practice. See Access modes.
Unity Catalog securable credentials and infrastructure
Unity Catalog manages access to cloud object storage, data sharing, and query federation using securable objects registered at the metastore level. The following are brief descriptions of these non-data securable objects.
Connecting Unity Catalog to cloud object storage
You must define storage credentials and external locations in order to create a new managed storage location or to register external tables or external volumes. These securable objects are registered in Unity Catalog:
- Storage credential: A long-term cloud credential that provides access to cloud storage.
- External location: A reference to a cloud object storage path accessible using the paired storage credential.
See Connect to cloud object storage using Unity Catalog.
OpenSharing
Databricks registers the following OpenSharing securable objects in Unity Catalog:
- Share: A read-only collection of tables, volumes, and other data assets.
- Provider: The organization or entity that shares data. In the Databricks-to-Databricks sharing model, the provider is registered in the recipient's Unity Catalog metastore as a unique entity identified by its metastore ID.
- Recipient: The entity that receives shares from a provider. In the Databricks-to-Databricks sharing model, the recipient is identified to the provider by their unique metastore ID.
See What is OpenSharing?.
Lakehouse Federation
Lakehouse Federation allows you to create foreign catalogs to provide read-only access to data residing in other systems such as PostgreSQL, MySQL, and Snowflake. You must define a connection to the external system in order to create foreign catalogs.
Connection: A Unity Catalog securable object specifies a path and credentials for accessing an external database system in a Lakehouse Federation scenario.
See Connect to external databases and catalogs.
Managed storage locations for managed volumes and tables
When you create tables and volumes in Databricks, you have the choice of making them managed or external. Unity Catalog manages access to external tables and volumes from Databricks but doesn't control underlying files or fully manage the storage location of those files. Managed tables and volumes, on the other hand, are fully managed by Unity Catalog and are stored in a managed storage location that is associated with the containing schema. See Specify a managed storage location in Unity Catalog.
Databricks recommends managed volumes and managed tables for most workloads, because they simplify configuration, optimization, and governance.
Unity Catalog vs. legacy Hive metastore
Databricks recommends using Unity Catalog for registering and governing all database objects, but also provides legacy support for Hive metastore for managing schemas, tables, views, and functions.
If you are interacting with database objects registered using Hive metastore, see Database objects in the legacy Hive metastore.