Databricks Connect
This article covers Databricks Connect for Databricks Runtime 13.3 LTS and above.
Databricks Connect is a client library for the Databricks Runtime that allows you to connect to Databricks compute from IDEs such as Visual Studio Code, PyCharm, and IntelliJ IDEA, notebooks and any custom application, to enable new interactive user experiences based on your Databricks Lakehouse.
Databricks Connect is available for the following languages:
What can I do with Databricks Connect?
Using Databricks Connect, you can write code using Spark APIs and run them remotely on Databricks compute instead of in the local Spark session.
-
Interactively develop and debug from any IDE. Databricks Connect enables developers to develop and debug their code on Databricks compute using any IDE's native running and debugging functionality. The Databricks Visual Studio Code extension uses Databricks Connect to provide built-in debugging of user code on Databricks.
-
Build interactive data apps. Just like a JDBC driver, the Databricks Connect library can be embedded in any application to interact with Databricks. Databricks Connect provides the full expressiveness of Python through PySpark, eliminating SQL programming language impedance mismatch and enabling you to run all data transformations with Spark on Databricks serverless scalable compute.
How does it work?
Databricks Connect is built on open-source Spark Connect, which has a decoupled client-server architecture for Apache Spark that allows remote connectivity to Spark clusters using the DataFrame API. The underlying protocol uses Spark unresolved logical plans and Apache Arrow on top of gRPC. The client API is designed to be thin, so that it can be embedded everywhere: in application servers, IDEs, notebooks, and programming languages.
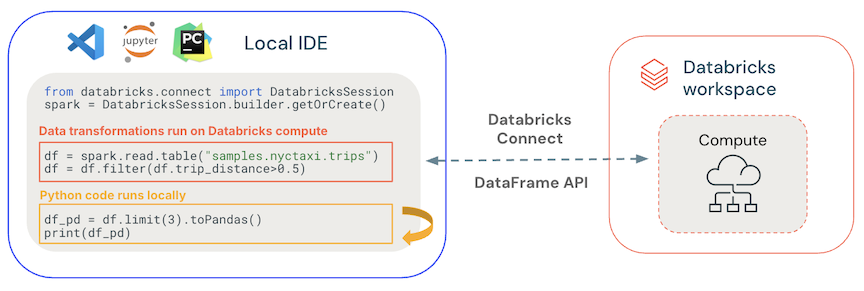
- General code runs locally: Python and Scala code runs on the client side, enabling interactive debugging. All code is executed locally, while all Spark code continues to run on the remote cluster.
- DataFrame APIs are executed on Databricks compute. All the data transformations are converted to Spark plans and run on the Databricks compute through the remote Spark session. They are materialized on your local client when you use commands such as
collect(),show(),toPandas(). - UDF code runs on Databricks compute: UDFs defined locally are serialized and transmitted to the cluster where it runs. APIs that run user code on Databricks include: UDFs,
foreach,foreachBatch, andtransformWithState. - For dependencies management:
- Install application dependencies on your local machine. These run locally and need to be installed as part of your project, such as part of your Python virtual environment.
- Install UDF dependencies on Databricks. See Manage UDF dependencies.
How are Databricks Connect and Spark Connect related?
Spark Connect is an open-source gRPC-based protocol within Apache Spark that allows remote execution of Spark workloads using the DataFrame API.
For Databricks Runtime 13.3 LTS and above, Databricks Connect is an extension of Spark Connect with additions and modifications to support working with Databricks compute modes and Unity Catalog.
Additional resources
See the following tutorials to quickly begin developing Databricks Connect solutions:
- Databricks Connect for Python classic compute tutorial
- Databricks Connect for Python serverless compute tutorial
- Databricks Connect for Scala classic compute tutorial
- Databricks Connect for Scala serverless compute tutorial
- Databricks Connect for R tutorial
To see example applications that use Databricks Connect, see the GitHub examples repository, which includes the following examples: