Configure a customer-managed VPC
This page describes the benefits and implementation of a customer-managed VPC.
Overview
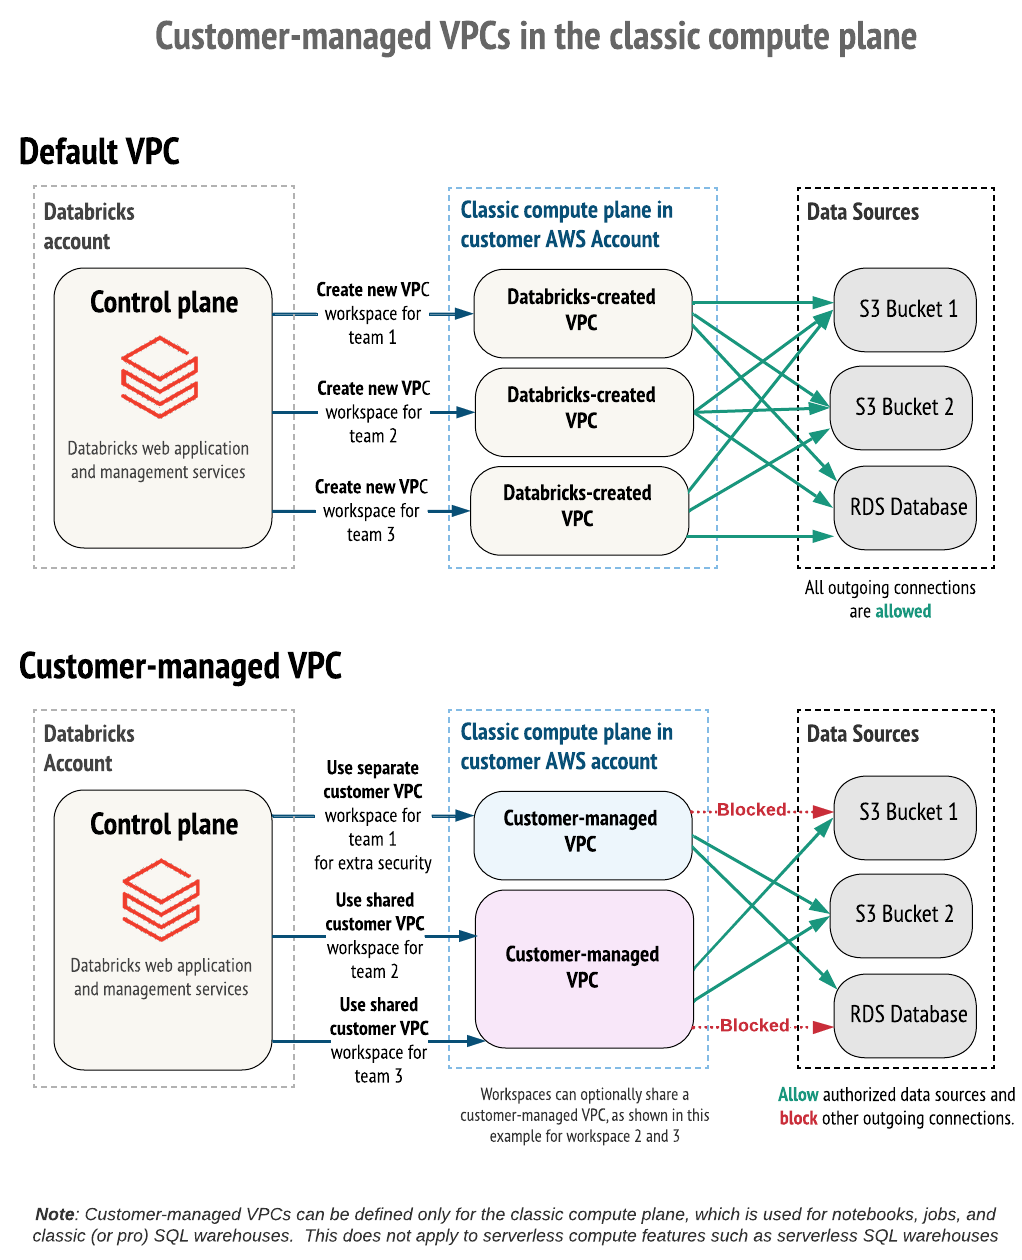
By default, Databricks clusters are created in a single AWS Virtual Private Cloud (VPC) that Databricks creates and configures within your AWS account.
Alternatively, you can create your Databricks workspaces within your own VPC. This feature is known as a customer-managed VPC.
Use a customer-managed VPC for:
- Enhanced control: Exercise more control over your network configurations.
- Compliance: Comply with specific cloud security and governance standards required by your organization.
- Internal policies: Adhere to security policies that prevent providers from creating VPCs in your AWS account.
- Clear approval processes: Align with internal approval processes where VPCs must be configured and secured by your own teams (For example, information security, cloud engineering).
- AWS PrivateLink: Using a customer-managed VPC is required if you need to configure AWS PrivateLink for any type of connection.
Benefits include:
- Lower privilege level: Maintain more control over your AWS account. Databricks requires fewer permissions using its cross-account IAM role compared to the default setup, which can simplify internal approvals.
- Simplified network operations: Achieve better network space utilization by configuring smaller subnets for a workspace compared to the default /16 CIDR. Avoid potentially complex VPC peering configurations.
- Consolidated VPCs: Multiple Databricks workspaces can share a single classic compute plane VPC, which is often preferred for billing and instance management.
- Limit outgoing connections: Use an egress firewall or proxy appliance to limit outbound traffic to a list of allowed internal or external data sources.
To take advantage of a customer-managed VPC, you must specify a VPC when you first create the Databricks workspace. You cannot move an existing workspace with a Databricks-managed VPC to use a customer-managed VPC. You can, however, move an existing workspace with a customer-managed VPC from one VPC to another VPC by updating the workspace configuration's network configuration object. See Update a running or failed workspace.
To deploy a workspace in your own VPC, you must:
-
Create the VPC following the requirements enumerated in VPC requirements.
-
Reference your VPC network configuration with Databricks when you create the workspace.
- Use the account console and choose the configuration by name
- Use the Account API and choose the configuration by its ID
You must provide the VPC ID, subnet IDs, and security group ID when you register the VPC with Databricks.
VPC requirements
Your VPC must meet the requirements described in this section in order to host a Databricks workspace.
Requirements:
- VPC region
- VPC sizing
- VPC IP address ranges
- DNS
- Subnets
- Security groups
- Subnet-level network ACLs
- AWS PrivateLink support
VPC region
For a list of AWS regions that support customer-managed VPC, see Features with limited regional availability.
VPC sizing
You can share one VPC with multiple workspaces in a single AWS account. However, Databricks recommends using unique subnets and security groups for each workspace. Be sure to size your VPC and subnets accordingly. Databricks assigns two IP addresses per node, one for management traffic and one for Apache Spark applications. The total number of instances for each subnet is equal to half the number of IP addresses that are available. Learn more in Subnets.
VPC IP address ranges
Databricks doesn't limit netmasks for the workspace VPC, but each workspace subnet must have a netmask between /17 and /26. This means that if your workspace has two subnets and both have a netmask of /26, then the netmask for your workspace VPC must be /25 or smaller.
If you have configured secondary CIDR blocks for your VPC, make sure that the subnets for the Databricks workspace are configured with the same VPC CIDR block.
DNS
The VPC must have DNS hostnames and DNS resolution enabled.
Subnets
Databricks must have access to at least two subnets for each workspace, with each subnet in a different availability zone. You cannot specify more than one Databricks workspace subnet per Availability Zone in the Create network configuration API call. You can have more than one subnet per availability zone as part of your network setup, but you can choose only one subnet per Availability Zone for the Databricks workspace.
You can choose to share one subnet across multiple workspaces or both subnets across workspaces. For example, you can have two workspaces that share the same VPC. One workspace can use subnets A and B and another workspaces can use subnets A and C. If you plan to share subnets across multiple workspaces, be sure to size your VPC and subnets to be large enough to scale with usage.
Databricks assigns two IP addresses per node, one for management traffic and one for Spark applications. The total number of instances for each subnet is equal to half of the number of IP addresses that are available.
Each subnet must have a netmask between /17 and /26.
Additional subnet requirements
- Subnets must be private.
- Subnets must have outbound access to the public network using a NAT gateway and internet gateway, or other similar customer-managed appliance infrastructure.
- The NAT gateway must be set up in its own subnet that routes quad-zero (
0.0.0.0/0) traffic to an internet gateway or other customer-managed appliance infrastructure.
Workspaces must have outbound access from the VPC to the public network. If you configure IP access lists, those public networks must be added to an allow list. See Configure IP access lists for workspaces.
Subnet route table
The route table for workspace subnets must have quad-zero (0.0.0.0/0) traffic that targets the appropriate network device. Quad-zero traffic must target a NAT Gateway or your own managed NAT device or proxy appliance.
Databricks requires subnets to add 0.0.0.0/0 to your allow list. This must be the first rule prioritized. To control egress traffic, use an egress firewall or proxy appliance to block most traffic but allow the URLs that Databricks needs to connect to. See Configure a firewall and outbound access.
This is a base guideline only. Your configuration requirements may differ. For questions, contact your Databricks account team.
Security groups
A Databricks workspace must have access to at least one AWS security group and no more than five security groups. You can reuse existing security groups rather than create new ones. However, Databricks recommends using unique subnets and security groups for each workspace.
Security groups must have the following rules:
Egress (outbound):
- Allow all TCP and UDP access to the workspace security group (for internal traffic)
- Allow TCP access to
0.0.0.0/0for these ports:- 443: for Databricks infrastructure, cloud data sources, and library repositories
- 3306: for the metastore
- 53: for DNS resolution when you use custom DNS
- 6666: for secure cluster connectivity. This is only required if you use PrivateLink.
- 2443: Supports FIPS encryption. Only required if you enable the compliance security profile.
- 8443: for internal calls from the Databricks compute plane to the Databricks control plane API.
- 8444: for Unity Catalog logging and lineage data streaming into Databricks.
- 8445 through 8451: Future extendability.
Ingress (inbound): Required for all workspaces (these can be separate rules or combined into one):
- Allow TCP on all ports when traffic source uses the same security group
- Allow UDP on all ports when traffic source uses the same security group
Subnet-level network ACLs
Subnet-level network ACLs must not deny ingress or egress to any traffic. Databricks validates for the following rules while creating the workspace:
Egress (outbound):
- Allow all traffic to the workspace VPC CIDR, for internal traffic
- Allow TCP access to
0.0.0.0/0for these ports:- 443: for Databricks infrastructure, cloud data sources, and library repositories
- 3306: for the metastore
- 6666: only required if you use PrivateLink
- 8443: for internal calls from the Databricks compute plane to the Databricks control plane API
- 8444: for Unity Catalog logging and lineage data streaming into Databricks
- 8445 through 8451: Future extendability
- Allow TCP access to
If you configure additional ALLOW or DENY rules for outbound traffic, set the rules required by Databricks to the highest priority (the lowest rule numbers), so that they take precedence.
Ingress (inbound):
ALLOW ALL from Source 0.0.0.0/0. This rule must be prioritized.
Databricks requires subnet-level network ACLs to add 0.0.0.0/0 to your allow list. To control egress traffic, use an egress firewall or proxy appliance to block most traffic but allow the URLs that Databricks needs to connect to. See Configure a firewall and outbound access.
AWS PrivateLink support
If you plan to enabled AWS PrivateLink on the workspace with this VPC:
- On the VPC, ensure that you enable both of the settings DNS Hostnames and DNS resolution.
- Review the article Configure classic private connectivity to Databricks for guidance about creating an extra subnet for VPC endpoints (recommended but not required) and creating an extra security group for VPC endpoints.
Create a VPC
To create VPCs you can use various tools:
- AWS console
- AWS CLI
- Terraform
- AWS Quickstart (create a new customer-managed VPC and a new workspace)
To use AWS Console, the basic instructions for creating and configuring a VPC and related objects are listed below. For complete instructions, see the AWS documentation.
These basic instructions might not apply to all organizations. Your configuration requirements may differ. This section does not cover all possible ways to configure NATs, firewalls, or other network infrastructure. If you have questions, contact your Databricks account team before proceeding.
-
Go to the VPCs page in AWS.
-
See the region picker in the upper-right. If needed, switch to the region for your workspace.
-
In the upper-right corner, click the orange button Create VPC.
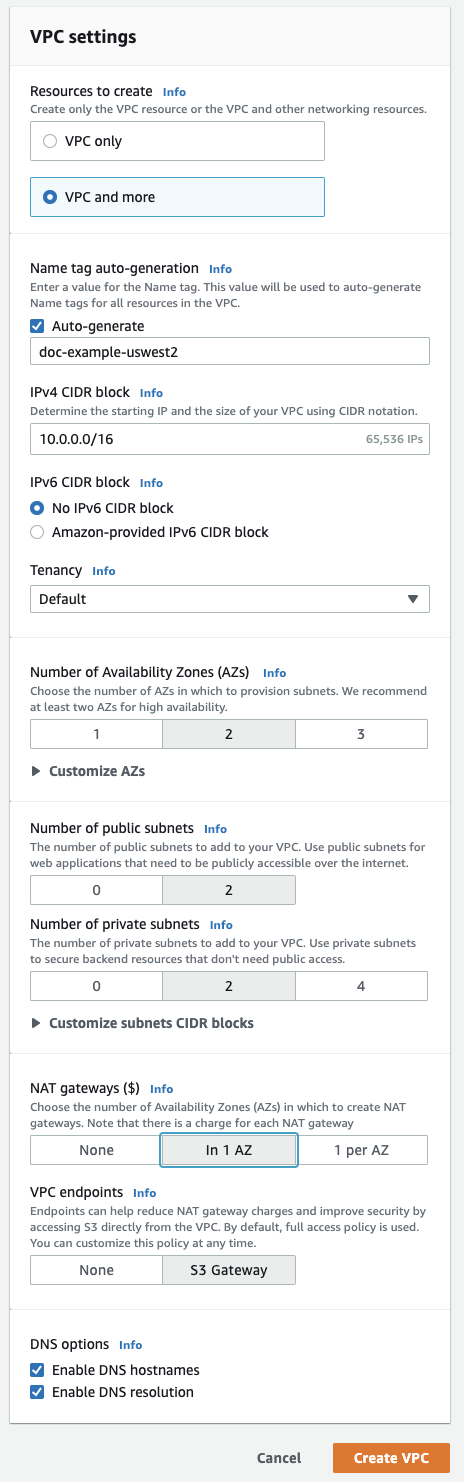
-
Click VPC and more.
-
In the Name tag auto-generation type a name for your workspace. Databricks recommends including the region in the name.
-
For VPC address range, optionally change it if desired.
-
For public subnets, click
2. Those subnets aren't used directly by your Databricks workspace, but they are required to enable NATs in this editor. -
For private subnets, click
2for the minimum for workspace subnets. You can add more if desired.Your Databricks workspace needs at least two private subnets. To resize them, click Customize subnet CIDR blocks.
-
For NAT gateways, click In 1 AZ.
-
Ensure the following fields at the bottom are enabled: Enable DNS hostnames and Enable DNS resolution.
-
Click Create VPC.
-
When viewing your new VPC, click on the left navigation items to update related settings on the VPC. To make it easier to find related objects, in the Filter by VPC field, select your new VPC.
-
Click Subnets and what AWS calls the private subnets labeled 1 and 2, which are the ones you will use to configure your main workspace subnets. Modify the subnets as specified in VPC requirements.
If you created an extra private subnet for use with PrivateLink, configure private subnet 3 as specified in Configure classic private connectivity to Databricks.
-
Click Security groups and modify the security group as specified in Security groups.
If you will use back-end PrivateLink connectivity, create an additional security group with inbound and outbound rules as specified in the PrivateLink article in the section Step 1: Configure AWS network objects.
-
Click Network ACLs and modify the network ACLs as specified in Subnet-level network ACLs.
-
Choose whether to perform the optional configurations that are specified later in this article.
Register your VPC with Databricks
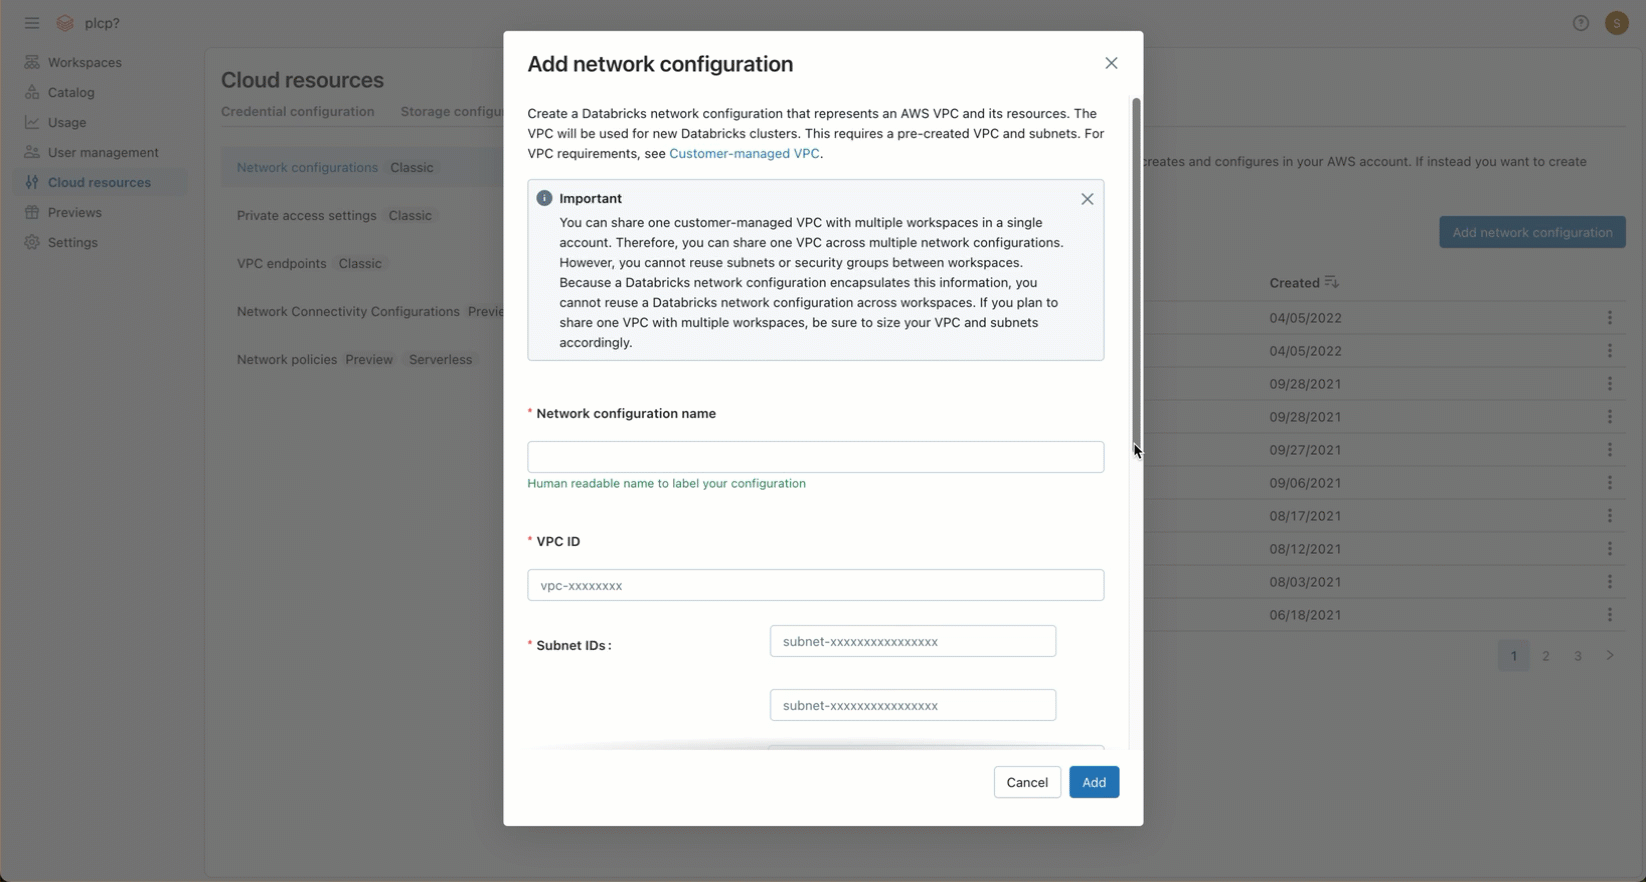
After creating your VPC and configuring the required network objects, you must reference that VPC—including network objects such as VPCs, subnets, and security groups—in a network configuration for your Databricks account. You can create the network configuration using the account console or by using the Account API.
If you plan to share a VPC and subnets across multiple workspaces, be sure to size your VPC and subnets to be large enough to scale with usage. You cannot reuse a network configuration object across workspaces.
-
In the account console, click Security.
-
In the Classic network configurations section, click Add network configuration.
-
In the Network configuration name field, enter a human-readable name for your new network configuration.
-
In the VPC ID field, enter the VPC ID.
-
In the Subnet IDs field, enter the IDs for at least two AWS subnets in the VPC. For network configuration requirements, see VPC requirements.
-
In the Security Group IDs field, enter the ID for at least one AWS security group. For network configuration requirements, see Security groups.
-
(Optional) To support AWS PrivateLink back-end connectivity, you must select two VPC endpoint registrations from the fields under the Back-end private connectivity heading.
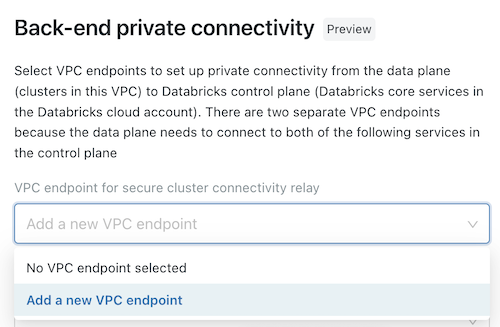
- If you have not yet created the two AWS VPC endpoints that are specific to your workspace region, you must do so now. See Step 2: Create VPC endpoints. You can use the AWS Console or various automation tools.
- For each field, either choose existing VPC endpoint registrations, or choose Register a new VPC endpoint to create one immediately that references the AWS VPC endpoints that you have already created. For guidance on fields, see Manage VPC endpoint registrations.
-
Click Add.
Updating CIDRs
You might need to, at a later time, update subnet CIDRs that overlap with original subnets.
To update the CIDRs and other workspace objects:
-
Terminate all running clusters (and other compute resources) that are running in the subnets that need to be updated.
-
Using the AWS console, delete the subnets to update.
-
Re-create the subnets with updated CIDR ranges.
-
Update the route table association for the two new subnets. You can reuse the ones in each availability zone for existing subnets.
importantIf you skip this step or misconfigure the route tables, cluster may fail to launch.
-
Create a new network configuration object with the new subnets.
-
Update the workspace to use this newly created network configuration object
(Recommended) Configure regional endpoints
If you use a customer-managed VPC (optional), Databricks recommends you configure your VPC to use only regional VPC endpoints to AWS services. Using regional VPC endpoints enables more direct connections to AWS services and reduced cost compared to AWS global endpoints. There are four AWS services that a Databricks workspace with a customer-managed VPC must reach: STS, S3, Kinesis, and RDS.
The connection from your VPC to the RDS service is required only if you use the default Databricks legacy Hive metastore and does not apply to Unity Catalog metastores. Although there is no VPC endpoint for RDS, instead of using the default Databricks legacy Hive metastore, you can configure your own external metastore. You can implement an external metastore with a Hive metastore or AWS Glue.
For the other three services, you can create VPC gateway or interface endpoints such that the relevant in-region traffic from clusters could transit over the secure AWS backbone rather than the public network:
-
S3: Create a VPC gateway endpoint that is directly accessible from your Databricks cluster subnets. This causes workspace traffic to all in-region S3 buckets to use the endpoint route. To access any cross-region buckets, open up access to S3 global URL
s3.amazonaws.comin your egress appliance, or route0.0.0.0/0to an AWS internet gateway.To use DBFS mounts with regional endpoints enabled:
- You must set up an environment variable in the cluster configuration to set
AWS_REGION=<aws-region-code>. For example, if your workspace is deployed in the N. Virginia region, setAWS_REGION=us-east-1. To enforce it for all clusters, use cluster policies.
- You must set up an environment variable in the cluster configuration to set
-
STS: Create a VPC interface endpoint directly accessible from your Databricks cluster subnets. You can create this endpoint in your workspace subnets. Databricks recommends that you use the same security group that was created for your workspace VPC. This configuration causes workspace traffic to STS to use the endpoint route.
-
Kinesis: Create a VPC interface endpoint directly accessible from your Databricks cluster subnets. You can create this endpoint in your workspace subnets. Databricks recommends that you use the same security group that was created for your workspace VPC. This configuration causes workspace traffic to Kinesis to use the endpoint route. The only exception to this rule is workspaces in the AWS region
us-west-1because target Kinesis streams in this region are cross-region to theus-west-2region.
Configure a firewall and outbound access
You must use an egress firewall or proxy appliance to block most traffic but allow the URLs that Databricks needs to connect to:
- If the firewall or proxy appliance is in the same VPC as the Databricks workspace VPC, route the traffic and configure it to allow the following connections.
- If the firewall or proxy appliance is in a different VPC or an on-premises network, route
0.0.0.0/0to that VPC or network first and configure the proxy appliance to allow the following connections.
Databricks strongly recommends that you specify destinations as domain names in your egress infrastructure, rather than as IP addresses.
Allow the following outgoing connections. For each connection type, follow the link to get IP addresses or domains for your workspace region.
-
Databricks web application: Required. Also used for REST API calls to your workspace.
-
Databricks secure cluster connectivity (SCC) relay: Required for secure cluster connectivity.
-
AWS S3 global URL: Required by Databricks to access the root S3 bucket. Use
s3.amazonaws.com:443, regardless of region. -
AWS S3 regional URL: Optional. If you use S3 buckets that might be in other regions, you must also allow the S3 regional endpoint. Although AWS provides a domain and port for a regional endpoint (
s3.<region-name>.amazonaws.com:443), Databricks recommends that you instead use a VPC endpoint so that this traffic goes through the private tunnel over the AWS network backbone. See (Recommended) Configure regional endpoints. -
AWS STS global URL: Required. Use the following address and port, regardless of region:
sts.amazonaws.com:443 -
AWS STS regional URL: Required due to expected switch to regional endpoint. Use a VPC endpoint. See (Recommended) Configure regional endpoints.
-
AWS Kinesis regional URL: Required. The Kinesis endpoint is used to capture logs needed to manage and monitor the software. For the URL for your region, see Kinesis addresses.
-
Table metastore RDS regional URL (by compute plane region): Required if your Databricks workspace uses the default Hive metastore.
The Hive metastore is always in the same region as your compute plane, but it might be in a different region than the control plane.
RDS addresses for legacy Hive metastore
noteInstead of using the default Hive metastore, you can choose to implement your own table metastore instance, in which case you are responsible for its network routing.
-
Control plane infrastructure: Required. Used by Databricks for standby Databricks infrastructure to improve the stability of Databricks services.
Troubleshoot regional endpoints
If you followed the instructions above and the VPC endpoints do not work as intended, for example, if your data sources are inaccessible or if the traffic is bypassing the endpoints, you can use one of two approaches to add support for the regional endpoints for S3 and STS instead of using VPC endpoints.
-
Add the environment variable
AWS_REGIONin the cluster configuration and set it to your AWS region. To enable it for all clusters, use cluster policies. You might have already configured this environment variable to use DBFS mounts. -
Add the required Apache Spark configuration. Do exactly one of the following approaches:
-
In each source notebook:
- Scala
- Python
Scala%scala
spark.conf.set("fs.s3a.stsAssumeRole.stsEndpoint", "https://sts.<region>.amazonaws.com")
spark.conf.set("fs.s3a.endpoint", "https://s3.<region>.amazonaws.com")Python%python
spark.conf.set("fs.s3a.stsAssumeRole.stsEndpoint", "https://sts.<region>.amazonaws.com")
spark.conf.set("fs.s3a.endpoint", "https://s3.<region>.amazonaws.com") -
Alternatively, in the Apache Spark config for the cluster*:
spark.hadoop.fs.s3a.endpoint https://s3.<region>.amazonaws.com
spark.hadoop.fs.s3a.stsAssumeRole.stsEndpoint https://sts.<region>.amazonaws.com
-
-
If you limit egress from the classic compute plane using a firewall or internet appliance, add these regional endpoint addresses to your allow list.
To set these values for all clusters, configure the values as part of your cluster policy.
(Optional) Access S3 using instance profiles
To access S3 mounts using instance profiles, set the following Spark configurations:
-
Either in each source notebook:
- Scala
- Python
Scala%scala
spark.conf.set("fs.s3a.stsAssumeRole.stsEndpoint", "https://sts.<region>.amazonaws.com")
spark.conf.set("fs.s3a.endpoint", "https://s3.<region>.amazonaws.com")Python%python
spark.conf.set("fs.s3a.stsAssumeRole.stsEndpoint", "https://sts.<region>.amazonaws.com")
spark.conf.set("fs.s3a.endpoint", "https://s3.<region>.amazonaws.com") -
Or in the Apache Spark config for the cluster:
spark.hadoop.fs.s3a.endpoint https://s3.<region>.amazonaws.com
spark.hadoop.fs.s3a.stsAssumeRole.stsEndpoint https://sts.<region>.amazonaws.com
To set these values for all clusters, configure the values as part of your cluster policy.
For the S3 service, there are limitations to applying additional regional endpoint configurations at the notebook or cluster level. Notably, access to cross-region S3 access is blocked, even if the global S3 URL is allowed in your egress firewall or proxy. If your Databricks deployment might require cross-region S3 access, it is important that you not apply the Spark configuration at the notebook or cluster level.
(Optional) Restrict access to S3 buckets
Most reads from and writes to S3 are self-contained within the compute plane. However, some management operations originate from the control plane, which is managed by Databricks. To limit access to S3 buckets to a specified set of source IP addresses, create an S3 bucket policy. In the bucket policy, include the IP addresses in the aws:SourceIp list. If you use a VPC Endpoint, allow access to it by adding it to the policy's aws:sourceVpce. Databricks uses VPC IDs for accessing S3 buckets in the same region as the Databricks control plane, and NAT IPs for accessing S3 buckets in different regions from the control plane.
For more information about S3 bucket policies, see the bucket policy examples in the Amazon S3 documentation. Working example bucket policies are also included in this topic.
Requirements for bucket policies
Your bucket policy must meet these requirements, to ensure that your clusters start correctly and that you can connect to them:
- You must allow access from the control plane NAT IP and VPC IDs for your region.
- You must allow access from the compute plane VPC, by doing one of the following:
- (Recommended) Configure a gateway VPC endpoint in your customer-managed VPC and adding it to the
aws:sourceVpceto the bucket policy, or - Add the compute plane NAT IP to the
aws:SourceIplist.
- (Recommended) Configure a gateway VPC endpoint in your customer-managed VPC and adding it to the
- When using Endpoint policies for Amazon S3, your policy must include:
- Your workspace's root storage bucket.
- The required artifact, log, system tables, and shared datasets bucket for your region.
- To avoid losing connectivity from within your corporate network, Databricks recommends always allowing access from at least one known and trusted IP address, such as the public IP of your corporate VPN. This is because Deny conditions apply even within the AWS console.
When deploying a new workspace with S3 bucket policy restrictions, you must allow access to the control plane NAT-IP for a us-west region, otherwise the deployment fails. After the workspace is deployed, you can remove the us-west info and update the control plane NAT-IP to reflect your region.
Required IPs and storage buckets
For the IP addresses and domains that you need for configuring S3 bucket policies and VPC Endpoint policies to restrict access to your workspace's S3 buckets, see Outbound IPs from Databricks control plane.
Example bucket policies
These examples use placeholder text to indicate where to specify recommended IP addresses and required storage buckets. Review the requirements to ensure that your clusters start correctly and that you can connect to them.
Restrict access to the Databricks control plane, compute plane, and trusted IPs:
This S3 bucket policy uses a Deny condition to selectively allow access from the control plane, NAT gateway, and corporate VPN IP addresses you specify. Replace the placeholder text with values for your environment. You can add any number of IP addresses to the policy. Create one policy per S3 bucket you want to protect.
If you use VPC Endpoints, this policy is not complete. See Restrict access to the Databricks control plane, VPC endpoints, and trusted IPs.
{
  "Sid": "IPDeny",
  "Effect": "Deny",
  "Principal": "*",
  "Action": "s3:*",
  "Resource": ["arn:aws:s3:::<S3-BUCKET>", "arn:aws:s3:::<S3-BUCKET>/*"],
  "Condition": {
    "NotIpAddress": {
      "aws:SourceIp": ["<CONTROL-PLANE-NAT-IP>", "<DATA-PLANE-NAT-IP>", "<CORPORATE-VPN-IP>"]
    }
  }
}
Restrict access to the Databricks control plane, VPC endpoints, and trusted IPs:
If you use a VPC Endpoint to access S3, you must add a second condition to the policy. This condition allows access from your VPC Endpoint and VPC ID by adding it to the aws:sourceVpce list.
This bucket selectively allows access from your VPC Endpoint, and from the control plane and corporate VPN IP addresses you specify.
When using VPC Endpoints, you can use a VPC Endpoint policy instead of an S3 bucket policy. A VPCE policy must allow access to your root S3 bucket and to the required artifact, log, and shared datasets bucket for your region. For the IP addresses and domains for your regions, see IP addresses and domains for Databricks services and assets.
Replace the placeholder text with values for your environment.
{
  "Sid": "IPDeny",
  "Effect": "Deny",
  "Principal": "*",
  "Action": "s3:*",
  "Resource": ["arn:aws:s3:::<S3-BUCKET>", "arn:aws:s3:::<S3-BUCKET>/*"],
  "Condition": {
    "NotIpAddressIfExists": {
      "aws:SourceIp": ["<CONTROL-PLANE-NAT-IP>", "<CORPORATE-VPN-IP>"]
    },
    "StringNotEqualsIfExists": {
      "aws:sourceVpce": "<VPCE-ID>",
      "aws:SourceVPC": "<VPC-ID>"
    }
  }
}