Configure the serverless environment
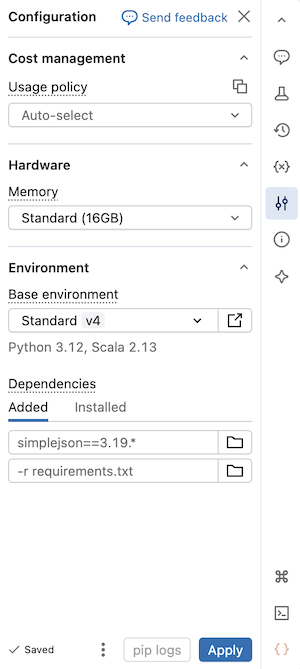
This page explains how to configure the serverless environment for notebooks and job tasks. For notebooks, use the Environment side pane to select a base environment, install dependencies, configure memory, and apply usage policies. For job tasks, configure the environment when you create or edit a task.
To expand the Environment side pane, click the ![]() button to the right of the notebook.
button to the right of the notebook.
Select a base environment
A base environment determines the pre-installed libraries and environment version available for your serverless notebook. The Base environment selector in the Environment side pane is where you choose your environment. To see details on each environment version, see Serverless environment versions. Databricks recommends using the latest version to get the most up-to-date notebook features.
The Base environment selector includes the following options:
- Standard: The default serverless base environment with Databricks-provided libraries.
- ML: A base environment with the Python and system packages from Databricks Runtime for Machine Learning pre-installed. Use this environment to migrate classic Databricks Runtime for Machine Learning workloads to serverless compute. See ML base environment.
- AI: An AI-optimized base environment with pre-installed machine learning (ML) libraries. This option appears only when an accelerator (GPU) is selected.
- More: Expands to show additional options:
- Previous versions of Standard, ML, and AI environments.
- Custom: Specify a custom environment using a YAML file.
- Workspace environments: Lists all compatible base environments configured for your workspace by an administrator.
To select a base environment:
- In the notebook UI, click the Environment side pane
 .
. - Under Base environment, select an environment from the drop-down menu.
- Click Apply.
Add dependencies to the notebook
Because serverless does not support compute policies or init scripts, you must install custom dependencies using the Environment side pane. You can install dependencies individually or use a shareable base environment to install multiple dependencies.
Databricks caches your notebook's virtual environment, so dependencies don't reinstall every time you reopen a notebook or resume after inactivity. Job tasks that share the same dependency set also benefit from this cache within a run.
To individually install a dependency:
-
In the notebook UI, click the Environment side pane
. -
In the Dependencies section, click Add Dependency and enter the path of the dependency in the field. You can specify a dependency in any format that is valid in a requirements.txt file. Python wheel files or Python projects (for example, the directory containing a
pyproject.tomlor asetup.py) can be located in workspace files or Unity Catalog volumes.- If using a workspace file, the path should be absolute and start with
/Workspace/. - If using a file in a Unity Catalog volume, the path should be in the following format:
/Volumes/<catalog>/<schema>/<volume>/<path>.whl.
- If using a workspace file, the path should be absolute and start with
-
Click Apply to install the dependencies and restart the Python process.
Do not install PySpark or any library that installs PySpark as a dependency on your serverless notebooks. Doing so will stop your session and result in an error. If this occurs, remove the library and reset your environment.
To view installed dependencies, click the Installed tab in the Environments side pane. Open the pip installation logs for the notebook environment by clicking pip logs at the bottom of the pane.
Workspace admins can configure private or authenticated package repositories as the default pip source for serverless notebooks and jobs. This lets users install packages from internal repositories without specifying index-url or extra-index-url. See Configure default Python package repositories.
Create a custom environment specification
You can create and reuse custom environment specifications.
- In a serverless notebook, select a base environment and install any dependencies you want.
- Click the kebab menu button
 at the bottom of the environment pane then click Export environment.
 - Save the specification as a Workspace file or in a Unity Catalog volume. Make sure you have permission to write to the destination, or the export fails with a
Forbiddenerror.
To use your custom environment specification in a notebook, select Custom from the Base environment drop-down menu, then use the folder ![]() to select your YAML file.
to select your YAML file.
Create common tools to share across your workspace
This example stores a utility in a workspace file and installs it as a serverless notebook dependency:
-
Create a folder with the following structure. Make sure other users have read access to this path:
Shellhelper_utils/
├── helpers/
│ └── __init__.py # your common functions live here
├── pyproject.toml -
Populate
pyproject.tomllike this:Python[project]
name = "common_utils"
version = "0.1.0" -
Add a function to the
init.pyfile. For example:Pythondef greet(name: str) -> str:
return f"Hello, {name}!" -
In the notebook UI, click the Environment side pane
 .
. -
In the Dependencies section, click Add Dependency then enter the path of your util file. For example:
/Workspace/helper_utils. -
Click Apply.
You can now use the function in your notebook:
from helpers import greet
print(greet('world'))
This outputs as:
Hello, world!
Use AI Runtime (serverless GPU)
AI Runtime is in Public Preview.
Follow these steps to configure AI Runtime, powered by serverless GPU compute, on your Databricks notebook:
- From a notebook, click the compute drop-down menu at the top and select Serverless GPU.
- Click the to open the Environment side pane.
- Select A10 or H100 from the Accelerator field.
- Under Base environment, select Standard for the default environment or AI for the AI-optimized environment with pre-installed machine learning (ML) libraries.
- Click Apply and then Confirm that you want to apply AI Runtime to your notebook environment.
For more details, see AI Runtime.
Use high memory serverless compute
This feature is in Public Preview.
If you run into out-of-memory errors in your notebook, configure the notebook to use a higher memory size. This memory size setting increases the size of the REPL memory used when running code in the notebook. It doesn't affect the memory size of the Spark session. Serverless usage with high memory has a higher DBU emission rate than standard memory.
The available memory options are:
- Standard: 16 GB total memory.
- High: 32 GB total memory.
To configure the notebook's memory setting:
- In the notebook UI, click the Environment side pane .
- Under Memory, select High memory.
- Click Apply.
This memory setting also applies to notebook job tasks that run using the notebook's memory preferences. Updating the memory preference in the notebook affects the next job run.
Select a serverless usage policy
This feature is in Public Preview.
Serverless usage policies allow your organization to apply custom tags on serverless usage for granular billing attribution.
If your workspace uses serverless usage policies, select the policy you want to apply to the notebook. If a user is assigned to only one serverless usage policy, that policy applies by default.
After connecting to serverless compute, select a policy from the Environment side pane:
- In the notebook UI, click the Environment side pane .
- Under Serverless usage policy select the serverless usage policy you want to apply to your notebook.
- Click Apply.
After applying, all notebook usage picks up the policy's custom tags.
If your notebook originates from a Git repository or does not have an assigned serverless usage policy, it defaults to your last chosen serverless usage policy when it is next attached to serverless compute.
Include the environment in source file exports
For Python notebooks, you can toggle Include in source file exports in the environment configuration. When enabled, the base environment and dependencies are stored in PEP 723 format in source file exports. This helps persist the environment configuration when notebooks are stored in Git folders or downloaded as source files.
For example, a notebook using Standard v5 exports its environment configuration as inline metadata at the top of the file:
# Databricks notebook source
# /// script
# [tool.databricks.environment]
# environment_version = "5"
# ///
print("Hello World!")
Reset the environment dependencies
If your notebook is connected to serverless compute, Databricks automatically caches the content of the notebook's virtual environment. This means you generally don't need to reinstall the Python dependencies specified in the Environment side pane when you open an existing notebook, even if it has been disconnected due to inactivity.
Python virtual environment caching also applies to jobs. When a job runs, any task that shares the same set of dependencies as a completed task in the same run finishes faster, because the cache already contains the required dependencies.
If you change the implementation of a custom Python package used in a job on serverless, you must also update its version number so that jobs can pick up the latest implementation.
To clear the environment cache and perform a fresh install of the dependencies specified in the Environment side pane of a notebook attached to serverless compute, click the arrow next to Apply and then click Reset to defaults.
If you install packages that break or change the core notebook or Apache Spark environment, remove the offending packages and then reset the environment. Starting a new session does not clear the entire environment cache.
Configure environment for job tasks
Each job task runs in an isolated environment that includes a base environment and any additional libraries you specify. The base environment sets the Python and Scala runtime version and pre-installed libraries. Tasks inherit the default set of installed libraries from the environment version. To see what's included, see the Installed Python libraries or Installed Java and Scala libraries section of the environment version you're using.
You can supplement the pre-installed libraries with libraries from workspace files, Unity Catalog volumes, or public package repositories. Only dependencies required for the task are installed at runtime.
Using serverless compute for JAR tasks is in Public Preview.
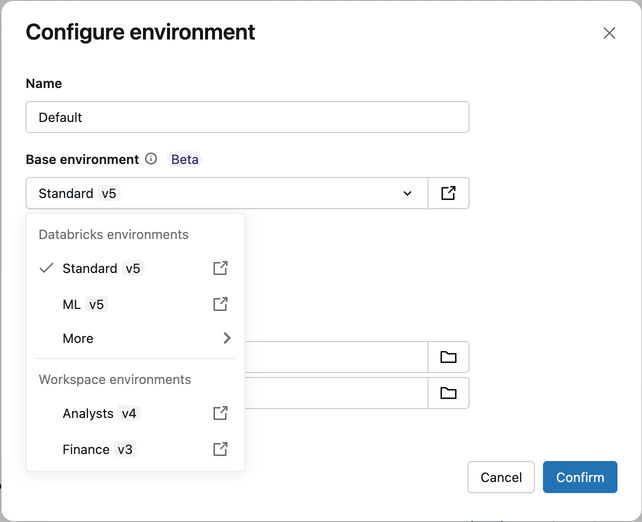
Selecting a managed base environment is in beta. The Base environment drop-down in the Configure environment dialog enables you to select from Databricks-provided environments (such as Standard and ML) or workspace-configured environments. Without this feature, the dialog shows an Environment version drop-down instead. Workspace administrators can enable this feature from the Previews page.
Configure the environment by task type
How you configure environments in a job depends on the task type:
- Notebook tasks
- Python script and Python wheel tasks
- Dbt tasks
- JAR tasks
Notebook tasks default to Notebook Environment, which uses the notebook's own configured base environment and dependencies. You can override this with a job-level environment.
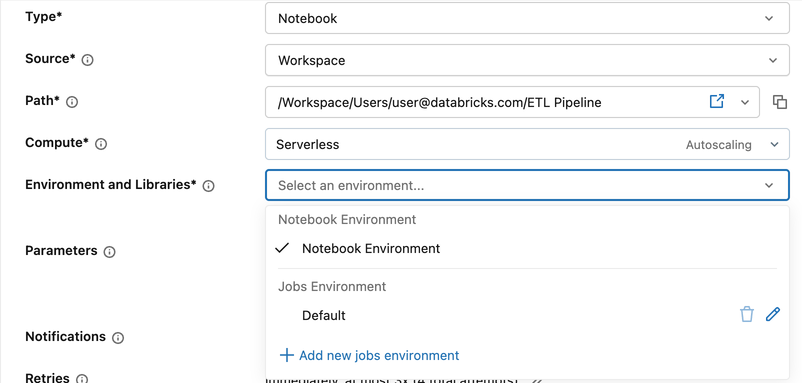
To configure a job-level environment:
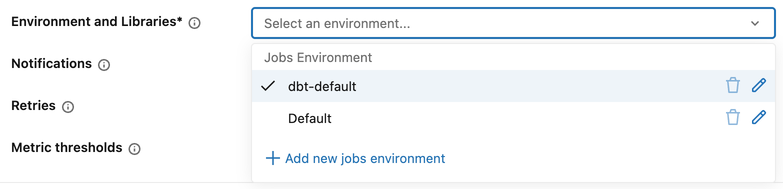
- In the task configuration, click the Environment and Libraries drop-down menu.
- In Jobs Environment, click the pencil icon next to Default, or click + Add new jobs environment.
- In the Configure environment dialog, select from the Base environment drop-down menu:
- Databricks environments: Databricks-provided options such as Standard and ML.
- Workspace environments: Custom environments configured by your workspace administrator. See Manage workspace base environments.
- More: Previous versions and Custom (specify a YAML file).
- Under Dependencies, add any additional libraries. You can specify a library in any format valid in a requirements.txt file, or use an absolute path to a workspace file or Unity Catalog volume.
- Click Confirm.
If your workspace does not have the workspace base environment for jobs preview enabled, the Configure environment dialog shows an Environment version drop-down instead of Base environment.
To configure the environment, select a version, then click + Add library. You can specify a workspace file path (starting with /Workspace/), a Unity Catalog volume path (starting with /Volumes/), or a requirements file reference (for example, -r /Workspace/path/to/requirements.txt).
Python script and Python wheel tasks require an environment to be configured.
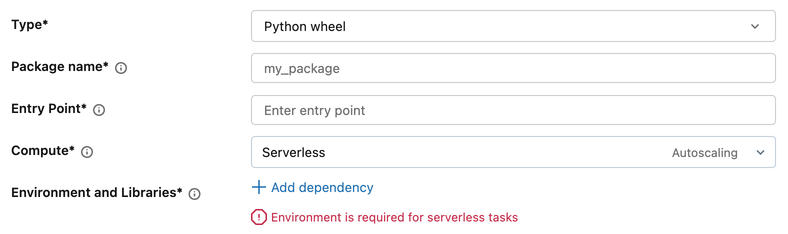
- In the task configuration, under Environment and Libraries, click + Add dependency.
- In the Configure environment dialog, select from the Base environment drop-down menu:
- Databricks environments: Databricks-provided options such as Standard and ML.
- Workspace environments: Custom environments configured by your workspace administrator. See Manage workspace base environments.
- More: Previous versions and Custom (specify a YAML file).
- Under Dependencies, add any additional libraries.
- Click Confirm.
If your workspace does not have the workspace base environment for jobs preview enabled, the Configure environment dialog shows an Environment version drop-down instead of Base environment.
To configure the environment, select a version, then click + Add library. You can specify a workspace file path (starting with /Workspace/), a Unity Catalog volume path (starting with /Volumes/), or a requirements file reference (for example, -r /Workspace/path/to/requirements.txt).
DBT tasks use a job-level environment for library configuration.
To configure a job-level environment:
- In the task configuration, click the Environment and Libraries drop-down menu.
- In Jobs Environment, click the pencil icon next to an existing environment, or click + Add new jobs environment.
- In the Configure environment dialog, select from the Base environment drop-down menu:
- Databricks environments: Databricks-provided options such as Standard and ML.
- Workspace environments: Custom environments configured by your workspace administrator. See Manage workspace base environments.
- More: Previous versions and Custom (specify a YAML file).
- Under Dependencies, add any additional libraries. You can specify a library in any format valid in a requirements.txt file, or use an absolute path to a workspace file or Unity Catalog volume.
- Click Confirm.
If your workspace does not have the workspace base environment for jobs preview enabled, the Configure environment dialog shows an Environment version drop-down instead of Base environment.
To configure the environment, select a version, then click + Add library. You can specify a workspace file path (starting with /Workspace/), a Unity Catalog volume path (starting with /Volumes/), or a requirements file reference (for example, -r /Workspace/path/to/requirements.txt).
Workspace base environments are not supported for JAR tasks. To configure the environment for a JAR task:
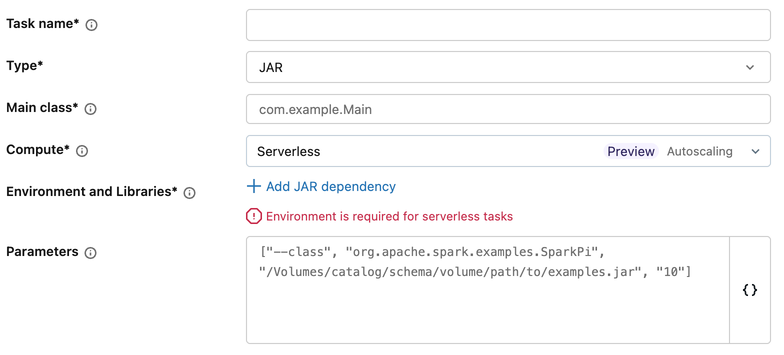
- In the task configuration, under Environment and Libraries, click + Add JAR dependency.
- In the Configure environment dialog:
- Optionally, enter a path to a YAML file in the Base environment field.
- Select an environment version from the Environment version drop-down menu.
- Under JAR Dependencies, add the paths to your JAR files.
- Click Confirm.
To create a custom YAML-based base environment, see Create a custom environment specification.
Environment and compute compatibility
The base environment you select must be compatible with the task's compute type. For example, an environment built for GPU compute is not compatible with CPU compute. In the jobs UI, incompatible environments are unavailable in the base environment drop-down menu.
When you configure a notebook task, the compute type (CPU or GPU) and base environment can each come from either the job settings or the notebook settings.
- If you set a hardware accelerator (GPU) at the job level, you must also select a base environment at the job level. You cannot use the notebook's environment with a job-level accelerator.
- If you have job tasks that reference a notebook, and you update the referenced notebook's compute type (for example, from CPU to GPU), existing tasks might become incompatible with their configured environment. Review your job's environment settings after changing the notebook's compute configuration.
- For API users: if you set the base environment at the job level but the notebook defines the compute type, Databricks validates compatibility at runtime, not at job creation time. If the configuration is incompatible, the run fails with an error.