What are catalogs in Databricks?
A catalog is the primary unit of data organization in the Databricks Unity Catalog data governance model. This article gives an overview of catalogs in Unity Catalog and how best to use them.
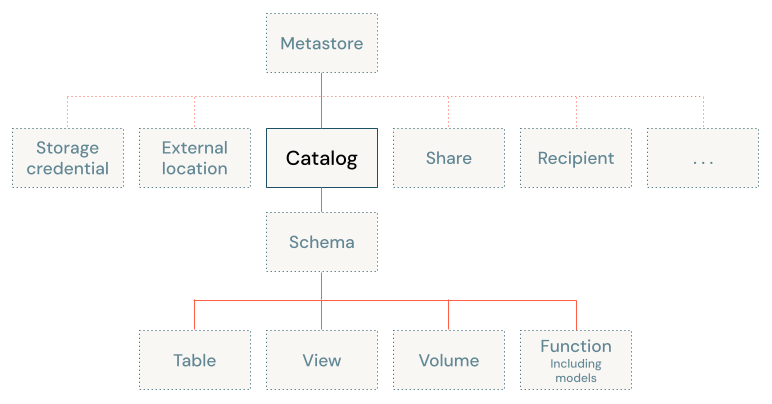
Catalogs are the first layer in Unity Catalog's three-level namespace (catalog.schema.table-etc). They contain schemas, which in turn can contain tables, views, volumes, models, and functions. Catalogs are registered in a Unity Catalog metastore in your Databricks account.
How should I organize my data into catalogs?
When you design your data governance model, you should give careful thought to the catalogs that you create. As the highest level in your organization's data governance model, each catalog should represent a logical unit of data isolation and a logical category of data access, allowing an efficient hierarchy of grants to flow down to schemas and the data objects that they contain. Catalogs therefore often mirror organizational units or software development lifecycle scopes. You might choose, for example, to have a catalog for production data and a catalog for development data, or a catalog for non-customer data and one for sensitive customer data.
Data isolation using catalogs
Each catalog typically has its own managed storage location to store managed tables and volumes, providing physical data isolation at the catalog level. You can also choose to store data at the metastore level, providing a default storage location for catalogs that don't have a managed storage location of their own. You can add storage at the schema level for more granular data isolation.
Because your Databricks account has one metastore per region, catalogs are inherently isolated by region.
For more information, see What are database objects in Databricks? and Catalogs and schemas.
Catalog-level privileges
Because grants on any Unity Catalog object are inherited by children of that object, owning a catalog or having broad privileges on a catalog is very powerful. For example, catalog owners have all privileges on the catalog and the objects in the catalog, and they can grant access to any object in the catalog. Users with SELECT on a catalog can read any table in the catalog. Users with CREATE TABLE on a catalog can create a table in any schema in the catalog.
To enforce the principle of least privilege, where users have the minimum access they need to perform their required tasks, typically you grant access only to the specific objects or level in the hierarchy that the user requires. But catalog-level privileges let the catalog owner manage what lower-level object owners can grant. Even if a user is granted access to a low-level data object like a table, for example, that user cannot access that table unless they also have the USE CATALOG privilege on the catalog that contains the table.
For more information, see Manage object ownership and Detailed Unity Catalog privileges reference.
Catalog types
When you create a catalog, you're given two options:
- Standard catalog: the typical catalog, used as the primary unit to organize your data objects in Unity Catalog. This is the catalog type that is discussed in this article.
- Foreign catalog: a Unity Catalog object that is used only in Lakehouse Federation scenarios. A foreign catalog mirrors a database in an external data system, enabling you to perform read-only queries on that data system in your Databricks workspace. See Connect to external databases and catalogs.
In addition to those two catalog types, Databricks provisions the following catalogs automatically when you create a new workspace:
hive_metastorecatalog: This is the repository of all data managed by the legacy Hive metastore in Databricks workspaces. When an existing non-Unity Catalog workspace is converted to Unity Catalog, all objects that are registered in the legacy Hive metastore are surfaced in Unity Catalog in thehive_metastorecatalog. For information about working with the Hive metastore alongside Unity Catalog, see Work with the legacy Hive metastore alongside Unity Catalog. The Hive metastore is deprecated, and all Databricks workspaces should migrate to Unity Catalog.- Workspace catalog: In all new workspaces, this catalog is created for you by default. Typically, it shares its name with your workspace name. If this catalog exists, all users in your workspace (and only your workspace) have access to it by default, which makes it a convenient place for users to try out the process of creating and accessing data objects in Unity Catalog. See Step 1: Confirm that your workspace is enabled for Unity Catalog.
The __databricks_internal catalog
Databricks automatically creates a catalog called __databricks_internal to store internal state for features such as Lakeflow pipelines and AI/BI dashboards. For example, Lakeflow pipelines use this catalog to store the backing data for some materialized views.
You might see __databricks_internal in Unity Catalog surfaces such as Catalog Explorer, permissions dialogs, error messages, and system tables. This is expected. The __databricks_internal name is reserved: only Databricks creates these assets, and you cannot create them directly.
Do not query, modify, or delete objects in the __databricks_internal catalog. Manage the underlying data through the feature that created it, such as the pipeline or dashboard.
Default catalog
A default catalog is configured for each workspace that is enabled for Unity Catalog. The default catalog lets you perform data operations without specifying a catalog. If you omit the top-level catalog name when you perform data operations, the default catalog is assumed.
If your workspace was enabled for Unity Catalog automatically, the pre-provisioned workspace catalog is specified as the default catalog. A workspace admin can change the default catalog as needed.
For details, see Manage the default catalog.
Workspace-catalog binding
If you use workspaces to isolate user data access, you might want to use workspace-catalog bindings. Workspace-catalog bindings enable you to limit catalog access by workspace boundaries. For example, you can ensure that workspace admins and users can only access production data in prod_catalog from a production workspace environment, prod_workspace. Catalogs are shared with all workspaces attached to the current metastore unless you specify a binding. See Workspace-catalog binding.
If your workspace was enabled for Unity Catalog automatically, the pre-provisioned workspace catalog is bound to your workspace by default.