What are schemas in Databricks?
In Unity Catalog, a schema is a child of a catalog and can contain tables, views, volumes, models, and functions. Schemas provide more granular categories of data organization than catalogs.
This page describes the role of schemas in the Databricks data object hierarchy in Unity Catalog.
For information on schemas in the legacy workspace-local Hive metastore, see Database objects in the legacy Hive metastore.
What is a schema?
In Unity Catalog, a schema is the second level of Unity Catalog's three-level namespace (catalog.schema.table-etc).
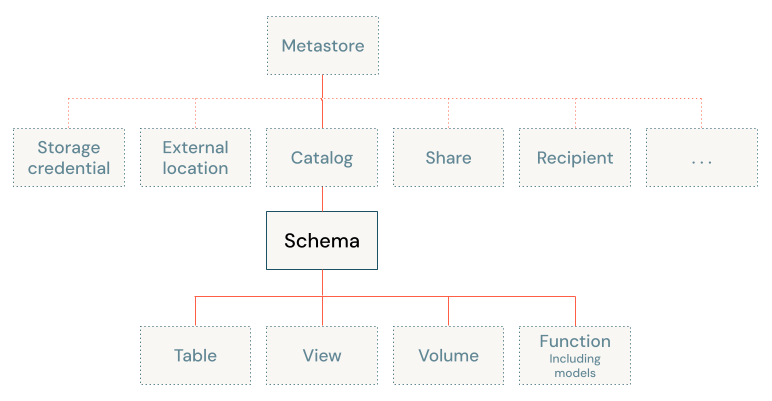
A schema organizes data and AI assets into logical categories that are more granular than catalogs. Typically a schema represents a single use case, project, or team sandbox. Regardless of category type, schemas are a useful tool for managing data access control and improving data discoverability.
In Databricks, schemas are sometimes called databases. For example, CREATE DATABASE is an alias for CREATE SCHEMA. This terminology differs from that of some relational database systems in which a database is a collection of schemas.
Every Unity Catalog catalog automatically includes an INFORMATION_SCHEMA, a system-provided schema of read-only metadata views that describe the catalog's objects. It is separate from any user-created schemas and the name is reserved. See Information schema.
For more information about the data object hierarchy in Unity Catalog, see What are database objects in Databricks?.
Managed locations for schemas
In Unity Catalog you can physically isolate the data for all managed tables and managed volumes in a schema from that of other schemas in a catalog by specifying a managed storage location for the schema. This is entirely optional. If you don't specify a managed storage location for the schema, data resides in the catalog's managed storage location (and if none is defined for the catalog, it resides in the metastore's managed storage location). See Specify a managed storage location in Unity Catalog.
Data isolation for external tables and volumes depends on how you manage the data in your cloud storage. It is independent of the schema's managed location.