Create shares for OpenSharing
This page explains how to create shares for OpenSharing.
A share is a securable object in Unity Catalog that you use for sharing the following data assets with one or more recipients:
- Tables and table partitions
- Streaming tables
- Managed Iceberg tables
- Foreign Iceberg tables
- Foreign schemas and tables
- Views, including dynamic views that restrict access at the row and column level
- Materialized views
- Volumes
- Python UDFs
- Notebooks
- AI models
- Genie Agents
If you share an entire schema (database), the recipient can access all of the tables, streaming tables, views, materialized views, models, and volumes in the schema at the moment you share it, along with any data and AI assets added to the schema in the future.
A share can contain data and AI assets from only one Unity Catalog metastore. You can add or remove data and AI assets from a share at any time.
Before creating a share, verify that you have Set up OpenSharing for your account (for providers).
To learn more about the sharing model, see Shares, providers, and recipients.
Requirements
Check that you meet the listed requirements for each task you want to complete.
When adding data assets to a share, Databricks recommends that you use a group as the share owner.
Task | Requirements |
|---|---|
Create a share |
|
Add the following to a share:
|
|
Share an entire schema or foreign schema |
|
Add volumes to a share |
|
Add Python UDFs to a share |
|
Add models to a share |
|
Add notebook files to a share |
|
Compute requirements
- If you use a Databricks notebook to create the share, your compute resource must use Databricks Runtime 11.3 LTS or above and have a standard or dedicated access mode (formerly shared and single user).
- If you use SQL statements to add a schema to a share (or update or remove a schema), you must use a SQL warehouse or compute running Databricks Runtime 13.3 LTS or above. Doing the same using Catalog Explorer has no compute requirements.
Create a share object
Check that you meet the requirements before creating a share object.
To create a share, use Catalog Explorer, the Databricks Unity Catalog CLI, or the CREATE SHARE SQL command in a Databricks notebook or the Databricks SQL query editor.
- Catalog Explorer
- SQL
- CLI
-
In your Databricks workspace, click
 Catalog.
 -
At the top of the Catalog pane, click the
 gear icon and select OpenSharing.
Alternatively, in the upper-right corner, click Share > OpenSharing.
-
On the Shared by me tab, click the Share data button.
-
On the Create share page, enter the share Name and an optional comment.
-
Click Save and continue.
You can continue to add data assets, or you can stop and come back later.
-
On the Add data assets tab, select the data assets you want to share.
For detailed instructions, additional requirements, and related limitations, see:
-
Click Save and continue.
-
On the Add notebooks tab, select the notebooks you want to share.
For detailed instructions, see Add notebook files to a share.
-
Click Save and continue.
-
On the Add recipients tab, select the recipients you want to share with.
For detailed instructions, see Manage access to OpenSharing data shares (for providers).
-
Click Share data to share the data with the recipients.
If you have not created recipients yet, click Share data, create recipients, and grant them access later.
Run the following command in a notebook or the Databricks SQL query editor:
CREATE SHARE [IF NOT EXISTS] <share-name>
[COMMENT "<comment>"];
Now you can add tables, streaming tables, volumes, views, materialized views, and models to the share.
For detailed instructions, additional requirements, and related limitations, see:
Run the following command using the Databricks CLI.
databricks shares create <share-name>
You can use --comment to add a comment or --json to add assets to the share. For details, see the sections that follow.
Now you can add tables, streaming tables, volumes, views, materialized views, and models to the share.
For detailed instructions, additional requirements, and related limitations, see:
Add tables to a share
Check that you meet the requirements before adding tables to a share.
If you are a workspace admin and you inherited the USE SCHEMA and USE CATALOG permissions on the schema and catalog that contain the table from the workspace admin group, then you cannot add the table to a share. You must first grant yourself the USE SCHEMA and USE CATALOG permissions on the schema and catalog.
Table comments, column comments, and primary key constraints are included in shares that are shared with a recipient using Databricks-to-Databricks sharing on or after July 25, 2024. If you want to start sharing comments and constraints through a share that was shared with a recipient before the release date, you must revoke and re-grant recipient access to trigger comment and constraint sharing.
To add tables to a share, use Catalog Explorer, the Databricks Unity Catalog CLI, or SQL commands in a Databricks notebook or the Databricks SQL query editor.
- Catalog Explorer
- SQL
- CLI
-
In your Databricks workspace, click
Catalog. -
At the top of the Catalog pane, click the
gear icon and select OpenSharing.Alternatively, in the upper-right corner, click Share > OpenSharing.
-
On the Shared by me tab, find the share you want to add a table to and click its name. You can add tables with row tracking enabled. Recipients can query the row tracking columns.
-
Click Manage assets > Edit assets.
-
On the Edit assets page, select either an entire schema (database) or individual tables.
-
To select a table, first select the catalog, then the schema that contains the table, then the table itself.
You can search for tables by name, column name, or comment using workspace search. See Search for workspace objects.
-
To select a schema, first select the catalog and then the schema.
For detailed information about sharing schemas, see Add schemas to a share.
-
-
History: Share the table history to allow recipients to perform time travel queries, read the table with Spark Structured Streaming, or run transactions. For Databricks-to-Databricks shares, the table's Delta log is also shared to improve performance. See Improve table read performance with history sharing. History sharing requires Databricks Runtime 12.2 LTS or above.
noteIf you also want your customers to be able to query a table's change data feed (CDF) using the table_changes() function, you must enable CDF on the table before you share it
WITH HISTORY. -
(Optional) Click
 under the Alias or Partition columns to add an alias or partition. Alias and partitions are not available if you select an entire schema. Table history is included by default if you select an entire schema.
- Alias: An alternate table name to make the table name more readable. The alias is the table name that the recipient sees and must use in queries. Recipients cannot use the actual table name if an alias is specified.
- Partition: Share only part of the table. For example,
(column = 'value'). See Specify table partitions to share and Use recipient properties to do partition filtering.
-
Click Save.
Run the following command in a notebook or the Databricks SQL query editor to add a table:
ALTER SHARE <share-name> ADD TABLE <catalog-name>.<schema-name>.<table-name>  [COMMENT "<comment>"]
   [PARTITION(<clause>)] [AS <alias>]
   [WITH HISTORY | WITHOUT HISTORY];
Run the following to add an entire schema. The ADD SCHEMA command requires a SQL warehouse or compute running Databricks Runtime 13.3 LTS or above. For detailed information about sharing schemas, see Add schemas to a share.
ALTER SHARE <share-name> ADD SCHEMA <catalog-name>.<schema-name>
[COMMENT "<comment>"];
Options include the following. PARTITION and AS <alias> are not available if you select an entire schema.
-
PARTITION(<clause>): If you want to share only part of the table, you can specify a partition. For example,(column = 'value')See Specify table partitions to share and Use recipient properties to do partition filtering. -
AS <alias>: An alternate table name, or Alias to make the table name more readable. The alias is the table name that the recipient sees and must use in queries. Recipients cannot use the actual table name if an alias is specified. Use the format<schema-name>.<table-name>. -
WITH HISTORYorWITHOUT HISTORY: WhenWITH HISTORYis specified, share the table with full history, allowing recipients to perform time travel queries, streaming reads, and run transactions. For Databricks-to-Databricks shares, history sharing also shares the table's Delta log to improve performance. The default behavior for table sharing isWITH HISTORYif your compute is running Databricks Runtime 16.2 or above andWITHOUT HISTORYfor earlier Databricks Runtime versions. For schema sharing, the default isWITH HISTORYregardless of Databricks Runtime version.WITH HISTORYandWITHOUT HISTORYrequire Databricks Runtime 12.2 LTS or above. See also Improve table read performance with history sharing.noteIf, in addition to doing time travel queries and streaming reads, you want your recipients to query a table's change data feed (CDF) using the table_changes() function, you must enable CDF on the table before you share it
WITH HISTORY.
For more information about ALTER SHARE options, see ALTER SHARE.
To add a table, run the following command using the Databricks CLI.
databricks shares update <share-name> \
  --json '{
    "updates": [
      {
        "action": "ADD",
        "data_object": {
          "name": "<table-full-name>",
          "data_object_type": "TABLE",
          "shared_as": "<table-alias>"
        }
      }
    ]
  }'
To add a schema, run the following Databricks CLI command:
databricks shares update <share-name> \
  --json '{
    "updates": [
      {
        "action": "ADD",
        "data_object": {
          "name": "<schema-full-name>",
          "data_object_type": "SCHEMA"
        }
      }
    ]
  }'
For tables, and only tables, you can omit "data_object_type".
To learn about the options listed in this example, view the instructions on the SQL tab.
To learn about additional parameters, run databricks shares update --help or see PATCH /api/2.1/unity-catalog/shares/ in the REST API reference.
For information about removing tables from a share, see Update shares.
Cloud token eligibility
Databricks uses cloud tokens (temporary, path-scoped cloud credentials) to give recipients direct read access to shared Delta table files. In the Databricks-to-Open sharing protocol, this is also called directory-based access mode. Views, materialized views, foreign tables, streaming tables, volumes, notebooks, Python UDFs, and AI models are not supported. Which tables qualify depends on the sharing protocol.
Databricks-to-Databricks sharing: Cloud tokens are used when all of the following are true:
- The table is shared
WITH HISTORY(full history from the beginning). - The table is shared without a partition filter.
Databricks-to-Open sharing: Cloud tokens (directory-based access mode) are used when all of the following are true:
- The shared object is a managed or external Delta table.
- The table is shared
WITH HISTORY(full history from the beginning). - The table is shared without a partition filter.
- The table is not a CCv2 table.
- The table does not use default storage.
For Databricks-to-Databricks shares, cloud tokens are exchanged directly between Unity Catalog metastores without long-lived bearer tokens, resulting in performance comparable to direct source table access. For Databricks-to-Open sharing, the OpenSharing server includes the table's cloud storage location and accessModes: ["url", "dir"] in list and metadata responses. Open recipients can call the Generate Temporary Table Credentials endpoint to obtain credentials and read directly from cloud storage.
When cloud token access is used, recipients receive credentials scoped to the root directory of the shared Delta table. This grants read access to both the data files and the Delta log. The Delta log contains the commit history for each table version, information about the committer, and deleted data that has not been vacuumed.
Specify table partitions to share
To share only part of a table when you add the table to a share, provide a partition specification. Specify partitions when you add a table to a share or update a share, using Catalog Explorer, the Databricks Unity Catalog CLI, or SQL commands in a Databricks notebook or the Databricks SQL query editor. See Add tables to a share and Update shares.
If you're using default storage, you can't share table with partitioning enabled. See Default storage in Databricks.
Example
The following SQL example shares part of the data in the inventory table, partitioned by the year, month, and date columns:
- Data for the year 2021.
- Data for December 2020.
- Data for December 25, 2019.
ALTER SHARE share_name
ADD TABLE inventory
PARTITION (year = "2021"),
          (year = "2020", month = "Dec"),
          (year = "2019", month = "Dec", date = "2019-12-25");
Use recipient properties to do partition filtering
You can share a table partition that matches data recipient properties, also known as parameterized partition sharing.
Default properties include:
databricks.accountId: The Databricks account that a data recipient belongs to (Databricks-to-Databricks sharing only).databricks.metastoreId: The Unity Catalog metastore that a data recipient belongs to (Databricks-to-Databricks sharing only).databricks.name: The name of the data recipient.
You can create any custom property when you create or update a recipient.
Filtering by recipient property enables you to share the same tables, using the same share, across multiple Databricks accounts, workspaces, and users while maintaining data boundaries between them.
For example, if your tables include a Databricks account ID column, you can create a single share with table partitions defined by Databricks account ID. When you share, OpenSharing dynamically delivers to each recipient only the data associated with their Databricks account.
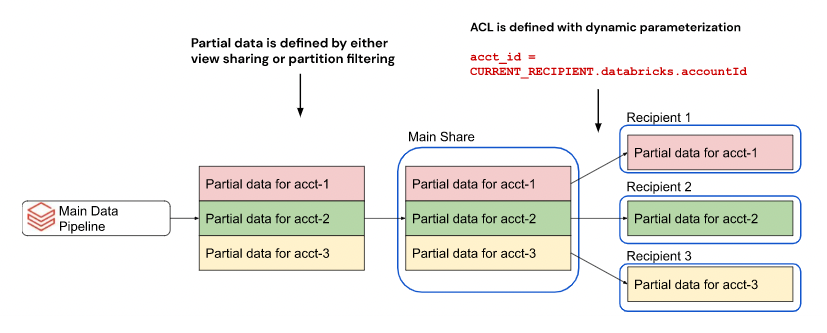
Without the ability to dynamically partition by property, you would have to create a separate share for each recipient.
To specify a partition that filters by recipient properties when you create or update a share, you can use Catalog Explorer or the CURRENT_RECIPIENT SQL function in a Databricks notebook or the Databricks SQL query editor:
Recipient properties are available on Databricks Runtime 12.2 or above.
- Catalog Explorer
- SQL
-
In your Databricks workspace, click
Catalog. -
At the top of the Catalog pane, click the
gear icon and select OpenSharing.Alternatively, in the upper-right corner, click Share > OpenSharing.
-
On the Shared by me tab, find the share you want to update and click its name.
-
Click Manage assets > Add data assets.
-
On the Add tables page, select the catalog and database that contain the table, then select the table.
If you aren't sure which catalog and database contain the table, you can search for it by name, column name, or comment using workspace search. See Search for workspace objects.
-
(Optional) Click
under Partition column to add a partition.On the Add partition to the table dialog, add the property-based partition specification using the following syntax:
(<column-name> = CURRENT_RECIPIENT().<property-key>)For example,
(country = CURRENT_RECIPIENT().country) -
Click Save.
Run the following command in a notebook or the Databricks SQL query editor:
ALTER SHARE <share-name> ADD TABLE <catalog-name>.<schema-name>.<table-name>
   PARTITION (<column-name> = CURRENT_RECIPIENT().<property-key>);
For example,
ALTER SHARE acme ADD TABLE acme.default.some_table
  PARTITION (country = CURRENT_RECIPIENT().country);
Add tables with deletion vectors or column mapping to a share
This feature is in Public Preview.
Deletion vectors are a storage optimization feature that you can enable on Delta tables. See Deletion vectors in Databricks.
Databricks also supports column mapping for Delta tables. See Rename and drop columns with Delta Lake column mapping.
To share a table with deletion vectors or column mapping, you must share it with history. See Add tables to a share.
When you share a table with deletion vectors or column mapping, recipients can query the table using a SQL warehouse, a compute running Databricks Runtime 14.1 or above, or a compute that is running open source delta-sharing-spark 3.1 or above. See Read tables with deletion vectors or column mapping enabled and Read tables with deletion vectors or column mapping enabled.
Add schemas to a share
Check that you meet the requirements before adding schemas to a share.
Adding an entire schema to a share provides your recipients with access to all of the data assets in the schema at the time that you create the share, as well as any assets that are added to the schema over time. This includes all tables, views, and volumes in the schema. Tables shared this way always include full history.
Share schemas with a recipient
To add a schema to a share, follow the instructions in Add tables to a share, paying attention to the content that specifies how to add a schema.
Adding, updating, or removing a schema using SQL requires a SQL warehouse or compute running Databricks Runtime 13.3 LTS or above. Doing the same using Catalog Explorer has no compute requirements.
Limitations
-
You can share schemas even if they include unsupported data assets. These assets are filtered out and not shared with recipients. Unsupported data assets include the following:
- Tables that use liquid clustering with partition filtering
- R2 tables with V2 checkpoint
- Tables with collations enabled
- Tables with row filters or columns masks
SHALLOW CLONEtables- Foreign key constraints in shared tables
-
Table aliases, partitions, and volume aliases are not available if you share an entire schema. If you have created aliases or partitions for any assets in the schema, these are removed when you add the entire schema to the share.
-
If you want to specify advanced options for a table or volume in the schema, you must share the table or volume using SQL and give the table or volume an alias with a different schema name.
-
Schema-level aliasing is not supported. Schemas with the same name from different catalogs can't be added to the same share. Instead, share individual tables with aliased schema names.
Add tables and schemas secured by ABAC policies to a share
Attribute-based access control (ABAC) is a data governance model that provides flexible, scalable, and centralized access control across Databricks.
You can share a table or schema secured by ABAC policies like standard tables. To learn how to apply ABAC policies to your data assets, see Create and manage row filter and column mask policies.
However, you must be a privileged user. A privileged user is the share owner and a user who is excluded from the ABAC policies applied to the data asset. The policy does not govern the recipient's access. Recipients have full access to the shared asset. ABAC limitations apply.
Add streaming tables to a share
Streaming tables are regular Delta tables with extra support for streaming or incremental data processing. Streaming tables are designed for append-only data sources and process inputs only once. See Use standalone streaming tables.
Check that you meet the requirements before adding streaming tables to a share.
Additional requirements
- If your workspace has workspace-catalog bindings enabled, check that the workspace has read and write access to the catalog the streaming table is in. For more information, see Workspace-catalog binding.
- Shareable streaming tables must be defined on Delta tables or other shareable streaming tables or views.
- You must use a SQL warehouse or a compute on Databricks Runtime 13.3 LTS or above when you add a streaming table to a share.
Limitations
- The streaming table cannot have row filters and column masks.
- The base table of the streaming table can have row filters and column masks.
- The streaming table cannot have partition filters. Instead, create a view on top of the streaming table.
- Databricks-to-Open sharing recipients can only read the current snapshot of the streaming table. Time travel, query history, streaming reads, and CDF are not supported for open recipients. If your recipients need CDF, share a regular Delta table with CDF enabled.
- If the recipient doesn't have direct access to the underlying data,
LIMITclauses and predicate pushdown aren't supported. The system fully materializes all query results before returning them to the recipient, regardless of query filters. See Do recipients have direct access to the underlying data in shared views, materialized views, and streaming tables?. - General limitations for streaming tables also apply. See Streaming table limitations.
Share streaming tables with a recipient
To add streaming tables to a share:
- Catalog Explorer
- SQL
- CLI
-
In your Databricks workspace, click
Catalog. -
At the top of the Catalog pane, click the
gear icon and select OpenSharing.Alternatively, in the upper-right corner, click Share > OpenSharing.
-
On the Shared by me tab, find the share you want to add a streaming table to and click its name.
-
Click Manage assets > Edit assets.
-
On the Edit assets page, search or browse for the streaming table that you want to share and select it.
-
(Optional) In the Alias column, click
to specify an alias, or alternate streaming table name, to make the streaming table name more readable. The alias is the name that the recipient sees and must use in queries. Recipients cannot use the actual streaming table name if an alias is specified. -
Click Save.
Run the following command in a notebook or the Databricks SQL query editor.
ALTER SHARE <share_name> ADD TABLE <st_name> [COMMENT <comment>] [AS <shared_st_name>];
Run the following Databricks CLI command.
databricks shares update <share-name> \
  --json '{
    “updates”: [
      {
        “action”: “ADD”,
        “data_object”: {
          “name”: “<st-full-name>",
          “data_object_type”: “TABLE”,
          “comment”: “<comment>”
        }
      }
    ]
  }'
For information about removing streaming tables from a share, see Update shares.
Add managed Iceberg tables to a share
This feature is in Public Preview.
Apache Iceberg is an open source table format for analytics workloads. In Databricks, you can create Iceberg tables in Unity Catalog, known as managed Iceberg tables.
Check that you meet the requirements before adding managed Iceberg tables to a share. Iceberg table and managed Iceberg table limitations apply. See Limitations.
Databricks does not support sharing managed Iceberg tables to external Iceberg clients.
To add managed Iceberg tables to a share:
- Catalog Explorer
- SQL
- CLI
-
In your Databricks workspace, click
Catalog. -
At the top of the Catalog pane, click the
gear icon and select OpenSharing.Alternatively, in the upper-right corner, click Share > OpenSharing.
-
On the Shared by me tab, find the share you want to add a managed Iceberg table to and click its name.
-
Click Manage assets > Edit assets.
-
On the Edit assets page, search or browse for the managed Iceberg table that you want to share and select it.
-
(Optional) In the Alias column, click
to specify an alias, or alternate managed Iceberg table name, to make the name more readable. The alias is the name that the recipient sees and must use in queries. Recipients cannot use the actual managed Iceberg table name if an alias is specified. -
Click Save.
Run the following command in a notebook or the Databricks SQL query editor. Optionally, specify <shared_iceberg_table_name> to expose the managed Iceberg table under a different name.
ALTER SHARE <share_name> ADD TABLE <managed_iceberg_name> [COMMENT <comment>] [AS <shared_iceberg_table_name>];
Run the following Databricks CLI command.
databricks shares update <share-name> \
  --json '{
    “updates”: [
      {
        “action”: “ADD”,
        “data_object”: {
          “name”: “<managed-iceberg-full-name>",
          “data_object_type”: “TABLE”,
          “comment”: “<comment>”
        }
      }
    ]
  }'
Add foreign schemas or tables to a share
This feature is in Beta. Workspace admins can control access to this feature from the Previews page. See Manage Databricks previews.
Lakehouse Federation enables you to use Databricks to run queries against external data sources. You can create foreign schemas and tables, which contain data and metadata managed by external systems, with Unity Catalog adding data governance to query these tables. To learn more about connecting to external sources, see Connect to external databases and catalogs.
OpenSharing enables you to securely share foreign data from its original location, without copying data into Databricks, complex network setups, or credential transfers.
Check that you meet the requirements before adding foreign schemas or tables to a share.
Additional requirements
-
You must enable Lakehouse Federation Sharing in your account-level Previews. See Manage Databricks previews.
-
You must enable Serverless compute for workflows, notebooks, and Lakeflow pipelines in the account where foreign schema or foreign table sharing is set up. See Connect to serverless compute.
-
When sharing foreign schemas and tables, the data is queried and temporarily materialized on the provider's side. By default, the materialized data is stored in a hidden schema using Databricks default storage. Verify that you meet the requirements and observe the limitations for default storage.
For details about default storage regional availability, see Serverless availability.
To opt out the use of Databricks default storage and use your own storage for temporary materialization, open a support case.
importantForeign tables that are too large to materialize can't be shared. If materialization exceeds limits, the query fails.
-
If you choose to use default storage, you must enable the OpenSharing for Default Storage – Expanded Access preview at the account level. See Manage Databricks previews.
Limitations
- Shared foreign tables don't support
LIMITclauses or predicate pushdown. The system fully materializes all query results before returning them to the recipient, regardless of query filters.
Recommended usage patterns
Query results are generated on-demand for each query, so foreign table and schema sharing might not be as cost-efficient compared to sharing tables or materialized views. Databricks recommends the following to improve performance:
- Keep the size of typical query results less than 10 GBs.
- Use ad-hoc exploratory queries instead of frequent data dumps.
- When using cloud-token sharing, consider sharing materialized views created on top of foreign tables for cost-efficiency and better performance.
Share the foreign schema or table with a recipient
To add foreign schemas or tables to a share, use Catalog Explorer, the Databricks Unity Catalog CLI, or SQL commands in a Databricks notebook or the Databricks SQL query editor.
- Catalog Explorer
- SQL
- CLI
-
In your Databricks workspace, click
Catalog. -
At the top of the Catalog pane, click the
gear icon and select OpenSharing.Alternatively, in the upper-right corner, click Share > OpenSharing.
-
On the Shared by me tab, find the share you want to add a foreign table or schema to and click its name.
-
Click Manage assets > Edit assets.
-
On the Edit assets page, search or browse for the foreign table or schema that you want to share and select it.
-
(Optional) In the Alias column, click
to specify an alias, or alternate foreign schema or table name, to make the foreign schema or table name more readable. The alias is the name that the recipient sees and must use in queries. Recipients cannot use the actual foreign schema or table name if an alias is specified. -
Click Save.
ALTER SHARE <share-name>
  ADD {TABLE | SCHEMA} {federated_catalog.federated_schema.federated_table | federated_catalog.federated_schema}
  [COMMENT "<comment>"]
  [AS <alias>];
Options include:
AS <alias>: An alternate name, or alias, to make the data asset name more readable. The alias is the data asset name that the recipient sees and must use in queries. Recipients cannot use the actual name if an alias is specified. Use the format<catalog-name>.<schema-name>.<view-name>.COMMENT "<comment>": Comments appear in the Catalog Explorer UI and when you list and display data asset details using SQL statements.
For more information about ALTER SHARE options, see ALTER SHARE.
databricks shares update <share-name> \
  --json '{
    “updates”: [
      {
        “action”: “ADD”,
        “data_object”: {
          “name”: “<federated-data-asset-full-name>",
          “data_object_type”: “{TABLE | SCHEMA}”,
          "shared_as": "<foreign-data-asset-alias>",
          “comment”: “<comment>”
        }
      }
    ]
  }'
Add foreign Iceberg tables to a share
This feature is in Public Preview.
Foreign Iceberg tables are tables federated from foreign Iceberg catalogs using Lakehouse Federation. To learn more about Apache Iceberg tables in Databricks, see What is Apache Iceberg in Databricks?.
Before you begin, check that you meet the general requirements and create a share. You can also share foreign Iceberg tables to recipients using external Iceberg clients. For more information, see Enable sharing to external Iceberg clients.
To verify recipients receive the freshest data, periodically refresh your foreign Iceberg tables. Any SELECT query or REFRESH TABLE command refreshes the table metadata.
Databricks recommends setting up a scheduled job so the foreign Iceberg table on Databricks stays in sync with the remote Iceberg source. For more information about scheduling refreshes, see Schedule a query.
Additional requirements
- You must enable the Lakehouse Federation Sharing preview at the account level. See Manage Databricks previews.
- If you are sharing foreign Iceberg tables with open recipients not using Iceberg clients, you must use default storage. You must enable the OpenSharing for Default Storage – Expanded Access preview at the account level. See Manage Databricks previews.
- When sharing with open recipients not using Iceberg clients, the shared data is first filtered and materialized using your compute and storage. You might incur additional costs. For more information, see How do I incur and check OpenSharing costs? and Do recipients have direct access to the underlying data in shared views, materialized views, and streaming tables?.
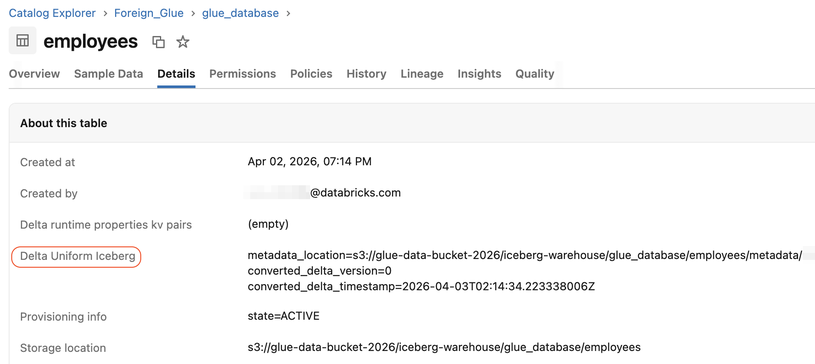
- Foreign Iceberg tables must have Delta Uniform enabled. If Uniform is not enabled, the table cannot be added to a share. See Read Delta Lake tables with Iceberg clients using UniForm.
Limitations
- Partitions aren't supported.
- When sharing with open recipients not using an Iceberg client,
LIMITclauses and predicate pushdown aren't supported. The system fully materializes all query results before returning them to the recipient, regardless of query filters.
Add a foreign Iceberg table to a share
Foreign Iceberg tables are automatically shared with full history.
To add a foreign Iceberg table to a share:
- Catalog Explorer
- SQL
- CLI
-
In your Databricks workspace, click
Catalog. -
At the top of the Catalog pane, click the
gear icon and select OpenSharing.Alternatively, in the upper-right corner, click Share > OpenSharing.
-
On the Shared by me tab, find the share you want to add a foreign Iceberg table to and click its name.
-
Click Manage assets > Edit assets.
-
On the Edit assets page, search or browse for the foreign Iceberg table that you want to share and select it.
-
(Optional) In the Alias column, click
to specify an alias. The alias is the name that the recipient sees and must use in queries. -
Click Save.
Run the following command in a notebook or the Databricks SQL query editor. Optionally, specify <shared_table_name> to expose the foreign Iceberg table under a different name.
ALTER SHARE <share_name> ADD TABLE <foreign_iceberg_table_name> [COMMENT <comment>] [AS <shared_table_name>];
Run the following Databricks CLI command.
databricks shares update <share-name> \
  --json '{
    "updates": [
      {
        "action": "ADD",
        "data_object": {
          "name": "<foreign-iceberg-table-full-name>",
          "data_object_type": "TABLE",
          "comment": "<comment>"
        }
      }
    ]
  }'
Add views to a share
Views are read-only objects created from one or more tables or other views. A view can be created from tables and other views that are contained in multiple schemas and catalogs in a Unity Catalog metastore. See Create and manage views.
When sharing views, the data is queried and temporarily materialized. The materialized data is stored in the storage location of the view's parent schema or catalog, or in the metastore root location.
Check that you meet the requirements before adding views to a share.
Additional requirements
- Shareable views must be defined on Delta tables, other shareable views, or local materialized views and streaming tables. Shareable views cannot be defined on foreign tables.
- You must use a SQL warehouse or a compute on Databricks Runtime 13.3 LTS or above when you add a view to a share.
- If your workspace has workspace-catalog bindings enabled, check that the workspace has read and write access to the catalog. For more information, see Workspace-catalog binding.
- When sharing views, the data might be queried and temporarily materialized on the provider side, depending on the recipient's compute type and account relationship. The materialized data is stored in the storage location of the view's parent schema or catalog, or in the metastore root location. For details about when materialization occurs and who pays for it, see Do recipients have direct access to the underlying data in shared views, materialized views, and streaming tables? and How do I incur and check OpenSharing costs?.
- If the storage location has custom network configurations, such as a firewall or private link, you must verify that your recipients are allowlisted to connect to the storage location. For instructions on configuring firewall rules for serverless compute, see Serverless compute firewall configuration.
- Alternatively, use Share data behind a firewall with SecureConnect to broker access without per-recipient allowlisting.
Limitations
- You cannot share views that reference shared tables or shared views.
- You cannot share views that reference foreign tables, including foreign Iceberg tables.
- If the recipient doesn't have direct access to the underlying data,
LIMITclauses and predicate pushdown aren't supported. The system fully materializes all query results before returning them to the recipient, regardless of query filters. See Do recipients have direct access to the underlying data in shared views, materialized views, and streaming tables?.
Share views with a recipient
This section describes how to add views to a share using Catalog Explorer, Databricks CLI, or SQL commands in a Databricks notebook or the Databricks SQL query editor. If you prefer to use the Unity Catalog REST API, see PATCH /api/2.1/unity-catalog/shares/ in the REST API reference.
- Catalog Explorer
- SQL
- CLI
-
In your Databricks workspace, click
Catalog. -
At the top of the Catalog pane, click the
gear icon and select OpenSharing.Alternatively, in the upper-right corner, click Share > OpenSharing.
-
On the Shared by me tab, find the share you want to add a view to and click its name.
-
Click Manage assets > Add data assets.
-
On the Add tables page, search or browse for the view that you want to share and select it.
-
(Optional) Click
under the Alias column to specify an alternate view name, or Alias, to make the view name more readable. The alias is the name that the recipient sees and must use in queries. Recipients cannot use the actual view name if an alias is specified. -
Click Save.
Run the following command in a notebook or the Databricks SQL query editor:
ALTER SHARE <share-name> ADD VIEW <catalog-name>.<schema-name>.<view-name>
   [COMMENT "<comment>"]
   [AS <alias>];
Options include:
AS <alias>: An alternate view name, or alias, to make the view name more readable. The alias is the view name that the recipient sees and must use in queries. Recipients cannot use the actual view name if an alias is specified. Use the format<schema-name>.<view-name>.COMMENT "<comment>": Comments appear in the Catalog Explorer UI and when you list and display view details using SQL statements.
For more information about ALTER SHARE options, see ALTER SHARE.
Run the following Databricks CLI command:
databricks shares update <share-name> \
  --json '{
    "updates": [
      {
        "action": "ADD",
        "data_object": {
          "name": "<view-full-name>",
          "data_object_type": "VIEW",
          "shared_as": "<view-alias>"
        }
      }
    ]
  }'
"shared_as": "<view-alias>" is optional and provides an alternate view name, or alias, to make the view name more readable. The alias is the view name that the recipient sees and must use in queries. Recipients cannot use the actual view name if an alias is specified. Use the format <schema-name>.<view-name>.
To learn about additional parameters, run databricks shares update --help or see PATCH /api/2.1/unity-catalog/shares/ in the REST API reference.
For information about removing views from a share, see Update shares.
Add dynamic views to a share to filter rows and columns
You can use dynamic views to configure fine-grained access control to table data, including:
- Security at the level of columns or rows.
- Data masking.
When you create a dynamic view that uses the CURRENT_RECIPIENT() function, you can limit recipient access according to properties that you specify in the recipient definition.
This section provides examples of restricting recipient access to table data at both the row and column level using a dynamic view.
Requirements
- Check that you meet the requirements for adding a view to a share.
- Databricks Runtime version: The
CURRENT_RECIPIENTfunction is supported in Databricks Runtime 14.2 and above.
Limitations
- All limitations for view sharing apply.
- When a provider shares a view that uses the
CURRENT_RECIPIENTfunction, the provider can't query the view directly because of the sharing context. To test such a dynamic view, the provider must share the view with themselves and query the view as a recipient. - Providers cannot create a view that references a dynamic view.
Set a recipient property
In these examples, the table to be shared has a column named country, and only recipients with a matching country property can view certain rows or columns.
You can set recipient properties using Catalog Explorer or SQL commands in a Databricks notebook or the SQL query editor.
- Catalog Explorer
- SQL
-
In your Databricks workspace, click
Catalog. -
At the top of the Catalog pane, click the
gear icon and select OpenSharing.Alternatively, in the upper-right corner, click Share > OpenSharing.
-
On the Recipients tab, find the recipient you want to add the properties to and click its name.
-
On the lower‑right side of the page, under Recipient properties, click the
 pencil next to databricks.metastoreID for a Databricks recipient or next to databricks.name for an open recipient.
 -
On the Edit recipient properties dialog, enter the column name as a key (in this case
country) and the value you want to filter by as the value (for example,CA). -
Click Save.
To set the property on the recipient, use ALTER RECIPIENT. In this example, the country property is set to CA.
ALTER RECIPIENT recipient1 SET PROPERTIES ('country' = 'CA');
Create a dynamic view with row-level permission for recipients
In this example, only recipients with a matching country property can view certain rows.
CREATE VIEW my_catalog.default.view1 AS
  SELECT * FROM my_catalog.default.my_table
  WHERE country = CURRENT_RECIPIENT('country');
Another option is for the data provider to maintain a separate mapping table that maps fact table fields to recipient properties. This allows recipient properties and fact table fields to be decoupled for greater flexibility.
Create a dynamic view with column-level permission for recipients
In this example, only recipients that match the country property can view certain columns. Others see the data returned as REDACTED:
CREATE VIEW my_catalog.default.view2 AS
  SELECT
  CASE
    WHEN CURRENT_RECIPIENT('country') = 'US' THEN pii
    ELSE 'REDACTED'
  END AS pii
  FROM my_catalog.default.my_table;
Share the dynamic view with a recipient
To share the dynamic view with a recipient, use the same SQL commands or UI procedure as you would for a standard view. See Add views to a share.
Add materialized views to a share
Like views, materialized views are the results of a query, and you can access them like you would a table. Unlike regular views, the results of a materialized view reflect the state of data when the materialized view was last refreshed. For more details about materialized views, see Use standalone materialized views.
Check that you meet the requirements before adding materialized views to a share.
Additional requirements
- If your workspace has workspace-catalog bindings enabled, check that the workspace has read and write access to the catalog containing the materialized view. For more information, see Workspace-catalog binding.
- Shareable materialized views must be defined on Delta tables or other shareable streaming tables, views, or materialized views.
- You must use a SQL warehouse or a compute on Databricks Runtime 13.3 LTS or above when you add a materialized view to a share.
Limitations
- The materialized view cannot have row filters, but the base table of the materialized view can have row filters and column masks.
- The materialized view cannot have partition filters. Instead, create a view on top of the materialized view.
- Databricks-to-Open sharing recipients can only read the current snapshot of the materialized view. Streaming reads are not supported for open recipients.
- If the recipient doesn't have direct access to the underlying data,
LIMITclauses and predicate pushdown aren't supported. The system fully materializes all query results before returning them to the recipient, regardless of query filters. See Do recipients have direct access to the underlying data in shared views, materialized views, and streaming tables?. - General limitations for materialized views also apply. See Materialized view limitations.
Share materialized views with a recipient
This section describes how to add materialized views to a share using Catalog Explorer, Databricks CLI, or SQL commands in a Databricks notebook or the Databricks SQL query editor. If you prefer to use the REST API, see PATCH /api/2.1/unity-catalog/shares/ in the REST API reference.
- Catalog Explorer
- SQL
- CLI
-
In your Databricks workspace, click
Catalog. -
At the top of the Catalog pane, click the
gear icon and select OpenSharing.Alternatively, in the upper-right corner, click Share > OpenSharing.
-
On the Shared by me tab, find the share you want to add a materialized view to and click its name.
-
Click Manage assets > Edit assets.
-
On the Edit assets page, search or browse for the materialized view that you want to share and select it.
-
(Optional) In the Alias column, click
to specify an alias, or alternate materialized view name, to make the materialized view name more readable. The alias is the name that the recipient sees and must use in queries. Recipients cannot use the actual materialized view name if an alias is specified. -
Click Save.
Run the following command in a notebook or the Databricks SQL query editor.
ALTER SHARE <share_name> ADD MATERIALIZED VIEW <mv_name> [COMMENT <comment>] [AS <shared_mv_name>];
databricks shares update <share-name> \
  --json '{
    “updates”: [
      {
        “action”: “ADD”,
        “data_object”: {
          “name”: “<mat-view-full-name>”,
          “data_object_type”: “MATERIALIZED_VIEW”,
          “comment”: “<comment>”
        }
      }
    ]
  }'
For information about removing materialized views from a share, see Update shares.
Add volumes to a share
Volumes are Unity Catalog objects that represent a logical volume of storage in a cloud object storage location. They are intended primarily to provide governance over non-tabular data assets. See What are Unity Catalog volumes?.
Check that you meet the requirements before adding volumes to a share.
Additional requirements
- Volume sharing is supported only in Databricks-to-Databricks sharing.
- You must use a SQL warehouse on version 2023.50 or above or a compute resource on Databricks Runtime 14.1 or above when you add a volume to a share.
- If the volume storage on the provider side has custom network configurations (such as a firewall or private link), then the provider must verify that the recipient's data plane addresses are properly allowlisted to be able to connect to the storage location of the volume. Catalog Explorer might not display the volumes correctly on the recipient side.
Volume comments are included in shares that are shared with a recipient using Databricks-to-Databricks sharing on or after July 25, 2024. If you want to start sharing comments through a share that was shared with a recipient before the release date, you must revoke and re-grant recipient access to trigger comment sharing.
Share volumes with a recipient
This section describes how to add volumes to a share using Catalog Explorer, the Databricks CLI, or SQL commands in a Databricks notebook or SQL query editor. If you prefer to use the Unity Catalog REST API, see PATCH /api/2.1/unity-catalog/shares/ in the REST API reference.
- Catalog Explorer
- SQL
- CLI
-
In your Databricks workspace, click
Catalog. -
At the top of the Catalog pane, click the
gear icon and select OpenSharing.Alternatively, in the upper-right corner, click Share > OpenSharing.
-
On the Shared by me tab, find the share you want to add a volume to and click its name.
-
Click Manage assets > Edit assets.
-
On the Edit assets page, search or browse for the volume that you want to share and select it.
Alternatively, you can select the entire schema that contains the volume. See Add schemas to a share.
-
(Optional) Click
under the Alias column to specify an alternate volume name, or Alias, to make the volume name more readable.Aliases are not available if you select an entire schema.
The alias is the name that the recipient sees and must use in queries. If an alias is specified, recipients cannot use the actual volume name.
-
Click Save.
Run the following command in a notebook or the Databricks SQL query editor:
ALTER SHARE <share-name> ADD VOLUME <catalog-name>.<schema-name>.<volume-name>
   [COMMENT "<comment>"]
   [AS <alias>];
Options include:
AS <alias>: An alternate volume name, or alias, to make the volume name more readable. The alias is the volume name that the recipient sees and must use in queries. Recipients cannot use the actual volume name if an alias is specified. Use the format<schema-name>.<volume-name>.COMMENT "<comment>": Comments appear in the Catalog Explorer UI and when you list and display volume details using SQL statements.
For more information about ALTER SHARE options, see ALTER SHARE.
Run the following command using Databricks CLI 0.210 or above:
 databricks shares update <share-name> \
   --json '{
     "updates": [
       {
         "action": "ADD",
         "data_object": {
           "name": "<volume-full-name>",
           "data_object_type": "VOLUME",
           "string_shared_as": "<volume-alias>"
         }
       }
     ]
   }'
"string_shared_as": "<volume-alias>" is optional and provides an alternate volume name, or alias, to make the volume name more readable. The alias is the volume name that the recipient sees and must use in queries. Recipients cannot use the actual volume name if an alias is specified. Use the format <schema-name>.<volume-name>.
To learn about additional parameters, run databricks shares update --help or see PATCH /api/2.1/unity-catalog/shares/ in the REST API reference.
For information about removing volumes from a share, see Update shares.
Add Python UDFs to a share
User-defined functions (UDFs) allow you to reuse and share code that extends built-in functionality on Databricks. To learn how to create Python UDFs, see Python scalar user-defined functions (UDFs).
Check that you meet the requirements before adding Python UDFs to a share.
Additional limitations
- You cannot share Python UDFs with an open recipient.
Share Python UDFs with a recipient
This section describes how to add Python UDFs to a share using Catalog Explorer, the Databricks CLI, or SQL commands in a Databricks notebook or SQL query editor. If you prefer to use the Unity Catalog REST API, see PATCH /api/2.1/unity-catalog/shares/ in the REST API reference.
- Catalog Explorer
- SQL
- CLI
-
In your Databricks workspace, click
Catalog. -
At the top of the Catalog pane, click the
gear icon and select OpenSharing.Alternatively, in the upper-right corner, click Share > OpenSharing.
-
On the Shared by me tab, find the share you want to add a Python UDF to and click its name.
-
Click Manage assets > Edit assets.
-
On the Edit assets page, search or browse for the Python UDF that you want to share and select it.
Alternatively, you can select the entire schema that contains the Python UDF. See Add schemas to a share.
-
(Optional) Click
under the Alias column to specify an alternate Python UDF name, or Alias, to make the Python UDF name more readable.Aliases are not available if you select an entire schema.
The alias is the name that the recipient sees and must use in queries. If an alias is specified, recipients cannot use the actual Python UDF name.
-
Click Save.
Run the following command, which uses ADD MODEL, in a notebook or the Databricks SQL query editor:
ALTER SHARE <share-name> ADD MODEL <catalog-name>.<schema-name>.<python-udf-name>
   [AS <alias>];
Options include:
AS <alias>: An alternate Python UDF name, or alias, to make the Python UDF name more readable. The alias is the Python UDF name that the recipient sees and must use in queries. Recipients cannot use the actual Python UDF name if an alias is specified. Use the format<schema-name>.<python-udf-name>.
For more information about ALTER SHARE options, see ALTER SHARE.
Run the following command, which specifies the object type as model, using Databricks CLI 0.210 or above:
 databricks shares update <share-name> \
   --json '{
     "updates": [
       {
         "action": "ADD",
         "data_object": {
           "name": "<python-udf-full-name>",
           "data_object_type": "MODEL",
           "string_shared_as": "<python-udf-alias>"
         }
       }
     ]
   }'
"string_shared_as": "<python-udf-alias>" is optional and provides an alternate Python UDF name, or alias, to make the Python UDF name more readable. The alias is the Python UDF name that the recipient sees and must use in queries. Recipients cannot use the actual Python UDF name if an alias is specified. Use the format <schema-name>.<python-udf-name>.
To learn about additional parameters, run databricks shares update --help or see PATCH /api/2.1/unity-catalog/shares/ in the REST API reference.
Add FeatureSpecs to a share
A FeatureSpec is a user-defined set of features and functions. Recipients can create a Feature Serving Endpoint from the shared FeatureSpec. To learn how to create FeatureSpecs, see Create a FeatureSpec.
Check that you meet the requirements before adding FeatureSpecs to a share.
Additional requirements
- All dependencies must be added to the share. When using the UI to add a
FeatureSpecto a share, all dependencies should automatically be added to the share. - If a dependency is added to the model, it must be added to the share as well.
Additional limitations
- If this asset is a dependency of another model, you cannot specify an alias.
- You cannot share
FeatureSpecswith an open recipient.
Share FeatureSpecs with a recipient
This section describes how to add FeatureSpecs to a share using Catalog Explorer, the Databricks CLI, or SQL commands in a Databricks notebook or SQL query editor. If you prefer to use the Unity Catalog REST API, see PATCH
/api/2.1/unity-catalog/shares/ in the REST API reference.
- Catalog Explorer
- SQL
- CLI
-
In your Databricks workspace, click
Catalog. -
At the top of the Catalog pane, click the
gear icon and select OpenSharing.Alternatively, in the upper-right corner, click Share > OpenSharing.
-
On the Shared by me tab, find the share you want to add a
FeatureSpecto and click its name. -
Click Manage assets > Edit assets.
-
On the Edit assets page, search or browse for the
FeatureSpecthat you want to share and select it.Alternatively, you can select the entire schema that contains the
FeatureSpec. See Add schemas to a share. -
(Optional) Click
under the Alias column to specify an alternate FeatureSpecname, or Alias, to make theFeatureSpecname more readable.Aliases are not available if you select an entire schema.
The alias is the name that the recipient sees and must use in queries. If an alias is specified, recipients cannot use the actual
FeatureSpecname. -
If there are any dependencies, the Add all dependencies dialog tells you that they are all automatically added. Click Add all dependencies.
-
Click Save.
Run the following command, which uses ADD MODEL, in a notebook or the Databricks SQL query editor:
ALTER SHARE <share-name> ADD MODEL <catalog-name>.<schema-name>.<featurespec-name>
   [AS <alias>];
--Options include:
AS <alias>: An alternateFeatureSpecname, or alias, to make theFeatureSpecname more readable. The alias is theFeatureSpecname that the recipient sees and must use in queries. Recipients cannot use the actualFeatureSpecname if an alias is specified. Use the format<schema-name>.<featurespec-name>.
For more information about ALTER SHARE options, see ALTER SHARE.
Run the following command, which specifies the object type as model, using Databricks CLI 0.210 or above:
 databricks shares update <share-name> \
   --json '{
     "updates": [
       {
         "action": "ADD",
         "data_object": {
           "name": "<featurespec-full-name>",
           "data_object_type": "MODEL",
           "string_shared_as": "<featurespec-alias>"
         }
       }
     ]
   }'
"string_shared_as": "<volume-alias>" is optional and provides an alternate FeatureSpec name, or alias, to make the FeatureSpec name more readable. The alias is the FeatureSpec name that the recipient sees and must use in queries. Recipients cannot use the actual FeatureSpec name if an alias is specified. Use the format <schema-name>.<featurespec-name>.
To learn about additional parameters, run databricks shares update --help or see PATCH /api/2.1/unity-catalog/shares/ in the REST API reference.
Add models to a share
Check that you meet the requirements before adding models to a share.
Model comments and model version comments are included in shares that are shared using Databricks-to-Databricks sharing.
Additional requirements
- Model sharing is supported only in Databricks-to-Databricks sharing.
- You must use a SQL warehouse on version 2023.50 or above or a compute resource on Databricks Runtime 14.0 or above when you add a model to a share.
Share models with a recipient
This section describes how to add models to a share using Catalog Explorer, the Databricks CLI, or SQL commands in a Databricks notebook or SQL query editor. If you prefer to use the Unity Catalog REST API, see PATCH /api/2.1/unity-catalog/shares/ in the REST API reference.
To add models to a share:
- Catalog Explorer
- SQL
- CLI
-
In your Databricks workspace, click
Catalog. -
At the top of the Catalog pane, click the
gear icon and select OpenSharing.Alternatively, in the upper-right corner, click Share > OpenSharing.
-
On the Shared by me tab, find the share you want to add a model to and click its name.
-
Click Manage assets > Edit assets.
-
On the Edit assets page, search or browse for the model that you want to share and select it.
Alternatively, you can select the entire schema that contains the model. See Add schemas to a share.
-
(Optional) Click
under the Alias column to specify an alternate model name, or Alias, to make the model name more readable.Aliases are not available if you select an entire schema.
The alias is the name that the recipient sees and must use in queries. Recipients cannot use the actual model name if an alias is specified.
-
Click Save.
Run the following command in a notebook or the Databricks SQL query editor:
ALTER SHARE <share-name> ADD MODEL <catalog-name>.<schema-name>.<model-name>
   [COMMENT "<comment>"]
   [AS <alias>];
Options include:
AS <alias>: An alternate model name, or alias, to make the model name more readable. The alias is the model name that the recipient sees and must use in queries. Recipients cannot use the actual model name if an alias is specified. Use the format<schema-name>.<model-name>.COMMENT "<comment>": Comments appear in the Catalog Explorer UI and when you list and display model details using SQL statements.
For more information about ALTER SHARE options, see ALTER SHARE.
Run the following command using Databricks CLI 0.210 or above:
 databricks shares update <share-name> \
   --json '{
     "updates": [
       {
         "action": "ADD",
         "data_object": {
           "name": "<model-full-name>",
           "data_object_type": "MODEL",
           "string_shared_as": "<model-alias>"
         }
       }
     ]
   }'
"string_shared_as": "<model-alias>" is optional and provides an alternate model name, or alias, to make the model name more readable. The alias is the model name that the recipient sees and must use in queries. Recipients cannot use the actual model name if an alias is specified. Use the format <schema-name>.<model-name>.
To learn about additional parameters, run databricks shares update --help or see PATCH /api/2.1/unity-catalog/shares/ in the REST API reference.
For information about removing models from a share, see Update shares.
Add notebook files to a share
Check that you meet the requirements before adding notebook files to a share.
Use Catalog Explorer to add a notebook file to a share.
- In your Databricks workspace, click Catalog.
- Click the OpenSharing > button.
- On the Shared by me tab, find the share you want to add a notebook to and click its name.
- Click Manage assets and select Add notebook file.
- On the Add notebook file page, click the file icon to browse for the notebook you want to share.
- Click the file you want to share and click Select.
- (Optionally) specify a user-friendly alias for the file in the Share as field. This is the identifier that recipients see.
- Under Storage location, enter the external location in cloud storage where you want to store the notebook. You can specify a subpath under the defined external location. If you don't specify an external location, the notebook is stored in the metastore-level storage location (or “metastore root location”). If no root location is defined for the metastore, you must enter an external location here. See Add managed storage to an existing metastore.
- Click Save.
The shared notebook file now appears in the Notebook files list on the Assets tab.
Remove notebook files from shares
To remove a notebook file from a share:
-
In your Databricks workspace, click
Catalog. -
At the top of the Catalog pane, click the
gear icon and select OpenSharing.Alternatively, in the upper-right corner, click Share > OpenSharing.
-
On the Shared by me tab, find the share that includes the notebook, and click the share name.
-
On the Assets tab, find the notebook file you want to remove from the share.
-
Click the
 kebab menu to the right of the row, and select Delete notebook file.
 -
On the confirmation dialog, click Delete.
Update notebook files in shares
To update a notebook that you have already shared, you must re-add it, giving it a new alias in the Share as field. Databricks recommends that you use a name that indicates the notebook's revised status, such as <old-name>-update-1. You may need to notify the recipient of the change. The recipient must select and clone the new notebook to take advantage of your update.
Enable sharing to external Iceberg clients
You can share Delta tables, foreign Iceberg tables, views, materialized views, and streaming tables with external Iceberg clients that use the Apache Iceberg REST Catalog API.
Before sharing, verify that you meet the OpenSharing requirements needed to add your data asset to a share.
This feature is different from sharing managed Iceberg tables.
Additional limitations
- Tables with deletion vectors enabled are not supported.
- Managed Iceberg tables are not supported.
- Assets using default storage cannot be shared to external Iceberg clients. See Default storage in Databricks.
Share with external Iceberg clients
To share data assets with external Iceberg clients:
-
If you are sharing a Delta table, configure each Delta table with
IcebergCompatV3to expose it as an Iceberg-compatible table. This enables asynchronous generation of Iceberg metadata alongside standard Delta operations. Check that you meet the requirements for sharing Delta tables with Iceberg clients and observe the limitations. To learn how to enable Iceberg reads, see Enable Iceberg reads (UniForm).If you are sharing to Snowflake, only uniform-enabled tables appear for the recipient. Other tables are filtered.
note- Use
DESCRIBE HISTORYto confirm that Iceberg metadata generation completed before the table can be queried from Iceberg clients. - The OIDC authentication type is not supported.
- Use
-
Add the data asset to a share. For detailed instructions, see:
- Add tables to a share
- Add views to a share
- Add materialized views to a share
- Add streaming tables to a share
- Add foreign Iceberg tables to a share
importantProvider-side data materialization is triggered if you share views, materialized views, or streaming tables, which might lead to the accumulation of compute costs. For more information, see How do I incur and check OpenSharing costs?.
-
Share with your open recipient. For instructions on how to create a recipient and grant them access to the share, see Create a recipient object for non-Databricks users using bearer tokens (Databricks-to-Open sharing) or Enable Open ID Connect (OIDC) federation for OpenSharing recipients.