Declarative Automation Bundles project templates
Declarative Automation Bundles (formerly known as Databricks Asset Bundles) describe Databricks resources such as jobs, pipelines, and notebooks as source files, allow you to include metadata alongside these source files to provision infrastructure and other resources, and provide an end-to-end definition of a project, all packaged as a single deployable project. See What are Declarative Automation Bundles?.
Bundle templates enable users to create bundles in a consistent, repeatable way, by establishing folder structures, build steps and tasks, tests, and other DevOps infrastructure-as-code (IaC) attributes common across a deployment pipeline.
For example, if you routinely run jobs that require custom packages with a time-consuming compilation step upon installation, you can speed up your development loop by creating a bundle template that specifies a custom container environment.
Databricks provides a set of default bundle templates, but you can also create custom bundle templates. Users can then initialize bundles using the bundle init command, specifying a default template or your custom template.
Create a bundle using a template
To use a Databricks bundle template to create your bundle, use the Databricks CLI bundle init command, specifying the name of the template to use, or select an available template when creating a bundle in the workspace. See Create a bundle.
For example, the following command creates a bundle using the default Python bundle template:
databricks bundle init default-python
To use a custom bundle template, pass the local path or remote URL of the template to the Databricks CLI bundle init command.
For example, the following command uses the dab-container-template template created in the Custom Bundle Template Tutorial:
databricks bundle init /projects/my-custom-bundle-templates/dab-container-template
If you do not specify a template, the bundle init command prompts with the set of available default templates from which you can choose.
Default bundle templates
Databricks provides the following default bundle templates:
Template | Description |
|---|---|
| A template for creating an empty bundle. This template contains only required files and no sample code, and also configures essential catalog variables. This allows you to quickly create new bundle projects. See default-minimal. |
| A template for using Python with Databricks. This template creates a bundle with a job and an ETL pipeline and requires uv. See default-python. |
| A template for using Scala with Databricks. This template creates a bundle that builds a Scala JAR that is configured to deploy to serverless compute. See default-scala. |
| A template for using SQL with Databricks. This template contains a configuration file that defines a job that runs SQL queries on a SQL warehouse. See default-sql. |
| A template which leverages dbt-core for local development and bundles for deployment. This template contains the configuration that defines a job with a dbt task, as well as a configuration file that defines dbt profiles for deployed dbt jobs. See dbt-sql. |
| An advanced full stack template for starting new MLOps Stacks projects. See mlops-stacks and Declarative Automation Bundles for MLOps Stacks. |
| A modified version of the |
Custom bundle templates
Bundle templates use Go package templating syntax, which provide flexibility on the custom bundle templates you can create. See the Go package template documentation.
Template project structure
At a minimum, a bundle template project must have:
- A
databricks_template_schema.jsonfile at the project root that defines one user-prompt property for the bundle project name. See Template schema. - A
databricks.yml.tmplfile located in atemplatefolder that defines configuration for any bundles created with the template. If yourdatabricks.yml.tmplfile references any additional*.yml.tmplconfiguration templates, specify the location of these in theincludemapping. See Configuration templates.
In addition, the folder structure and included files of the bundle template project template folder is mirrored by bundles created with the template. For example, if you want the template to generate a bundle with a simple notebook in the src folder and a job definition that runs the notebook in the resources folder, you would organize your template project like this:
basic-bundle-template
  ├── databricks_template_schema.json
  └── template
      └── {{.project_name}}
          ├── databricks.yml.tmpl
          ├── resources
          │   └── {{.project_name}}_job.yml.tmpl
          └── src
              └── simple_notebook.ipynb
The project folder name and the name of the job definition file in this bundle template use a template variable. For information about template helpers and variables, see Template helpers and variables.
Template schema
A custom bundle template project must contain a databricks_template_schema.json JSON file at the project root. This file defines fields used by the Databricks CLI when the bundle init command is run, such as prompt text.
The following basic databricks_template_schema.json file defines an input variable project_name for the bundle project, which includes the prompt message and a default value. It then defines a success message for bundle project initialization that uses the input variable value within the message.
{
  "properties": {
    "project_name": {
      "type": "string",
      "default": "basic_bundle",
      "description": "What is the name of the bundle you want to create?",
      "order": 1
    }
  },
  "success_message": "\nYour bundle '{{.project_name}}' has been created."
}
Template schema fields
The databricks_template_schema.json file supports defining input variables for collecting information during bundle initialization from your user within the properties field, as well as additional fields to customize the initialization.
Input variables are defined in the properties field of the template schema. Each input variable defines metadata needed to present a prompt to the user during bundle initalization. The value of the variable is then accessible using template variable syntax, such as {{.project_name}}.
You can also set the values of some fields to customize the bundle initialization process.
Supported schema fields are listed in the following table.
Schema field | Description |
|---|---|
| The bundle template input variable definitions. Databricks recommends defining at least one input variable that is the name of the bundle project. |
| The name of the input variable. |
| A default value to use if a value is not provided by the user with |
| The user prompt message associated with the input variable. |
| A list of possible values for the property, such as |
| An integer that defines the relative order for the input properties. This controls the order in which the prompts for these input variables are shown at the command line. |
| The regexp pattern to use to validate the user input, for example |
| The message that is displayed to the user if the value entered by the user does not match the pattern specified, for example, |
| Skip prompting for the input variable if this schema is satisfied by the configuration already present. In that case the default value of the property is used instead. For an example, see the mlops-stacks template. Only |
| If the value for |
| The path to the template directory, such as |
| The first message to output before prompting the user for input. |
| The message to print after the template is successfully initialized. |
| The minimum semver version of this Databricks CLI that the template requires. |
| Reserved for future use. The version of the schema. This is used to determine if the schema is compatible with the current CLI version. |
Configuration templates
A custom bundle template should contain a databricks.yml.tmpl file in a template folder in the bundle template project that is used to create the bundle project databricks.yml configuration file. Templates for configuration files for resources can be created in the resources folder. Populate these template files with configuration template YAML.
The following simple example configuration templates for databricks.yml and the associated *_job.yml establish the bundle name and two target environments, and define a job that runs the notebook in the bundle, for bundles created using this template. These configuration templates take advantage of bundle substitutions and bundle template helpers.
template/{{.project_name}}/databricks.yml.tmpl:
# databricks.yml
# This is the configuration for the bundle {{.project_name}}.

bundle:
  name: {{.project_name}}

include:
  - resources/*.yml

targets:
  # The deployment targets. See https://docs.databricks.com/en/dev-tools/bundles/deployment-modes.html
  dev:
    mode: development
    default: true
    workspace:
      host: {{workspace_host}}

  prod:
    mode: production
    workspace:
      host: {{workspace_host}}
      # Deploy to a folder whose write access is restricted to the deploying
      # identity. Avoid /Shared, which is writable by all workspace users.
      root_path: /Workspace/Production/.bundle/${bundle.name}
    {{- if not is_service_principal}}
    run_as:
      # This runs as {{user_name}} in production. Alternatively,
      # a service principal could be used here using service_principal_name
      user_name: {{user_name}}
    {{end -}}
template/{{.project_name}}/resources/{{.project_name}}_job.yml.tmpl:
# {{.project_name}}_job.yml
# The main job for {{.project_name}}

resources:
    jobs:
        {{.project_name}}_job:
        name: {{.project_name}}_job
        tasks:
            - task_key: notebook_task
            job_cluster_key: job_cluster
            notebook_task:
                notebook_path: ../src/simple_notebook.ipynb
        job_clusters:
            - job_cluster_key: job_cluster
            new_cluster:
                node_type_id: i3.xlarge
                spark_version: 13.3.x-scala2.12
Template helpers and variables
Template helpers are functions provided by Databricks that you can use within your template files to get user-specific information at runtime or interact with the template engine. You can also define your own template variables.
The following template helpers are available for Databricks bundle template projects. For information about using Go templates and variables, see Go templates.
Helper | Description |
|---|---|
| An alias for https://pkg.go.dev/net/url#Parse. This allows usage of all methods of |
| An alias for https://pkg.go.dev/regexp#Compile. This allows usage of all methods of |
| Returns, as an int, a non-negative pseudo-random number in the half-open interval (0,n). |
| Returns, as a string, a UUID which is a 128 bit (16 byte) Universal Unique IDentifier as defined in RFC 4122.This ID is stable for the duration of the template execution, and can be used to populate the |
| A unique ID for the bundle. Multiple invocations of this function will return the same UUID. |
| A key value pair. This is used with the |
| Converts a list of pairs to a map object. This is useful to pass multiple objects to templates defined in the library directory. Because Go text template syntax for invoking a template only allows specifying a single argument, this function can be used to workaround that limitation. For example in the following line, |
| Returns the smallest node type. |
| The path separator character for the operating system. This is |
| The workspace host URL the user is currently authenticated to. |
| The full name of the user initializing the template. |
| The short name of the user initializing the template. |
| Returns the default workspace catalog. If there is no default, or if Unity Catalog is not enabled, this returns an empty string. |
| Whether or not the current user is a service principal. |
| Causes the template engine to skip generating all files and directories that match the input glob pattern. For an example, see the mlops-stacks template. |
Custom template helpers
To define your own template helpers, create a template file in the library folder of the template project and use Go templating syntax to define helpers. For example, the following contents of a library/variables.tmpl file define the variables cli_version and model_name. When this template is used to initialize a bundle, the value of the model_name variable is constructed using the input_project_name field defined in the template schema file. The value of this field value is the user input after a prompt.
{{ define `cli_version` -}}
    v0.240.0
{{- end }}

{{ define `model_name` -}}
    {{ .input_project_name }}-model
{{- end }}
To see a complete example, see the mlops-stacks template variables file.
Test the bundle template
Finally, make sure to test your template. For example, use the Databricks CLI to initialize a new bundle using the template defined in the previous sections:
databricks bundle init basic-bundle-template
For the prompt, What is your bundle project name?, type my_test_bundle.
Once the test bundle is created, the success message from the schema file is output. If you examine the contents of the my_test_bundle folder, you should see the following:
my_test_bundle
   ├── databricks.yml
   ├── resources
   │  └── my_test_bundle_job.yml
   └── src
      └── simple_notebook.ipynb
And the databricks.yml file and job is now customized:
# databricks.yml
# This is the configuration for the bundle my-test-bundle.

bundle:
  name: my_test_bundle

include:
  - resources/*.yml

targets:
  # The 'dev' target, used for development purposes. See [_](https://docs.databricks.com/en/dev-tools/bundles/deployment-modes.html#development-mode)
  dev:
    mode: development
    default: true
    workspace:
      host: https://my-host.cloud.databricks.com

  # The 'prod' target, used for production deployment. See [_](https://docs.databricks.com/en/dev-tools/bundles/deployment-modes.html#production-mode)
  prod:
    mode: production
    workspace:
      host: https://my-host.cloud.databricks.com
      # Deploy to a folder whose write access is restricted to the deploying
      # identity. Avoid /Shared, which is writable by all workspace users.
      root_path: /Workspace/Production/.bundle/${bundle.name}
    run_as:
      # This runs as someone@example.com in production. Alternatively,
      # a service principal could be used here using service_principal_name
      user_name: someone@example.com
# my_test_bundle_job.yml
# The main job for my_test_bundle

resources:
    jobs:
        my_test_bundle_job:
        name: my_test_bundle_job
        tasks:
            - task_key: notebook_task
                job_cluster_key: job_cluster
                notebook_task:
                    notebook_path: ../src/simple_notebook.ipynb
        job_clusters:
            - job_cluster_key: job_cluster
                new_cluster:
                    node_type_id: i3.xlarge
                    spark_version: 13.3.x-scala2.12
Share a custom template
If you want to share a bundle template with other users, you can store it in version control with any provider that Git supports and that your users have access to. To run the bundle init command with a Git URL, make sure that the databricks_template_schema.json file is in the root location relative to that Git URL.
You can put the databricks_template_schema.json file in a different folder, relative to the bundle's root. You can then use the bundle init command's --template-dir option to reference that folder, which contains the databricks_template_schema.json file.
Configure a custom template folder in the workspace
This feature is in Beta.
Custom bundle templates can be made available for creating bundles in the workspace.
-
Store your bundle template in a GitHub repository and configure a Git folder to connect to it. For information about configuring a Git folder, see Clone a repo.
-
As an account or workspace admin, navigate to Settings in the workspace. See Manage your workspace.
-
Click Development.
-
Under Declarative Automation Bundles, select a folder for custom templates. All custom bundle templates must be available at the root level of the folder.
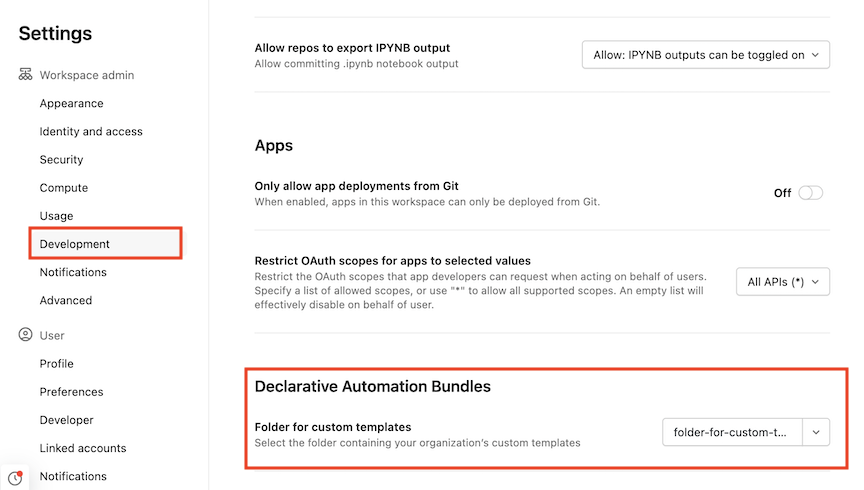
-
When the permissions dialog appears, give all users CAN VIEW access to the folder for custom templates or select Don't give access to set more granular permissions.
-
To set more granular permissions, select the three dots within any folder and click View details.

-
Click Share in the Git folder details panel.
-
Choose who can edit templates (CAN MANAGE) and who can create bundles using templates (CAN VIEW).
For more information about permissions, see Folder ACLs and Git folder ACLs.
-
Templates in this folder are now available for users when they create bundles in the workspace. See Create a bundle.
Next steps
- Browse additional templates that are created and maintained by Databricks. See the bundle samples repository in GitHub.
- To use MLOps Stacks with Declarative Automation Bundles templates, see Declarative Automation Bundles for MLOps Stacks.
- Learn more about Go package templating. See the Go package template documentation.