Databricks Connect reference

Note

This article covers Databricks Connect for Databricks Runtime 13.0 and above.

Python support is generally available in Databricks Connect for Databricks Runtime 13.0 and above. Scala support is in Public Preview and is available only in Databricks Connect for Databricks Runtime 13.3 LTS and above.

To learn how to quickly get started with Databricks Connect for Databricks Runtime 13.0 and above, see Databricks Connect.

For information about Databricks Connect for prior Databricks Runtime versions, see Databricks Connect for Databricks Runtime 12.2 LTS and below.

Databricks Connect allows you to connect popular IDEs such as Visual Studio Code, PyCharm, and IntelliJ IDEA, notebook servers, and other custom applications to Databricks clusters.

This article explains how Databricks Connect works, walks you through the steps to get started with Databricks Connect, and explains how to troubleshoot issues that may arise when using Databricks Connect.

Overview

Databricks Connect is a client library for the Databricks Runtime. It allows you to write code using Spark APIs and run them remotely on a Databricks cluster instead of in the local Spark session.

For example, when you run the DataFrame command spark.read.format(...).load(...).groupBy(...).agg(...).show() using Databricks Connect, the logical representation of the command is sent to the Spark server running in Databricks for execution on the remote cluster.

With Databricks Connect, you can:

  • Run large-scale Spark code from any Python or Scala application. Anywhere you can import pyspark for Python or import org.apache.spark for Scala, you can now run Spark code directly from your application, without needing to install any IDE plugins or use Spark submission scripts.

    Note

    Databricks Connect for Databricks Runtime 13.0 and above support running Python applications. Scala is supported only in Databricks Connect for Databricks Runtime 13.3 LTS and above.

  • Step through and debug code in your IDE even when working with a remote cluster.

  • Iterate quickly when developing libraries. You do not need to restart the cluster after changing Python or Scala library dependencies in Databricks Connect, because each client session is isolated from each other in the cluster.

  • Shut down idle clusters without losing work. Because the client application is decoupled from the cluster, it is unaffected by cluster restarts or upgrades, which would normally cause you to lose all the variables, RDDs, and DataFrame objects defined in a notebook.

For Databricks Runtime 13.0 and above, Databricks Connect is now built on open-source Spark Connect. Spark Connect introduces a decoupled client-server architecture for Apache Spark that allows remote connectivity to Spark clusters using the DataFrame API and unresolved logical plans as the protocol. With this “V2” architecture based on Spark Connect, Databricks Connect becomes a thin client that is simple and easy to use. Spark Connect can be embedded everywhere to connect to Databricks: in IDEs, notebooks, and applications, allowing individual users and partners alike to build new (interactive) user experiences based on the Databricks Lakehouse. For more information about Spark Connect, see Introducing Spark Connect.

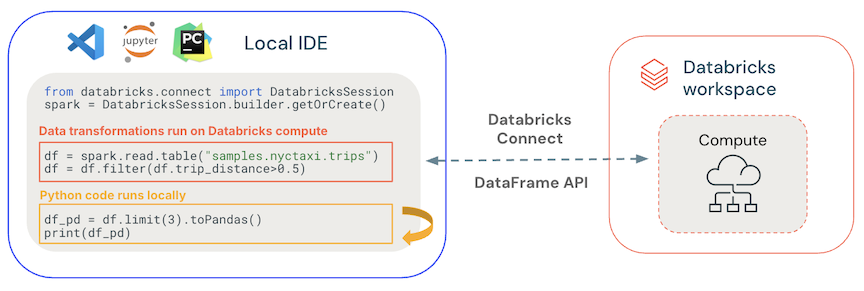
Databricks Connect determines where your code runs and debugs, as shown in the following figure.

Figure showing were Databricks Connect code runs and debugs
  • For running code: All Python code runs locally, while all PySpark code involving DataFrame operations runs on the cluster in the remote Databricks workspace and run responses are sent back to the local caller.

  • For debugging code: All Python code is debugged locally, while all PySpark code continues to run on the cluster in the remote Databricks workspace. The core Spark engine code cannot be debugged directly from the client.

Requirements

This section lists the requirements for Databricks Connect.

Python requirements

  • A Databricks workspace and its corresponding account that are enabled for Unity Catalog. See Get started using Unity Catalog and Enable a workspace for Unity Catalog.

  • A cluster with Databricks Runtime 13.0 or higher installed.

  • Only clusters that are compatible with Unity Catalog are supported. These include clusters with assigned or shared access modes. See Access modes.

  • You must install Python 3 on your development machine, and the minor version of your client Python installation must be the same as the minor Python version of your Databricks cluster. To find the minor Python version of your cluster, refer to the “System environment” section of the Databricks Runtime release notes for your cluster. See Databricks Runtime release notes versions and compatibility.

    Note

    If you want to use PySpark UDFs, it’s important that your development machine’s installed minor version of Python match the minor version of Python that is included with Databricks Runtime installed on the cluster.

  • Databricks strongly recommends that you have a Python virtual environment activated for each Python version that you use with Databricks Connect. Python virtual environments help to make sure that you are using the correct versions of Python and Databricks Connect together. This can help to reduce or shorten resolving related technical issues.

    For example, if you’re using venv on your development machine and your cluster is running Python 3.10, you must create a venv environment with that version. The following example command generates the scripts to activate a venv environment with Python 3.10, and this command then places those scripts within a hidden folder named .venv within the current working directory:

    # Linux and macOS
    python3.10 -m venv ./.venv
    
    # Windows
    python3.10 -m venv .\.venv
    

    To use these scripts to activate this venv environment, see How venvs work.

  • The Databricks Connect major and minor package version should match your Databricks Runtime version. Databricks recommends that you always use the most recent package of Databricks Connect that matches your Databricks Runtime version. For example, when you use a Databricks Runtime 13.3 LTS cluster, you should also use the databricks-connect==13.3.* package.

    Note

    See the Databricks Connect release notes for a list of available Databricks Connect releases and maintenance updates.

    Using the most recent package of Databricks Connect that matches your Databricks Runtime version is not a requirement. For Databricks Runtime 13.0 and above, you can use the Databricks Connect package against all versions of Databricks Runtime at or above the version of the Databricks Connect package. However, if you want to use features that are available in later versions of the Databricks Runtime, you must upgrade the Databricks Connect package accordingly.

Skip ahead to Set up the client.

Scala requirements

  • A Databricks workspace and its corresponding account that are enabled for Unity Catalog. See Get started using Unity Catalog and Enable a workspace for Unity Catalog.

  • A cluster with Databricks Runtime 13.3 LTS or above installed. The cluster must use a cluster access mode of Single User or Shared. See Access modes.

    Note

    Scala is not supported on Databricks Connect for Databricks Runtime 13.2 and below.

  • The Java Development Kit (JDK) installed on your development machine. Databricks recommends that the version of your JDK installation that you use matches the JDK version on your Databricks cluster. To find the JDK version on your cluster, refer to the “System environment” section of the Databricks Runtime release notes for your cluster. For instance, Zulu 8.70.0.23-CA-linux64 corresponds to JDK 8. See Databricks Runtime release notes versions and compatibility.

  • Scala installed on your development machine. Databricks recommends that the version of your Scala installation you use matches the Scala version on your Databricks cluster. To find the Scala version on your cluster, refer to the “System environment” section of the Databricks Runtime release notes for your cluster. See Databricks Runtime release notes versions and compatibility.

  • A Scala build tool on your development machine, such as sbt.

Set up the client

Complete the following steps to set up the local client for Databricks Connect.

Python client setup

Note

Before you begin to set up the local Databricks Connect client, you must meet the requirements for Databricks Connect.

Tip

If you already have the Databricks extension for Visual Studio Code installed, you do not need to follow these setup instructions.

The Databricks extension for Visual Studio Code already has built-in support for Databricks Connect for Databricks Runtime 13.0 and above. Skip ahead to Debug code by using Databricks Connect for the Databricks extension for Visual Studio Code.

Step 1: Install the Databricks Connect client

  1. With your virtual environment activated, uninstall PySpark, if it is already installed, by running the uninstall command. This is required because the databricks-connect package conflicts with PySpark. For details, see Conflicting PySpark installations. To check whether PySpark is already installed, run the show command.

    # Is PySpark already installed?
    pip3 show pyspark
    
    # Uninstall PySpark
    pip3 uninstall pyspark
    
  2. With your virtual environment still activated, install the Databricks Connect client by running the install command. Use the --upgrade option to upgrade any existing client installation to the specified version.

    pip3 install --upgrade "databricks-connect==13.3.*"  # Or X.Y.* to match your cluster version.
    

    Note

    Databricks recommends that you append the “dot-asterisk” notation to specify databricks-connect==X.Y.* instead of databricks-connect=X.Y, to make sure that the most recent package is installed. While this is not a requirement, it helps make sure that you can use the latest supported features for that cluster.

Step 2: Configure connection properties

In this section, you configure properties to establish a connection between Databricks Connect and your remote Databricks cluster. These properties include settings to authenticate Databricks Connect with your cluster.

For Databricks Connect for Databricks Runtime 13.1 and above, Databricks Connect includes the Databricks SDK for Python. This SDK implements the Databricks client unified authentication standard, a consolidated and consistent architectural and programmatic approach to authentication. This approach makes setting up and automating authentication with Databricks more centralized and predictable. It enables you to configure Databricks authentication once and then use that configuration across multiple Databricks tools and SDKs without further authentication configuration changes.

Note

Databricks Connect for Databricks Runtime 13.0 supports only Databricks personal access token authentication for authentication.

  1. Collect the following configuration properties.

  2. Configure the connection within your code. Databricks Connect searches for configuration properties in the following order until it finds them. Once it finds them, it stops searching through the remaining options:

    1. For Databricks personal access token authentication only, direct configuration of connection properties, specified through the DatabricksSession class

      For this option, which applies to Databricks personal access token authentication only, specify the workspace instance name, the Databricks personal access token, and the ID of the cluster.

      The following code examples demonstrate how to initialize the DatabricksSession class for Databricks personal access token authentication.

      Databricks does not recommend that you directly specify these connection properties in your code. Instead, Databricks recommends configuring properties through environment variables or configuration files, as described throughout this section. The following code examples assume that you provide some implementation of the proposed retrieve_* functions yourself to get the necessary properties from the user or from some other configuration store, such as AWS Systems Manager Parameter Store.

      # By setting fields in builder.remote:
      from databricks.connect import DatabricksSession
      
      spark = DatabricksSession.builder.remote(
        host       = f"https://{retrieve_workspace_instance_name()}",
        token      = retrieve_token(),
        cluster_id = retrieve_cluster_id()
      ).getOrCreate()
      
      # Or, by using the Databricks SDK's Config class:
      from databricks.connect import DatabricksSession
      from databricks.sdk.core import Config
      
      config = Config(
        host       = f"https://{retrieve_workspace_instance_name()}",
        token      = retrieve_token(),
        cluster_id = retrieve_cluster_id()
      )
      spark = DatabricksSession.builder.sdkConfig(config).getOrCreate()
      
      # Or, specify a Databricks configuration profile and
      # the cluster_id field separately:
      from databricks.connect import DatabricksSession
      from databricks.sdk.core import Config
      
      config = Config(
        profile    = "<profile-name>",
        cluster_id = retrieve_cluster_id()
      )
      
      spark = DatabricksSession.builder.sdkConfig(config).getOrCreate()
      
      # Or, by setting the Spark Connect connection string in builder.remote:
      from databricks.connect import DatabricksSession
      
      workspace_instance_name = retrieve_workspace_instance_name()
      token                   = retrieve_token()
      cluster_id              = retrieve_cluster_id()
      
      spark = DatabricksSession.builder.remote(
        f"sc://{workspace_instance_name}:443/;token={token};x-databricks-cluster-id={cluster_id}"
      ).getOrCreate()
      
    2. For all Databricks authentication types, a Databricks configuration profile name, specified using profile()

      For this option, create or identify a Databricks configuration profile containing the field cluster_id and any other fields that are necessary for the Databricks authentication type that you want to use.

      The required configuration profile fields for each authentication type are as follows:

      Then set the name of this configuration profile through the Config class.

      Note

      You can use the auth login command’s --configure-cluster option to automtically add the cluster_id field to a new or existing configuration profile. For more information, run the command databricks auth login -h.

      Instead of specifying cluster_id in your configuration profile, you can specify the cluster ID in your code, separately from the configuration profile. To do so, the second code example in the following code block assumes that you provide some implementation of the proposed retrieve_cluster_id function yourself to get the cluster ID from the user or from some other configuration store, such as AWS Systems Manager Parameter Store.

      For example:

      # Specify a Databricks configuration profile that contains the
      # cluster_id field:
      from databricks.connect import DatabricksSession
      
      spark = DatabricksSession.builder.profile("<profile-name>").getOrCreate()
      
      # Or, specify the cluster ID separate from the configuration profile:
      from databricks.connect import DatabricksSession
      from databricks.sdk.core import Config
      
      config = Config(
        profile    = "<profile-name>",
        cluster_id = retrieve_cluster_id()
      )
      
      spark = DatabricksSession.builder.sdkConfig(config).getOrCreate()
      
    3. For Databricks personal access token authentication only, the SPARK_REMOTE environment variable

      For this option, which applies to Databricks personal access token authentication only, set the SPARK_REMOTE environment variable to the following string, replacing the placeholders with the appropriate values.

      sc://<workspace-instance-name>:443/;token=<access-token-value>;x-databricks-cluster-id=<cluster-id>
      

      Then initialize the DatabricksSession class as follows:

      from databricks.connect import DatabricksSession
      
      spark = DatabricksSession.builder.getOrCreate()
      

      To set environment variables, see your operating system’s documentation.

    4. For all Databricks authentication types, the DATABRICKS_CONFIG_PROFILE environment variable

      For this option, create or identify a Databricks configuration profile containing the field cluster_id and any other fields that are necessary for the Databricks authentication type that you want to use.

      The required configuration profile fields for each authentication type are as follows:

      Note

      You can use the auth login command’s --configure-cluster to automtically add the cluster_id field to a new or existing configuration profile. For more information, run the command databricks auth login -h.

      Set the DATABRICKS_CONFIG_PROFILE environment variable to the name of this configuration profile. Then initialize the DatabricksSession class as follows:

      from databricks.connect import DatabricksSession
      
      spark = DatabricksSession.builder.getOrCreate()
      

      To set environment variables, see your operating system’s documentation.

    5. For all Databricks authentication types, an environment variable for each connection property

      For this option, set the DATABRICKS_CLUSTER_ID environment variable and any other environment variables that are necessary for the Databricks authentication type that you want to use.

      The required environment variables for each authentication type are as follows:

      Then initialize the DatabricksSession class as follows:

      from databricks.connect import DatabricksSession
      
      spark = DatabricksSession.builder.getOrCreate()
      

      To set environment variables, see your operating system’s documentation.

    6. For all Databricks authentication types, a Databricks configuration profile named DEFAULT

      For this option, create or identify a Databricks configuration profile containing the field cluster_id and any other fields that are necessary for the Databricks authentication type that you want to use.

      The required configuration profile fields for each authentication type are as follows:

      Name this configuration profile DEFAULT.

      Note

      You can use the auth login command’s --configure-cluster option to automtically add the cluster_id field to the DEFAULT configuration profile. For more information, run the command databricks auth login -h.

      Then initialize the DatabricksSession class as follows:

      from databricks.connect import DatabricksSession
      
      spark = DatabricksSession.builder.getOrCreate()
      
  3. If you choose to use Databricks personal access token authentication authentication, you can use the included pyspark utility to test connectivity to your Databricks cluster as follows.

    • With your virtual environment still activated, run the following command:

      If you set the SPARK_REMOTE environment variable earlier, run the following command:

      pyspark
      

      If you did not set the SPARK_REMOTE environment variable earlier, run the following command instead:

      pyspark --remote "sc://<workspace-instance-name>:443/;token=<access-token-value>;x-databricks-cluster-id=<cluster-id>"
      
    • The Spark shell appears, for example:

      Python 3.10 ...
      [Clang ...] on darwin
      Type "help", "copyright", "credits" or "license" for more information.
      Welcome to
            ____              __
           / __/__  ___ _____/ /__
          _\ \/ _ \/ _ `/ __/  '_/
         /__ / .__/\_,_/_/ /_/\_\   version 13.0
            /_/
      
      Using Python version 3.10 ...
      Client connected to the Spark Connect server at sc://...:.../;token=...;x-databricks-cluster-id=...
      SparkSession available as 'spark'.
      >>>
      
    • At the >>> prompt, run a simple PySpark command, such as spark.range(1,10).show(). If there are no errors, you have successfully connected.

    • If you have successfully connected, to stop the Spark shell, press Ctrl + d or Ctrl + z, or run the command quit() or exit().

Skip ahead to Use Databricks Connect.

Scala client setup

Note

Before you begin to set up the local Databricks Connect client, you must meet the requirements for Databricks Connect.

Step 1: Add a reference to the Databricks Connect client

  1. In your Scala project’s build file such as build.sbt for sbt, pom.xml for Maven, or build.gradle for Gradle, add the following reference to the Databricks Connect client:

    libraryDependencies += "com.databricks" % "databricks-connect" % "13.3.0"
    
    <dependency>
      <groupId>com.databricks</groupId>
      <artifactId>databricks-connect</artifactId>
      <version>13.3.0</version>
    </dependency>
    
    implementation 'com.databricks.databricks-connect:13.3.0'
    

    Replace 13.3.0 with the version of the Databricks Connect library that matches the Databricks Runtime version on your cluster. You can find the Databricks Connect library version numbers in the Maven central repository.

Step 2: Configure connection properties

In this section, you configure properties to establish a connection between Databricks Connect and your remote Databricks cluster. These properties include settings to authenticate Databricks Connect with your cluster.

For Databricks Connect for Databricks Runtime 13.3 LTS and above, for Scala, Databricks Connect includes the Databricks SDK for Java. This SDK implements the Databricks client unified authentication standard, a consolidated and consistent architectural and programmatic approach to authentication. This approach makes setting up and automating authentication with Databricks more centralized and predictable. It enables you to configure Databricks authentication once and then use that configuration across multiple Databricks tools and SDKs without further authentication configuration changes.

  1. Collect the following configuration properties.

  2. Configure the connection within your code. Databricks Connect searches for configuration properties in the following order until it finds them. Once it finds them, it stops searching through the remaining options:

    1. For Databricks personal access token authentication only, direct configuration of connection properties, specified through the DatabricksSession class

      For this option, which applies to Databricks personal access token authentication only, specify the workspace instance name, the Databricks personal access token, and the ID of the cluster.

      The following code examples demonstrate how to initialize the DatabricksSession class for Databricks personal access token authentication.

      Databricks does not recommend that you directly specify these connection properties in your code. Instead, Databricks recommends configuring properties through environment variables or configuration files, as described throughout this section. The following code examples assume that you provide some implementation of the proposed retrieve* functions yourself to get the necessary properties from the user or from some other configuration store, such as AWS Systems Manager Parameter Store.

      // By setting fields in builder():
      import com.databricks.connect.DatabricksSession
      
      val spark = DatabricksSession.builder()
        .host(retrieveWorkspaceInstanceName())
        .token(retrieveToken())
        .clusterId(retrieveClusterId())
        .getOrCreate()
      
      // Or, by using the Databricks SDK's Config class:
      import com.databricks.connect.DatabricksSession
      import com.databricks.sdk.core.DatabricksConfig
      
      val config = new DatabricksConfig()
        .setHost(retrieveWorkspaceInstanceName())
        .setToken(retrieveToken())
      val spark = DatabricksSession.builder()
        .sdkConfig(config)
        .clusterId(retrieveClusterId())
        .getOrCreate()
      
      // Or, specify a Databricks configuration profile and
      // the clusterId field separately:
      import com.databricks.connect.DatabricksSession
      import com.databricks.sdk.core.DatabricksConfig
      
      val config = new DatabricksConfig()
        .setProfile("<profile-name>")
      val spark = DatabricksSession.builder()
        .sdkConfig(config)
        .clusterId(retrieveClusterId())
        .getOrCreate()
      
    2. For all Databricks authentication types, a Databricks configuration profile name, specified using setProfile()

      For this option, create or identify a Databricks configuration profile containing the field cluster_id and any other fields that are necessary for the supported Databricks authentication type that you want to use.

      The required configuration profile fields for each authentication type are as follows:

      Then set the name of this configuration profile through the DatabricksConfig class.

      Note

      You can use the auth login command’s --configure-cluster option in Databricks CLI versions 0.200.1 and above to automtically add the cluster_id field to a new or existing configuration profile. For more information, run the command databricks auth login -h.

      Alternatively, you can specify cluster_id separately from the configuration profile. Instead of directly specifying the cluster ID in your code, the following code example assumes that you provide some implementation of the proposed retrieveClusterId function yourself to get the cluster ID from the user or from some other configuration store, such as AWS Systems Manager Parameter Store.

      For example:

      // Specify a Databricks configuration profile that contains the
      // cluster_id field:
      import com.databricks.connect.DatabricksSession
      import com.databricks.sdk.core.DatabricksConfig
      
      val config = new DatabricksConfig()
        .setProfile("<profile-name>")
      val spark = DatabricksSession.builder()
        .sdkConfig(config)
        .getOrCreate()
      
      // Or, specify the cluster ID separate from the configuration profile:
      import com.databricks.connect.DatabricksSession
      import com.databricks.sdk.core.DatabricksConfig
      
      val config = new DatabricksConfig()
        .setProfile("<profile-name>")
      val spark = DatabricksSession.builder()
        .sdkConfig(config)
        .clusterId(retrieveClusterId())
        .getOrCreate()
      
    3. For Databricks personal access token authentication only, the SPARK_REMOTE environment variable

      For this option, which applies to Databricks personal access token authentication only, set the SPARK_REMOTE environment variable to the following string, replacing the placeholders with the appropriate values.

      sc://<workspace-instance-name>:443/;token=<access-token-value>;x-databricks-cluster-id=<cluster-id>
      

      Then initialize the DatabricksSession class as follows:

      import com.databricks.connect.DatabricksSession
      
      val spark = DatabricksSession.builder().getOrCreate()
      

      To set environment variables, see your operating system’s documentation.

    4. For all Databricks authentication types, the DATABRICKS_CONFIG_PROFILE environment variable

      For this option, create or identify a Databricks configuration profile containing the field cluster_id and any other fields that are necessary for the supported Databricks authentication type that you want to use.

      The required configuration profile fields for each authentication type are as follows:

      Note

      You can use the auth login command’s --configure-cluster option in Databricks CLI versions 0.200.1 and above to automtically add the cluster_id field to a new or existing configuration profile. For more information, run the command databricks auth login -h.

      Set the DATABRICKS_CONFIG_PROFILE environment variable to the name of this configuration profile. Then initialize the DatabricksSession class as follows:

      import com.databricks.connect.DatabricksSession
      
      val spark = DatabricksSession.builder().getOrCreate()
      

      To set environment variables, see your operating system’s documentation.

    5. For all Databricks authentication types, an environment variable for each connection property

      For this option, set the DATABRICKS_CLUSTER_ID environment variable and any other environment variables that are necessary for the supported Databricks authentication type that you want to use.

      The required environment variables for each authentication type are as follows:

      Then initialize the DatabricksSession class as follows:

      import com.databricks.connect.DatabricksSession
      
      val spark = DatabricksSession.builder().getOrCreate()
      

      To set environment variables, see your operating system’s documentation.

    6. For all Databricks authentication types, a Databricks configuration profile named DEFAULT

      For this option, create or identify a Databricks configuration profile containing the field cluster_id and any other fields that are necessary for the supported Databricks authentication type that you want to use.

      The required configuration profile fields for each authentication type are as follows:

      Name this configuration profile DEFAULT.

      Note

      You can use the auth login command’s --configure-cluster option in Databricks CLI versions 0.200.1 and above to automtically add the cluster_id field to the DEFAULT configuration profile. For more information, run the command databricks auth login -h.

      Then initialize the DatabricksSession class as follows:

      scala
      import com.databricks.connect.DatabricksSession
      
      val spark = DatabricksSession.builder().getOrCreate()
      

Use Databricks Connect

These sections describes how to configure many popular IDEs and notebook servers to use the Databricks Connect client. Or, for Python, you can use the built-in Spark shell for Python.

JupyterLab with Python

Note

Before you begin to use Databricks Connect, you must meet the requirements and set up the client for Databricks Connect.

To use Databricks Connect with JupyterLab and Python, follow these instructions.

  1. To install JupyterLab, with your Python virtual environment activated, run the following command from your terminal or Command Prompt:

    pip3 install jupyterlab
    
  2. To start JupyterLab in your web browser, run the following command from your activated Python virtual environment:

    jupyter lab
    

    If JupyterLab does not appear in your web browser, copy the URL that starts with localhost or 127.0.0.1 from your virtual environment, and enter it in your web browser’s address bar.

  3. Create a new notebook: in JupyterLab, click File > New > Notebook on the main menu, select Python 3 (ipykernel) and click Select.

  4. In the notebook’s first cell, enter either the example code or your own code. If you use your own code, at minimum you must initialize DatabricksSession as shown in the example code.

  5. To run the notebook, click Run > Run All Cells. All Python code runs locally, while all PySpark code involving DataFrame operations runs on the cluster in the remote Databricks workspace and run responses are sent back to the local caller.

  6. To debug the notebook, click the bug (Enable Debugger) icon next to Python 3 (ipykernel) in the notebook’s toolbar. Set one or more breakpoints, and then click Run > Run All Cells. All Python code is debugged locally, while all PySpark code continues to run on the cluster in the remote Databricks workspace. The core Spark engine code cannot be debugged directly from the client.

  7. To shut down JupyterLab, click File > Shut Down. If the JupyterLab process is still running in your terminal or Command Prompt, stop this process by pressing Ctrl + c and then entering y to confirm.

For more specific debug instructions, see Debugger.

Classic Jupyter Notebook with Python

Note

Before you begin to use Databricks Connect, you must meet the requirements and set up the client for Databricks Connect.

To use Databricks Connect with classic Jupyter Notebook and Python, follow these instructions.

  1. To install classic Jupyter Notebook, with your Python virtual environment activated, run the following command from your terminal or Command Prompt:

    pip3 install notebook
    
  2. To start classic Jupyter Notebook in your web browser, run the following command from your activated Python virtual environment:

    jupyter notebook
    

    If classic Jupyter Notebook does not appear in your web browser, copy the URL that starts with localhost or 127.0.0.1 from your virtual environment, and enter it in your web browser’s address bar.

  3. Create a new notebook: in classic Jupyter Notebook, on the Files tab, click New > Python 3 (ipykernel).

  4. In the notebook’s first cell, enter either the example code or your own code. If you use your own code, at minimum you must initialize DatabricksSession as shown in the example code.

  5. To run the notebook, click Cell > Run All. All Python code runs locally, while all PySpark code involving DataFrame operations runs on the cluster in the remote Databricks workspace and run responses are sent back to the local caller.

  6. To debug the notebook, add the following line of code at the beginning of your notebook:

    from IPython.core.debugger import set_trace

    And then call set_trace() to enter debug statements at that point of notebook execution. All Python code is debugged locally, while all PySpark code continues to run on the cluster in the remote Databricks workspace. The core Spark engine code cannot be debugged directly from the client.

  7. To shut down classic Jupyter Notebook, click File > Close and Halt. If the classic Jupyter Notebook process is still running in your terminal or Command Prompt, stop this process by pressing Ctrl + c and then entering y to confirm.

Visual Studio Code with Python

Note

Before you begin to use Databricks Connect, you must meet the requirements and set up the client for Databricks Connect.

Tip

The Databricks extension for Visual Studio Code already has built-in support for Databricks Connect for Databricks Runtime 13.0 and above. See Debug code by using Databricks Connect for the Databricks extension for Visual Studio Code.

To use Databricks Connect with Visual Studio Code and Python, follow these instructions.

  1. Start Visual Studio Code.

  2. Open the folder that contains your Python virtual environment (File > Open Folder).

  3. In the Visual Studio Code Terminal (View > Terminal), activate the virtual environment.

  4. Set the current Python interpreter to be the one that is referenced from the virtual environment:

    1. On the Command Palette (View > Command Palette), type Python: Select Interpreter, and then press Enter.

    2. Select the path to the Python interpreter that is referenced from the virtual environment.

  5. Add to the folder a Python code (.py) file that contains either the example code or your own code. If you use your own code, at minimum you must initialize DatabricksSession as shown in the example code.

  6. To run the code, click Run > Run Without Debugging on the main menu. All Python code runs locally, while all PySpark code involving DataFrame operations runs on the cluster in the remote Databricks workspace and run responses are sent back to the local caller.

  7. To debug the code:

    1. With the Python code file open, set any breakpoints where you want your code to pause while running.

    2. Click the Run and Debug icon on the sidebar, or click View > Run on the main menu.

    3. In the Run and Debug view, click the Run and Debug button.

    4. Follow the on-screen instructions to start running and debugging the code.

    All Python code is debugged locally, while all PySpark code continues to run on the cluster in the remote Databricks workspace. The core Spark engine code cannot be debugged directly from the client.

For more specific run and debug instructions, see Configure and run the debugger and Python debugging in VS Code.

Visual Studio Code with Scala

Note

Before you begin to use Databricks Connect, you must meet the requirements and set up the client for Databricks Connect.

To use Databricks Connect and Visual Studio Code with the Scala (Metals) extension to create, run, and debug a sample Scala sbt project, follow these instructions. You can also adapt this sample to your existing Scala projects.

  1. Make sure that the Java Development Kit (JDK) and Scala are installed locally. Databricks recommends that your local JDK and Scala version match the version of the JDK and Scala on your Databricks cluster.

  2. Make sure that the latest version of sbt is installed locally.

  3. Install the Scala (Metals) extension for Visual Studio Code.

  4. In Visual Studio Code, create a Scala project: In the Command Palette (View > Command Palette), run the command >Metals: New Scala Project.

  5. In the Command Palette, choose the template named scala/hello-world.g8, and complete the on-screen instructions to finish creating the Scala project.

  6. Add project build settings: In the Explorer view (View > Explorer), open the build.sbt file from the project’s root, replace the file’s contents with the following, and save the file:

    scalaVersion := "2.12.15"
    
    libraryDependencies += "com.databricks" % "databricks-connect" % "13.3.0"
    

    Replace 2.12.15 with your installed version of Scala, which should match the version that is included with the Databricks Runtime version on your cluster.

    Replace 13.3.0 with the version of the Databricks Connect library that matches the Databricks Runtime version on your cluster. You can find the Databricks Connect library version numbers in the Maven central repository.

  7. Add Scala code: Open the src/main/scala/Main.scala file relative to the project’s root, replace the file’s contents with the following, and save the file:

    import com.databricks.connect.DatabricksSession
    import org.apache.spark.sql.SparkSession
    
    object Main extends App {
      val spark = DatabricksSession.builder().remote().getOrCreate()
      val df = spark.read.table("samples.nyctaxi.trips")
      df.limit(5).show()
    }
    
  8. Build the project: Run the command >Metals: Import build from the Command Palette.

  9. Add project run settings: In the Run & Debug view (View > Run), click the gear (Open ‘launch.json’) icon.

  10. Add the following run configuration to the launch.json file, and then save the file:

    {
      // Use IntelliSense to learn about possible attributes.
      // Hover to view descriptions of existing attributes.
      // For more information, visit: https://go.microsoft.com/fwlink/?linkid=830387
      "version": "0.2.0",
      "configurations": [
        {
          "type": "scala",
          "request": "launch",
          "name": "Scala: Run main class",
          "mainClass": "Main",
          "args": [],
          "jvmOptions": [],
          "env": {
            "DATABRICKS_HOST": "<workspace-instance-name>",
            "DATABRICKS_TOKEN": "<personal-access-token>",
            "DATABRICKS_CLUSTER_ID": "<cluster-id>"
          }
        }
      ]
    }
    

    Replace the following placeholders:

    • Replace <workspace-instance-name> with your workspace instance name, for example dbc-a1b2345c-d6e7.cloud.databricks.com.

    • Replace <personal-access-token> with the value of the Databricks personal access token for your Databricks workspace user. To create a personal access token for your workspace user, see Databricks personal access token authentication.

    • Replace <cluster-id> with the value of your cluster’s ID. To get a cluster’s ID, see Cluster URL and ID.

  11. Run the project: Click the play (Start Debugging) icon next to Scala: Run main class. In the Debug Console view (View > Debug Console), the first 5 rows of the samples.nyctaxi.trips table appear. All Scala code runs locally, while all Scala code involving DataFrame operations runs on the cluster in the remote Databricks workspace and run responses are sent back to the local caller.

  12. Debug the project: Set breakpoints in your code, and then click the play icon again. All Scala code is debugged locally, while all Scala code continues to run on the cluster in the remote Databricks workspace. The core Spark engine code cannot be debugged directly from the client.

PyCharm with Python

Note

Before you begin to use Databricks Connect, you must meet the requirements and set up the client for Databricks Connect.

IntelliJ IDEA Ultimate provides plugin support for PyCharm with Python also. For details, see Python plug-in for IntelliJ IDEA Ultimate.

To use Databricks Connect with PyCharm and Python, follow these instructions.

  1. Start PyCharm.

  2. Create a project: click File > New Project.

  3. For Location, click the folder icon, and then select the path to your Python virtual environment.

  4. Select Previously configured interpreter.

  5. For Interpreter, click the ellipses.

  6. Click System Interpreter.

  7. For Interpreter, click the ellipses, and select the full path to the Python interpreter that is referenced from the virtual environment. Then click OK.

  8. Click OK again.

  9. Click Create.

  10. Click Create from Existing Sources.

  11. Add to the project a Python code (.py) file that contains either the example code or your own code. If you use your own code, at minimum you must initialize DatabricksSession as shown in the example code.

  12. With the Python code file open, set any breakpoints where you want your code to pause while running.

  13. To run the code, click Run > Run. All Python code runs locally, while all PySpark code involving DataFrame operations runs on the cluster in the remote Databricks workspace and run responses are sent back to the local caller.

  14. To debug the code, click Run > Debug. All Python code is debugged locally, while all PySpark code continues to run on the cluster in the remote Databricks workspace. The core Spark engine code cannot be debugged directly from the client.

  15. Follow the on-screen instructions to start running or debugging the code.

For more specific run and debug instructions, see Run without any previous configuring and Debug.

IntelliJ IDEA with Scala

Note

Before you begin to use Databricks Connect, you must meet the requirements and set up the client for Databricks Connect.

To use Databricks Connect and IntelliJ IDEA with the Scala plugin to create, run, and debug a sample Scala sbt project, follow these instructions.

  1. Make sure that the Java Development Kit (JDK) is installed locally. Databricks recommends that your local JDK version match the version of the JDK on your Databricks cluster.

  2. Start IntelliJ IDEA.

  3. Click File > New > Project.

  4. Give your project some meaningful Name.

  5. For Location, click the folder icon, and complete the on-screen directions to specify the path to your new Scala project.

  6. For Language, click Scala.

  7. For Build system, click sbt.

  8. In the JDK drop-down list, select an existing installation of the JDK on your development machine that matches the JDK version on your cluster, or select Download JDK and follow the on-screen instructions to download a JDK that matches the JDK version on your cluster.

    Note

    Choosing a JDK install that is above or below the JDK version on your cluster might produce unexpected results, or your code might not run at all.

  9. In the sbt drop-down list, select the latest version.

  10. In the Scala drop-down list, select the version of Scala that matches the Scala version on your cluster.

    Note

    Choosing a Scala version that is below or above the Scala version on your cluster might produce unexpected results, or your code might not run at all.

  11. For Package prefix, enter some package prefix value for your project’s sources, for example org.example.application.

  12. Make sure the Add sample code box is checked.

  13. Click Create.

  14. Add the Databricks Connect package: with your new Scala project open, in your Project tool window (View > Tool Windows > Project), open the file named build.sbt, in project-name > target.

  15. Add the following code to the end of the build.sbt file, which declares your project’s dependency on a specific version of the Databricks Connect library for Scala:

    libraryDependencies += "com.databricks" % "databricks-connect" % "13.3.0"
    

    Replace 13.3.0 with the version of the Databricks Connect library that matches the Databricks Runtime version on your cluster. You can find the Databricks Connect library version numbers in the Maven central repository.

  16. Click the Load sbt changes notification icon to update your Scala project with the new library location and dependency.

  17. Wait until the sbt progress indicator at the bottom of the IDE disappears. The sbt load process might take a few minutes to complete.

  18. Add code: in your Project tool window, open the file named Main.scala, in project-name > src > main > scala.

  19. Replace any existing code in the file with the following code and then save the file:

    package org.example.application
    
    import com.databricks.connect.DatabricksSession
    import org.apache.spark.sql.SparkSession
    
    object Main {
      def main(args: Array[String]): Unit = {
        val spark = DatabricksSession.builder().remote().getOrCreate()
        val df = spark.read.table("samples.nyctaxi.trips")
        df.limit(5).show()
      }
    }
    
  20. Add environment variables: in the Project tool window, right-click the Main.scala file and click Modify Run Configuration.

  21. For Environment variables, enter the following string:

    DATABRICKS_HOST=<workspace-instance-name>;DATABRICKS_TOKEN=<personal-access-token>;DATABRICKS_CLUSTER_ID=<cluster-id>
    

    In the preceding string, replace the following placeholders:

    • Replace <workspace-instance-name> with your workspace instance name, for example dbc-a1b2345c-d6e7.cloud.databricks.com.

    • Replace <personal-access-token> with the value of the Databricks personal access token for your Databricks workspace user. To create a personal access token for your workspace user, see Databricks personal access token authentication.

    • Replace <cluster-id> with the value of your cluster’s ID. To get a cluster’s ID, see Cluster URL and ID.

  22. Click OK.

  23. Run the code: start the target cluster in your remote Databricks workspace.

  24. After the cluster has started, on the main menu, click Run > Run ‘Main’.

  25. In the Run tool window (View > Tool Windows > Run), in the Main tab, the first 5 rows of the samples.nyctaxi.trips table appear. All Scala code runs locally, while all Scala code involving DataFrame operations runs on the cluster in the remote Databricks workspace and run responses are sent back to the local caller.

  26. Debug the code: start the target cluster in your remote Databricks workspace, if it is not already running.

  27. In the preceding code, click the gutter next to df.limit(5).show() to set a breakpoint.

  28. After the cluster has started, on the main menu, click Run > Debug ‘Main’.

  29. In the Debug tool window (View > Tool Windows > Debug), in the Console tab, click the calculator (Evaluate Expression) icon.

  30. Enter the expression df.schema and click Evaluate to show the DataFrame’s schema.

  31. In the Debug tool window’s sidebar, click the green arrow (Resume Program) icon.

  32. In the Console pane, the first 5 rows of the samples.nyctaxi.trips table appear. All Scala code runs locally, while all Scala code involving DataFrame operations runs on the cluster in the remote Databricks workspace and run responses are sent back to the local caller.

Eclipse with PyDev

Note

Before you begin to use Databricks Connect, you must meet the requirements and set up the client for Databricks Connect.

To use Databricks Connect and Eclipse with PyDev, follow these instructions.

  1. Start Eclipse.

  2. Create a project: click File > New > Project > PyDev > PyDev Project, and then click Next.

  3. Specify a Project name.

  4. For Project contents, specify the path to your Python virtual environment.

  5. Click Please configure an interpreter before proceding.

  6. Click Manual config.

  7. Click New > Browse for python/pypy exe.

  8. Browse to and select select the full path to the Python interpreter that is referenced from the virtual environment, and then click Open.

  9. In the Select interpreter dialog, click OK.

  10. In the Selection needed dialog, click OK.

  11. In the Preferences dialog, click Apply and Close.

  12. In the PyDev Project dialog, click Finish.

  13. Click Open Perspective.

  14. Add to the project a Python code (.py) file that contains either the example code or your own code. If you use your own code, at minimum you must initialize DatabricksSession as shown in the example code.

  15. With the Python code file open, set any breakpoints where you want your code to pause while running.

  16. To run the code, click Run > Run. All Python code runs locally, while all PySpark code involving DataFrame operations runs on the cluster in the remote Databricks workspace and run responses are sent back to the local caller.

  17. To debug the code, click Run > Debug. All Python code is debugged locally, while all PySpark code continues to run on the cluster in the remote Databricks workspace. The core Spark engine code cannot be debugged directly from the client.

For more specific run and debug instructions, see Running a Program.

Spark shell with Python

Note

Before you begin to use Databricks Connect, you must meet the requirements and set up the client for Databricks Connect.

The Spark shell works with Databricks personal access token authentication authentication only.

To use Databricks Connect with the Spark shell and Python, follow these instructions.

  1. To start the Spark shell and to connect it to your running cluster, run one of the following commands from your activated Python virtual environment:

    If you set the SPARK_REMOTE environment variable earlier, run the following command:

    pyspark
    

    If you did not set the SPARK_REMOTE environment variable earlier, run the following command instead:

    pyspark --remote "sc://<workspace-instance-name>:443/;token=<access-token-value>;x-databricks-cluster-id=<cluster-id>"
    

    The Spark shell appears, for example:

    Python 3.10 ...
    [Clang ...] on darwin
    Type "help", "copyright", "credits" or "license" for more information.
    Welcome to
         ____              __
        / __/__  ___ _____/ /__
       _\ \/ _ \/ _ `/ __/  '_/
      /__ / .__/\_,_/_/ /_/\_\   version 13.x.dev0
         /_/
    
    Using Python version 3.10 ...
    Client connected to the Spark Connect server at sc://...:.../;token=...;x-databricks-cluster-id=...
    SparkSession available as 'spark'.
    >>>
    
  2. Refer to Interactive Analysis with the Spark Shell for information about how to use the Spark shell with Python to run commands on your cluster.

    Use the built-in spark variable to represent the SparkSession on your running cluster, for example:

    >>> df = spark.read.table("samples.nyctaxi.trips")
    >>> df.show(5)
    +--------------------+---------------------+-------------+-----------+----------+-----------+
    |tpep_pickup_datetime|tpep_dropoff_datetime|trip_distance|fare_amount|pickup_zip|dropoff_zip|
    +--------------------+---------------------+-------------+-----------+----------+-----------+
    | 2016-02-14 16:52:13|  2016-02-14 17:16:04|         4.94|       19.0|     10282|      10171|
    | 2016-02-04 18:44:19|  2016-02-04 18:46:00|         0.28|        3.5|     10110|      10110|
    | 2016-02-17 17:13:57|  2016-02-17 17:17:55|          0.7|        5.0|     10103|      10023|
    | 2016-02-18 10:36:07|  2016-02-18 10:41:45|          0.8|        6.0|     10022|      10017|
    | 2016-02-22 14:14:41|  2016-02-22 14:31:52|         4.51|       17.0|     10110|      10282|
    +--------------------+---------------------+-------------+-----------+----------+-----------+
    only showing top 5 rows
    

    All Python code runs locally, while all PySpark code involving DataFrame operations runs on the cluster in the remote Databricks workspace and run responses are sent back to the local caller.

  3. To stop the Spark shell, press Ctrl + d or Ctrl + z, or run the command quit() or exit().

Code examples

Databricks provides several example applications that show how to use Databricks Connect. See the databricks-demos/dbconnect-examples repository in GitHub.

You can also use the following simpler code examples to experiment with Databricks Connect. These examples assume that you are using default authentication for Databricks Connect client setup.

This simple code example queries the specified table and then shows the specified table’s first 5 rows. To use a different table, adjust the call to spark.read.table.

from databricks.connect import DatabricksSession

spark = DatabricksSession.builder.getOrCreate()

df = spark.read.table("samples.nyctaxi.trips")
df.show(5)
import com.databricks.connect.DatabricksSession
import org.apache.spark.sql.SparkSession

object Main {
  def main(args: Array[String]): Unit = {
    val spark = DatabricksSession.builder().getOrCreate()
    val df = spark.read.table("samples.nyctaxi.trips")
    df.limit(5).show()
  }
}

This longer code example does the following:

  1. Creates an in-memory DataFrame.

  2. Creates a table with the name zzz_demo_temps_table within the default schema. If the table with this name already exists, the table is deleted first. To use a different schema or table, adjust the calls to spark.sql, temps.write.saveAsTable, or both.

  3. Saves the DataFrame’s contents to the table.

  4. Runs a SELECT query on the table’s contents.

  5. Shows the query’s result.

  6. Deletes the table.

from databricks.connect import DatabricksSession
from pyspark.sql.types import *
from datetime import date

spark = DatabricksSession.builder.getOrCreate()

# Create a Spark DataFrame consisting of high and low temperatures
# by airport code and date.
schema = StructType([
  StructField('AirportCode', StringType(), False),
  StructField('Date', DateType(), False),
  StructField('TempHighF', IntegerType(), False),
  StructField('TempLowF', IntegerType(), False)
])

data = [
  [ 'BLI', date(2021, 4, 3), 52, 43],
  [ 'BLI', date(2021, 4, 2), 50, 38],
  [ 'BLI', date(2021, 4, 1), 52, 41],
  [ 'PDX', date(2021, 4, 3), 64, 45],
  [ 'PDX', date(2021, 4, 2), 61, 41],
  [ 'PDX', date(2021, 4, 1), 66, 39],
  [ 'SEA', date(2021, 4, 3), 57, 43],
  [ 'SEA', date(2021, 4, 2), 54, 39],
  [ 'SEA', date(2021, 4, 1), 56, 41]
]

temps = spark.createDataFrame(data, schema)

# Create a table on the Databricks cluster and then fill
# the table with the DataFrame's contents.
# If the table already exists from a previous run,
# delete it first.
spark.sql('USE default')
spark.sql('DROP TABLE IF EXISTS zzz_demo_temps_table')
temps.write.saveAsTable('zzz_demo_temps_table')

# Query the table on the Databricks cluster, returning rows
# where the airport code is not BLI and the date is later
# than 2021-04-01. Group the results and order by high
# temperature in descending order.
df_temps = spark.sql("SELECT * FROM zzz_demo_temps_table " \
  "WHERE AirportCode != 'BLI' AND Date > '2021-04-01' " \
  "GROUP BY AirportCode, Date, TempHighF, TempLowF " \
  "ORDER BY TempHighF DESC")
df_temps.show()

# Results:
#
# +-----------+----------+---------+--------+
# |AirportCode|      Date|TempHighF|TempLowF|
# +-----------+----------+---------+--------+
# |        PDX|2021-04-03|       64|      45|
# |        PDX|2021-04-02|       61|      41|
# |        SEA|2021-04-03|       57|      43|
# |        SEA|2021-04-02|       54|      39|
# +-----------+----------+---------+--------+

# Clean up by deleting the table from the Databricks cluster.
spark.sql('DROP TABLE zzz_demo_temps_table')
import com.databricks.connect.DatabricksSession
import org.apache.spark.sql.SparkSession
import org.apache.spark.sql.types._
import java.time.LocalDate

object Main {
  def main(args: Array[String]): Unit = {
    val spark = DatabricksSession.builder().getOrCreate()

    // Create a Spark DataFrame consisting of high and low temperatures
    // by airport code and date.
    val schema = StructType(
      Seq(
        StructField("AirportCode", StringType, false),
        StructField("Date", DateType, false),
        StructField("TempHighF", IntegerType, false),
        StructField("TempLowF", IntegerType, false)
      )
    )

    val data = Seq(
      ( "BLI", LocalDate.of(2021, 4, 3), 52, 43 ),
      ( "BLI", LocalDate.of(2021, 4, 2), 50, 38),
      ( "BLI", LocalDate.of(2021, 4, 1), 52, 41),
      ( "PDX", LocalDate.of(2021, 4, 3), 64, 45),
      ( "PDX", LocalDate.of(2021, 4, 2), 61, 41),
      ( "PDX", LocalDate.of(2021, 4, 1), 66, 39),
      ( "SEA", LocalDate.of(2021, 4, 3), 57, 43),
      ( "SEA", LocalDate.of(2021, 4, 2), 54, 39),
      ( "SEA", LocalDate.of(2021, 4, 1), 56, 41)
    )

    val temps = spark.createDataFrame(data).toDF(schema.fieldNames: _*)

    // Create a table on the Databricks cluster and then fill
    // the table with the DataFrame 's contents.
    // If the table already exists from a previous run,
    // delete it first.
    spark.sql("USE default")
    spark.sql("DROP TABLE IF EXISTS zzz_demo_temps_table")
    temps.write.saveAsTable("zzz_demo_temps_table")

    // Query the table on the Databricks cluster, returning rows
    // where the airport code is not BLI and the date is later
    // than 2021-04-01.Group the results and order by high
    // temperature in descending order.
    val df_temps = spark.sql("SELECT * FROM zzz_demo_temps_table " +
      "WHERE AirportCode != 'BLI' AND Date > '2021-04-01' " +
      "GROUP BY AirportCode, Date, TempHighF, TempLowF " +
      "ORDER BY TempHighF DESC")
    df_temps.show()

    // Results:
    // +------------+-----------+---------+--------+
    // | AirportCode|       Date|TempHighF|TempLowF|
    // +------------+-----------+---------+--------+
    // |        PDX | 2021-04-03|      64 |     45 |
    // |        PDX | 2021-04-02|      61 |     41 |
    // |        SEA | 2021-04-03|      57 |     43 |
    // |        SEA | 2021-04-02|      54 |     39 |
    // +------------+-----------+---------+--------+

    // Clean up by deleting the table from the Databricks cluster.
    spark.sql("DROP TABLE zzz_demo_temps_table")
  }
}

Migrate to the latest Databricks Connect

Follow these guidelines to migrate your existing Python code project or coding environment from Databricks Connect for Databricks Runtime 12.2 LTS and below to Databricks Connect for Databricks Runtime 13.0 and above.

Python migration to the latest Databricks Connect

  1. Install the correct version of Python as listed in the requirements to match your Databricks cluster, if it is not already installed locally.

  2. Upgrade your Python virtual environment to use the correct version of Python to match your cluster, if needed. For instructions, see your virtual environment provider’s documentation.

  3. With your virtual environment activated, uninstall PySpark from your virtual environment:

    pip3 uninstall pyspark
    
  4. With your virtual environment still activated, uninstall Databricks Connect for Databricks Runtime 12.2 LTS and below:

    pip3 uninstall databricks-connect
    
  5. With your virtual environment still activated, install Databricks Connect for Databricks Runtime 13.0 and above:

    pip3 install --upgrade "databricks-connect==13.1.*"  # Or X.Y.* to match your cluster version.
    

    Note

    Databricks recommends that you append the “dot-asterisk” notation to specify databricks-connect==X.Y.* instead of databricks-connect=X.Y, to make sure that the most recent package is installed. While this is not a requirement, it helps make sure that you can use the latest supported features for that cluster.

  6. Update your Python code to initialize the spark variable (which represents an instantiation of the DatabricksSession class, similar to SparkSession in PySpark). For code examples, see Step 2: Configure connection properties.

Scala migration to the latest Databricks Connect

  1. Install the correct version of the Java Development Kit (JDK) and Scala as listed in the requirements to match your Databricks cluster, if it is not already installed locally.

  2. In your Scala project’s build file such as build.sbt for sbt, pom.xml for Maven, or build.gradle for Gradle, update the following reference to the Databricks Connect client:

    libraryDependencies += "com.databricks" % "databricks-connect" % "13.3.0"
    
    <dependency>
      <groupId>com.databricks</groupId>
      <artifactId>databricks-connect</artifactId>
      <version>13.3.0</version>
    </dependency>
    
    implementation 'com.databricks.databricks-connect:13.3.0'
    

    Replace 13.3.0 with the version of the Databricks Connect library that matches the Databricks Runtime version on your cluster. You can find the Databricks Connect library version numbers in the Maven central repository.

  3. Update your Scala code to initialize the spark variable (which represents an instantiation of the DatabricksSession class, similar to SparkSession in Spark). For code examples, see Code examples.

Access Databricks Utilities

The following sections describes how to use Databricks Connect to access Databricks Utilities.

Access Databricks Utilities for Python

This section describes how to use Databricks Connect for Python to access Databricks Utilities.

  • Use the WorkspaceClient class’s dbfs variable to access the Databricks File System (DBFS) utility through Databricks Utilities. This approach is similar to calling Databricks Utilities through the dbfs variable from a notebook within a workspace. The WorkspaceClient class belongs to the Databricks SDK for Python, which is included in Databricks Connect.

  • Use WorkspaceClient.secrets to access the Databricks Utilities secrets utility.

  • Use WorkspaceClient.jobs to aceess the jobs utility.

  • Use WorkspaceClient.libraries to access library utility through.

  • No Databricks Utilities functionality other than the preceding utilities are available for Python projects.

Tip

You can also use the included Databricks SDK for Python to access any available Databricks REST API, not just the preceding Databricks Utilities APIs. See databricks-sdk on PyPI.

To initialize WorkspaceClient, you must provide enough information to authenticate an Databricks SDK with the workspace. For example, you can:

  • Hard-code the workspace URL and your access token directly within your code, and then intialize WorkspaceClient as follows. Although this option is supported, Databricks does not recommend this option, as it can expose sensitive information, such as access tokens, if your code is checked into version control or otherwise shared:

    from databricks.sdk import WorkspaceClient
    
    w = WorkspaceClient(host  = "https://<workspace-instance-name>",
                        token = "<access-token-value>")
    
  • Create or specify a configuration profile that contains the fields host and token, and then intialize the WorkspaceClient as follows:

    from databricks.sdk import WorkspaceClient
    
    w = WorkspaceClient(profile = "<profile-name>")
    
  • Set the environment variables DATABRICKS_HOST and DATABRICKS_TOKEN in the same way you set them for Databricks Connect, and then initialize WorkspaceClient as follows:

    from databricks.sdk import WorkspaceClient
    
    w = WorkspaceClient()
    

The Databricks SDK for Python does not recognize the SPARK_REMOTE environment variable for Databricks Connect.

For additional Databricks authentication options for the Databricks SDK for Python, as well as how to initialize AccountClient within the Databricks SDKs to access available Databricks REST APIs at the account level instead of at the workspace level, see databricks-sdk on PyPI.

The following example shows how to use the Databricks SDK for Python to automate DBFS. This example creates a file named zzz_hello.txt in the DBFS root within the workspace, writes data into the file, closes the file, reads the data from the file, and then deletes the file. This example assumes that the environment variables DATABRICKS_HOST and DATABRICKS_TOKEN have already been set:

from databricks.sdk import WorkspaceClient
import base64

w = WorkspaceClient()

file_path  = "/zzz_hello.txt"
file_data  = "Hello, Databricks!"

# The data must be base64-encoded before being written.
file_data_base64 = base64.b64encode(file_data.encode())

# Create the file.
file_handle = w.dbfs.create(
  path      = file_path,
  overwrite = True
).handle

# Add the base64-encoded version of the data.
w.dbfs.add_block(
  handle = file_handle,
  data   = file_data_base64.decode()
)

# Close the file after writing.
w.dbfs.close(handle = file_handle)

# Read the file's contents and then decode and print it.
response = w.dbfs.read(path = file_path)
print(base64.b64decode(response.data).decode())

# Delete the file.
w.dbfs.delete(path = file_path)

Access Databricks Utilities for Scala

This section describes how to use Databricks Connect for Scala to access Databricks Utilities.

  • Use DBUtils.getDBUtils to access the Databricks File System (DBFS) and secrets through Databricks Utilities. DBUtils.getDBUtils belongs to the Databricks Utilities for Scala library. The Databricks Utilities for Scala library must be included in your Scala projects, separate from the Databricks Connect library for Scala. The Databricks Utilities for Scala library works only with Databricks Connect for Databricks Runtime 13.3 LTS and above.

  • No Databricks Utilities functionality other than the preceding utilities are available for Scala projects.

  • Authentication for the Databricks Utilities for Scala library is determined through initiatlizing the DatabricksSession class in your Databricks Connect project for Scala.

  • In your Scala project’s build file such as build.sbt for sbt, pom.xml for Maven, or build.gradle for Gradle, add the following reference to the Databricks Utilities for Scala library:

libraryDependencies += "com.databricks" % "dbutils-scala" % "0.0.1"
<dependency>
  <groupId>com.databricks</groupId>
  <artifactId>dbutils-scala</artifactId>
  <version>0.0.1</version>
</dependency>
implementation 'com.databricks.dbutils-scala:0.0.1'

Replace 0.0.1 with the version of the Databricks Utilities for Scala library that corresponds to the Databricks Runtime version on your cluster. You can find the list of Databricks Utilities for Scala library version numbers and their corresponding Databricks Runtime versions in the Maven central repository.

Tip

You can also use the Databricks SDK for Java from Scala to access any available Databricks REST API, not just the preceding Databricks Utilities APIs. See the databricks/databricks-sdk-java repository in GitHub and also Use Scala with the Databricks SDK for Java.

Disabling Databricks Connect

Databricks Connect (and the underlying Spark Connect) services can be disabled on any given cluster. To disable the Databricks Connect service, set the following Spark configuration on the cluster.

spark.databricks.service.server.enabled false

Once disabled, any Databricks Connect queries reaching the cluster are rejected with an appropriate error message.

Asynchronous queries and interruptions

For Databricks Connect for Databricks Runtime 14.0 and above, query execution is more resilient to network and other interrupts when executing long running queries. When the client program receives an interruption or the process is paused (up to 5 minutes) by the operating system, such as when the laptop lid is shut, the client reconnects to the running query. This also allows queries to run for longer times (previously only 1 hour).

Databricks Connect now also comes with the ability to interrupt running queries, if desired, such as for cost saving.

The following Python program interrupts a long running query by using the interruptTag() API.

from databricks.connect import DatabricksSession
from time import sleep
import threading

session = DatabricksSession.builder.getOrCreate()

def thread_fn():
  sleep(5)
  session.interruptTag("interrupt-me")

# All subsequent DataFrame queries that use session will have this tag.
session.addTag("interrupt-me")

t = threading.Thread(target=thread_fn).start()

df = <a long running DataFrame query>
df.show()

t.join()

The interruptAll() API can also be used to interrupt all running queries in a given session.

Set Hadoop configurations

On the client you can set Hadoop configurations using the spark.conf.set API, which applies to SQL and DataFrame operations. Hadoop configurations set on the sparkContext must be set in the cluster configuration or using a notebook. This is because configurations set on sparkContext are not tied to user sessions but apply to the entire cluster.

Troubleshooting

This section describes some common issues that you might encounter with Databricks Connect and how to resolve them.

Error: StatusCode.UNAVAILABLE, StatusCode.UNKNOWN, DNS resolution failed, or Received http2 header with status 500

Issue: When you try to run code with Databricks Connect, you get an error messages that contains strings such as StatusCode.UNAVAILABLE, StatusCode.UNKNOWN, DNS resolution failed, or Received http2 header with status: 500.

Possible cause: Databricks Connect cannot reach your cluster.

Recommended solutions:

  • Check to make sure that your workspace instance name is correct. If you use environment variables, check to make sure the related environment variable is available and correct on your local development machine.

  • Check to make sure that your cluster ID is correct. If you use environment variables, check to make sure the related environment variable is available and correct on your local development machine.

  • Check to make sure that your cluster has the correct custom cluster version that is compatible with Databricks Connect.

Python version mismatch

Check the Python version you are using locally has at least the same minor release as the version on the cluster (for example, 3.10.11 versus 3.10.10 is OK, 3.10 versus 3.9 is not).

If you have multiple Python versions installed locally, ensure that Databricks Connect is using the right one by setting the PYSPARK_PYTHON environment variable (for example, PYSPARK_PYTHON=python3).

Conflicting PySpark installations

The databricks-connect package conflicts with PySpark. Having both installed will cause errors when initializing the Spark context in Python. This can manifest in several ways, including “stream corrupted” or “class not found” errors. If you have PySpark installed in your Python environment, ensure it is uninstalled before installing databricks-connect. After uninstalling PySpark, make sure to fully re-install the Databricks Connect package:

pip3 uninstall pyspark
pip3 uninstall databricks-connect
pip3 install --upgrade "databricks-connect==13.1.*"  # or X.Y.* to match your specific cluster version.

Conflicting or Missing PATH entry for binaries

It is possible your PATH is configured so that commands like spark-shell will be running some other previously installed binary instead of the one provided with Databricks Connect. You should make sure either the Databricks Connect binaries take precedence, or remove the previously installed ones.

If you can’t run commands like spark-shell, it is also possible your PATH was not automatically set up by pip3 install and you’ll need to add the installation bin dir to your PATH manually. It’s possible to use Databricks Connect with IDEs even if this isn’t set up.

The filename, directory name, or volume label syntax is incorrect on Windows

If you are using Databricks Connect on Windows and see:

The filename, directory name, or volume label syntax is incorrect.

Databricks Connect was installed into a directory with a space in your path. You can work around this by either installing into a directory path without spaces, or configuring your path using the short name form.

Limitations

Databricks Connect does not support the following Databricks features and third-party platforms.

Python limitations

The following features are not supported for Databricks Connect for Databricks Runtime 13.0 and above and above unless otherwise specified.

  • DataSet objects

  • Pandas UDF: 13.0 only

  • Structured Streaming (except for forEachBatch): 13.0 only

  • Databricks Utilities: 13.0 only

  • Databricks authentication types except for Databricks personal access tokens: 13.0 only

  • SparkContext

  • RDDs

  • MLflow model inference with mlflow.pyfunc.spark_udf(spark...) (you can load the model locally with mlflow.pyfunc.load_model(<model>), or you can wrap it as a custom Pandas UDF)

  • Mosaic geospatials

  • CREATE TABLE <table-name> AS SELECT (instead, use spark.sql("SELECT ...").write.saveAsTable("table"))

  • applyInPandas() and cogroup() running on single user clusters: 13.0 only

  • applyInPandas() and cogroup() running on shared clusters

Scala limitations

The following features are not supported for Databricks Connect for Databricks Runtime 13.3 LTS and above unless otherwise specified. Scala is not supported for Databricks Connect for Databricks Runtime 13.2 and below.

  • UDFs

  • SparkContext

  • RDDs

  • CREATE TABLE <table-name> AS SELECT (instead, use spark.sql("SELECT ...").write.saveAsTable("table"))

Additionally:

  • The Scala typed APIs reduce(), groupByKey(), filter(), map(), mapPartitions(), flatMap(), and foreach() require the user to install the JAR containing the function as a library to the cluster.