Databricks Connect for Python tutorial
This article demonstrates how to quickly get started with Databricks Connect by using Python and PyCharm. For the Scala version of this tutorial, see the Databricks Connect for Scala tutorial.
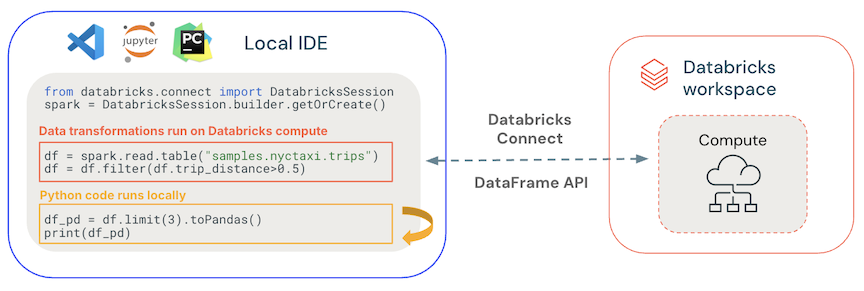
Databricks Connect enables you to connect popular IDEs such as PyCharm, notebook servers, and other custom applications to Databricks clusters.
Note
This article covers Databricks Connect for Databricks Runtime 13.0 and above.
For information beyond this tutorial about Databricks Connect for Databricks Runtime 13.0 and above, see the Databricks Connect reference.
For information about Databricks Connect for prior Databricks Runtime versions, see Databricks Connect for Databricks Runtime 12.2 LTS and below.
Requirements
You have PyCharm installed.
You have a Databricks workspace and its corresponding account that are enabled for Unity Catalog. See Get started using Unity Catalog and Enable a workspace for Unity Catalog.
You have a Databricks cluster in the workspace. The cluster has Databricks Runtime 13.0 or higher installed. The cluster also has a cluster access mode of assigned or shared. See Access modes.
You have Python 3 installed on your development machine, and the minor version of your client Python installation is the same as the minor Python version of your Databricks cluster. The following table shows the Python version installed with each Databricks Runtime.
Databricks Runtime version
Python version
13.0 ML - 13.3 ML LTS, 13.0 - 13.3 LTS
3.10
To complete this tutorial, follow these steps:
Step 1: Create a personal access token
This tutorial uses Databricks personal access token authentication and a Databricks configuration profile for authenticating with your Databricks workspace. If you already have a Databricks personal access token and a matching Databricks configuration profile, skip ahead to Step 3.
To create a personal access token:
In your Databricks workspace, click your Databricks username in the top bar, and then select User Settings from the drop down.
Click Developer.
Next to Access tokens, click Manage.
Click Generate new token.
(Optional) Enter a comment that helps you to identify this token in the future, and change the token’s default lifetime of 90 days. To create a token with no lifetime (not recommended), leave the Lifetime (days) box empty (blank).
Click Generate.
Copy the displayed token to a secure location, and then click Done.
Be sure to save the copied token in a secure location. Do not share your copied token with others. If you lose the copied token, you cannot regenerate that exact same token. Instead, you must repeat this procedure to create a new token. If you lose the copied token, or you believe that the token has been compromised, Databricks strongly recommends that you immediately delete that token from your workspace by clicking the X next to the token on the Access tokens page.
Note
If you are not able to create or use tokens in your workspace, this might be because your workspace administrator has disabled tokens or has not given you permission to create or use tokens. See your workspace administrator or the following:
Step 2: Create an authentication configuration profile
Create a Databricks authentication configuration profile to store necessary information about your personal access token on your local machine. Databricks developer tools and SDKs can use this configuration profile to quickly authenticate with your Databricks workspace.
To create a profile:
Create a file named
.databrickscfg
in the root of your user’s home directory on your machine, if this file does not already exist. For Linux and macOS, the path is~/.databrickscfg
. For Windows, the path is%USERPROFILE%\.databrickscfg
.Use a text editor to add the following configuration profile to this file and then save the file:
[<some-unique-profile-name>] host = <my-workspace-url> token = <my-personal-access-token-value> cluster_id = <my-cluster-id>
Replace the following placeholders:
Replace
<some-unique-profile-name>
with some unique name for this profile. This name must be unique within the.databrickscfg
file.Replace
<my-workspace-url>
with your Databricks workspace URL, starting withhttps://
. See Workspace instance names, URLs, and IDs.Replace
<my-personal-access-token-value>
with your Databricks personal access token value. See Databricks personal access token authentication.Replace
<my-cluster-id>
with the ID of your Databricks cluster. See Cluster URL and ID.
For example:
[DEFAULT] host = https://my-workspace-url.com token = dapi... cluster_id = abc123...
Note
The preceding fields
host
andtoken
are for Databricks personal access token authentication, which is the most common type of Databricks authentication. Some Databricks developer tools and SDKs also use thecluster_id
field in some scenarios. For other supported Databricks authentication types and scenarios, see your tool’s or SDK’s documentation or Databricks client unified authentication.
Step 3: Create the project
Start PyCharm.
Click File > New Project.
For Location, click the folder icon, and complete the on-screen directions to specify the path to your new Python project.
Expand Python interpreter: New environment.
Click the New environment using option.
In the drop-down list, select Virtualenv.
Leave Location with the suggested path to the
venv
folder.For Base interpreter, use the drop-down list or click the ellipses to specify the path to the Python interpreter from the preceding requirements.
Click Create.
Step 4: Add the Databricks Connect package
On PyCharm’s main menu, click View > Tool Windows > Python Packages.
In the search box, enter
databricks-connect
.In the PyPI repository list, click databricks-connect.
In the result pane’s latest drop-down list, select the version that matches your cluster’s Databricks Runtime version. For example, if your cluster has Databricks Runtime 13.2 installed, select 13.2.0.
Click Install.
After the package installs, you can close the Python Packages window.
Step 5: Add code
In the Project tool window, right-click the project’s root folder, and click New > Python File.
Enter
main.py
and click Python file.Enter the following code into the file and then save the file:
from databricks.connect import DatabricksSession spark = DatabricksSession.builder.getOrCreate() df = spark.read.table("samples.nyctaxi.trips") df.show(5)
Step 6: Run the code
Start the target cluster in your remote Databricks workspace.
After the cluster has started, on the main menu, click Run > Run. If prompted, select main > Run.
In the Run tool window (View > Tool Windows > Run), in the Run tab’s main pane, the first 5 rows of the
samples.nyctaxi.trips
appear.
Step 7: Debug the code
With the cluster still running, in the preceding code, click the gutter next to
df.show(5)
to set a breakpoint.On the main menu, click Run > Debug. If prompted, select main > Debug.
In the Debug tool window (View > Tool Windows > Debug), in the Debugger tab’s Variables pane, expand the df and spark variable nodes to browse information about the code’s
df
andspark
variables.In the Debug tool window’s sidebar, click the green arrow (Resume Program) icon.
In the Debugger tab’s Console pane, the first 5 rows of the
samples.nyctaxi.trips
appear.
Next steps
To learn more about Databricks Connect and experiment with a more complex code example, see the Databricks Connect reference. This reference article includes guidance for the following topics:
Supported Databricks authentication types in addition to Databricks personal access token authentication.
How to use SparkShell, and use IDEs in addition to PyCharm such as JupyterLab, classic Jupyter Notebook, Visual Studio Code, and Eclipse with PyDev.
Migrate from Databricks Connect for Databricks Runtime 12.2 LTS and below to Databricks Connect for Databricks Runtime 13.0 and above.
How to use Databricks Connect to access Databricks Utilities.
Provides troubleshooters.
Lists the limitations of Databricks Connect.