Tutorial: Run Python on a cluster and as a job using the Databricks extension for Visual Studio Code
This tutorial walks you through setting up the Databricks extension for Visual Studio Code, and then running Python on a Databricks cluster and as a Databricks job in your remote workspace. See Databricks extension for Visual Studio Code.
Requirements
This tutorial requires that:
- You have installed the Databricks extension for Visual Studio Code. See Install the Databricks extension for Visual Studio Code.
- You have a remote Databricks cluster to use. Make a note of the cluster's name. To view your available clusters, in your Databricks workspace sidebar, click Compute. See Compute.
Step 1: Create a new Databricks project
In this step, you create a new Databricks project and configure the connection with your remote Databricks workspace.
- Launch Visual Studio Code, then click File > Open Folder and open some empty folder on your local development machine.
- On the sidebar, click the Databricks logo icon. This opens the Databricks extension.
- In the Configuration view, click Create configuration.
- The Command Palette to configure your Databricks workspace opens. For Databricks Host, enter or select your workspace instance URL, for example
https://dbc-a1b2345c-d6e7.cloud.databricks.com. - Select an authentication profile for the project. See Set up authorization for the Databricks extension for Visual Studio Code.
Step 2: Add cluster information to the Databricks extension and start the cluster
-
With the Configuration view already open, click Select a cluster or click the gear (Configure cluster) icon.

-
In the Command Palette, select the name of the cluster that you created previously.
-
Click the play icon (Start Cluster) if it is not already started.
Step 3: Create and run Python code
-
Create a local Python code file: on the sidebar, click the folder (Explorer) icon.
-
On the main menu, click File > New File and choose a Python file. Name the file demo.py and save it to the project's root.
-
Add the following code to the file and then save it. This code creates and displays the contents of a basic PySpark DataFrame:
Pythonfrom pyspark.sql import SparkSession
from pyspark.sql.types import *
spark = SparkSession.builder.getOrCreate()
schema = StructType([
StructField('CustomerID', IntegerType(), False),
StructField('FirstName', StringType(), False),
StructField('LastName', StringType(), False)
])
data = [
[ 1000, 'Mathijs', 'Oosterhout-Rijntjes' ],
[ 1001, 'Joost', 'van Brunswijk' ],
[ 1002, 'Stan', 'Bokenkamp' ]
]
customers = spark.createDataFrame(data, schema)
customers.show()Output# +----------+---------+-------------------+
# |CustomerID|FirstName| LastName|
# +----------+---------+-------------------+
# | 1000| Mathijs|Oosterhout-Rijntjes|
# | 1001| Joost| van Brunswijk|
# | 1002| Stan| Bokenkamp|
# +----------+---------+-------------------+ -
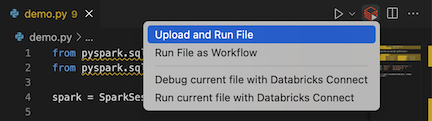
Click the Run on Databricks icon next to the list of editor tabs, and then click Upload and Run File. The output appears in the Debug Console view.
Alternatively, in the Explorer view, right-click the
demo.pyfile, and then click Run on Databricks > Upload and Run File.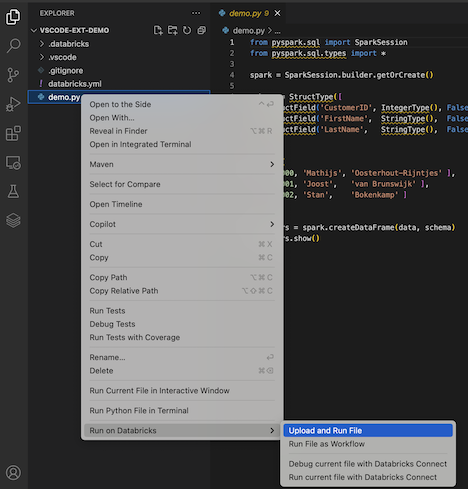
Step 4: Run the code as a job
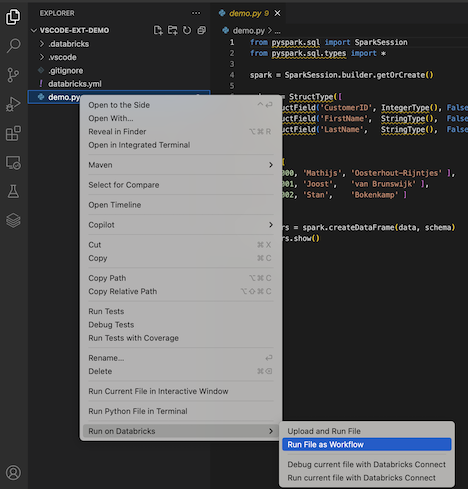
To run demo.py as a job, click the Run on Databricks icon next to the list of editor tabs, and then click Run File as Workflow. The output appears in a separate editor tab next to the demo.py file editor.
![]()
Alternatively, right-click the demo.py file in the Explorer panel, then select Run on Databricks > Run File as Workflow.
Next steps
Now that you have successfully used the Databricks extension for Visual Studio Code to upload a local Python file and run it remotely, you can also:
- Explore Declarative Automation Bundles resources and variables using the extension UI. See Declarative Automation Bundles extension features.
- Run or debug Python code with Databricks Connect. See Debug code using Databricks Connect for the Databricks extension for Visual Studio Code.
- Run a file or a notebook as a Databricks job. See Run a file on a cluster or a file or notebook as a job in Databricks using the Databricks extension for Visual Studio Code.
- Run tests with
pytest. See Run Python tests using the Databricks extension for Visual Studio Code.