Create your first workflow with Lakeflow Jobs
This article demonstrates using Lakeflow Jobs to orchestrate tasks to read and process a sample dataset. In this quickstart, you:
- Create a new notebook and add code to retrieve a sample dataset containing popular baby names by year.
- Save the sample dataset to Unity Catalog.
- Create a new notebook and add code to read the dataset from Unity Catalog, filter it by year, and display the results.
- Create a new job and configure two tasks using the notebooks.
- Run the job and view the results.
Requirements
If your workspace is Unity Catalog-enabled and Serverless Jobs is enabled, by default, the job runs on Serverless compute. You do not need cluster creation permission to run your job with Serverless compute.
Otherwise, you must have cluster creation permission to create job compute or permissions to all-purpose compute resources.
You must have a volume in Unity Catalog. This article uses an example volume named my-volume in a schema named default within a catalog named main. You must have the following permissions in Unity Catalog:
READ VOLUMEandWRITE VOLUMEfor themy-volumevolumeUSE SCHEMAfor thedefaultschemaUSE CATALOGfor themaincatalog
To set these permissions, see your Databricks administrator or Unity Catalog privileges and securable objects.
Create notebooks
The following steps create two notebooks to run in this workflow.
Retrieve and save data
To create a notebook that retrieves the sample dataset and saves it to Unity Catalog:
-
Click
New in the sidebar, then click Notebook. Databricks creates and opens a new, blank notebook in your default folder. The default language is the language you most recently used, and the notebook is automatically attached to the compute resource that you most recently used.
-
(Optional) Rename the notebook Retrieve name data.
-
If necessary, change the default language to Python.
-
Copy the following Python code and paste it into the first cell of the notebook.
Pythonimport requests
response = requests.get('https://health.data.ny.gov/api/views/jxy9-yhdk/rows.csv')
csvfile = response.content.decode('utf-8')
dbutils.fs.put("/Volumes/main/default/my-volume/babynames.csv", csvfile, True)
Read and display filtered data
To create a notebook that filters and displays your data:
-
Click
New in the sidebar, then click Notebook.
-
(Optional) Rename the notebook Filter name data.
-
The following Python code reads the data you saved in the previous step and creates a table. It also creates a widget that you can use to filter the data in the table.
Pythonbabynames = spark.read.format("csv").option("header", "true").option("inferSchema", "true").load("/Volumes/main/default/my-volume/babynames.csv")
babynames.createOrReplaceTempView("babynames_table")
years = spark.sql("select distinct(Year) from babynames_table").toPandas()['Year'].tolist()
years.sort()
dbutils.widgets.dropdown("year", "2014", [str(x) for x in years])
display(babynames.filter(babynames.Year == dbutils.widgets.get("year")))
Create a job
The job you are creating consists of two tasks.
To create the first task:
- In your workspace, click
Jobs & Pipelines in the sidebar.
- Click Create, then Job.
- Click the Notebook tile to configure the first task. If the Notebook tile is not available, click Add another task type and search for Notebook.
- (Optional) Replace the name of the job, which defaults to
New Job <date-time>, with your job name. - In the Task name field, enter a name for the task; for example, retrieve-baby-names.
- If necessary, select Notebook from the Type drop-down menu.
- In the Source drop-down menu, select Workspace, which allows you to use a notebook you saved previously.
- For Path, use the file browser to find the first notebook you created, click the notebook name, and click Confirm.
- Click Create task. A notification appears in the upper-right corner of the screen.
To create the second task:
- Click + Add task > Notebook.
- In the Task name field, enter a name for the task; for example, filter-baby-names.
- For Path, use the file browser to find the second notebook you created, click the notebook name, and click Confirm.
- Click Add under Parameters. In the Key field, enter
year. In the Value field, enter2014. - Click Create task.
Run the job
To run the job immediately, click in the upper right corner.
View run details
-
Click the Runs tab and click the link in the Start time column to open the run that you want to view.
-
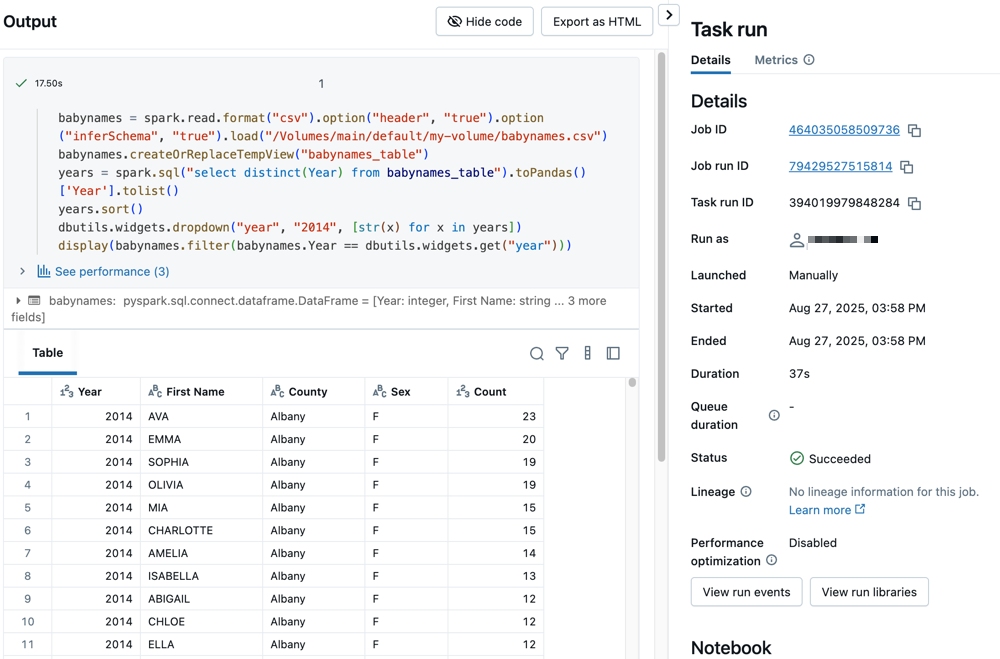
Click click either task to see the output and details. For example, click the filter-baby-names task to view the output and run details for the filter task:

Run with different parameters
To re-run the job and filter baby names for a different year:
- Click
next to Run now and select Run now with different settings.
- In the Value field, enter
2015. - Click Run.