Create and manage Git folders
This page describes how to create Databricks Git folders and perform common Git operations, including cloning, branching, committing, and pushing.
This guide covers the following Git operations:
Setup and configuration | Daily workflow | Advanced operations |
|---|---|---|
Clone a repo
When you clone a remote repository, Databricks creates a Git folder in your workspace that contains the repo contents and tracks changes. You can create Git folders using the Databricks UI or the web terminal.
- You must have
CAN MANAGEpermission on the parent folder where you want to create the Git folder. - Your workspace must have Git credentials configured. See Connect your Git provider to Databricks.
Clone from the UI
-
In the sidebar, select Workspace and browse to the folder where you want to create the Git repo clone.
-
Click Create > Git folder.
-
In the Create Git folder dialog, provide the following information:
Field
Description
Git repository URL
The URL of the Git repository you want to clone, in the format
https://example.com/organization/project.git.Git provider
The Git provider for the repository you want to clone.
Git folder name
The name of the folder in your workspace that contains the contents of the cloned repo.
Sparse checkout mode
Whether to use sparse checkout, which clones only a subset of your repository's directories using a cone pattern. This is useful if your repository exceeds the size limits.
Enable Git CLI support (Beta)
Run standard Git commands directly from a Databricks terminal, including pre-commit hooks, Git submodules, and Large File Storage (LFS). See Use Git CLI commands (Beta). This option requires serverless compute. If serverless compute isn't available in your workspace, clone from the web terminal instead.
-
Click Create Git folder. The remote repository contents are cloned to your workspace, and you can start working with supported Git operations.
Clone from the web terminal
You can also create Git folders with CLI access directly from the web terminal:
-
Access the web terminal. See Run shell commands in Databricks web terminal.
-
Navigate to the parent directory in
/Workspace:Bashcd /Workspace/Users/<your-email>/<project>noteYou can't create Git folders with Git CLI access in
/Reposor in existing Git folders. -
Clone your repository:
Bashgit clone <remote-url>The
git clonecommand uses the Git credentials configured in your workspace. See Connect your Git provider to Databricks. -
Refresh your browser to see the new folder in the workspace file browser.
Use Git CLI commands (Beta)
This feature is in Beta. Workspace admins can control access to this feature from the Previews page. See Manage Databricks previews.
Git folders with Git CLI access let you run standard Git commands directly from a Databricks terminal. You can:
- Run any Git command including
git stash,git pull --force, andgit rebase -i. - Integrate linting and code scanning with pre-commit hooks.
- Work with repositories that exceed the 2 GB memory and 4 GB disk limits of standard Git folders.
- Use Git submodules and Large File Storage (LFS).
- Stage multiple commits locally before pushing to the remote repository.
Git CLI compute requirements
The required compute depends on how you use a CLI-enabled Git folder:
Operation | Compute requirement |
|---|---|
Create a Git folder with CLI access from the UI | |
Run Git operations from the Git folders UI (pull, push, commit) | |
Run Git CLI commands from the web terminal | serverless compute (environment version 4 or above) or classic compute (Databricks Runtime 17.0 or above) |
To enable serverless compute, see Connect to serverless compute.
If your Git provider requires private network connectivity, see Configure network connectivity.
Create a Git folder with Git CLI access
To create a Git folder with CLI access:
- If you use the web terminal, any repository that you clone has Git CLI access automatically.
- If you use the UI, select Enable Git CLI support when you create the Git folder.
After you create a Git folder with CLI access, run any standard Git command from the web terminal. To open a web terminal, see Launch the web terminal.
cd /Workspace/Users/<your-email>/<project>/my-repo

# Interactive rebase
git rebase -i main

# Stash uncommitted changes
git stash

# Work with submodules
git submodule update --init --recursive
Git CLI limitations
Git folders with CLI access have the following limitations:
- Remote URL allowlists are ignored for Git folders with Git CLI support.
- Git CLI commands ignore the admin setting that blocks committing notebook outputs.
- The Repos API isn't supported for Git folders with CLI access.
- You can't enable Git CLI access for existing Git folders.
Troubleshoot Git CLI operations
- Git operations are disabled in the workspace UI: Serverless compute isn't enabled in your workspace. You can still run Git commands from the web terminal. To enable serverless compute, see Connect to serverless compute.
- Terminal prompts for credentials on every operation: The Git CLI feature isn't enabled on your workspace. Contact your workspace admin to verify that the preview is enabled.
- Git operations fail with permission errors: Verify that you have
CAN MANAGEpermission on the parent folder and that your workspace Git credentials are valid. See Connect your Git provider to Databricks.
Access the Git dialog
Access the Git dialog from a notebook or from the Databricks Git folders browser.
-
From a notebook, click the button next to the notebook name that identifies the current Git branch.

-
From the Databricks Git folders browser, click Git beside the repo name.
A full-screen dialog appears where you can perform Git operations.
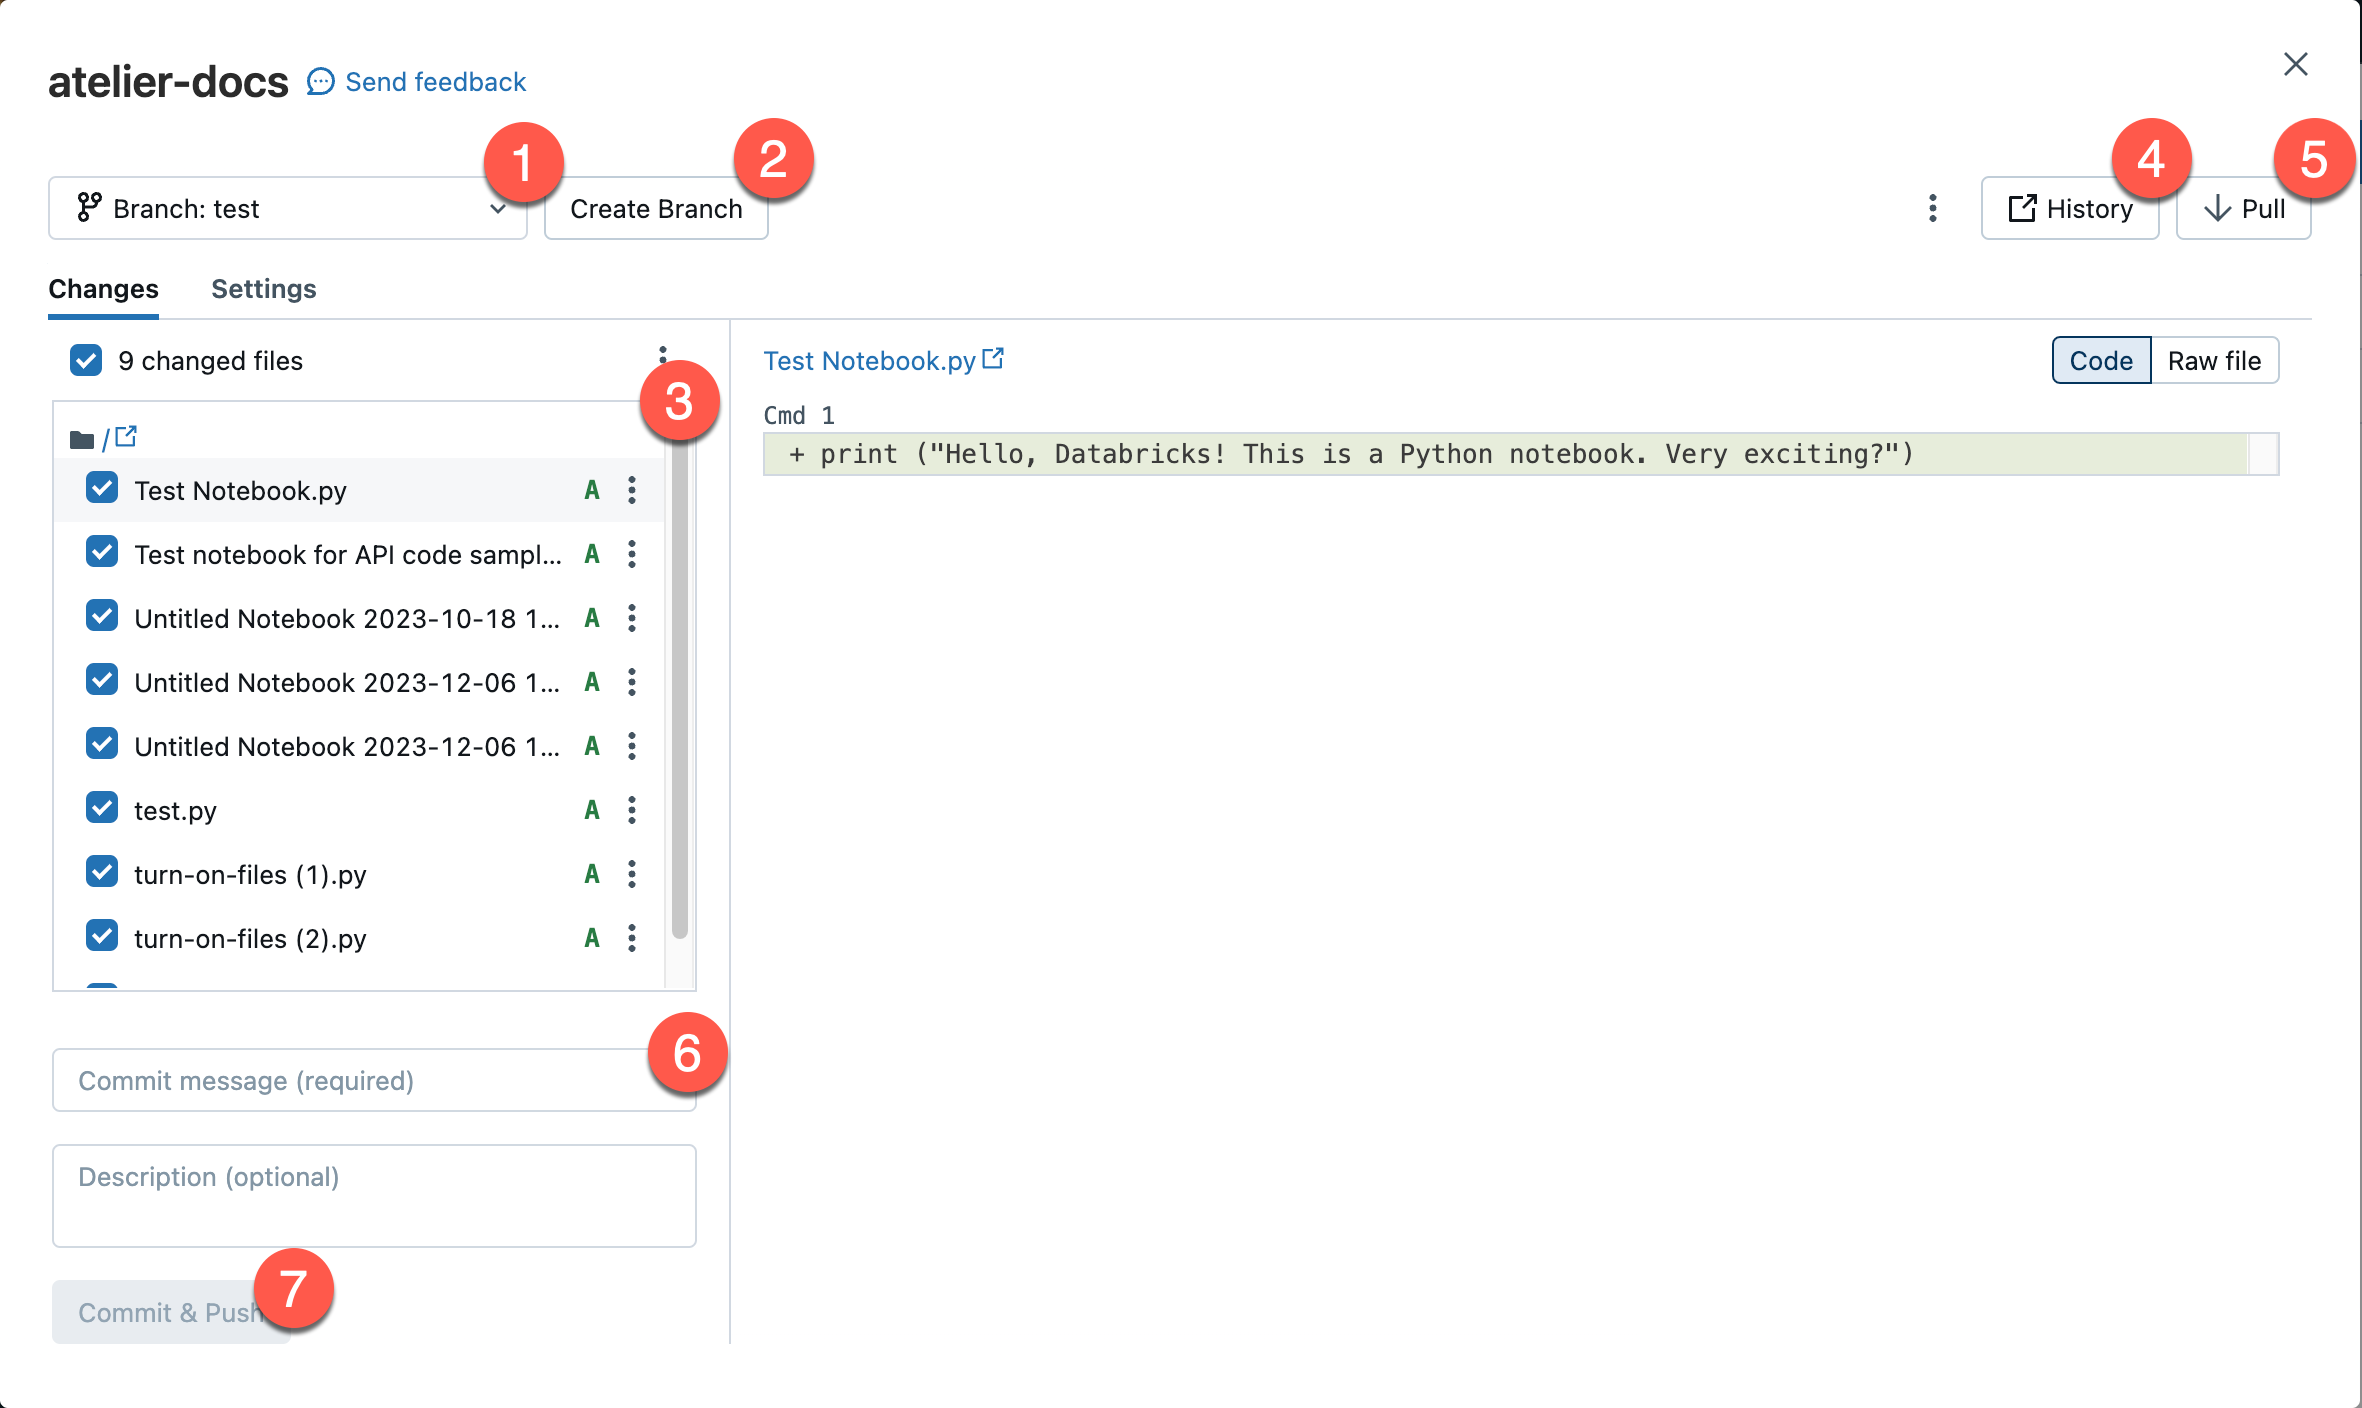
- Your current working branch. You can select other branches here. If other users have access to this Git folder, changing the branch also changes the branch for them if they share the same workspace. See a recommended best practice to avoid this problem.
- Create a new branch.
- File assets and subfolders checked into your current branch.
- Show the current branch history.
- Pull content from the remote Git repository.
- Add a commit message and optional expanded description for your changes.
- Commit your work to the working branch and push the updated branch to the remote Git repository.
Click the ![]() kebab menu to choose from additional Git branch operations, such as a hard reset, merge, or rebase.
kebab menu to choose from additional Git branch operations, such as a hard reset, merge, or rebase.

Create a new branch
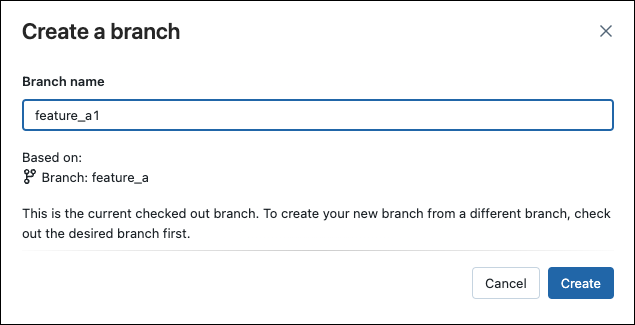
To create a new branch:
- Open the Git dialog.
- Click Create Branch.
- Enter a name for the new branch and select the base branch.
- Click Create.
Switch to a different branch
To check out a different branch, use the branch dropdown in the Git dialog:
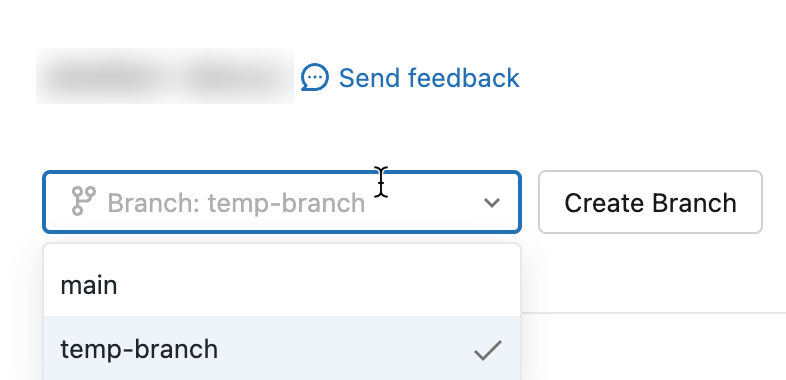
Uncommitted changes on the current branch carry over and show as uncommitted changes on the new branch, if the uncommitted changes don't conflict with code on the new branch. Discard the changes before or after branch switches if you don't intend to carry over the uncommitted changes.
The local version of a branch can remain present in the associated Git folder for up to 30 days after you delete the remote branch. To completely remove a local branch in a Git folder, delete the repository.
Switching branches might delete workspace assets when the new branch doesn't contain these assets. Switching back to the current branch recreates the deleted assets with new IDs and URLs. This change can't be reversed.
If you shared or bookmarked assets from a Git folder, verify the asset exists on the new branch before switching.
Commit and push changes
When you add new notebooks or files, or make changes to existing notebooks or files, the Git folder UI highlights the changes.
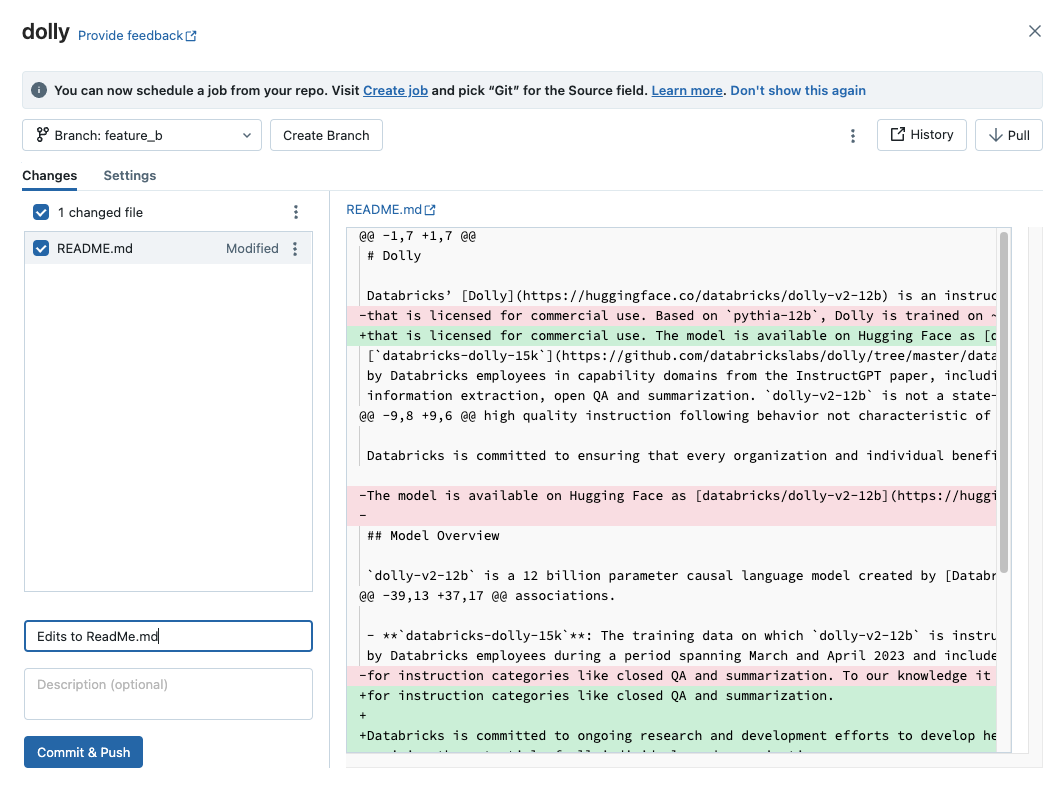
Add a required commit message for the changes, and click Commit & Push to push the changes to the remote Git repository.
If you don't have permission to commit to the default branch, create a new branch and use your Git provider's interface to create a pull request and merge it into the default branch.
Notebook outputs aren't included in commits by default when notebooks are saved in source file formats (.py, .scala, .sql, .r). For information on committing notebook outputs using the IPYNB format, see Control IPYNB notebook output artifact commits.
Author in a Git folder while acting as a role
This section applies to role-based access control (RBAC), which is in Public Preview.
With RBAC, you assume a role to access data scoped to that role. To author code that reads that data, you assume the role so its data access is in effect, then commit your changes. You can commit either as your own user identity or as the role. The choice determines how your Git provider attributes commits, traded off against how much setup the workflow requires. Both depend on the role's Git credential.
Approach | Commits attributed to | Trade-off |
|---|---|---|
You, individually. | More setup: you share the Git folder so it is reachable under both identities, and switch back to your user identity to commit. Works with a read-only role credential. | |
The role. | Simpler: you stay acting as the role and don't share a folder. Commits carry the role's Git identity, and the role's Git credential must have write access and is shared by everyone who assumes the role. |
Commit with your user identity
In this approach you commit with your personal Git credential, so your Git provider attributes commits to you. You assume the role only to author against the data the role can access, then switch back to your user identity to commit. Because you author while acting as the role but commit as your user identity, the Git folder must be reachable under both identities. Set this up in one of two ways, which differ in who owns the folder and which direction you share it.
Option 1: Clone in your home folder and share it with the role
- As your user identity (do not assume the role), clone the repository into a Git folder in your home folder (
/Workspace/Users/<your-username>/...). See Clone a repo. The clone uses your personal Git credential, and you own the folder. The role does not need its own Git credential for this option. - Grant the role access to the folder (Can Run, or Can Edit if the role needs to modify files) so you can work in it while acting as the role.
- Assume the role, then make your changes in the folder. The role's data access is in effect.
- Switch back to your user identity, then commit and push. The commit uses your personal
git_usernameandgit_email.
Because you share the folder from your user identity to the role, workspace asset sharing controls do not affect this option. Those controls restrict only a role from sharing assets outward.
Option 2: Clone in the role's home folder and share it with your user identity
- Assume the role and clone the repository into a Git folder in the role's home folder. The clone uses the role's Git credential, which must have at least read access.
- While acting as the role, grant your user identity access to the folder (Can Edit).
- Make your changes while acting as the role. The role's data access is in effect.
- Switch back to your user identity. Because you granted your user access, you can reach the folder, so commit and push with your personal credential. The commit uses your personal
git_usernameandgit_email.
Because the role shares the folder outward to your user identity, this option does not work if the role is on the workspace asset sharing controls deny list. Use option 1 for those roles.
Commit as the role
In this approach you clone, author, and commit all while acting as the role. This is the simplest workflow: you don't share a folder or switch identities to commit. It requires the role's Git credential to have write access, because the workspace UI commits and pushes in a single action.
- Assume the role.
- Clone the repository into a Git folder. Because you are acting as the role, the clone uses the role's Git credential.
- Make your changes, then commit and push. The commit uses the role's
git_usernameandgit_email.
Weigh these implications before choosing this approach:
- Attribution is at the role level. Commits in your Git provider show the role's Git identity, not the individual author. Databricks audit logs record both
identity_metadata.run_as(the role) andidentity_metadata.run_by(you) for commits made through the workspace UI. This does not apply to raw Git commits run from the Git CLI in a web terminal, which Databricks does not attribute to an individual user. - The role's Git credential is shared and write-enabled. Everyone who assumes the role uses the same credential to push, so a leaked or misused token can push, delete branches, or author commits under the role's identity. Because of this, Databricks recommends a read-only group Git credential and the commit with your user identity approach. Use write-enabled credentials only when you accept these trade-offs. See Token permissions. Scope the credential to only the repositories the role needs.
Pull changes
To pull changes from the remote Git repository, click Pull in the Git operations dialog. Notebooks and other files update automatically to the latest version in your remote Git repository. If the changes pulled from the remote repo conflict with your local changes in Databricks, resolve the merge conflicts.
Git operations that pull upstream changes clear the notebook state. See Incoming changes clear the notebook state.
Collaborate in Git folders
Databricks Git folders behave as embedded Git clients in your workspace, letting you collaborate through Git-based source control and versioning. For effective team collaboration:
- Each team member has their own Git folder mapped to the remote Git repository, where they work in their own development branch.
- Only one user performs Git operations on each Git folder. Multiple users performing Git operations on the same folder can cause branch management issues, such as one user unintentionally switching branches for everyone.
To share your Git folder configuration with a collaborator:
- Click Share.
- Click Copy link to create Git folder.
- Send the URL to your collaborator.
- When your collaborator opens the URL, they see a dialog pre-populated with your Git folder configuration.
- They click Create Git folder to clone the repository into their own workspace under their current working folder.
Merge branches
The merge function in Databricks Git folders uses git merge to combine the commit history from one branch into another. For Git beginners, Databricks recommends using merge instead of rebase because it doesn't require force pushing and doesn't rewrite commit history.
To merge one branch into another, click the ![]() kebab menu and select Merge.
kebab menu and select Merge.
- If there's a merge conflict, resolve it in the Git folders UI.
- If there's no conflict, the merge pushes to the remote Git repo using
git push.
Resolve merge conflicts
Merge conflicts occur when Git can't automatically reconcile changes to the same lines of a file from different sources, such as during a pull, rebase, or merge operation.
To resolve a merge conflict, use the Git folders UI which displays conflicting files and resolution options.
- Manually edit the file to choose which changes to keep.
- Select Keep all current changes or Take all incoming changes to accept one version entirely.
- Abort the operation and discard conflicting changes to try again.
Manually resolve conflicts
Manual conflict resolution lets you determine which conflicting lines to accept. Edit the file contents directly to resolve the conflicts.
To resolve the conflict, select the code lines you want to preserve and delete everything else, including the Git merge conflict markers. When you're done, select Mark As Resolved.
If you made the wrong choices when resolving merge conflicts, click Abort to abort the process and undo everything. Once all conflicts are resolved, click Continue Merge or Continue Rebase to resolve the conflict and complete the operation.
Rebase a branch
The rebase function in Databricks Git folders uses git rebase to integrate changes from one branch into another by reapplying your commits on top of the target branch, creating a linear history.
To rebase a branch on another branch, click the ![]() kebab menu and select Rebase, then select the target branch.
kebab menu and select Rebase, then select the target branch.
- After the rebase, Git folders run
git commitandgit push --forceto update the remote repo. - Rebase rewrites commit history, which can cause versioning issues for collaborators working in the same repo.
Reset a branch
Perform a Git reset from the Git folders UI. This operation is equivalent to git reset --hard combined with git push --force.
Git reset replaces the branch contents and history with the most recent state of another branch. You can use this when edits conflict with the upstream branch, and you don't mind losing those edits when you reset to the upstream branch. Read more about git reset --hard.
Reset to a remote branch
With git reset in this scenario:
- You reset your selected branch (for example,
feature_a) to a different branch (for example,main). - You also reset the upstream (remote) branch
feature_ato main.
When you reset, you lose all uncommitted and committed changes in both the local and remote version of the branch.
To reset a branch to a remote branch:
-
In the Git folders UI from the Branch menu, choose the branch you want to reset.
-
Select Reset from the
 kebab menu.
-
Select the branch to reset and click Run Git Reset.
Configure sparse checkout mode
Sparse checkout is a client-side setting that allows you to clone and work with only a subset of the remote repository's directories in Databricks. This is especially useful if your repository's size exceeds the Databricks supported limits.
Enable sparse checkout mode when you clone a new repo. You can't disable sparse checkout mode after you enable it.
-
In the Create Git folder dialog, enable Sparse checkout mode.
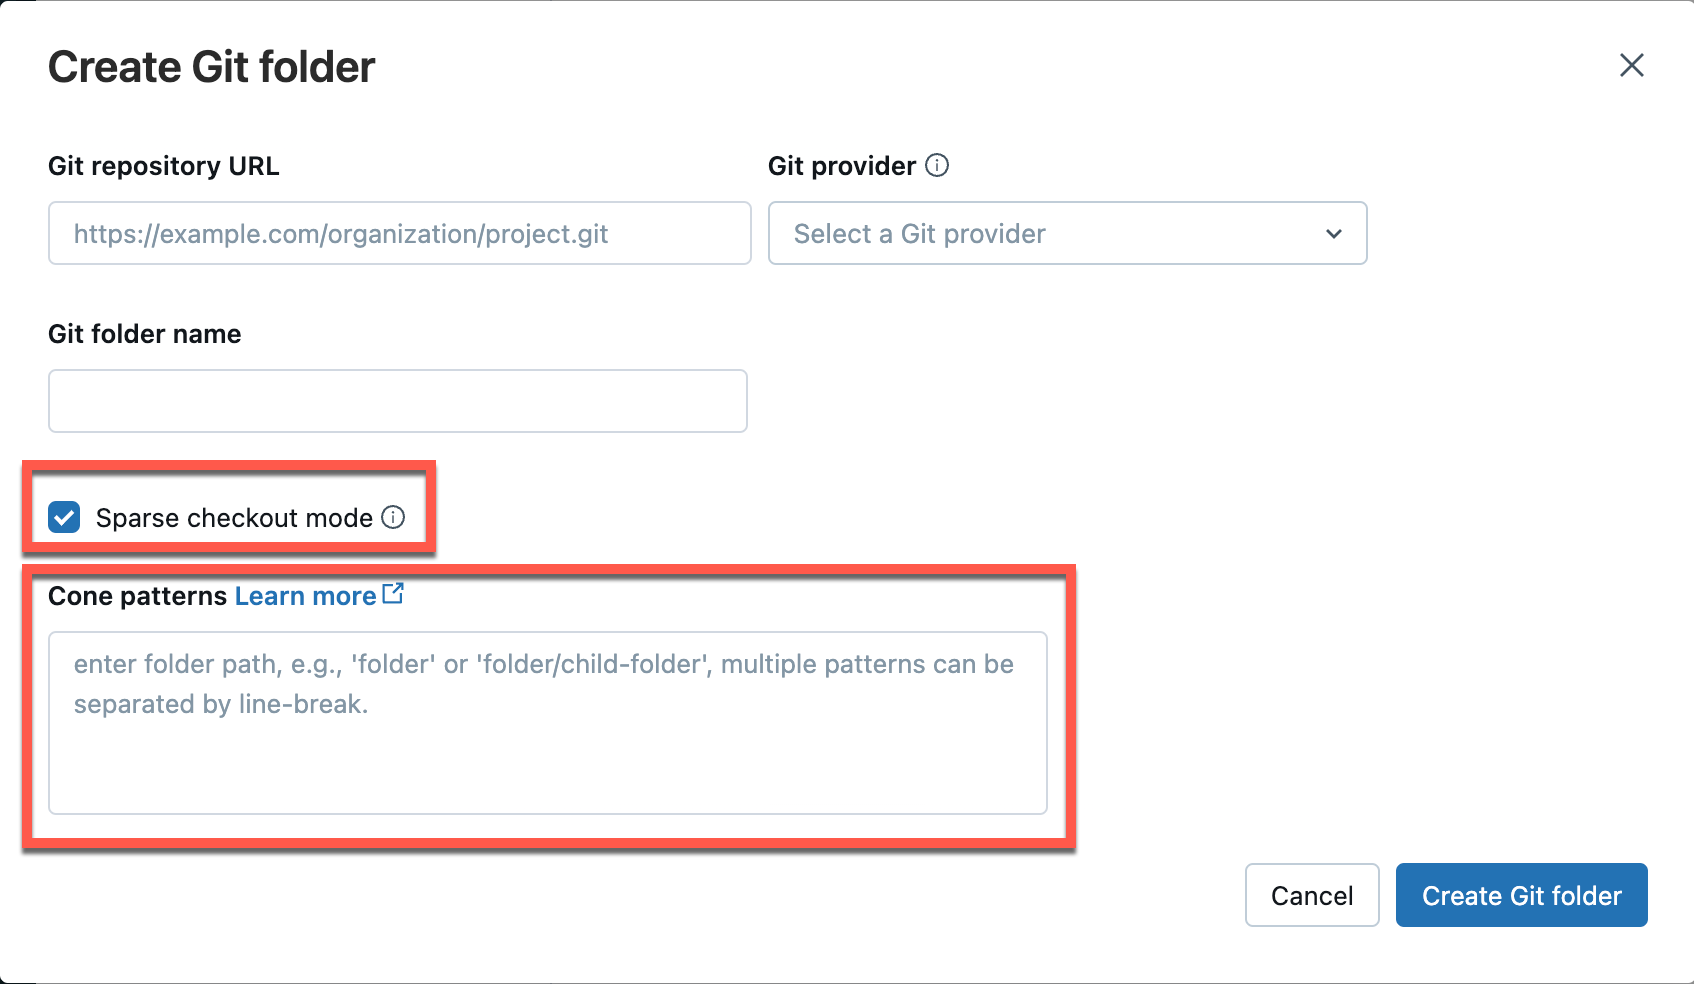
-
In the Cone patterns box, specify the cone checkout patterns you want. Separate multiple patterns by line breaks.
How cone patterns work
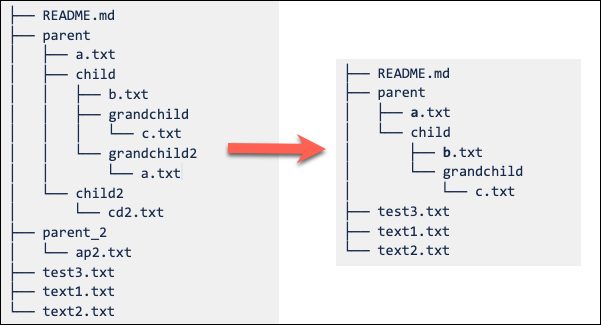
To understand how cone patterns work in sparse checkout mode, see the following diagram representing the remote repository structure.

If you select Sparse checkout mode, but don't specify a cone pattern, the default cone pattern applies. This includes only the files in root and no subdirectories, resulting in a repo structure as follows:

Setting the sparse checkout cone pattern as parent/child/grandchild recursively includes all contents of the grandchild directory. The files immediately in the /parent, /parent/child and root directory are also included. See the directory structure in the following diagram:
Exclusion behaviors (!) aren't supported in Git cone pattern syntax.
Modify sparse checkout settings
After you create a repo, edit the sparse checkout cone pattern from Settings > Advanced > Cone patterns.
Note the following behavior:
-
Removing a folder from the cone pattern removes it from Databricks if there are no uncommitted changes.
-
Adding a folder by editing the sparse checkout cone pattern adds it to Databricks without requiring an additional pull.
-
Sparse checkout patterns can't be changed to remove a folder when there are uncommitted changes in that folder.
For example, if you edit a file in a folder and don't commit changes, then try to change the sparse checkout pattern to exclude that folder, the pattern is accepted but the folder isn't deleted. You need to revert the pattern to include that folder, commit your changes, and then reapply the new pattern.
Make changes with sparse checkout
Edit existing files and commit and push them from the Git folder. When creating new folders of files, include them in the cone pattern you specified for that repo.
Including a new folder outside of the cone pattern results in an error during the commit and push operation. To fix it, edit the cone pattern to include the new folder you're trying to commit and push.
Sparse checkout limitations
- Sparse checkout doesn't work for Azure DevOps repositories larger than 4 GB.
- You can't disable sparse checkout for a repo that was created with sparse checkout enabled.
Manage Git folders programmatically
To manage Git folders using the API, see the Repos API reference.
Delete a Git folder
To remove a Git folder from your workspace:
- Right-click the Git folder and select Move to Trash.
- Click Confirm and move to Trash.
Next steps
- Set up authentication to connect Databricks to your Git provider. See Connect your Git provider to Databricks.
- Learn about size limits and other constraints for Git folders. See Databricks Git folder limits and reference.
- Configure workspace-level settings for Git integration. See Configure Git integration for Git folders.