Connect to managed ingestion sources
Learn how to create connections in Catalog Explorer that store authentication details for Lakeflow Connect managed ingestion sources. Any user with the USE CONNECTION privilege on the connection can then create managed ingestion pipelines from sources like Salesforce and SQL Server.
An admin user must complete the steps in this article if the users who will create pipelines are non-admin users or will use programmatic interfaces. These interfaces require that users specify an existing connection when they create a pipeline.
Alternatively, admin users can create a connection and a pipeline at the same time in the data ingestion UI. See Managed connectors in Lakeflow Connect.
Ingestion vs. federation connections
Lakeflow Connect offers fully-managed ingestion connectors for enterprise apps and database sources. Lakehouse Federation allows you to query external data sources without moving your data. You can create connections for both ingestion and query federation in Catalog Explorer.
Privilege requirements
The user privileges required to connect to a managed ingestion source depend on the interface you choose:
Scenario | Supported interfaces | Required user privileges |
|---|---|---|
An admin user creates a connection and an ingestion pipeline at the same time. | Data ingestion UI |
|
An admin user creates a connection for non-admin users to create pipelines with. | Admin:
Non-admin:
| Admin:
Non-admin:
|
Confluence
To create a Confluence connection in Catalog Explorer, do the following:
-
Complete the source setup. Use the authentication details you obtain to create the connection.
-
In the Databricks workspace, click Catalog > External data > Connections > Create connection.
-
On the Connection basics page of the Set up connection wizard, enter a unique Connection name.
-
In the Connection type drop-down menu, select Confluence.
-
In the Auth type drop-down menu, select OAuth.
-
(Optional) Add a comment.
-
Click Next.
-
On the Authentication page, enter the following credentials:
- Domain: The Confluence instance domain name (for example,
your-domain.atlassian.net). Don't includehttps://orwww. - Client secret: The client secret from the source setup.
- Client ID: The client ID from the source setup.
- Domain: The Confluence instance domain name (for example,
-
Click Sign in with Confluence.
You're redirected to the Atlassian authorization page.
-
Enter your Confluence credentials and complete the authentication process.
You're redirected to the Databricks workspace.
-
Click Create connection.
Dynamics 365
This feature is in Public Preview.
A workspace admin or metastore admin must set up Microsoft Dynamics 365 as a data source for ingestion into Databricks using Lakeflow Connect. See Configure data source for Microsoft Dynamics 365 ingestion.
Lakeflow Connect supports ingesting data from Microsoft Dynamics 365. This includes both applications built-in to Dataverse and non-Dataverse applications (such as Finance & Operations) that can be connected to Dataverse. The connector accesses data through Azure Synapse Link, which exports D365 data to Azure Data Lake Storage Gen2.
Synapse Link for Dataverse to Azure Data Lake replaces the service formerly known as Export data to Azure Data Lake Storage Gen2 (Export to Data Lake).
Prerequisites
A workspace admin or metatstore admin must set up Microsoft Dynamics 365 as a data source for ingestion into Databricks using Lakeflow Connect. See Configure data source for Microsoft Dynamics 365 ingestion.
Create a connection
-
In the Databricks workspace, click Catalog > External data > Connections > Create connection.
-
On the Connection basics page of the Set up connection wizard, specify a unique Connection name.
-
In the Connection type drop-down menu, select Dynamics 365.
-
(Optional) Add a comment.
-
Click Next.
-
On the Authentication page, specify the following:
- Client secret: The secret value for your Microsoft Entra ID application registration. Obtain this from the source setup.
- Client ID: The unique identifier (Application ID) for your Microsoft Entra ID application registration. Obtain this from the source setup.
- Azure storage account name: The name of the Azure Data Lake Storage Gen2 account where Synapse Link exports your D365 data.
- Tenant ID: The unique identifier for your Microsoft Entra ID tenant. Obtain this from the source setup.
- ADLS container name: The name of the container within your Azure Data Lake Storage (ADLS) Gen2 account where the D365 data is stored.
-
Click Create connection.
Next steps
Google Ads
-
Configure OAuth for Google Ads ingestion. You'll use the authentication details that you obtain to create the connection.
-
In the Databricks workspace, click Catalog > External data > Connections > Create connection.
-
On the Connection basics page of the Set up connection wizard, enter a unique Connection name.
-
In the Connection type drop-down menu, select Google Ads.
-
In the Auth type drop-down menu, select OAuth.
-
(Optional) Add a comment.
-
Click Next.
-
On the Authentication page, enter the following credentials:
- Client ID: The client ID from the source setup.
- Client secret: The client secret from the source setup.
-
Click Sign in with Google Ads. You're redirected to the Google authorization page.
-
Select the account that has access to your Google Ads account and complete the authentication process. You're redirected to the Databricks workspace.
-
Enter the Developer Token from the source setup.
-
Click Create connection.
Google Analytics Raw Data
The following authentication methods are supported:
- U2M OAuth (recommended)
- Service account authentication using a JSON key (In the UI, this is called Username and password)
U2M OAuth
- In the Databricks workspace, click Catalog > External locations > Connections > Create connection.
- On the Connection basics page of the Set up connection wizard, specify a unique Connection name.
- In the Connection type drop-down menu, select Google Analytics Raw Data.
- In the Auth type drop-down menu, select OAuth.
- (Optional) Add a comment.
- Click Next.
- On the Authentication page, click Sign in to Google and sign in with your Google account credentials.
- At the prompt to allow Lakeflow Connect to access your Google account, click Allow.
- After you're redirected back to the Databricks workspace, click Create connection.
Service account authentication
- In the Databricks workspace, click Catalog > External locations > Connections > Create connection.
- On the Connection basics page of the Set up connection wizard, specify a unique Connection name.
- In the Connection type drop-down menu, select Google Analytics Raw Data.
- In the Auth type drop-down menu, select Username and password.
- (Optional) Add a comment.
- Click Next.
- On the Authentication page, enter the Google service account key from the source setup in JSON format.
- Click Create connection.
Jira
To create a Jira connection in Catalog Explorer, do the following:
-
Complete the source setup. You'll use the authentication details that you obtain to create the connection.
-
In the Databricks workspace, click Catalog > External data > Connections > Create connection.
-
On the Connection basics page of the Set up connection wizard, specify a unique Connection name.
-
In the Connection type drop-down menu, select Jira.
-
(Optional) Add a comment.
-
Click Next.
-
On the Authentication page, enter the following:
- Host: The domain for the Jira data source, including
http/https. - (Optional) Port: The port for an on-premesis Jira instance. The default is 443.
- Client secret: The client secret from the source setup.
- (Optional) On premise: Select if the Jira instance is on-premesis.
- Client ID: The client ID from the source setup.
- (Optional) Jira deployment path: The on-premesis deployment path (for example, if the URL is
http://<domain>:<port>/<path>, the path is<path>).
- Host: The domain for the Jira data source, including
-
Click Sign in with Jira and authorize the Databricks application.
Meta Ads
Prerequisites
Set up Meta Ads as a data source.
Create a connection
- In Catalog Explorer, click Add and select Add a connection.
- In the Connection type drop-down menu, select Meta Ads.
- Enter a name for the connection.
- In the App ID field, enter the App ID from your Meta app.
- In the App Secret field, enter the App Secret from your Meta app.
- Click Authenticate and create connection.
- In the Meta authentication window, sign in with your Meta account and grant the requested permissions.
- After authentication succeeds, the connection is created.
MySQL
Prerequisites
Complete the source setup. You'll use the authentication details that you obtain to create the connection.
Create connection
-
In the Databricks workspace, click Catalog > External locations > Connections > Create connection.
-
On the Connection basics page of the Set up connection wizard, specify a unique Connection name.
-
In the Connection type drop-down menu, select MySQL.
-
(Optional) Add a comment.
-
Click Next.
-
On the Authentication page, enter the following:
- Host: Specify the MySQL domain name.
- User and Password: Enter the MySQL login credentials of the replication user.
-
Click Create connection.
The Test Connection button currently fails for users created with caching_sha2_password or sha256_password even when the credentials are correct. This is a known issue.
PostgreSQL
Prerequisites
Configure PostgreSQL for ingestion into Databricks
Create connection
- In the Databricks workspace, click Catalog > External locations > Connections > Create connection.
- On the Connection basics page of the Set up connection wizard, specify a unique Connection name.
- In the Connection type drop-down menu, select PostgreSQL.
- (Optional) Add a comment.
- Click Next.
- On the Authentication page, for Host, specify the PostgreSQL domain name.
- For User and Password, enter the PostgreSQL login credentials of the replication user.
- Click Create connection.
Salesforce
Lakeflow Connect supports ingesting data from the Salesforce Platform. Databricks also offers a zero-copy connector in Lakehouse Federation to run federated queries on Salesforce Data 360 (formerly Data Cloud).
Prerequisites
Salesforce applies usage restrictions to connected apps. The permissions in the following table are required for a successful first-time authentication. If you lack these permissions, Salesforce blocks the connection and requires an admin to install the Databricks connected app.
Condition | Required permission |
|---|---|
API Access Control is enabled. |
|
API Access Control is not enabled. |
|
For background, see Prepare for Connected App Usage Restrictions Change in the Salesforce documentation.
Create a connection
To create a Salesforce ingestion connection in Catalog Explorer, do the following:
-
In the Databricks workspace, click Catalog > External locations > Connections > Create connection.
-
On the Connection basics page of the Set up connection wizard, specify a unique Connection name.
-
In the Connection type drop-down menu, select Salesforce.
-
(Optional) Add a comment.
-
Click Next.
-
If you're ingesting from a Salesforce sandbox account, set Is sandbox to
true. -
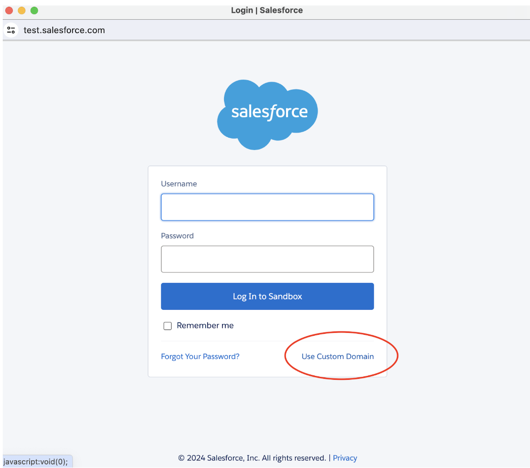
Click Sign in with Salesforce.
You're redirected to Salesforce.
-
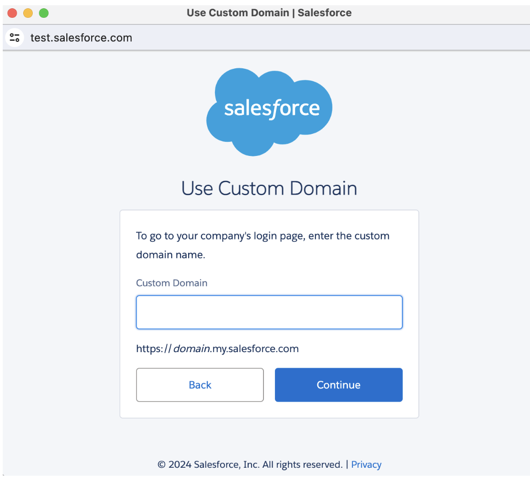
If you're ingesting from a Salesforce sandbox, click Use Custom Domain, provide the sandbox URL, and then click Continue.


-
Enter your Salesforce credentials and click Log in. Databricks recommends logging in as a Salesforce user that's dedicated to Databricks ingestion.
importantFor security purposes, only authenticate if you clicked an OAuth 2.0 link in the Databricks UI.
-
After returning to the ingestion wizard, click Create connection.
ServiceNow
The steps to create a ServiceNow connection in Catalog Explorer depend on the OAuth method you choose. The following methods are supported:
- U2M OAuth (recommended)
- OAuth Resource Owner Password Credentials (ROPC)
U2M OAuth
-
Configure ServiceNow for Databricks ingestion. You'll use the authentication details that you obtain to create the connection.
-
In the Databricks workspace, click Catalog > External locations > Connections > Create connection.
-
On the Connection basics page of the Set up connection wizard, specify a unique Connection name.
-
In the Connection type drop-down menu, select ServiceNow.
-
In the Auth type drop-down menu, select OAuth.
-
(Optional) Add a comment.
-
Click Next.
-
On the Authentication page, enter the following:
- Instance URL: ServiceNow instance URL.
- OAuth scope: Leave the default value
useraccount. - Client secret: The client secret that you obtained in the source setup.
- Client ID: The client ID that you obtained in the source setup.
-
Click Sign in with ServiceNow.
-
Sign in using your ServiceNow credentials.
You're redirected to the Databricks workspace.
-
Click Create connection.
ROPC
-
Configure ServiceNow for Databricks ingestion. You'll use the authentication details that you obtain to create the connection.
-
In the Databricks workspace, click Catalog > External locations > Connections > Create connection.
-
On the Connection basics page of the Set up connection wizard, specify a unique Connection name.
-
In the Connection type drop-down menu, select ServiceNow.
-
In the Auth type drop-down menu, select OAuth Resource Owner Password.
-
(Optional) Add a comment.
-
Click Next.
-
On the Authentication page, enter the following:
- User: Your ServiceNow username.
- Password: Your ServiceNow password.
- Instance URL: ServiceNow instance URL.
- Client ID: The client ID that you obtained in the source setup.
- Client secret: The client secret that you obtained in the source setup.
-
Click Create connection.
SharePoint
The following authentication methods are supported:
- OAuth M2M (Public Preview)
- OAuth U2M
- OAuth with manual token refresh
In most scenarios, Databricks recommends machine-to-machine (M2M) OAuth. M2M scopes connector permissions to a specific site. However, if you want to scope permissions to whatever the authenticating user can access, choose user-to-machine (U2M) OAuth instead. Both methods offer automated token refresh and heightened security.
- M2M
- U2M
- Manual refresh token
-
Complete the source setup. You'll use the authentication details that you obtain to create the connection.
-
In the Databricks workspace, click Catalog > External data > Connections > Create connection.
-
On the Connection basics page of the Set up connection wizard, specify a unique Connection name.
-
In the Connection type drop-down menu, select Microsoft SharePoint.
-
In the Auth type drop-down menu, select OAuth Machine to Machine.
-
(Optional) Add a comment.
-
Click Next.
-
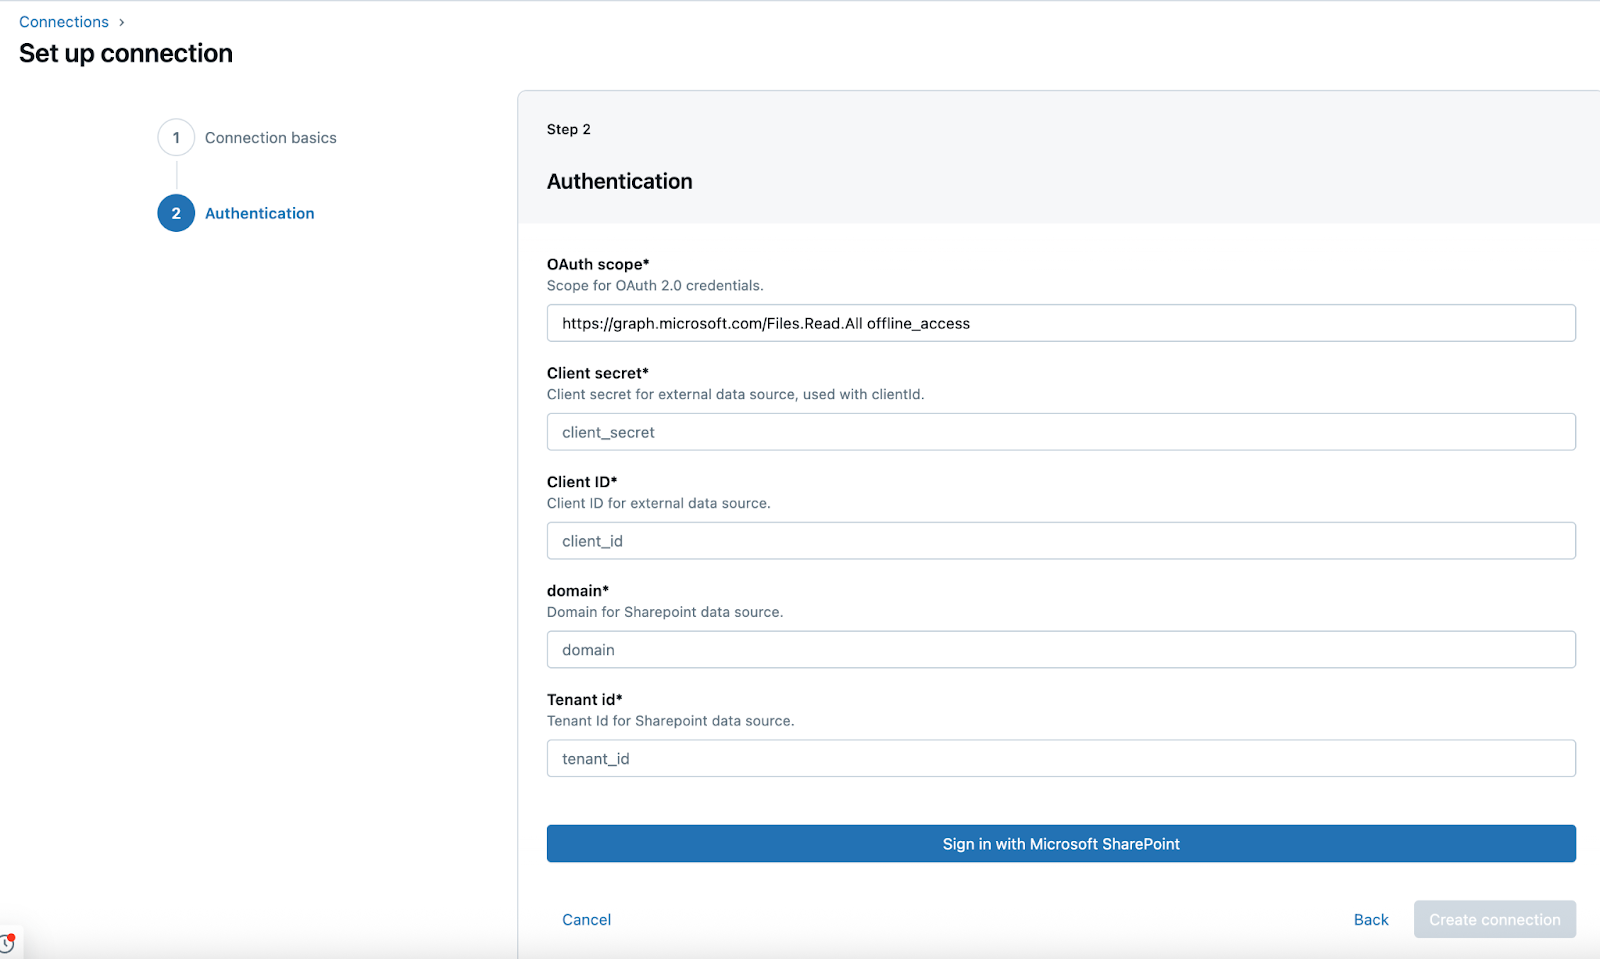
On the Authentication page, enter the following credentials for your Microsoft Entra ID app:
- Client secret: The client secret that you retrieved in the source setup.
- Client ID: The client ID that you retrieved in the source setup.
- Domain: The SharePoint instance URL in the following format:
https://MYINSTANCE.sharepoint.com - Tenant ID: The tenant ID that you retrieved in the source setup.
-
Click Sign in with Microsoft SharePoint.
A new window opens. After you sign in with your SharePoint credentials, the permissions you’re granting to the Entra ID app are shown.
-
Click Accept.
A Successfully authorized message displays, and you’re redirected to the Databricks workspace.
-
Click Create connection.
-
Complete the source setup. You'll use the authentication details that you obtain to create the connection.
-
In the Databricks workspace, click Catalog > External data > Connections > Create connection.
-
On the Connection basics page of the Set up connection wizard, specify a unique Connection name.
-
In the Connection type drop-down menu, select Microsoft SharePoint.
-
In the Auth type drop-down menu, select OAuth.
-
(Optional) Add a comment.
-
Click Next.
-
On the Authentication page, enter the following credentials for your Microsoft Entra ID app:
- Client secret: The client secret that you retrieved in the source setup.
- Client ID: The client ID that you retrieved in the source setup.
- OAuth scope: Leave the OAuth scope set to the pre-filled value:
https://graph.microsoft.com/Sites.Read.All offline_access - Domain: The SharePoint instance URL in the following format:
https://MYINSTANCE.sharepoint.com - Tenant ID: The tenant ID that you retrieved in the source setup.

-
Click Sign in with Microsoft SharePoint.
A new window opens. After you sign in with your SharePoint credentials, the permissions you’re granting to the Entra ID app are shown.
-
Click Accept.
A Successfully authorized message displays, and you’re redirected to the Databricks workspace.
-
Click Create connection.
-
Complete the source setup. You'll use the authentication details that you obtain to create the connection.
-
In the Databricks workspace, click Catalog > External data > Connections > Create connection.
-
On the Connection basics page of the Set up connection wizard, specify a unique Connection name.
-
In the Connection type drop-down menu, select Microsoft SharePoint.
-
In the Auth type drop-down menu, select OAuth Refresh Token.
-
(Optional) Add a comment.
-
Click Next.
-
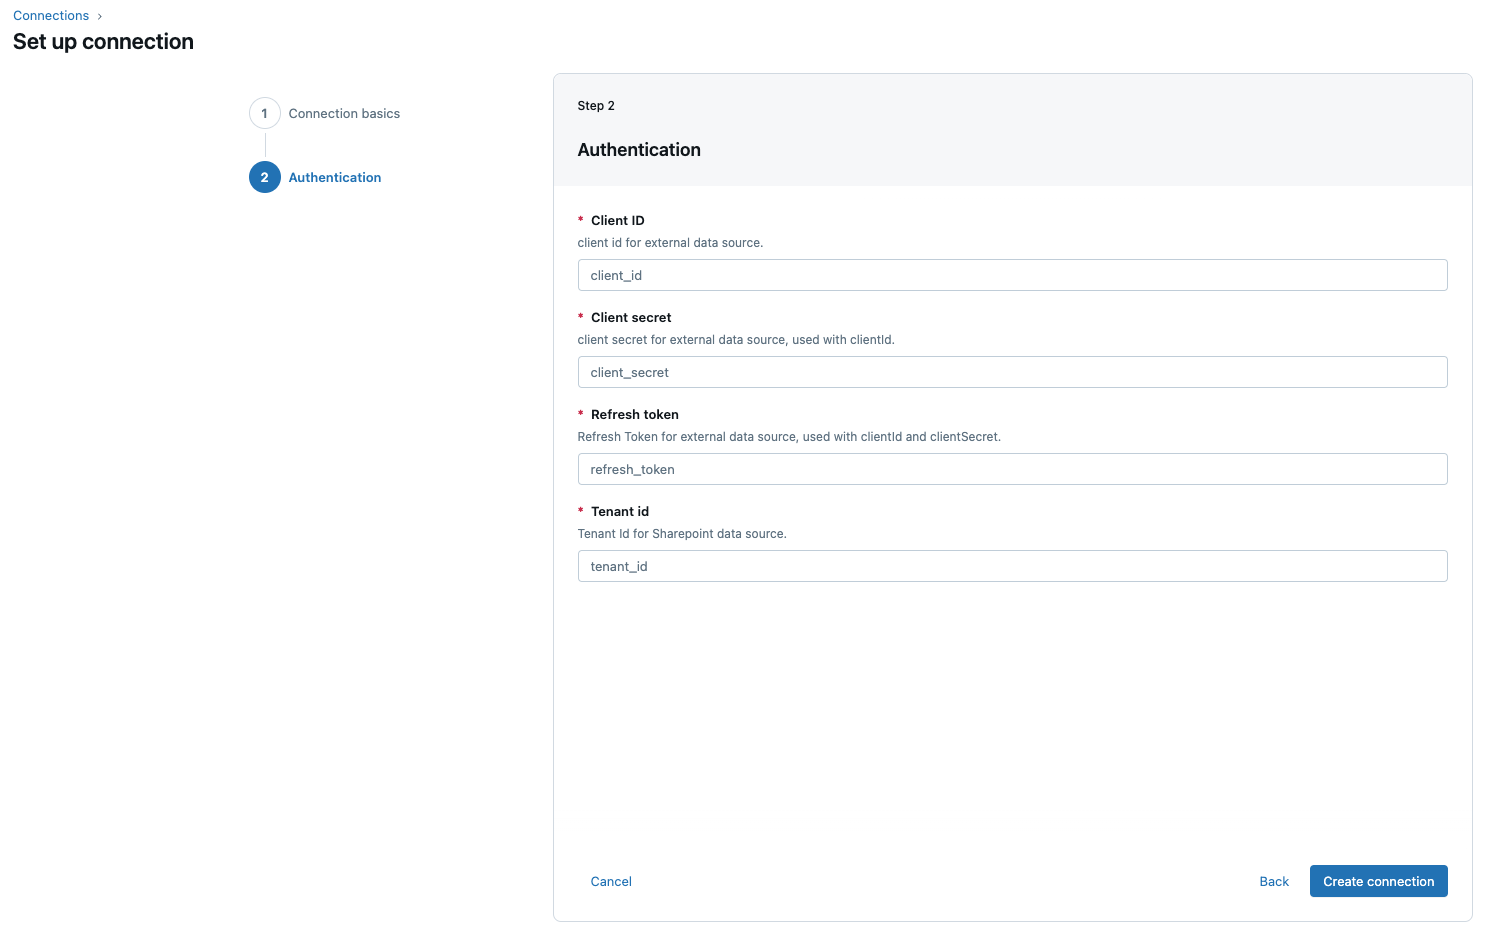
On the Authentication page, enter the following credentials for your Microsoft Entra ID app:
- Tenant ID: The tenant ID that you retrieved in the source setup.
- Client ID: The client ID that you retrieved in the source setup.
- Client secret: The client secret that you retrieved in the source setup.
- Refresh token: The refresh token that you retrieved in the source setup.

-
Click Create connection.
SQL Server
- In the Databricks workspace, click Catalog > External Data > Connections.
- Click Create connection.
- Enter a unique Connection name.
- For Connection type select SQL Server.
- For Host, specify the SQL Server domain name.
- For User and Password, enter your SQL Server login credentials.
- Click Create connection.
Workday Reports
To create a Workday Reports connection in Catalog Explorer, do the following:
- Create Workday access credentials. For instructions, see Configure Workday reports for ingestion.
- In the Databricks workspace, click Catalog > External locations > Connections > Create connection.
- For Connection name, enter a unique name for the Workday connection.
- For Connection type, select Workday Reports.
- For Auth type, select OAuth Refresh Token or Username and password (basic authentication), then click Next.
- (OAuth refresh token) On the Authentication page, enter the Client ID, Client secret, and Refresh token that you obtained in the source setup.
- (Basic authentication) Enter your Workday username and password.
- Click Create connection.
Zendesk Support
This feature is in Beta. Workspace admins can control access to this feature from the Previews page. See Manage Databricks previews.
To create a Zendesk Support connection in Catalog Explorer, do the following:
-
Configure OAuth in Zendesk Support. See Configure Zendesk Support for OAuth.
-
In the Databricks workspace, click Catalog > External Data > Connections.
-
Enter a unique Connection name.
-
For Connection type, select Zendesk Support.
-
(Optional) Add a comment.
-
Click Next.
-
On the Authentication page, enter the following credentials:
- Subdomain: Your Zendesk subdomain (for example,
your-companyfromhttps://your-company.zendesk.com). - Client ID: The OAuth client identifier from the source setup.
- Client secret: The OAuth client secret from the source setup.
- Subdomain: Your Zendesk subdomain (for example,
-
Click Sign in with Zendesk Support. You're redirected to the Zendesk authorization page.
-
Complete the authentication process and authorize the application.
-
You're redirected back to Databricks. Click Create connection.
Next step
After you create a connection to your managed ingestion source in Catalog Explorer, any user with the USE CONNECTION privilege on the connection can create an ingestion pipeline in the following ways:
- Ingestion wizard (supported connectors only)
- Databricks Asset Bundles
- Databricks APIs
- Databricks SDKs
- Databricks CLI
For instructions to create a pipeline, see the managed connector documentation.