Author an AI agent and deploy it on Databricks Apps
Build an AI agent and deploy it using Databricks Apps. Databricks Apps gives you full control over the agent code, server configuration, and deployment workflow. This approach is ideal when you need custom server behavior, git-based versioning, or local IDE development.
Every conversational agent template includes a built-in chat UI (shown above) with no additional setup required. The chat UI supports streaming responses, markdown rendering, Databricks authentication, and optional persistent chat history.
Requirements
Enable Databricks Apps in your workspace. See Set up your Databricks Apps workspace and development environment.
Step 1. Clone the agent app template
Get started by using a pre-built agent template from the Databricks app templates repository.
This tutorial uses the agent-openai-agents-sdk template, which includes:
- An agent created using OpenAI Agent SDK
- Starter code for an agent application with a conversational REST API and an interactive chat UI
- Code to evaluate the agent using MLflow
Choose one of the following paths to set up the template:
- Workspace UI
- Clone from GitHub
Install the app template using the Workspace UI. This installs the app and deploys it to a compute resource in your workspace. You can then sync the application files to your local environment for further development.
-
In your Databricks workspace, click + New > App.
-
Click Agents > Agent - OpenAI Agents SDK.
-
Create a new MLflow experiment with the name
openai-agents-templateand complete the rest of the set up to install the template. -
After you create the app, click the app URL to open the chat UI.
After you create the app, download the source code to your local machine to customize it:
-
Copy the first command under Sync the files
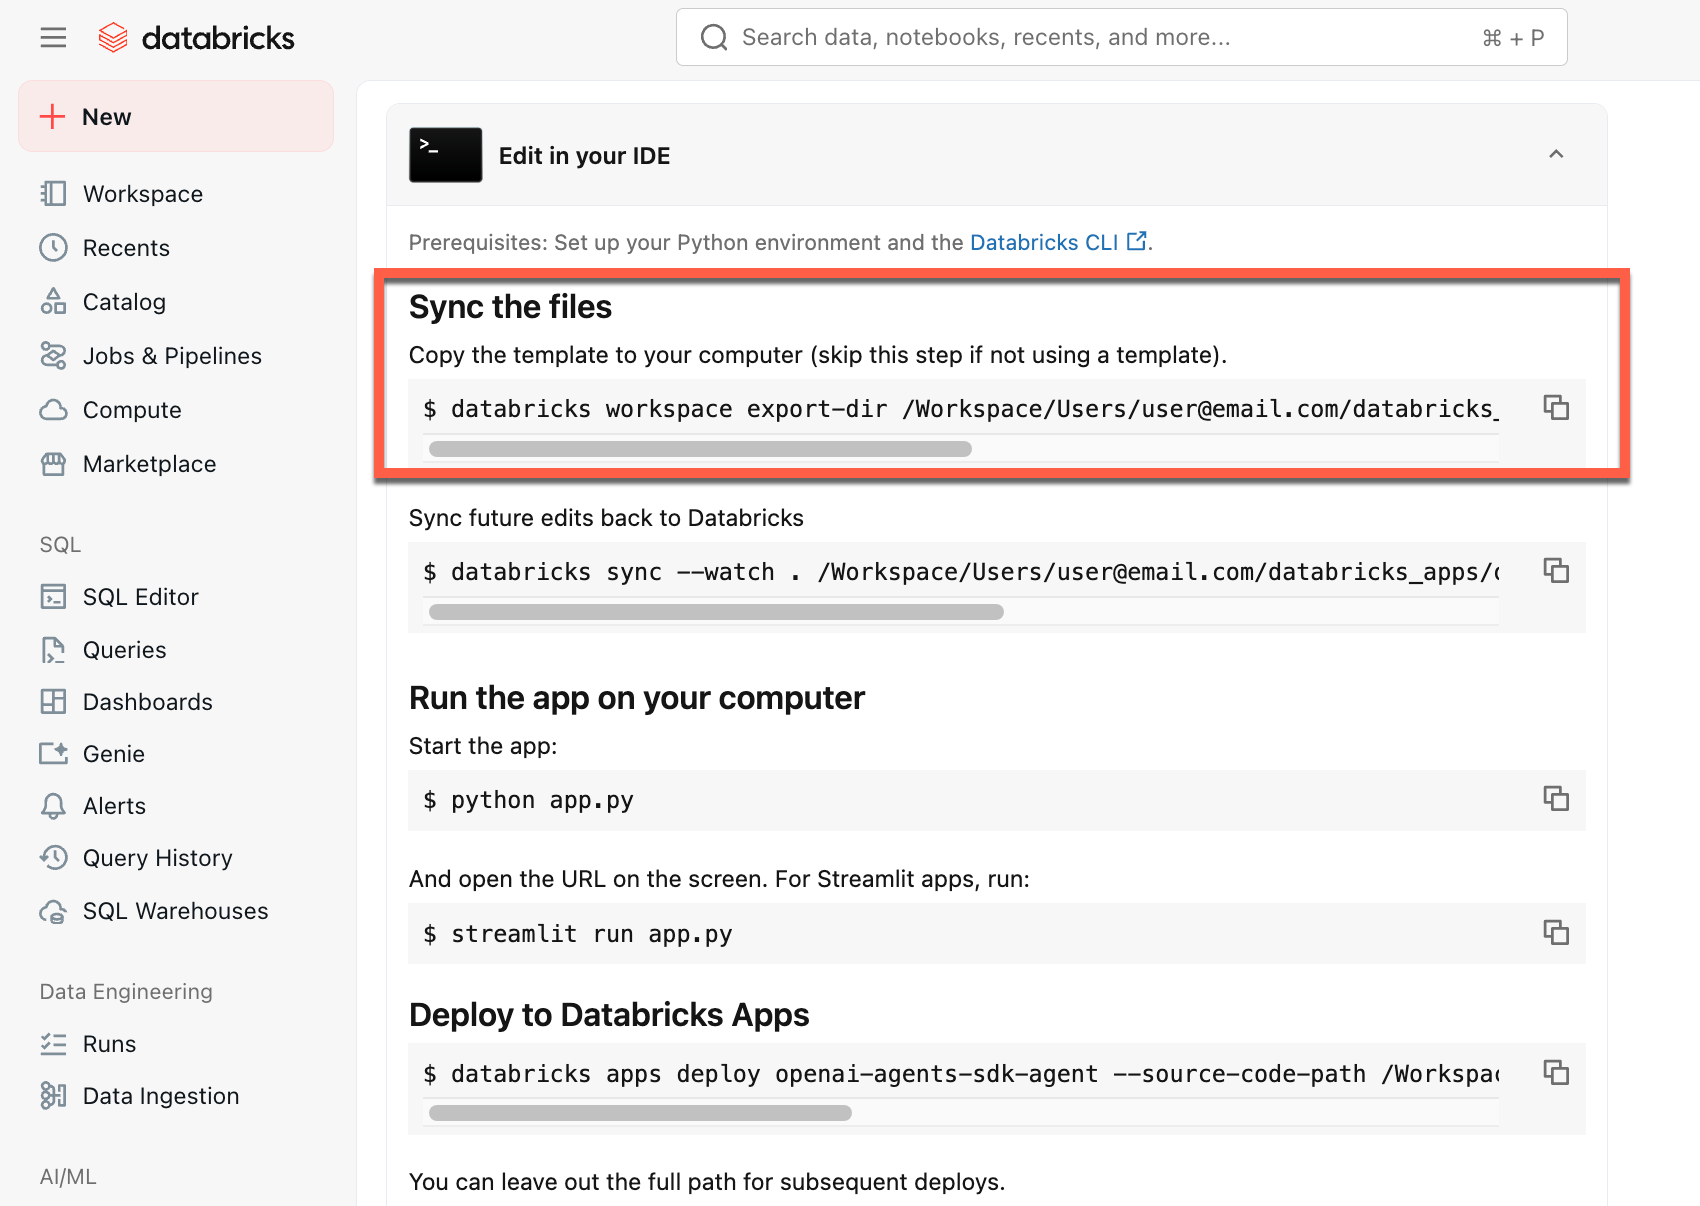
-
In a local terminal, run the copied command.
To start from a local environment, clone the agent template repository and open the agent-openai-agents-sdk directory:
git clone https://github.com/databricks/app-templates.git
cd app-templates/agent-openai-agents-sdk
Step 2. Understand the agent application
The agent template demonstrates a production-ready architecture with these key components. Open the following sections for more details about each component:

Open the following sections for more details about each component:
 Built-in chat UI
The agent template automatically fetches and runs the chat app template as its frontend. This chat UI is bundled into the same Databricks Apps deployment and served alongside your agent, so there is no additional setup required.
You can customize the chat UI directly in your project. For more details on the chat app's features, including how to enable persistent chat history and user feedback collection, see Build and share a chat UI with Databricks Apps.
 MLflow AgentServer
An async FastAPI server that handles agent requests with built-in tracing and observability. The AgentServer provides the /invocations endpoint for querying your agent and automatically manages request routing, logging, and error handling.

ResponsesAgent interface
ResponsesAgent interfaceDatabricks recommends MLflow ResponsesAgent to build agents. ResponsesAgent lets you build agents with any third-party framework, then integrate it with Databricks AI features for robust logging, tracing, evaluation, deployment, and monitoring capabilities.

To learn how to create a ResponsesAgent, see the examples in MLflow documentation - ResponsesAgent for Model Serving.
ResponsesAgent provides the following benefits:
-
Advanced agent capabilities
- Multi-agent support
- Streaming output: Stream the output in smaller chunks.
- Comprehensive tool-calling message history: Return multiple messages, including intermediate tool-calling messages, for improved quality and conversation management.
- Tool-calling confirmation support
- Long-running tool support
-
Streamlined development, deployment, and monitoring
- Author agents using any framework: Wrap any existing agent using the
ResponsesAgentinterface to get out-of-the-box compatibility with AI Playground, Agent Evaluation, and Agent Monitoring. - Typed authoring interfaces: Write agent code using typed Python classes, benefiting from IDE and notebook autocomplete.
- Automatic tracing: MLflow automatically aggregates streamed responses in traces for easier evaluation and display.
- Compatible with the OpenAI
Responsesschema: See OpenAI: Responses vs. ChatCompletion.
- Author agents using any framework: Wrap any existing agent using the
 OpenAI Agents SDK
The template uses the OpenAI Agents SDK as the agent framework for conversation management and tool orchestration. You can author agents using any framework. The key is wrapping your agent with MLflow ResponsesAgent interface.
 MCP (Model Context Protocol) servers
The template connects to Databricks MCP servers to give agents access to tools and data sources. See Model Context Protocol (MCP) on Databricks.
Author agents using AI coding assistants
Databricks recommends using AI coding assistants such as Claude, Cursor, and Copilot to author agents. Use the provided agent skills, in /.claude/skills, and the AGENTS.md file to help AI assistants understand the project structure, available tools, and best practices. Agents can automatically read those files to develop and deploy the Databricks Apps.
Advanced authoring topics
Streaming responses
Streaming responses
Streaming allows agents to send responses in real-time chunks instead of waiting for the complete response. To implement streaming with ResponsesAgent, emit a series of delta events followed by a final completion event:
- Emit delta events: Send multiple
output_text.deltaevents with the sameitem_idto stream text chunks in real-time. - Finish with done event: Send a final
response.output_item.doneevent with the sameitem_idas the delta events containing the complete final output text.
Each delta event streams a chunk of text to the client. The final done event contains the complete response text and signals Databricks to do the following:
- Trace your agent's output with MLflow tracing
- Aggregate streamed responses in AI Gateway inference tables
- Show the complete output in the AI Playground UI
Streaming error propagation
Mosaic AI propagates any errors encountered while streaming with the last token under databricks_output.error. It is up to the calling client to properly handle and surface this error.
{
  "delta": …,
  "databricks_output": {
    "trace": {...},
    "error": {
      "error_code": BAD_REQUEST,
      "message": "TimeoutException: Tool XYZ failed to execute."
    }
  }
}
Custom inputs and outputs
Custom inputs and outputs
Some scenarios might require additional agent inputs, such as client_type and session_id, or outputs like retrieval source links that should not be included in the chat history for future interactions.
For these scenarios, MLflow ResponsesAgent natively supports the fields custom_inputs and custom_outputs. You can access the custom inputs via request.custom_inputs in the framework examples above.
The Agent Evaluation review app does not support rendering traces for agents with additional input fields.
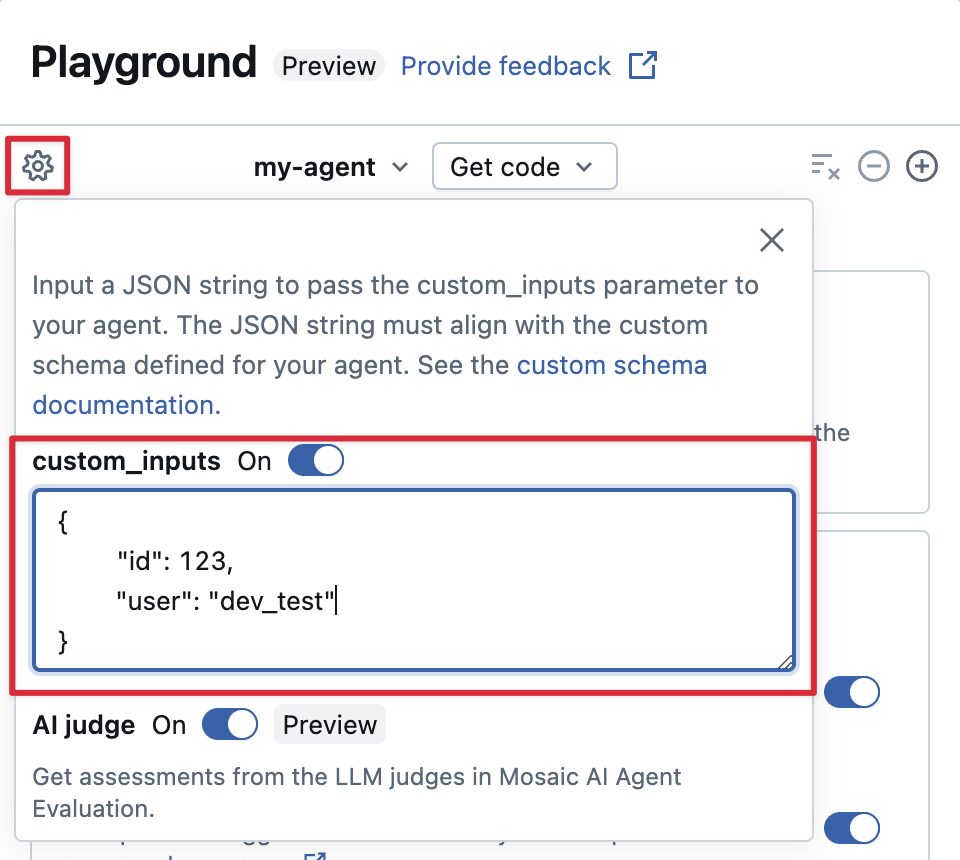
Provide custom_inputs in the AI Playground and review app
If your agent accepts additional inputs using the custom_inputs field, you can manually provide these inputs in both the AI Playground and the review app.
-
In either the AI Playground or the Agent Review App, select the gear icon
 .
. -
Enable custom_inputs.
-
Provide a JSON object that matches your agent's defined input schema.
Custom retriever schemas
Custom retriever schemas
AI agents commonly use retrievers to find and query unstructured data from vector search indices. For example retriever tools, see Connect agents to unstructured data.
Trace these retrievers within your agent with MLflow RETRIEVER spans to enable Databricks product features, including:
- Automatically displaying links to retrieved source documents in the AI Playground UI
- Automatically running retrieval groundedness and relevance judges in Agent Evaluation
Databricks recommends using retriever tools provided by Databricks AI Bridge packages like databricks_langchain.VectorSearchRetrieverTool and databricks_openai.VectorSearchRetrieverTool because they already conform to the MLflow retriever schema. See Locally develop Vector Search retriever tools with AI Bridge.
If your agent includes retriever spans with a custom schema, call mlflow.models.set_retriever_schema when you define your agent in code. This maps your retriever's output columns to MLflow's expected fields (primary_key, text_column, doc_uri).
import mlflow
# Define the retriever's schema by providing your column names
# For example, the following call specifies the schema of a retriever that returns a list of objects like
# [
#     {
#         'document_id': '9a8292da3a9d4005a988bf0bfdd0024c',
#         'chunk_text': 'MLflow is an open-source platform, purpose-built to assist machine learning practitioners...',
#         'doc_uri': 'https://mlflow.org/docs/latest/index.html',
#         'title': 'MLflow: A Tool for Managing the Machine Learning Lifecycle'
#     },
#     {
#         'document_id': '7537fe93c97f4fdb9867412e9c1f9e5b',
#         'chunk_text': 'A great way to get started with MLflow is to use the autologging feature. Autologging automatically logs your model...',
#         'doc_uri': 'https://mlflow.org/docs/latest/getting-started/',
#         'title': 'Getting Started with MLflow'
#     },
# ...
# ]
mlflow.models.set_retriever_schema(
    # Specify the name of your retriever span
    name="mlflow_docs_vector_search",
    # Specify the output column name to treat as the primary key (ID) of each retrieved document
    primary_key="document_id",
    # Specify the output column name to treat as the text content (page content) of each retrieved document
    text_column="chunk_text",
    # Specify the output column name to treat as the document URI of each retrieved document
    doc_uri="doc_uri",
    # Specify any other columns returned by the retriever
    other_columns=["title"],
)
The doc_uri column is especially important when evaluating the retriever's performance. doc_uri is the main identifier for documents returned by the retriever, allowing you to compare them against ground truth evaluation sets. See Evaluation sets (MLflow 2).
Step 3. Run the agent app locally
Set up your local environment:
-
Install
uv(Python package manager),nvm(Node version manager), and the Databricks CLI:uvinstallationnvminstallation- Run the following to use Node 20 LTS:
Bash
nvm use 20 databricks CLIinstallation
-
Change directory to the
agent-openai-agents-sdkfolder. -
Run the provided quickstart scripts to install dependencies, set up your environment, and start the app.
Bashuv run quickstart
uv run start-app
In a browser, go to http://localhost:8000 to open the built-in chat UI and start chatting with the agent.
Step 4. Configure authentication
Your agent needs authentication to access Databricks resources. Databricks Apps provides two authentication methods:
- App authorization (default)
- User authorization
App authorization uses a service principal that Databricks automatically creates for your app. All users share the same permissions.
Grant permissions to the MLflow experiment:
- Click Edit on your app home page.
- Navigate to the Configure step.
- In the App resources section, add the MLflow experiment resource with
Can Editpermission.
For other resources (Vector Search, Genie spaces, serving endpoints), add them the same way in the App resources section.
See App authorization for more details.
User authorization lets your agent act with each user's individual permissions. Use this when you need per-user access control or audit trails.
Add this code to your agent:
from agent_server.utils import get_user_workspace_client

# In your agent code (inside @invoke or @stream)
user_workspace = get_user_workspace_client()

# Access resources with the user's permissions
response = user_workspace.serving_endpoints.query(name="my-endpoint", inputs=inputs)
Important: Initialize get_user_workspace_client() inside your @invoke or @stream functions, not during app startup. User credentials only exist when handling a request.
Configure scopes: Add authorization scopes in the Databricks Apps UI to define which APIs your agent can access on behalf of users.
See User authorization for complete setup instructions.
Step 5. Evaluate the agent
The template includes agent evaluation code. See agent_server/evaluate_agent.py for more information. Evaluate the relevance and safety of your agent's responses by running the following in a terminal:
uv run agent-evaluate
Step 6. Deploy the agent to Databricks Apps
After configuring authentication, deploy your agent to Databricks. Ensure you have the Databricks CLI installed and configured.
-
If you cloned the repository locally, create the Databricks app before deploying it. If you created your app through the workspace UI, skip this step as the app and MLflow experiment are already configured.
Bashdatabricks apps create agent-openai-agents-sdk -
Sync local files to your workspace. See Deploy the app.
BashDATABRICKS_USERNAME=$(databricks current-user me | jq -r .userName)
databricks sync . "/Users/$DATABRICKS_USERNAME/agent-openai-agents-sdk" -
Deploy your Databricks App.
Bashdatabricks apps deploy agent-openai-agents-sdk --source-code-path /Workspace/Users/$DATABRICKS_USERNAME/agent-openai-agents-sdk
For future updates to the agent, sync and redeploy your agent.
Step 7. Query the deployed agent
Users query your deployed agent using OAuth tokens. Personal access tokens (PATs) are not supported for Databricks Apps.
Generate an OAuth token using the Databricks CLI:
databricks auth login --host <https://host.databricks.com>
databricks auth token
Use the token to query the agent:
curl -X POST <app-url.databricksapps.com>/invocations \
   -H "Authorization: Bearer <oauth token>" \
   -H "Content-Type: application/json" \
   -d '{ "input": [{ "role": "user", "content": "hi" }], "stream": true }'
Limitations
- Only medium and large compute sizes are supported. See Configure the compute size for a Databricks app.
- The MLflow Review App Chat UI does not currently support agents deployed on Databricks Apps. To evaluate existing traces, use labeling sessions, which work regardless of deployment method. Databricks is building review and feedback support directly into the chatbot template.