Get started: Build your first machine learning model on Databricks
This example notebook illustrates how to train a machine learning classification model on Databricks. Databricks Runtime for Machine Learning comes with many libraries pre-installed, including scikit-learn for training and pre-processing algorithms, MLflow to track the model development process, and Hyperopt with SparkTrials to scale hyperparameter tuning.
In this notebook, you create a classification model to predict whether a wine is considered "high-quality". The dataset consists of 11 features of different wines (for example, alcohol content, acidity, and residual sugar) and a quality ranking between 1 to 10.
This tutorial covers:
- Part 1: Train a classification model with MLflow tracking
- Part 2: Hyperparameter tuning to improve model performance
- Part 3: Save results and models to Unity Catalog
- Part 4: Deploy the model
For more details on productionizing machine learning on Databricks including model lifecycle management and model inference, see the ML End to End Example.
The dataset is available from the UCI Machine Learning Repository and is presented in Modeling wine preferences by data mining from physicochemical properties [Cortez et al., 2009].
Requirements
- Cluster running one of the following Databricks Runtime versions: 13.3 LTS ML, 14.3 LTS ML, 15.4 LTS ML, or 16.4 LTS ML. For Databricks Runtime 17.3 LTS ML or above, see Tutorial: Build your first machine learning model on Databricks.
Setup
In this section, you do the following:
- Configure the MLflow client to use Unity Catalog as the model registry.
- Set the catalog and schema where the model will be registered.
- Read in the data and save it to tables in Unity Catalog.
- Preprocess the data.
Configure MLflow client
By default, the MLflow Python client creates models in the Databricks workspace model registry. To save models in Unity Catalog, configure the MLflow client as shown in the following cell.
import mlflow
mlflow.set_registry_uri("databricks-uc")
The following cell sets the catalog and schema where the model will be registered. You must have USE CATALOG privilege on the catalog, and USE_SCHEMA, CREATE_TABLE, and CREATE_MODEL privileges on the schema. Change the catalog and schema names in the following cell if necessary.
For more information, see the Unity Catalog documentation.
# Specify the catalog and schema to use. You must have USE_CATALOG privilege on the catalog and USE_SCHEMA, CREATE_TABLE, and CREATE_MODEL privileges on the schema.
# Change the catalog and schema here if necessary.
CATALOG_NAME = "main"
SCHEMA_NAME = "default"
Read in data and save it to tables in Unity Catalog
The dataset is available in databricks-datasets. In the following cell, you read the data in from .csv files into Spark DataFrames. You then write the DataFrames to tables in Unity Catalog. This both persists the data and lets you control how to share it with others.
white_wine = spark.read.csv("/databricks-datasets/wine-quality/winequality-white.csv", sep=';', header=True)
red_wine = spark.read.csv("/databricks-datasets/wine-quality/winequality-red.csv", sep=';', header=True)

# Remove the spaces from the column names
for c in white_wine.columns:
    white_wine = white_wine.withColumnRenamed(c, c.replace(" ", "_"))
for c in red_wine.columns:
    red_wine = red_wine.withColumnRenamed(c, c.replace(" ", "_"))

# Define table names
red_wine_table = f"{CATALOG_NAME}.{SCHEMA_NAME}.red_wine"
white_wine_table = f"{CATALOG_NAME}.{SCHEMA_NAME}.white_wine"

# Write to tables in Unity Catalog
spark.sql(f"DROP TABLE IF EXISTS {red_wine_table}")
spark.sql(f"DROP TABLE IF EXISTS {white_wine_table}")
white_wine.write.saveAsTable(f"{CATALOG_NAME}.{SCHEMA_NAME}.white_wine")
red_wine.write.saveAsTable(f"{CATALOG_NAME}.{SCHEMA_NAME}.red_wine")
Preprocess data
# Import required libraries
import numpy as np
import pandas as pd
import sklearn.datasets
import sklearn.metrics
import sklearn.model_selection
import sklearn.ensemble

import matplotlib.pyplot as plt

from hyperopt import fmin, tpe, hp, SparkTrials, Trials, STATUS_OK
from hyperopt.pyll import scope
# Load data from Unity Catalog as Pandas dataframes
white_wine = spark.read.table(f"{CATALOG_NAME}.{SCHEMA_NAME}.white_wine").toPandas()
red_wine = spark.read.table(f"{CATALOG_NAME}.{SCHEMA_NAME}.red_wine").toPandas()

# Add Boolean fields for red and white wine
white_wine['is_red'] = 0.0
red_wine['is_red'] = 1.0
data_df = pd.concat([white_wine, red_wine], axis=0)

# Define classification labels based on the wine quality
data_labels = data_df['quality'].astype('int') >= 7
data_df = data_df.drop(['quality'], axis=1)

# Split 80/20 train-test
X_train, X_test, y_train, y_test = sklearn.model_selection.train_test_split(
  data_df,
  data_labels,
  test_size=0.2,
  random_state=1
)
Part 1. Train a classification model
# Enable MLflow autologging for this notebook
mlflow.autolog()
Next, train a classifier within the context of an MLflow run, which automatically logs the trained model and many associated metrics and parameters.
You can supplement the logging with additional metrics such as the model's AUC score on the test dataset.
with mlflow.start_run(run_name='gradient_boost') as run:
    model = sklearn.ensemble.GradientBoostingClassifier(random_state=0)

    # Models, parameters, and training metrics are tracked automatically
    model.fit(X_train, y_train)

    predicted_probs = model.predict_proba(X_test)
    roc_auc = sklearn.metrics.roc_auc_score(y_test, predicted_probs[:,1])
    roc_curve = sklearn.metrics.RocCurveDisplay.from_estimator(model, X_test, y_test)

    # Save the ROC curve plot to a file
    roc_curve.figure_.savefig("roc_curve.png")

    # The AUC score on test data is not automatically logged, so log it manually
    mlflow.log_metric("test_auc", roc_auc)

    # Log the ROC curve image file as an artifact
    mlflow.log_artifact("roc_curve.png")

    print("Test AUC of: {}".format(roc_auc))
View MLflow runs
To view the logged training run, click the Experiment icon ![]() at the upper right of the notebook to display the experiment sidebar. If necessary, click the refresh icon to fetch and monitor the latest runs.
at the upper right of the notebook to display the experiment sidebar. If necessary, click the refresh icon to fetch and monitor the latest runs.
![]()
To display the more detailed MLflow experiment page, click the experiment page icon. This page allows you to compare runs and view details for specific runs. See Track model development using MLflow.
Load models
You can also access the results for a specific run using the MLflow API. The code in the following cell illustrates how to load the model trained in a given MLflow run and use it to make predictions. You can also find code snippets for loading specific models on the MLflow run page.
# After a model has been logged, you can load it in different notebooks or jobs
# mlflow.pyfunc.load_model makes model prediction available under a common API
model_loaded = mlflow.pyfunc.load_model(
  'runs:/{run_id}/model'.format(
    run_id=run.info.run_id
  )
)

predictions_loaded = model_loaded.predict(X_test)
predictions_original = model.predict(X_test)

# The loaded model should match the original
assert(np.array_equal(predictions_loaded, predictions_original))
Part 2. Hyperparameter tuning
At this point, you have trained a simple model and used the MLflow tracking service to organize your work. Next, you can perform more sophisticated tuning using Hyperopt.
Parallel training with Hyperopt and SparkTrials
Hyperopt is a Python library for hyperparameter tuning. For more information about using Hyperopt in Databricks, see Use distributed training algorithms with Hyperopt.
You can use Hyperopt with SparkTrials to run hyperparameter sweeps and train multiple models in parallel. This reduces the time required to optimize model performance. MLflow tracking is integrated with Hyperopt to automatically log models and parameters.
# Define the search space to explore
search_space = {
  'n_estimators': scope.int(hp.quniform('n_estimators', 20, 1000, 1)),
  'learning_rate': hp.loguniform('learning_rate', -3, 0),
  'max_depth': scope.int(hp.quniform('max_depth', 2, 5, 1)),
}

def train_model(params):
  # Enable autologging on each worker
  mlflow.autolog()
  with mlflow.start_run(nested=True):
    model_hp = sklearn.ensemble.GradientBoostingClassifier(
      random_state=0,
      **params
    )
    model_hp.fit(X_train, y_train)
    predicted_probs = model_hp.predict_proba(X_test)
    # Tune based on the test AUC
    # In production, you could use a separate validation set instead
    roc_auc = sklearn.metrics.roc_auc_score(y_test, predicted_probs[:,1])
    mlflow.log_metric('test_auc', roc_auc)

    # Set the loss to -1*auc_score so fmin maximizes the auc_score
    return {'status': STATUS_OK, 'loss': -1*roc_auc}

# SparkTrials distributes the tuning using Spark workers
# Greater parallelism speeds processing, but each hyperparameter trial has less information from other trials
# On smaller clusters try setting parallelism=2
spark_trials = SparkTrials(
  parallelism=1
)

with mlflow.start_run(run_name='gb_hyperopt') as run:
  # Use hyperopt to find the parameters yielding the highest AUC
  best_params = fmin(
    fn=train_model,
    space=search_space,
    algo=tpe.suggest,
    max_evals=32,
    trials=spark_trials)
Search runs to retrieve the best model
Because all of the runs are tracked by MLflow, you can retrieve the metrics and parameters for the best run using the MLflow search runs API to find the tuning run with the highest test auc.
This tuned model should perform better than the simpler models trained in Part 1.
# Sort runs by their test auc. In case of ties, use the most recent run.
best_run = mlflow.search_runs(
  order_by=['metrics.test_auc DESC', 'start_time DESC'],
  max_results=10,
).iloc[0]
print('Best Run')
print('AUC: {}'.format(best_run["metrics.test_auc"]))
print('Num Estimators: {}'.format(best_run["params.n_estimators"]))
print('Max Depth: {}'.format(best_run["params.max_depth"]))
print('Learning Rate: {}'.format(best_run["params.learning_rate"]))

best_model_pyfunc = mlflow.pyfunc.load_model(
  'runs:/{run_id}/model'.format(
    run_id=best_run.run_id
  )
)

# Make a dataset with all predictions
best_model_predictions = X_test
best_model_predictions["prediction"] = best_model_pyfunc.predict(X_test)
Part 3. Save results and models to Unity Catalog
predictions_table = f"{CATALOG_NAME}.{SCHEMA_NAME}.predictions"
spark.sql(f"DROP TABLE IF EXISTS {predictions_table}")

results = spark.createDataFrame(best_model_predictions)

# Write results back to Unity Catalog from Python
results.write.saveAsTable(f"{CATALOG_NAME}.{SCHEMA_NAME}.predictions")
model_uri = 'runs:/{run_id}/model'.format(
    run_id=best_run.run_id
  )

mlflow.register_model(model_uri, f"{CATALOG_NAME}.{SCHEMA_NAME}.wine_quality_model")
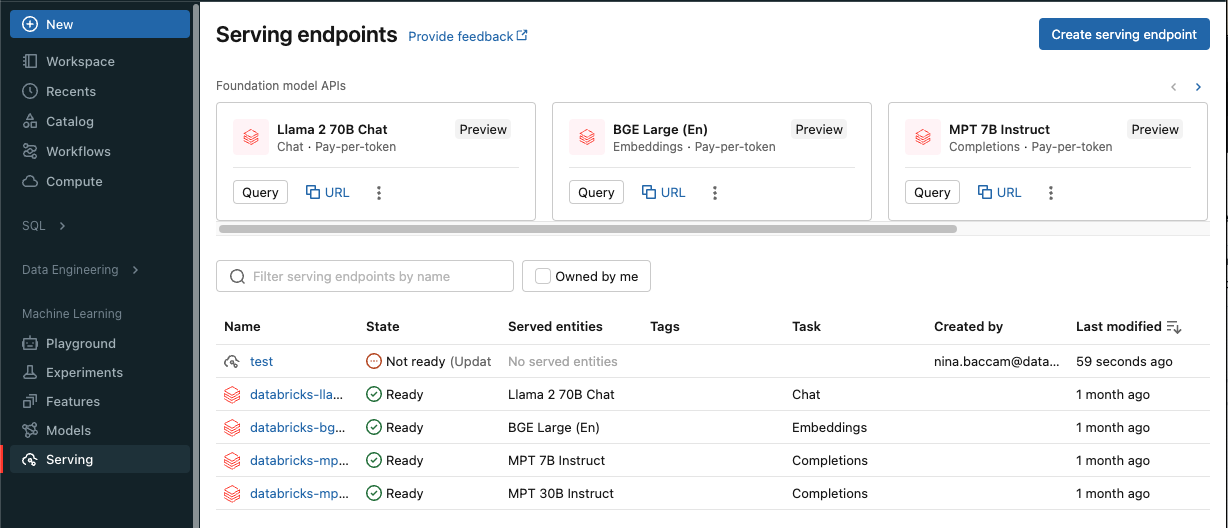
Part 4. Deploy model
After you save your model to Unity Catalog, you can deploy it using the Serving UI. The following instructions give a brief description. For more information, see Create custom model serving endpoints.
- Click Serving in the sidebar to display the Serving UI.
-
Click Create serving endpoint.
-
In the Name field provide a name for your endpoint.
-
In the Served entities section
- Click into the Entity field to open the Select served entity form.
- Select My models- Unity Catalog. The form dynamically updates based on your selection.
- Select the
wine_quality_modeland model version you want to serve. - Select 100 as the percentage of traffic you want to route to your served model.
- Select CPU as the compute type for this example.
- Under Compute Scale-out, select Small as the compute scale out size.
-
Click Create. The Serving endpoints page appears with Serving endpoint state shown as Not Ready.
-
When your endpoint is Ready, select Use to submit an inference request to the endpoint.