Ingest data from PostgreSQL
The PostgreSQL connector for Lakeflow Connect is in Public Preview. Reach out to your Databricks account team to enroll in the Public Preview.
This page describes how to ingest data from PostgreSQL and load it into Databricks using Lakeflow Connect. The PostgreSQL connector supports AWS RDS PostgreSQL, Aurora PostgreSQL, Amazon EC2, Azure Database for PostgreSQL, Azure virtual machines, GCP Cloud SQL for PostgreSQL, and on-premises PostgreSQL databases using Azure ExpressRoute, AWS Direct Connect, or VPN networking.
Before you begin
-
To create an ingestion gateway and an ingestion pipeline, you must meet the following requirements:
-
Your workspace is enabled for Unity Catalog.
-
Serverless compute is enabled for your workspace. See Serverless compute requirements.
-
If you plan to create a connection: You have
CREATE CONNECTIONprivileges on the metastore. See Manage privileges in Unity Catalog.If your connector supports UI-based pipeline authoring, you can create the connection and the pipeline at the same time by completing the steps on this page. However, if you use API-based pipeline authoring, you must create the connection in Catalog Explorer before you complete the steps on this page. See Connect to managed ingestion sources.
-
If you plan to use an existing connection: You have
USE CONNECTIONprivileges orALL PRIVILEGESon the connection. -
You have
USE CATALOGprivileges on the target catalog. -
You have
USE SCHEMA,CREATE TABLE, andCREATE VOLUMEprivileges on an existing schema orCREATE SCHEMAprivileges on the target catalog.
- You have access to a primary PostgreSQL instance. Logical replication is only supported on primary instances and not on read replicas.
- Unrestricted permissions to create clusters, or a custom policy (API only). A custom policy for the gateway must meet the following requirements:
-
Family: Job Compute
-
Policy family overrides:
{
  "cluster_type": {
    "type": "fixed",
    "value": "dlt"
  },
  "num_workers": {
    "type": "unlimited",
    "defaultValue": 1,
    "isOptional": true
  },
  "runtime_engine": {
    "type": "fixed",
    "value": "STANDARD",
    "hidden": true
  }
} -
Databricks recommends specifying the smallest possible worker nodes for ingestion gateways because they do not impact the gateway performance. The following compute policy enables Databricks to scale the ingestion gateway to meet the needs of your workload. The minimum requirement is 8 cores to enable efficient and performant data extraction from your source database.
Python{
"driver_node_type_id": {
"type": "fixed",
"value": "n2-highmem-64"
},
"node_type_id": {
"type": "fixed",
"value": "n2-standard-4"
}
}For more information about cluster policies, see Select a compute policy.
-
-
-
To ingest from PostgreSQL, you must also complete the source setup.
Create a gateway and an ingestion pipeline
Databricks UI
-
In the sidebar of the Databricks workspace, click Data Ingestion.
-
On the Add data page, under Databricks connectors, click PostgreSQL.
-
On the Connection page of the ingestion wizard, select the connection that stores your PostgreSQL access credentials. If you have the
CREATE CONNECTIONprivilege on the metastore, you can click Create connection to create a new connection with the authentication details in Create a PostgreSQL connection.
 -
Click Next.
-
On the Ingestion setup page, enter a unique name for the ingestion pipeline. This pipeline moves data from the staging location to the destination.
-
Select a catalog and a schema to write event logs to. The event log contains audit logs, data quality checks, pipeline progress, and errors. If you have
USE CATALOGandCREATE SCHEMAprivileges on the catalog, you can click Create schema in the drop-down menu to create a new schema. -
(Optional) Set Auto full refresh for all tables to On. When auto refresh is on, the pipeline automatically tries to fix issues like log cleanup events and certain types of schema evolution by fully refreshing the impacted table. If history tracking is enabled, a full refresh erases that history.
-
Enter a unique name for the ingestion gateway. The gateway is a pipeline that extracts changes from the source and stages them for the ingestion pipeline to load.
-
Select a catalog and a schema for the Staging location. A volume is created in this location to stage extracted data. If you have
USE CATALOGandCREATE SCHEMAprivileges on the catalog, you can click Create schema in the drop-down menu to create a new schema. -
Click Create pipeline and continue.
-
On the Source page, select the tables to ingest. If you select specific tables, you can configure table settings:
a. (Optional) On the Settings tab, specify a Destination name for each ingested table. This is useful to differentiate between destination tables when you ingest an object into the same schema multiple times. See Name a destination table.
a. (Optional) Change the default History tracking setting. See Enable history tracking (SCD type 2).
-
Click Next, then click Save and continue.
-
On the Destination page, select a catalog and a schema to load data into. If you have
USE CATALOGandCREATE SCHEMAprivileges on the catalog, you can click Create schema in the drop-down menu to create a new schema. -
Click Save and continue.
-
On the Database setup page, enter the replication slot name and publication name for each database you want to ingest from.
-
(Optional) On the Schedules and notifications page, click
Create schedule. Set the frequency to refresh the destination tables. -
(Optional) Click
Add notification to set email notifications for pipeline operation success or failure, then click Save and run pipeline.
Before you ingest using Declarative Automation Bundles, Databricks APIs, Databricks SDKs, the Databricks CLI, or Terraform, you must have access to an existing Unity Catalog connection. For instructions, see Create a PostgreSQL connection.
Create the staging catalog and schema
The staging catalog and schema can be the same as the destination catalog and schema. The staging catalog cannot be a foreign catalog.
- CLI
export CONNECTION_NAME="my_postgresql_connection"
export TARGET_CATALOG="main"
export TARGET_SCHEMA="lakeflow_postgresql_connector_cdc"
export STAGING_CATALOG=$TARGET_CATALOG
export STAGING_SCHEMA=$TARGET_SCHEMA
export DB_HOST="postgresql-instance.example.com"
export DB_PORT="5432"
export DB_DATABASE="your_database"
export DB_USER="databricks_replication"
export DB_PASSWORD="your_secure_password"

output=$(databricks connections create --json '{
  "name": "'"$CONNECTION_NAME"'",
  "connection_type": "POSTGRESQL",
  "options": {
    "host": "'"$DB_HOST"'",
    "port": "'"$DB_PORT"'",
    "database": "'"$DB_DATABASE"'",
    "user": "'"$DB_USER"'",
    "password": "'"$DB_PASSWORD"'"
  }
}')

export CONNECTION_ID=$(echo $output | jq -r '.connection_id')
The ingestion gateway extracts snapshot and change data from the source database and stores it in the Unity Catalog staging volume. You must run the gateway as a continuous pipeline. This is critical for PostgreSQL to prevent Write-Ahead Log (WAL) bloat and ensure that replication slots do not accumulate unconsumed changes.
The ingestion pipeline applies the snapshot and change data from the staging volume into destination streaming tables.
Declarative Automation Bundles
You can deploy an ingestion pipeline using Declarative Automation Bundles. Bundles can contain YAML definitions of jobs and tasks, are managed using the Databricks CLI, and can be shared and run in different target workspaces (such as development, staging, and production). For more information, see Declarative Automation Bundles.
-
Create a bundle using the Databricks CLI:
Bashdatabricks bundle init -
Add two new resource files to the bundle:
- A pipeline definition file (for example,
resources/postgresql_pipeline.yml). - A job definition file that controls the frequency of data ingestion (for example,
resources/postgresql_job.yml).
The following is an example
resources/postgresql_pipeline.ymlfile:YAMLvariables:
# Common variables used multiple places in the DAB definition.
gateway_name:
default: postgresql-gateway
dest_catalog:
default: main
dest_schema:
default: ingest-destination-schema
resources:
pipelines:
gateway:
name: ${var.gateway_name}
gateway_definition:
connection_name: <postgresql-connection>
gateway_storage_catalog: main
gateway_storage_schema: ${var.dest_schema}
gateway_storage_name: ${var.gateway_name}
catalog: ${var.dest_catalog}
schema: ${var.dest_schema}
pipeline_postgresql:
name: postgresql-ingestion-pipeline
ingestion_definition:
ingestion_gateway_id: ${resources.pipelines.gateway.id}
source_type: POSTGRESQL
objects:
# Modify this with your tables!
- table:
# Ingest the table public.orders to dest_catalog.dest_schema.orders.
source_catalog: your_database
source_schema: public
source_table: orders
destination_catalog: ${var.dest_catalog}
destination_schema: ${var.dest_schema}
- schema:
# Ingest all tables in the public schema to dest_catalog.dest_schema. The destination
# table name will be the same as it is on the source.
source_catalog: your_database
source_schema: public
destination_catalog: ${var.dest_catalog}
destination_schema: ${var.dest_schema}
source_configurations:
- catalog:
source_catalog: your_database
postgres:
slot_config:
slot_name: databricks_slot
publication_name: databricks_publication
catalog: ${var.dest_catalog}
schema: ${var.dest_schema}The following is an example
resources/postgresql_job.ymlfile:YAMLresources:
jobs:
postgresql_dab_job:
name: postgresql_dab_job
trigger:
# Run this job every day, exactly one day from the last run
# See https://docs.databricks.com/api/workspace/jobs/create#trigger
periodic:
interval: 1
unit: DAYS
email_notifications:
on_failure:
- <email-address>
tasks:
- task_key: refresh_pipeline
pipeline_task:
pipeline_id: ${resources.pipelines.pipeline_postgresql.id} - A pipeline definition file (for example,
-
Deploy the pipeline using the Databricks CLI:
Bashdatabricks bundle deploy
Databricks notebook
Update the Configuration cell in the following notebook with the source connection, target catalog, target schema, and tables to ingest from the source.
Create gateway and ingestion pipeline
Databricks CLI
To create the gateway:
gateway_json=$(cat <<EOF
{
  "name": "$GATEWAY_PIPELINE_NAME",
  "catalog": "$STAGING_CATALOG",
  "schema": "$STAGING_SCHEMA",
  "gateway_definition": {
    "connection_name": "$CONNECTION_NAME",
    "gateway_storage_catalog": "$STAGING_CATALOG",
    "gateway_storage_schema": "$STAGING_SCHEMA",
    "gateway_storage_name": "$GATEWAY_PIPELINE_NAME"
  }
}
EOF
)

output=$(databricks pipelines create --json "$gateway_json")
echo $output
export GATEWAY_PIPELINE_ID=$(echo $output | jq -r '.pipeline_id')
To create the ingestion pipeline:
pipeline_json=$(cat <<EOF
{
  "name": "$INGESTION_PIPELINE_NAME",
  "catalog": "$TARGET_CATALOG",
  "schema": "$TARGET_SCHEMA",
  "ingestion_definition": {
    "ingestion_gateway_id": "$GATEWAY_PIPELINE_ID",
    "source_type": "POSTGRESQL",
    "objects": [
      {
        "table": {
          "source_catalog": "your_database",
          "source_schema": "public",
          "source_table": "orders",
          "destination_catalog": "$TARGET_CATALOG",
          "destination_schema": "$TARGET_SCHEMA",
          "destination_table": "orders"
        }
      },
      {
        "schema": {
          "source_catalog": "your_database",
          "source_schema": "public",
          "destination_catalog": "$TARGET_CATALOG",
          "destination_schema": "$TARGET_SCHEMA"
        }
      }
    ],
    "source_configurations": [
      {
        "catalog": {
          "source_catalog": "your_database",
          "postgres": {
            "slot_config": {
              "slot_name": "databricks_slot",
              "publication_name": "databricks_publication"
            }
          }
        }
      }
    ]
  }
}
EOF
)

databricks pipelines create --json "$pipeline_json"
Requires Databricks CLI v0.276.0 or later.
Terraform
You can use Terraform to deploy and manage PostgreSQL ingestion pipelines. For a complete example framework, including Terraform configurations for creating gateways and ingestion pipelines, see the Lakeflow Connect Terraform examples repository on GitHub.
Start, schedule, and set alerts on your pipeline
For information about starting, scheduling, and setting alerts on your pipeline, see Common pipeline maintenance tasks.
Verify successful data ingestion
The list view on the pipeline details page shows the number of records processed as data is ingested. These numbers refresh automatically.
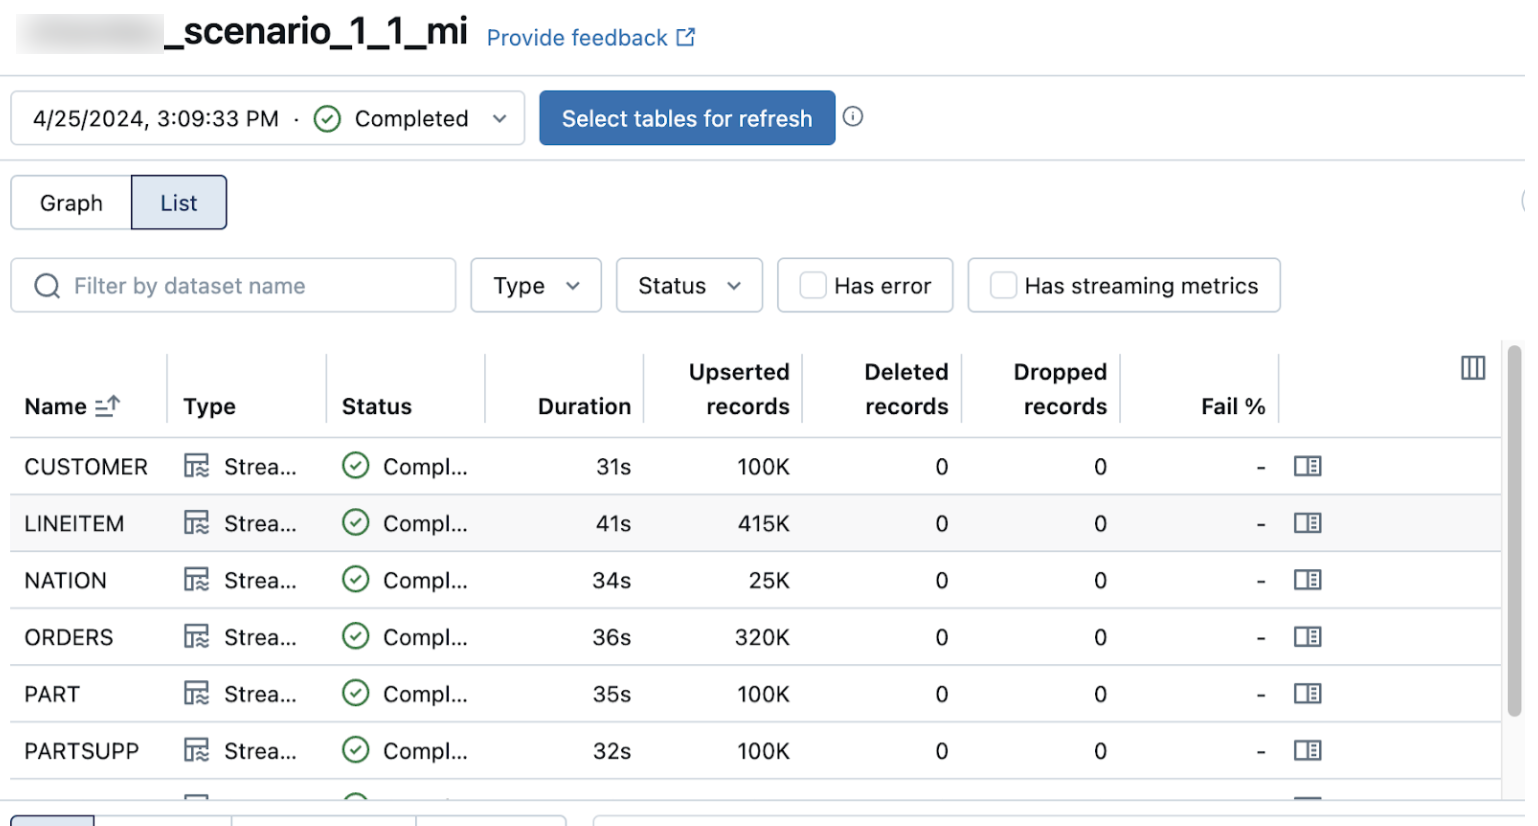
The Upserted records and Deleted records columns are not shown by default. You can enable them by clicking on the columns configuration ![]() button and selecting them.
button and selecting them.