Tutorial: Connect your development environment to MLflow
This page shows you how to create an MLflow Experiment and connect your development environment to it.
An MLflow Experiment is the container for your GenAI application. Learn more about MLflow Experiments in the Experiment data model concept guide.
Go the section relevant to your development environment:
Local development environment
Step 1: Install MLflow
Install MLflow with Databricks connectivity:
pip install --upgrade "mlflow[databricks]>=3.1"
Step 2: Create an MLflow Experiment
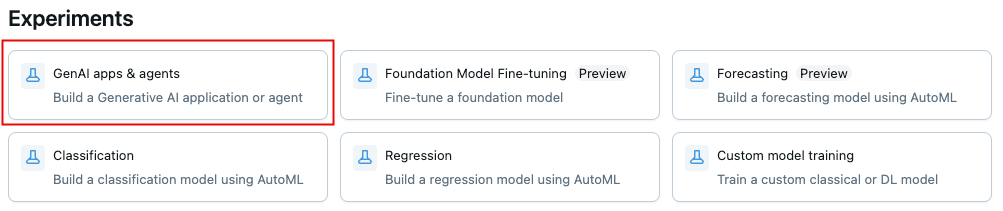
- Open your Databricks workspace.
- In the left sidebar, under AI/ML, click Experiments.
- At the top of the Experiments page, click GenAI apps & agents.
Step 3: Configure authentication
These steps describe using a Databricks Personal Access Token. MLflow also works with the other Databricks-supported authentication methods.
Choose one of the following authentication methods:
- Environment Variables
- .env File
- In your MLflow Experiment, click the Kebab menu icon
 > Log traces locally > click Generate API Key.
 - Copy and run the generated code in your terminal:
export DATABRICKS_TOKEN=<databricks-personal-access-token>
export DATABRICKS_HOST=https://<workspace-name>.cloud.databricks.com
export MLFLOW_TRACKING_URI=databricks
export MLFLOW_REGISTRY_URI=databricks-uc
export MLFLOW_EXPERIMENT_ID=<experiment-id>
- In your MLflow Experiment, click the Kebab menu icon > Log traces locally > click Generate API Key.
- Copy the generated code to a
.envfile in your project root:
DATABRICKS_TOKEN=<databricks-personal-access-token>
DATABRICKS_HOST=https://<workspace-name>.cloud.databricks.com
MLFLOW_TRACKING_URI=databricks
MLFLOW_REGISTRY_URI=databricks-uc
MLFLOW_EXPERIMENT_ID=<experiment-id>
- Install the
python-dotenvpackage:
pip install python-dotenv
- Load environment variables in your code:
# At the beginning of your Python script
from dotenv import load_dotenv

# Load environment variables from .env file
load_dotenv()
Step 4: Verify your connection
Create a test file and run this code to verify your connection and log a test trace to your MLflow Experiment:
import mlflow
import os

experiment_id = os.environ.get("MLFLOW_EXPERIMENT_ID")
databricks_host = os.environ.get("DATABRICKS_HOST")
mlflow_tracking_uri = os.environ.get("MLFLOW_TRACKING_URI")

if experiment_id is None or databricks_host is None or mlflow_tracking_uri is None:
    raise Exception("Environment variables are not configured correctly.")

@mlflow.trace
def hello_mlflow(message: str):

    hello_data = {
        "experiment_url": f"{databricks_host}/mlflow/experiments/{experiment_id}",
        "experiment_name": mlflow.get_experiment(experiment_id=experiment_id).name,
        "message": message,
    }
    return hello_data

result = hello_mlflow("hello, world!")
print(result)

Develop in a Databricks-hosted Notebook
Step 1: Create a notebook
Creating a Databricks Notebook creates an MLflow Experiment that is the container for your GenAI application. To learn more about experiments, see data model.
- Open your Databricks workspace.
- Go to New at the top of the left sidebar.
- Click Notebook.
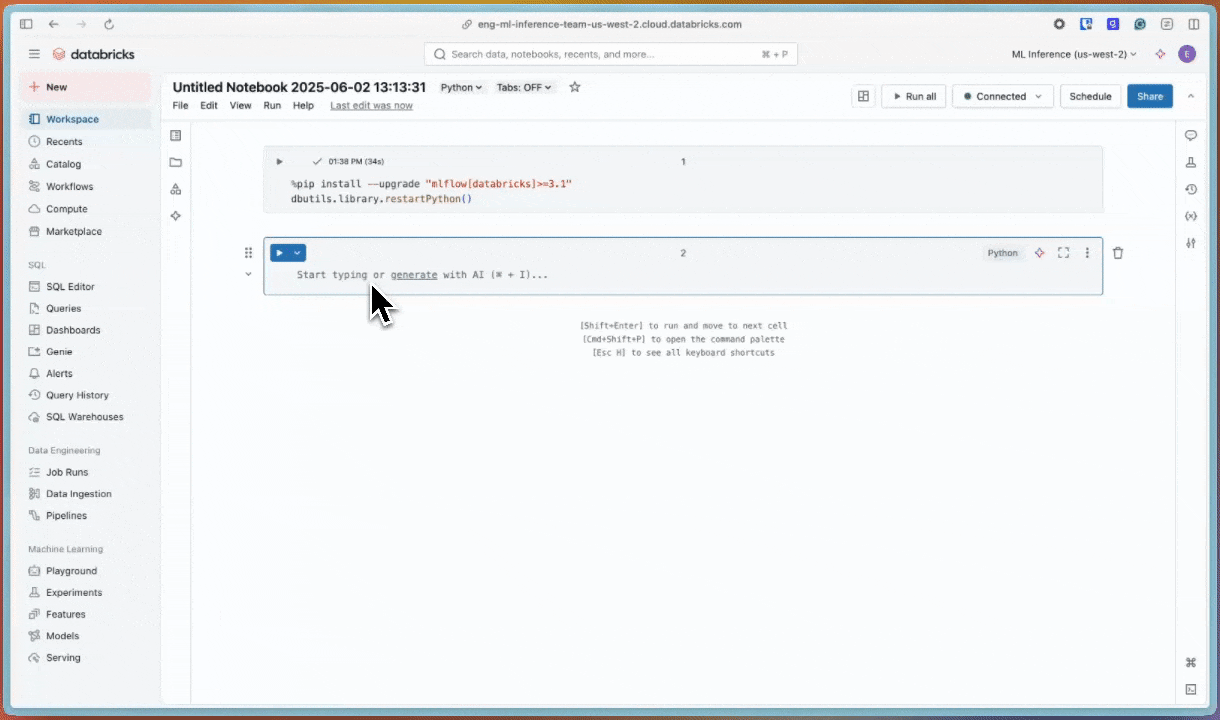
Step 2: Install MLflow
Databricks runtimes include MLflow, but for the best experience with GenAI capabilities, update to the latest version:
%pip install --upgrade "mlflow[databricks]>=3.1"
dbutils.library.restartPython()
Step 3: Configure authentication
No additional authentication configuration is needed when working within a Databricks Notebook. The notebook automatically has access to your workspace and the associated MLflow Experiment.
Step 4: Verify your connection
Run this code in a notebook cell to verify your connection. You will see an MLflow trace appear below your notebook cell.
import mlflow
import os

@mlflow.trace
def hello_mlflow(message: str):
    hello_data = {
        "message": message,
    }
    return hello_data

result = hello_mlflow("hello, world!")
print(result)
Additional resources
- Instrument your app with tracing (IDE) - Add MLflow Tracing to your GenAI app in a local IDE
- Instrument your app with tracing (Notebook) - Add MLflow Tracing in a Databricks Notebook
For details on concepts and features in this guide, see:
- MLflow Experiments - Understand the experiment container for your GenAI application
- Databricks authentication - Explore all available authentication methods
- Tracing concepts - Learn the fundamentals of MLflow Tracing