SSO to Databricks with Okta
This feature is in Public Preview.
This page shows how to configure Okta as the identity provider for single sign-on (SSO) in your Databricks account. Okta supports both OpenID Connect (OIDC) and SAML 2.0. To sync users and groups from Okta, see Sync users and groups from your identity provider using SCIM.
The following demos walk you through configuring SSO with Okta:
Enable Okta single sign-on
Choose your identity protocol:
- OIDC
- SAML 2.0
-
As an account admin, log in to the account console and click Security.
-
Click the Authentication tab.
-
Next to Authentication, click Manage.
-
Choose Single sign-on with my identity provider.
-
Click Continue.
-
Under Identity protocol, select OpenID Connect.
-
On the Authentication tab, make note of the Databricks Redirect URL value.
-
In a new browser tab, log into Okta as an administrator.
-
In the home page, click Applications > Applications.
-
Click Create App Integration.
-
Select OIDC - OpenID Connect and Web Application and click Next.
-
Name your app integration.
-
In Sign-in redirect URIs, enter the Databricks Redirect URL from step 7. You can choose to configure the other settings or you can leave them to their default values.
-
In Assignments, select Allow everyone in your organization to access. This ensures all users in your organization can access the Databricks account.
-
Click Save.
-
In the General tab, copy the client ID and client secret generated by Okta for the application.
- Client ID is the unique identifier for the Databricks application you created in your identity provider.
- Client secret is a secret or password generated for the Databricks application that you created. It is used to authorize Databricks with your identity provider.
-
Click the Sign On tab, in OpenID Connect ID Token copy the Okta URL in the issuer field.
If the issuer field says Dynamic, click Edit and select Okta URL in the dropdown menu.
noteThis URL points to Okta’s OpenID Configuration Document, which is located at
{issuer-url}/.well-known/openid-configuration. You can specify query parameters by appending them to the issuer URL, for example{issuer-url}?appid=123. -
Return to the Databricks account console Authentication tab and enter values you copied from the identity provider application to the Client ID, Client secret, and Issuer URL fields.
-
Optionally, enter a Username claim if you want to use a claim other than
emailas users' Databricks usernames. See your identity provider's documentation for specific information on claim values.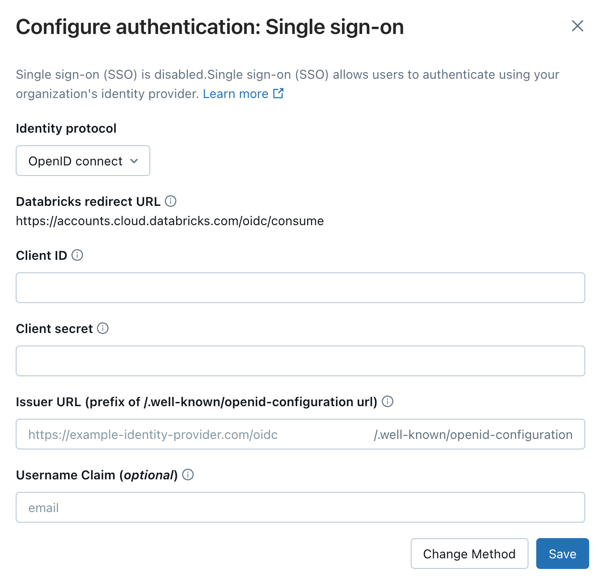
-
Click Save.
-
Click Test SSO to validate that your SSO configuration is working properly. Databricks opens a new browser window and attempts to authenticate using Okta. Complete the sign-in flow and review the test results.
-
Click Enable SSO to enable single sign-on for your account.
-
Test account console login with SSO. For testing steps, see Test your SSO configuration.
-
As an account admin, log in to the account console and click Security.
-
Click the Authentication tab.
-
Next to Authentication, click Manage.
-
Choose Single sign-on with my identity provider.
-
Click Continue.
-
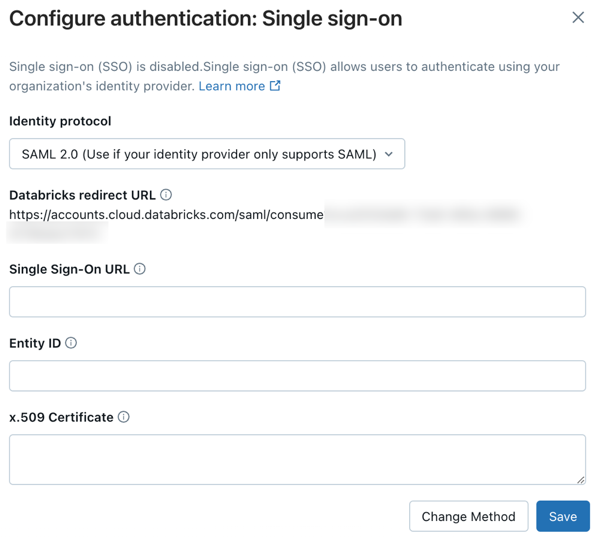
Under Identity protocol, select SAML 2.0.
-
On the Authentication tab, make note of the Databricks redirect URL.
-
In a new browser tab, log into Okta as an administrator.
-
Go to Applications and click Browse App Catalog.
-
Search for and select Databricks.
-
Click Add integration.
-
Name your application and click Done.
-
Select the Sign On tab and click Edit.
-
Under Advanced sign-on settings, configure the application using the following settings:
- Databricks SAML URL: the Databricks redirect URL you copied above.
- Application username format: Email
-
Click Save. The Databricks SAML app is shown.
-
Under SAML 2.0 is not configured until you complete the setup instructions, click View Setup Instructions.
-
Copy the following values:
- Identity Provider Single Sign-On URL
- Identity Provider Issuer
- x.509 certificate
-
Click the Assignments tab. Add the Okta group named Everyone to the application. This ensures all users in your organization can access the Databricks account.
-
Return to the Databricks account console Authentication tab and enter values you copied from Okta:
- Single Sign-On URL: The Okta Identity Provider Single Sign-On URL
- Identity Provider Entity ID: The Okta Identity Provider Issuer
- x.509 Certificate: The Okta x.509 certificate, including the markers for the beginning and ending of the certificate
-
Click Save.
-
Click Test SSO to validate that your SSO configuration is working properly. Databricks opens a new browser window and attempts to authenticate using Okta. Complete the sign-in flow and review the test results.
-
Click Enable SSO to enable single sign-on for your account.
-
Test account console login with SSO. For testing steps, see Test your SSO configuration.
Add users to Databricks
After you configure SSO, add users to your account. Databricks recommends syncing users from your identity provider using automatic identity management, which syncs users and groups automatically from your identity provider to your Databricks account. See Configure Microsoft Entra ID for automatic identity management. Alternatively, if your identity provider does not support automatic identity management, you can configure SCIM provisioning. See Sync users and groups from your identity provider using SCIM.
Just-in-time (JIT) provisioning, which automatically adds users to Databricks when they first log in using SSO, is on by default for accounts created after February 2, 2026. See Automatically provision users (JIT).