コードベースのカスタムスコアラーを作成する
カスタム コード ベースのスコアラーは、GenAI アプリケーションの品質を測定する方法を正確に定義するための究極の柔軟性を提供します。単純なヒューリスティック、高度なロジック、プログラムによる評価など、特定のビジネスユースケースに合わせてカスタマイズされた評価メトリックを定義できます。
カスタム スコアラーは、次のシナリオで使用します。
- カスタムヒューリスティックまたはコードベースの評価の定義 メトリクス.
- アプリのトレースのデータが、Databricks の研究に基づいた LLM ジャッジにどのようにマップされるかをカスタマイズします。
- 評価には、Databricks がホストする LLM ジャッジではなく、独自の LLM を使用します。
- カスタム LLM ジャッジが提供する以上の柔軟性と制御が必要なその他のユースケース。
多くの例を含むチュートリアルについては、 「コードベースのスコアラーの例」を参照してください。
カスタムスコアラーの仕組み
カスタム スコアラーは Python で記述されており、アプリのトレースのあらゆるデータを評価するための完全な制御を提供します。カスタム スコアラーを定義したら、組み込みの LLM Judgeとまったく同じように使用できます。他のスコアラーと同様に、同じカスタム スコアラーを開発時の評価に使用したり、本番運用のモニタリングに再利用したりできます。
たとえば、LLM の応答時間が許容範囲内であるかどうかをチェックするスコアラーが必要だとします。以下のMLflow UI の画像は、このカスタム メトリクスによってスコア付けされたトレースを示しています。

以下のコード スニペットは、このカスタム スコアラーを定義し、それをmlflow.genai.evaluate()で使用します。
import mlflow
from mlflow.genai.scorers import scorer
from mlflow.entities import Trace, Feedback, SpanType

@scorer
def llm_response_time_good(trace: Trace) -> Feedback:
    # Search particular span type from the trace
    llm_span = trace.search_spans(span_type=SpanType.CHAT_MODEL)[0]

    response_time = (llm_span.end_time_ns - llm_span.start_time_ns) / 1e9 # second
    max_duration = 5.0
    if response_time <= max_duration:
        return Feedback(
            value="yes",
            rationale=f"LLM response time {response_time:.2f}s is within the {max_duration}s limit."
        )
    else:
        return Feedback(
            value="no",
            rationale=f"LLM response time {response_time:.2f}s exceeds the {max_duration}s limit."
        )

# Evaluate the scorer using pre-generated traces
span_check_eval_results = mlflow.genai.evaluate(
    data=generated_traces,
    scorers=[llm_response_time_good]
)
上記の例は、コードベースのスコアラーの一般的なパターンを示しています。
@scorerデコレータはスコアラーを定義するために使用されます。- このスコアラーへの入力は完全な
traceであり、AI アプリの入力、中間スパン、および出力にアクセスできます。 - スコアラーロジックは完全にカスタマイズできます。LLM や他のスコアラーに電話することもできます。
- このスコアラーの出力は、値と説明を含む豊富な
Feedbackオブジェクトです。 - メトリクス名は
llm_response_time_goodで、スコアラー関数名と一致します。
このパターンは、コードベースのスコアラーの可能性の 1 つにすぎません。この記事の残りの部分では、カスタム スコアラーを定義するためのオプションについて説明します。
@scorerデコレータでスコアラーを定義する
ほとんどのコードベースのスコアラーは、 @scorerデコレータを使用して定義する必要があります。以下は、このようなスコアラーの署名であり、可能な入力と出力を示しています。
from mlflow.genai.scorers import scorer
from typing import Optional, Any
from mlflow.entities import Feedback

@scorer
def my_custom_scorer(
    *,  # All arguments are keyword-only
    inputs: Optional[dict[str, Any]],       # App's raw input, a dictionary of input argument names and values
    outputs: Optional[Any],                 # App's raw output
    expectations: Optional[dict[str, Any]], # Ground truth, a dictionary of label names and values
    trace: Optional[mlflow.entities.Trace]  # Complete trace with all spans and metadata
) -> Union[int, float, bool, str, Feedback, List[Feedback]]:
    # Your evaluation logic here
@scorerデコレータよりも柔軟性を高めるには、代わりにScorerクラスを使用してスコアラーを定義することもできます。
入力
スコアラーは、すべてのスパン、属性、および出力を含む完全なMLflow トレースを受け取ります。利便性のため、MLflow は一般的に必要なデータを抽出し、名前付き引数として渡します。すべての入力引数はオプションなので、スコアラーに必要なものだけを宣言します。
inputs: アプリに送信されたリクエスト (例: ユーザークエリ、コンテキスト)。outputs: アプリからの応答(生成されたテキスト、ツールの呼び出しなど)expectations: グラウンドトゥルースまたはラベル (例: 予想される応答、ガイドラインなど)trace: すべてのスパンを含む完全なMLflow トレースで、中間ステップ、レイテンシ、ツールの使用状況などを分析できます。トレースは、インスタンス化されたmlflow.entities.traceクラスとしてカスタム スコアラーに渡されます。
mlflow.genai.evaluate()を実行する場合、 inputs 、 outputs 、およびexpectations引数をdata引数で指定するか、トレースから解析することができます。
本番運用モニタリングに登録されているスコアラーは、常にトレースからinputsとoutputsを解析します。 expectationsは使用できません。
出力
スコアラーは、評価のニーズに応じて、さまざまな種類の単純な値または豊富なフィードバック オブジェクトを返すことができます。
戻り値の型 | MLflow UI ディスプレイ | ユースケース |
|---|---|---|
| 合格/不合格 | バイナリ評価 |
| true/false | Booleanチェック |
| 数値 | スコア、カウント |
価値 + 根拠 | 詳細な評価 | |
| 複数のメトリクス | 多面的な評価 |
単純な値
簡単な合格/不合格または数値評価のためのプリミティブ値を出力します。以下は、応答として文字列を返す AI アプリのシンプルなスコアラーです。
@scorer
def response_length(outputs: str) -> int:
    # Return a numeric metric
    return len(outputs.split())

@scorer
def contains_citation(outputs: str) -> str:
    # Return pass/fail string
    return "yes" if "[source]" in outputs else "no"
豊富なフィードバック
スコア、根拠、メタデータを含む詳細な評価のFeedbackオブジェクトまたはFeedbackオブジェクトのリストを返します。
from mlflow.entities import Feedback, AssessmentSource

@scorer
def content_quality(outputs):
    return Feedback(
        value=0.85,  # Can be numeric, boolean, string, or other types
        rationale="Clear and accurate, minor grammar issues",
        # Optional: source of the assessment. Several source types are supported,
        # such as "HUMAN", "CODE", "LLM_JUDGE".
        source=AssessmentSource(
            source_type="HUMAN",
            source_id="grammar_checker_v1"
        ),
        # Optional: additional metadata about the assessment.
        metadata={
            "annotator": "me@example.com",
        }
    )
複数のフィードバック オブジェクトをリストとして返すことができます。各フィードバックにはnameフィールドを指定する必要があり、それらの名前は評価結果に個別のメトリックとして表示されます。
@scorer
def comprehensive_check(inputs, outputs):
    return [
        Feedback(name="relevance", value=True, rationale="Directly addresses query"),
        Feedback(name="tone", value="professional", rationale="Appropriate for audience"),
        Feedback(name="length", value=150, rationale="Word count within limits")
    ]
メトリクスの命名動作
スコアラーを定義するときは、スコアラーの目的を示す明確で一貫性のある名前を使用します。これらの名前は、評価、モニタリングの結果、ダッシュボードにメトリクス名として表示されます。 safety_checkやrelevance_monitorなどの MLflow 命名規則に従ってください。
@scorerデコレータまたはScorerクラスのいずれかを使用してスコアラーを定義すると、評価およびモニタリングによって作成された評価実行内のメトリクス名は、単純なルールに従います。
- スコアラーが 1 つ以上の
Feedbackオブジェクトを返す場合、指定されていればFeedback.nameフィールドが優先されます。 - プリミティブな戻り値または名前のない
Feedbackの場合、関数名 (@scorerデコレータの場合) またはScorer.nameフィールド (Scorerクラスの場合) が使用されます。
これらのルールをあらゆる可能性に拡張すると、メトリクスの命名動作に関する次の表が得られます。
戻り値 |
|
|
|---|---|---|
プリミティブ値 ( | 関数名 |
|
名前なしのフィードバック | 関数名 |
|
名前付きのフィードバック |
|
|
|
|
|
評価とモニタリングでは、すべてのメトリクスに個別の名前が付いていることが重要です。 スコアラーがList[Feedback]返す場合、 List内の各Feedbackには異なる名前が必要です。
命名動作の例についてはチュートリアルを参照してください。
スコアラーのアクセス秘密
カスタム スコアラーは、 Databricks シークレットにアクセスして、API キーと資格情報を安全に使用できます。これは、Azure OpenAI、AWS Bedrock などの認証を必要とするカスタム LLM エンドポイントなどの外部サービスを統合する場合に役立ちます。このアプローチは、開発評価と本番運用モニタリングの両方に機能します。
デフォルトでは、 dbutilsスコアラーのランタイム環境では使用できません。スコアラー ランタイム環境のシークレットにアクセスするには、スコアラー関数内からfrom databricks.sdk.runtime import dbutils呼び出します。
次の例は、カスタム スコアラーのシークレットにアクセスする方法を示しています。
import mlflow
from mlflow.genai.scorers import scorer, ScorerSamplingConfig
from mlflow.entities import Trace, Feedback

@scorer
def custom_llm_scorer(trace: Trace) -> Feedback:
    # Explicitly import dbutils to access secrets
    from databricks.sdk.runtime import dbutils

    # Retrieve your API key from Databricks secrets
    api_key = dbutils.secrets.get(scope='my-scope', key='api-key')

    # Use the API key to call your custom LLM endpoint
    # ... your custom evaluation logic here ...

    return Feedback(
        value="yes",
        rationale="Evaluation completed using custom endpoint"
    )

# Register and start the scorer
custom_llm_scorer.register()
custom_llm_scorer.start(sampling_config = ScorerSamplingConfig(sample_rate=1))
エラー処理
スコアラーがトレースのエラーに遭遇すると、MLflow はそのトレースのエラーの詳細をキャプチャし、正常に実行を続行できます。エラーの詳細をキャプチャするために、MLflow は次の 2 つの方法を提供します。
- 例外を伝播させて (推奨)、MLflow がエラー メッセージをキャプチャできるようにします。
- 例外を明示的に処理します。
例外を伝播させる(推奨)
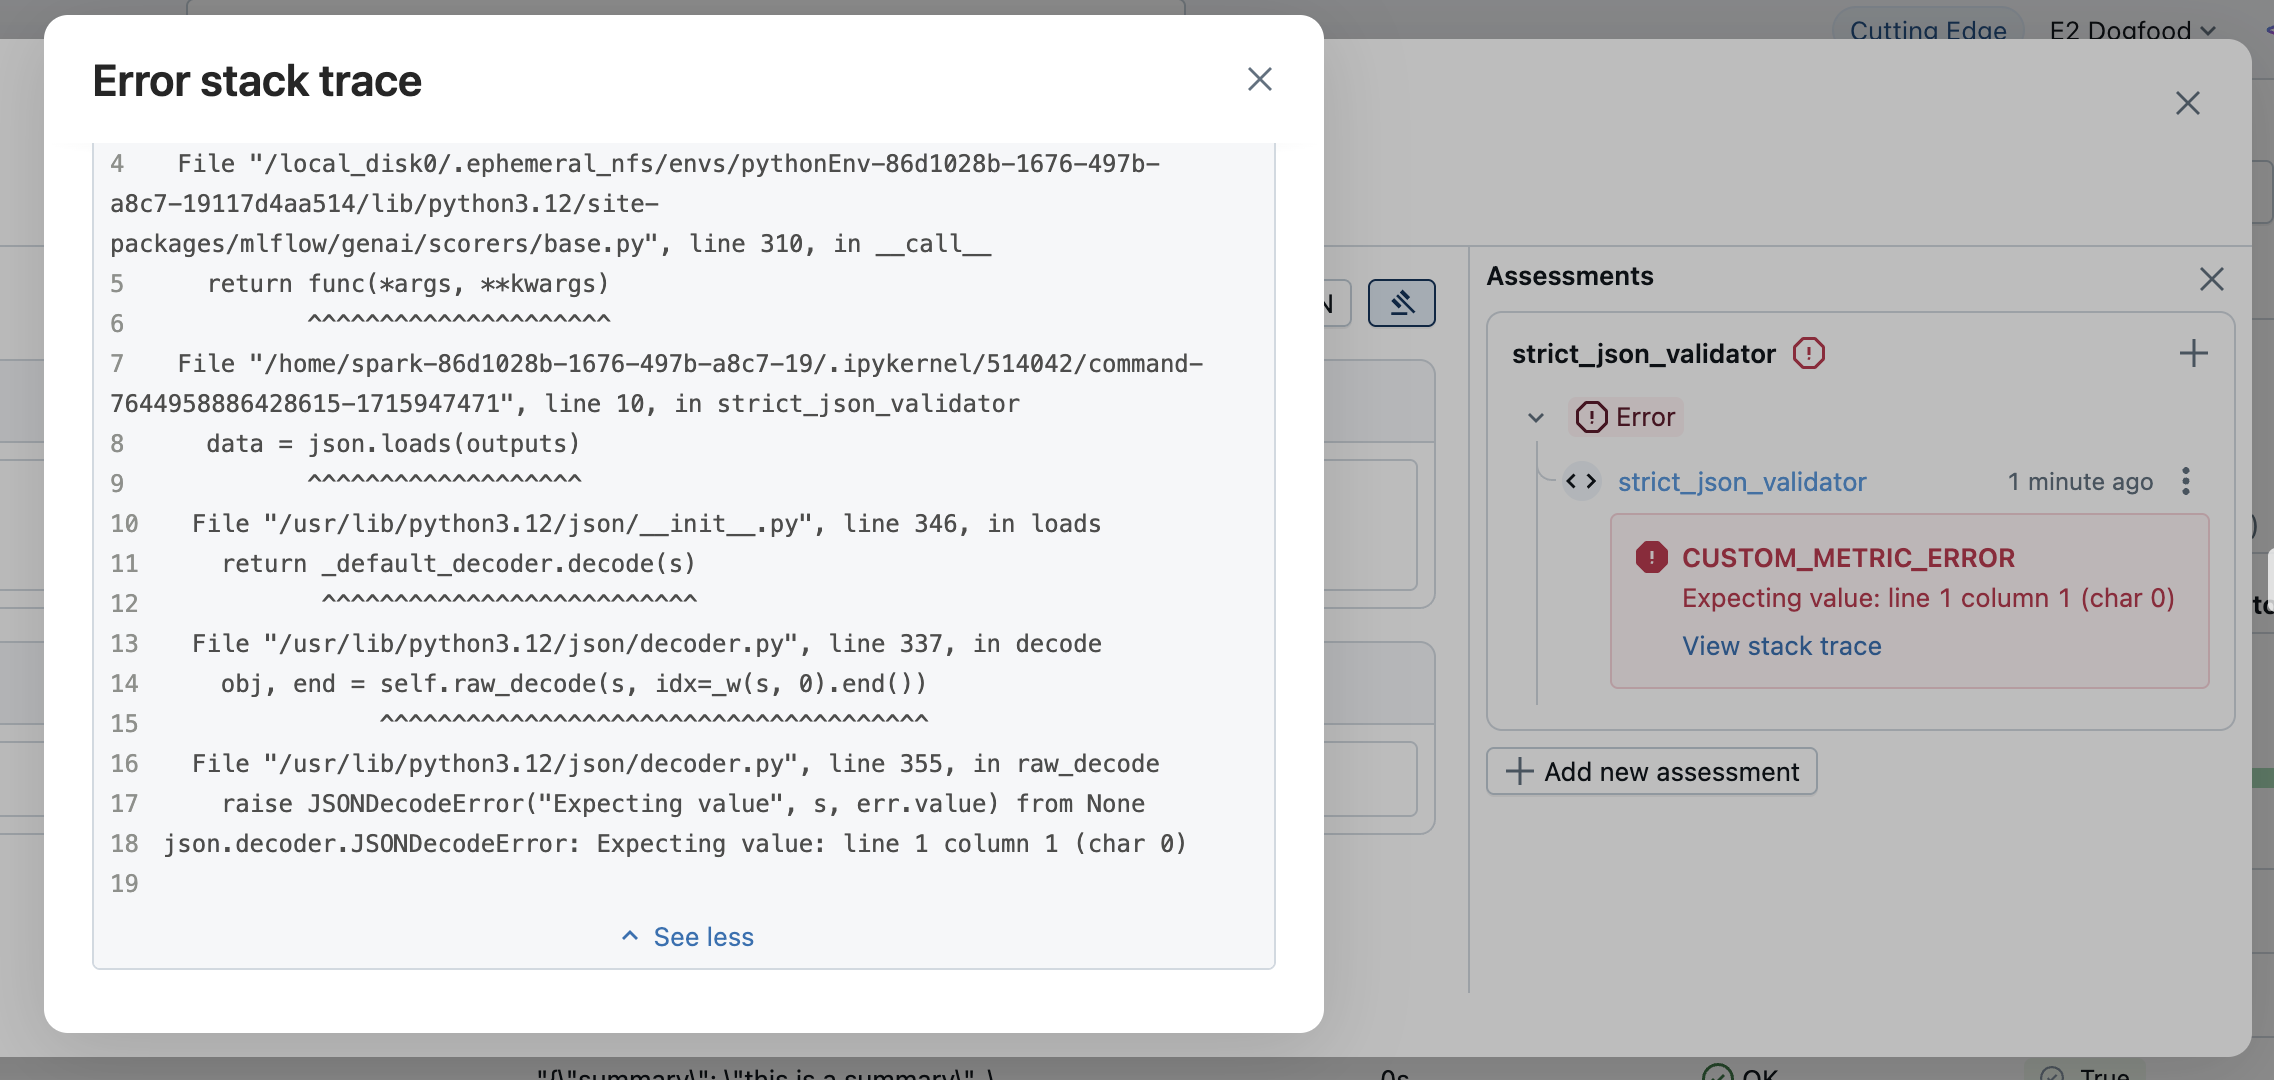
最も単純なアプローチは、例外を自然にスローさせることです。MLflow は自動的に例外をキャプチャし、次のエラーの詳細を含むFeedbackオブジェクトを作成します。
value:Noneerror: 例外オブジェクト、エラーメッセージ、スタックトレースなどの例外の詳細
評価結果にエラー情報が表示されます。対応する行を開いてエラーの詳細を表示します。

例外を明示的に処理する
カスタム エラー処理や特定のエラー メッセージを提供するには、例外をキャッチし、 None値とエラーの詳細を含むFeedbackを返します。
from mlflow.entities import AssessmentError, Feedback

@scorer
def is_valid_response(outputs):
    import json

    try:
        data = json.loads(outputs)
        required_fields = ["summary", "confidence", "sources"]
        missing = [f for f in required_fields if f not in data]

        if missing:
            return Feedback(
                error=AssessmentError(
                    error_code="MISSING_REQUIRED_FIELDS",
                    error_message=f"Missing required fields: {missing}",
                ),
            )

        return Feedback(
            value=True,
            rationale="Valid JSON with all required fields"
        )

    except json.JSONDecodeError as e:
        return Feedback(error=e)  # Can pass exception object directly to the error parameter
errorパラメーターは以下を受け入れます:
- Python 例外 : 例外オブジェクトを直接渡す
AssessmentError: エラーコードを含む構造化されたエラーレポート用
Scorerクラスでスコアラーを定義する
上で説明した@scorerデコレータはシンプルで、一般的に推奨されますが、不十分な場合は代わりにScorer基本クラスを使用できます。クラスベースの定義により、より複雑なスコアラー、特に状態を必要とするスコアラーが可能になります。ScorerクラスはPydantic オブジェクトなので、追加のフィールドを定義して__call__メソッドで使用することができます。
メトリクス名を設定するには、 nameフィールドを定義する必要があります。 Feedbackオブジェクトのリストを返す場合は、名前の競合を避けるために、各Feedbackのnameフィールドを設定する必要があります。
from mlflow.genai.scorers import Scorer
from mlflow.entities import Feedback
from typing import Optional

# Scorer class is a Pydantic object
class CustomScorer(Scorer):
    # The `name` field is mandatory
    name: str = "response_quality"
    # Define additional fields
    my_custom_field_1: int = 50
    my_custom_field_2: Optional[list[str]] = None

    # Override the __call__ method to implement the scorer logic
    def __call__(self, outputs: str) -> Feedback:
        # Your logic here
        return Feedback(
            value=True,
            rationale="Response meets all quality criteria"
        )
国家管理
Scorerクラスを使用してスコアラーを作成するときは、Python クラスで状態を管理するためのルールに注意してください。特に、変更可能なクラス属性ではなく、インスタンス属性を使用するようにしてください。以下の例は、スコアラーインスタンス間で状態を誤って共有していることを示しています。
from mlflow.genai.scorers import Scorer
from mlflow.entities import Feedback

# WRONG: Don't use mutable class attributes
class BadScorer(Scorer):
    results = []  # Shared across all instances!

    name: str = "bad_scorer"

    def __call__(self, outputs, **kwargs):
        self.results.append(outputs)  # Causes issues
        return Feedback(value=True)

# CORRECT: Use instance attributes
class GoodScorer(Scorer):
    results: list[str] = None

    name: str = "good_scorer"

    def __init__(self):
        self.results = []  # Per-instance state

    def __call__(self, outputs, **kwargs):
        self.results.append(outputs)  # Safe
        return Feedback(value=True)
次のステップ
- コードベースのスコアラーの例- コードベースのスコアラーの多くの例を参照してください
- コードベースのスコアラーを開発する- カスタム スコアラーの開発ワークフローをステップスルーする
- 開発中の GenAI を評価する-
mlflow.genai.evaluate()がスコアラーをどのように使用するかを理解する - 本番運用で GenAI を監視する- スコアラーを展開して継続的なモニタリングを行う
APIリファレンス
このガイドで使用されるMLflow APIsには以下が含まれます。