関数デコレータ
@mlflow.traceデコレータを使用すると、任意の関数のスパンを作成できます。関数デコレータは、最小限のコード変更でトレースを追加するための最も簡単な方法を提供します。
- MLflow は関数間の親子関係を検出し、自動トレース統合と互換性を持たせます。
- 関数実行中に例外をキャプチャし、それらをスパン イベントとして記録します。
- 関数の名前、入力、出力、実行時間を自動的に記録します。
- 自動トレース機能と併用できます。
前提条件
- MLflow 3
- MLflow 2.x
このページには次のパッケージが必要です:
mlflow[databricks]3.1 以上: GenAI 機能と Databricks 接続を備えたコア MLflow 機能。openai1.0.0 以上: (オプション) カスタム コードが OpenAI と対話する場合のみ。必要に応じて他の SDK に置き換えます。
基本要件をインストールします。
%pip install --upgrade "mlflow[databricks]>=3.1"
# %pip install --upgrade "openai>=1.0.0" # Install if needed
このガイドには次のパッケージが必要です。
mlflow[databricks]2.15.0 以上: Databricks 接続を備えた Core MLflow 機能。openai1.0.0以上。(オプション) カスタム コードが OpenAI と対話する場合のみ。
MLflow バージョン
Databricks では、 mlflow[databricks]を使用する場合は MLflow 3.1 以降をインストールすることを強くお勧めします。
基本要件をインストールします。
%pip install --upgrade "mlflow[databricks]>=2.15.0,<3.0.0"
# pip install --upgrade "openai>=1.0.0" # Install if needed
基本的な例
次のコードは、Python 関数をトレースするためにデコレータを使用する最小限の例です。
デコレータの順序
完全な監視可能性を確保するには、複数のデコレータを使用する場合、通常、 @mlflow.traceデコレータが最も外側にある必要があります。詳細な説明と例については、 「@mlflow.trace を他のデコレータと共に使用する」を参照してください。
import mlflow


@mlflow.trace(span_type="func", attributes={"key": "value"})
def add_1(x):
    return x + 1


@mlflow.trace(span_type="func", attributes={"key1": "value1"})
def minus_1(x):
    return x - 1


@mlflow.trace(name="Trace Test")
def trace_test(x):
    step1 = add_1(x)
    return minus_1(step1)


trace_test(4)
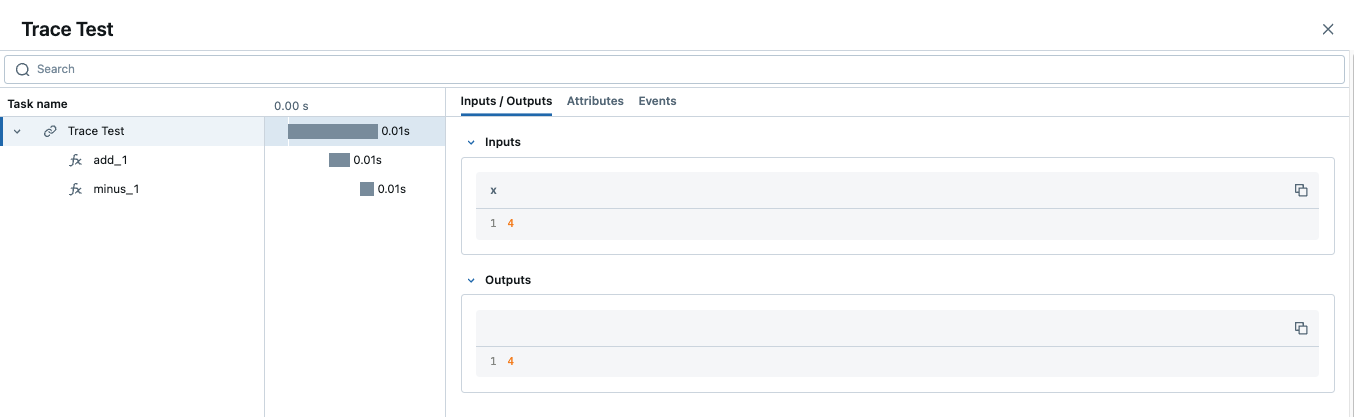
トレースに同じ名前の複数のスパンが含まれている場合、MLflow はそれらに_1 、 _2などの自動増分サフィックスを追加します。
スパンをカスタマイズする
@mlflow.traceデコレータは、作成するスパンをカスタマイズするために次の引数を受け入れます。
name問題 (装飾された関数の名前) からスパン名をオーバーライドするspan_typeパラメーターを使用して、スパン のタイプを設定します。 組み込みの スパン タイプ のいずれかまたは文字列を設定します。attributesスパンにカスタム属性を追加するためのパラメーター。
デコレータの順序
@mlflow.trace他のデコレータ(たとえば、Web フレームワークのデコレータ)と組み合わせる場合、それが最も外側にあることが重要です。正しい順序と間違った順序の明確な例については、 「他のデコレータでの @mlflow.trace の使用」を参照してください。
@mlflow.trace(
    name="call-local-llm", span_type=SpanType.LLM, attributes={"model": "gpt-4o-mini"}
)
def invoke(prompt: str):
    return client.invoke(
        messages=[{"role": "user", "content": prompt}], model="gpt-4o-mini"
    )
あるいは、 mlflow.get_current_active_span API を使用して関数内でアクティブ スパンまたはライブ スパンを動的に更新することもできます。
@mlflow.trace(span_type=SpanType.LLM)
def invoke(prompt: str):
    model_id = "gpt-4o-mini"
    # Get the current span (created by the @mlflow.trace decorator)
    span = mlflow.get_current_active_span()
    # Set the attribute to the span
    span.set_attributes({"model": model_id})
    return client.invoke(messages=[{"role": "user", "content": prompt}], model=model_id)
オブジェクトの編集の詳細な例については、 コンテキスト マネージャーを使用したスパン トレースを LiveSpan参照してください。
@mlflow.trace他のデコレータと一緒に使用する
1 つの関数に複数のデコレータを適用する場合は、 @mlflow.trace 最も外側の デコレータ (一番上にあるデコレータ) として配置することが重要です。これにより、MLflow は内部デコレータの動作を含め、関数の実行全体をキャプチャできるようになります。
@mlflow.traceが最も外側のデコレータでない場合、関数の実行に対する可視性が制限されるか不正確になる可能性があり、関数の入力、出力、実行時間のトレースが不完全になったり、誤って表現されたりする可能性があります。
次の概念的な例を考えてみましょう。
import mlflow
import functools
import time

# A hypothetical additional decorator
def simple_timing_decorator(func):
    @functools.wraps(func)
    def wrapper(*args, **kwargs):
        start_time = time.time()
        result = func(*args, **kwargs)
        end_time = time.time()
        print(f"{func.__name__} executed in {end_time - start_time:.4f} seconds by simple_timing_decorator.")
        return result
    return wrapper

# Correct order: @mlflow.trace is outermost
@mlflow.trace(name="my_decorated_function_correct_order")
@simple_timing_decorator
# @another_framework_decorator # e.g., @app.route("/mypath") from Flask
def my_complex_function(x, y):
    # Function logic here
    time.sleep(0.1) # Simulate work
    return x + y

# Incorrect order: @mlflow.trace is NOT outermost
@simple_timing_decorator
@mlflow.trace(name="my_decorated_function_incorrect_order")
# @another_framework_decorator
def my_other_complex_function(x, y):
    time.sleep(0.1)
    return x * y

# Example calls
if __name__ == "__main__":
    print("Calling function with correct decorator order:")
    my_complex_function(5, 3)

    print("\nCalling function with incorrect decorator order:")
    my_other_complex_function(5, 3)
my_complex_function例 (正しい順序) では、 @mlflow.trace simple_timing_decoratorによって追加された時間を含む完全な実行をキャプチャします。my_other_complex_function (順序が正しくありません) では、MLflow によってキャプチャされたトレースが合計実行時間を正確に反映しない可能性があり、また、 @mlflow.trace認識する前にsimple_timing_decoratorによって行われた入力/出力の変更が見逃される可能性があります。
トレースタグを追加する
トレースにタグを追加して、トレース レベルで追加のメタデータを提供できます。トレースにタグを設定する方法はいくつかあります。その他の方法については、カスタム タグの添付ガイドを参照してください。
@mlflow.trace
def my_func(x):
    mlflow.update_current_trace(tags={"fruit": "apple"})
    return x + 1
UI でリクエストとレスポンスのプレビューをカスタマイズする
MLflow UI の [トレース] タブにはトレースの一覧が表示され、 Request列とResponse列には各トレースのエンドツーエンドの入力と出力のプレビューが表示されます。これにより、各トレースが何を表しているかをすぐに理解できます。
デフォルトでは、これらのプレビューは固定の文字数に切り捨てられます。ただし、 mlflow.update_current_trace()関数内のrequest_previewとresponse_preview引数を使用して、これらの列に表示される内容をカスタマイズできます。 これは、デフォルトの切り捨てでは最も関連性の高い情報が表示されない可能性がある複雑な入力または出力の場合に特に役立ちます。
以下は、長いドキュメントとユーザー指示を処理し、UI のRequest列に最も関連性の高い情報を表示することを目的として、トレースのカスタム リクエスト プレビューを設定する例です。
import mlflow

@mlflow.trace(name="Summarization Pipeline")
def summarize_document(document_content: str, user_instructions: str):
    # Construct a custom preview for the request column
    # For example, show beginning of document and user instructions
    request_p = f"Doc: {document_content[:30]}... Instr: {user_instructions[:30]}..."
    mlflow.update_current_trace(request_preview=request_p)

    # Simulate LLM call
    # messages = [
    #     {"role": "system", "content": "Summarize the following document based on user instructions."},
    #     {"role": "user", "content": f"Document: {document_content}\nInstructions: {user_instructions}"}
    # ]
    # completion = client.chat.completions.create(model="gpt-4o-mini", messages=messages)
    # summary = completion.choices[0].message.content
    summary = f"Summary of document starting with '{document_content[:20]}...' based on '{user_instructions}'"

    # Customize the response preview
    response_p = f"Summary: {summary[:50]}..."
    mlflow.update_current_trace(response_preview=response_p)

    return summary

# Example Call
long_document = "This is a very long document that contains many details about various topics..." * 10
instructions = "Focus on the key takeaways regarding topic X."
summary_result = summarize_document(long_document, instructions)
# print(summary_result)
トレース(通常はルートスパン)にrequest_previewとresponse_preview設定することで、メインのトレース リスト ビューで全体的なインタラクションの概要を制御することができ、一目でトレースを識別して理解しやすくなります。
自動例外処理
トレースが計測される操作の処理中に Exception が発生した場合、呼び出しがそうではなかったことを示すメッセージが UI 内に表示されます
成功し、デバッグを支援するためにデータの部分的なキャプチャが利用可能になります。さらに、発生した例外の詳細も含まれます
部分的に完了したスパンから Events 以内で、コード内で問題が発生している場所の特定にさらに役立ちます。

自動トレースと組み合わせる
手動トレースは、MLflow の自動トレース機能とシームレスに統合されます。「手動トレースと自動トレースを組み合わせる」を参照してください。
複雑なワークフローのトレース
複数のステップを含む複雑なワークフローの場合は、ネストされたスパンを使用して詳細な実行フローをキャプチャします。
@mlflow.trace(name="data_pipeline")
def process_data_pipeline(data_source: str):
    # Extract phase
    with mlflow.start_span(name="extract") as extract_span:
        raw_data = extract_from_source(data_source)
        extract_span.set_outputs({"record_count": len(raw_data)})

    # Transform phase
    with mlflow.start_span(name="transform") as transform_span:
        transformed = apply_transformations(raw_data)
        transform_span.set_outputs({"transformed_count": len(transformed)})

    # Load phase
    with mlflow.start_span(name="load") as load_span:
        result = load_to_destination(transformed)
        load_span.set_outputs({"status": "success"})

    return result
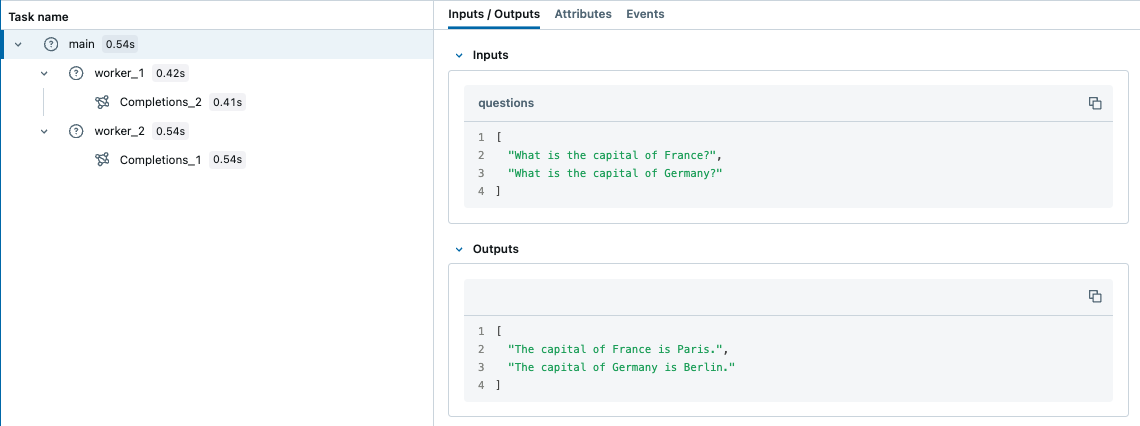
マルチスレッド
MLflow Tracingはスレッドセーフであるため、トレースはスレッドごとにデフォルトによって分離されます。 ただし、いくつかの追加の手順で複数のスレッドにまたがるトレースを作成することもできます。
MLflow は、デフォルトではスレッド間で伝播されないスレッドの安全性を確保するために Python の組み込みContextVarメカニズムを使用します。したがって、次の例に示すように、メイン スレッドからワーカー スレッドにコンテキストを手動でコピーする必要があります。
import contextvars
from concurrent.futures import ThreadPoolExecutor, as_completed
import mlflow
from mlflow.entities import SpanType
import openai

client = openai.OpenAI()

# Enable MLflow Tracing for OpenAI
mlflow.openai.autolog()


@mlflow.trace
def worker(question: str) -> str:
    messages = [
        {"role": "system", "content": "You are a helpful assistant."},
        {"role": "user", "content": question},
    ]
    response = client.chat.completions.create(
        model="gpt-4o-mini",
        messages=messages,
        temperature=0.1,
        max_tokens=100,
    )
    return response.choices[0].message.content


@mlflow.trace
def main(questions: list[str]) -> list[str]:
    results = []
    # Almost same as how you would use ThreadPoolExecutor, but two additional steps
    #  1. Copy the context in the main thread using copy_context()
    #  2. Use ctx.run() to run the worker in the copied context
    with ThreadPoolExecutor(max_workers=2) as executor:
        futures = []
        for question in questions:
            ctx = contextvars.copy_context()
            futures.append(executor.submit(ctx.run, worker, question))
        for future in as_completed(futures):
            results.append(future.result())
    return results


questions = [
    "What is the capital of France?",
    "What is the capital of Germany?",
]

main(questions)
対照的に、 ContextVarはデフォルトで 非同期 タスクにコピーされます。したがって、 asyncioを使用するときにコンテキストを手動でコピーする必要はありません。
これは、 MLflow Tracingを使用してPythonで並列 I/O バインドされたタスクを処理する簡単な方法かもしれません。
ストリーミング出力
MLflow 2.20.2 以降では、 @mlflow.traceデコレータを使用して、ジェネレータまたはイテレータを返す関数をトレースできます。
@mlflow.trace
def stream_data():
    for i in range(5):
        yield i
上記の例では、 stream_data関数の単一のスパンを持つトレースが生成されます。デフォルトでは、MLflow はジェネレーターによって生成されたすべての要素をスパンの出力のリストとしてキャプチャします。上記の例では、スパンの出力は[0, 1, 2, 3, 4]になります。
ストリーム関数のスパンは、返されたイテレータが 消費され 始めたときに開始され、イテレータが使い果たされるか、反復中に例外が発生したときに終了します。
出力リデューサーの使用
要素を単一のスパン出力に集約する場合は、 output_reducer引数を使用して、要素を集約するカスタム関数を指定できます。 カスタム関数は、生成された要素のリストを入力として受け取る必要があります。
from typing import List, Any

@mlflow.trace(output_reducer=lambda x: ",".join(x))
def stream_data():
    for c in "hello":
        yield c
上記の例では、スパンの出力は"h,e,l,l,o"になります。生のチャンクは、MLflow トレース UI のスパンのEventsタブに引き続き表示されるため、デバッグ時に生成された個々の値を検査できます。
一般的な出力リデューサーパターン
出力リデューサーを実装するための一般的なパターンを次に示します。
トークン集約
from typing import List, Dict, Any

def aggregate_tokens(chunks: List[str]) -> str:
    """Concatenate streaming tokens into complete text"""
    return "".join(chunks)

@mlflow.trace(output_reducer=aggregate_tokens)
def stream_text():
    for word in ["Hello", " ", "World", "!"]:
        yield word
メトリクスの集約
def aggregate_metrics(chunks: List[Dict[str, Any]]) -> Dict[str, Any]:
    """Aggregate streaming metrics into summary statistics"""
    values = [c["value"] for c in chunks if "value" in c]
    return {
        "count": len(values),
        "sum": sum(values),
        "average": sum(values) / len(values) if values else 0,
        "max": max(values) if values else None,
        "min": min(values) if values else None
    }

@mlflow.trace(output_reducer=aggregate_metrics)
def stream_metrics():
    for i in range(10):
        yield {"value": i * 2, "timestamp": time.time()}
エラー収集
def collect_results_and_errors(chunks: List[Dict[str, Any]]) -> Dict[str, Any]:
    """Separate successful results from errors"""
    results = []
    errors = []

    for chunk in chunks:
        if chunk.get("error"):
            errors.append(chunk["error"])
        else:
            results.append(chunk.get("data"))

    return {
        "results": results,
        "errors": errors,
        "success_rate": len(results) / len(chunks) if chunks else 0,
        "has_errors": len(errors) > 0
    }
高度な例: OpenAI
以下は、 output_reducerを使用して、OpenAI LLM からの ChatCompletionChunk 出力を単一のメッセージ オブジェクトに統合する高度な例です。
本番運用のユースケースでは、これを自動的に処理する OpenAIの自動トレース を使用することをお勧めします。 以下の例は、デモンストレーション用です。
import mlflow
import openai
from openai.types.chat import *
from typing import Optional


def aggregate_chunks(outputs: list[ChatCompletionChunk]) -> Optional[ChatCompletion]:
    """Consolidate ChatCompletionChunks to a single ChatCompletion"""
    if not outputs:
        return None

    first_chunk = outputs[0]
    delta = first_chunk.choices[0].delta
    message = ChatCompletionMessage(
        role=delta.role, content=delta.content, tool_calls=delta.tool_calls or []
    )
    finish_reason = first_chunk.choices[0].finish_reason
    for chunk in outputs[1:]:
        delta = chunk.choices[0].delta
        message.content += delta.content or ""
        message.tool_calls += delta.tool_calls or []
        finish_reason = finish_reason or chunk.choices[0].finish_reason

    base = ChatCompletion(
        id=first_chunk.id,
        choices=[Choice(index=0, message=message, finish_reason=finish_reason)],
        created=first_chunk.created,
        model=first_chunk.model,
        object="chat.completion",
    )
    return base


@mlflow.trace(output_reducer=aggregate_chunks)
def predict(messages: list[dict]):
    client = openai.OpenAI()
    stream = client.chat.completions.create(
        model="gpt-4o-mini",
        messages=messages,
        stream=True,
    )
    for chunk in stream:
        yield chunk


for chunk in predict([{"role": "user", "content": "Hello"}]):
    print(chunk)
上記の例では、生成されたpredictスパンには、カスタム リデューサー関数によって集約された単一のチャット完了メッセージが出力として含まれます。
実際の使用例
一般的な 生成AI シナリオの出力レデューサーのその他の例を次に示します。
JSON解析によるLLM応答
from typing import List, Dict, Any
import json

def parse_json_from_llm(content: str) -> str:
    """Extract and clean JSON from LLM responses that may include markdown"""
    # Remove common markdown code block wrappers
    if content.startswith("```json") and content.endswith("```"):
        content = content[7:-3]  # Remove ```json prefix and ``` suffix
    elif content.startswith("```") and content.endswith("```"):
        content = content[3:-3]  # Remove generic ``` wrappers
    return content.strip()

def json_stream_reducer(chunks: List[Dict[str, Any]]) -> Dict[str, Any]:
    """Aggregate LLM streaming output and parse JSON response"""
    full_content = ""
    metadata = {}
    errors = []

    # Process different chunk types
    for chunk in chunks:
        chunk_type = chunk.get("type", "content")

        if chunk_type == "content" or chunk_type == "token":
            full_content += chunk.get("content", "")
        elif chunk_type == "metadata":
            metadata.update(chunk.get("data", {}))
        elif chunk_type == "error":
            errors.append(chunk.get("error"))

    # Return early if errors occurred
    if errors:
        return {
            "status": "error",
            "errors": errors,
            "raw_content": full_content,
            **metadata
        }

    # Try to parse accumulated content as JSON
    try:
        cleaned_content = parse_json_from_llm(full_content)
        parsed_data = json.loads(cleaned_content)

        return {
            "status": "success",
            "data": parsed_data,
            "raw_content": full_content,
            **metadata
        }
    except json.JSONDecodeError as e:
        return {
            "status": "parse_error",
            "error": f"Failed to parse JSON: {str(e)}",
            "raw_content": full_content,
            **metadata
        }

@mlflow.trace(output_reducer=json_stream_reducer)
def generate_structured_output(prompt: str, schema: dict):
    """Generate structured JSON output from an LLM"""
    # Simulate streaming JSON generation
    yield {"type": "content", "content": '{"name": "John", '}
    yield {"type": "content", "content": '"email": "john@example.com", '}
    yield {"type": "content", "content": '"age": 30}'}

    # Add metadata
    trace_id = mlflow.get_current_active_span().request_id if mlflow.get_current_active_span() else None
    yield {"type": "metadata", "data": {"trace_id": trace_id, "model": "gpt-4"}}
OpenAIによる構造化出力生成
以下は、OpenAI で出力リデューサーを使用して構造化された JSON 応答を生成および解析する完全な例です。
import json
import mlflow
import openai
from typing import List, Dict, Any, Optional

def structured_output_reducer(chunks: List[Dict[str, Any]]) -> Dict[str, Any]:
    """
    Aggregate streaming chunks into structured output with comprehensive error handling.
    Handles token streaming, metadata collection, and JSON parsing.
    """
    content_parts = []
    trace_id = None
    model_info = None
    errors = []

    for chunk in chunks:
        chunk_type = chunk.get("type", "token")

        if chunk_type == "token":
            content_parts.append(chunk.get("content", ""))
        elif chunk_type == "trace_info":
            trace_id = chunk.get("trace_id")
            model_info = chunk.get("model")
        elif chunk_type == "error":
            errors.append(chunk.get("message"))

    # Join all content parts
    full_content = "".join(content_parts)

    # Base response
    response = {
        "trace_id": trace_id,
        "model": model_info,
        "raw_content": full_content
    }

    # Handle errors
    if errors:
        response["status"] = "error"
        response["errors"] = errors
        return response

    # Try to extract and parse JSON
    try:
        # Clean markdown wrappers if present
        json_content = full_content.strip()
        if json_content.startswith("```json") and json_content.endswith("```"):
            json_content = json_content[7:-3].strip()
        elif json_content.startswith("```") and json_content.endswith("```"):
            json_content = json_content[3:-3].strip()

        parsed_data = json.loads(json_content)
        response["status"] = "success"
        response["data"] = parsed_data

    except json.JSONDecodeError as e:
        response["status"] = "parse_error"
        response["error"] = f"JSON parsing failed: {str(e)}"
        response["error_position"] = e.pos if hasattr(e, 'pos') else None

    return response

@mlflow.trace(output_reducer=structured_output_reducer)
async def generate_customer_email(
    customer_name: str,
    issue: str,
    sentiment: str = "professional"
) -> None:
    """
    Generate a structured customer service email response.
    Demonstrates real-world streaming with OpenAI and structured output parsing.
    """
    client = openai.AsyncOpenAI()

    system_prompt = """You are a customer service assistant. Generate a professional email response in JSON format:
    {
        "subject": "email subject line",
        "greeting": "personalized greeting",
        "body": "main email content addressing the issue",
        "closing": "professional closing",
        "priority": "high|medium|low"
    }"""

    user_prompt = f"Customer: {customer_name}\nIssue: {issue}\nTone: {sentiment}"

    try:
        # Stream the response
        stream = await client.chat.completions.create(
            model="gpt-4o-mini",
            messages=[
                {"role": "system", "content": system_prompt},
                {"role": "user", "content": user_prompt}
            ],
            stream=True,
            temperature=0.7
        )

        # Yield streaming tokens
        async for chunk in stream:
            if chunk.choices[0].delta.content:
                yield {
                    "type": "token",
                    "content": chunk.choices[0].delta.content
                }

        # Add trace metadata
        if current_span := mlflow.get_current_active_span():
            yield {
                "type": "trace_info",
                "trace_id": current_span.request_id,
                "model": "gpt-4o-mini"
            }

    except Exception as e:
        yield {
            "type": "error",
            "message": f"OpenAI API error: {str(e)}"
        }

# Example usage
async def main():
    # This will automatically aggregate the streamed output into structured JSON
    async for chunk in generate_customer_email(
        customer_name="John Doe",
        issue="Product arrived damaged",
        sentiment="empathetic"
    ):
        # In practice, you might send these chunks to a frontend
        print(chunk.get("content", ""), end="", flush=True)
統合のメリット
この例では、いくつかの実際のパターンを示します。
- ストリーミング UI 更新 : 到着次第表示可能
- 構造化された出力検証 : JSON解析により応答形式が保証される
- エラー耐性 : APIエラーと解析失敗を適切に処理します
- トレース相関 : デバッグのためにストリーミング出力を MLflow トレースにリンクします
マルチモデル応答集約
def multi_model_reducer(chunks: List[Dict[str, Any]]) -> Dict[str, Any]:
    """Aggregate responses from multiple models"""
    responses = {}
    latencies = {}

    for chunk in chunks:
        model = chunk.get("model")
        if model:
            responses[model] = chunk.get("response", "")
            latencies[model] = chunk.get("latency", 0)

    return {
        "responses": responses,
        "latencies": latencies,
        "fastest_model": min(latencies, key=latencies.get) if latencies else None,
        "consensus": len(set(responses.values())) == 1
    }
出力低減装置のテスト
出力リデューサーはトレース フレームワークとは独立してテストできるため、エッジ ケースが正しく処理されているかどうかを簡単に確認できます。
import unittest
from typing import List, Dict, Any

def my_reducer(chunks: List[Dict[str, Any]]) -> Dict[str, Any]:
    """Example reducer to be tested"""
    if not chunks:
        return {"status": "empty", "total": 0}

    total = sum(c.get("value", 0) for c in chunks)
    errors = [c for c in chunks if c.get("error")]

    return {
        "status": "error" if errors else "success",
        "total": total,
        "count": len(chunks),
        "average": total / len(chunks) if chunks else 0,
        "error_count": len(errors)
    }

class TestOutputReducer(unittest.TestCase):
    def test_normal_case(self):
        chunks = [
            {"value": 10},
            {"value": 20},
            {"value": 30}
        ]
        result = my_reducer(chunks)
        self.assertEqual(result["status"], "success")
        self.assertEqual(result["total"], 60)
        self.assertEqual(result["average"], 20.0)

    def test_empty_input(self):
        result = my_reducer([])
        self.assertEqual(result["status"], "empty")
        self.assertEqual(result["total"], 0)

    def test_error_handling(self):
        chunks = [
            {"value": 10},
            {"error": "Network timeout"},
            {"value": 20}
        ]
        result = my_reducer(chunks)
        self.assertEqual(result["status"], "error")
        self.assertEqual(result["total"], 30)
        self.assertEqual(result["error_count"], 1)

    def test_missing_values(self):
        chunks = [
            {"value": 10},
            {"metadata": "some info"},  # No value field
            {"value": 20}
        ]
        result = my_reducer(chunks)
        self.assertEqual(result["total"], 30)
        self.assertEqual(result["count"], 3)
パフォーマンスに関する考慮事項
- 出力リデューサーはメモリ内のすべてのチャンクを一度に受信します。非常に大規模なストリームの場合は、ストリーミングの代替手段またはチャンク戦略の実装を検討してください。
- スパンは、ジェネレーターが完全に消費されるまで開いたままになり、レイテンシー メトリクスに影響を与えます。
- リデューサーはステートレスであり、予測可能な動作のために副作用を回避する必要があります。
サポートされている関数の種類
@mlflow.traceデコレータは現在、次の種類の関数をサポートしています。
関数タイプ | サポートされている |
|---|---|
同期 | はい |
非同期 | はい (MLflow >= 2.16.0) |
ジェネレータ | はい (MLflow >= 2.20.2) |
非同期ジェネレータ | はい (MLflow >= 2.20.2) |
その他のリソース
- スパントレース- よりきめ細かな制御で特定のコードブロックをトレースします
- 低レベルのクライアントAPI - 完全な制御を必要とする高度なシナリオを学習します
- アプリのデバッグと観察- 手動でトレースしたアプリをデバッグに使用します