Pular para o conteúdo principal

Protocolo de contexto de modelo (MCP) em Databricks

Esta página explica como usar o MCP no Databricks. O MCP é um padrão de código aberto que conecta os agentes do AI a ferramentas, recursos, prompts e outras informações contextuais.

O principal benefício do MCP é a padronização. Você pode criar uma ferramenta uma vez e usá-la com qualquer agente, seja uma que você criou ou um agente terceirizado. Da mesma forma, você pode usar ferramentas desenvolvidas por outras pessoas, da sua equipe ou de fora da sua organização.

A Databricks oferece as seguintes opções de MCP:

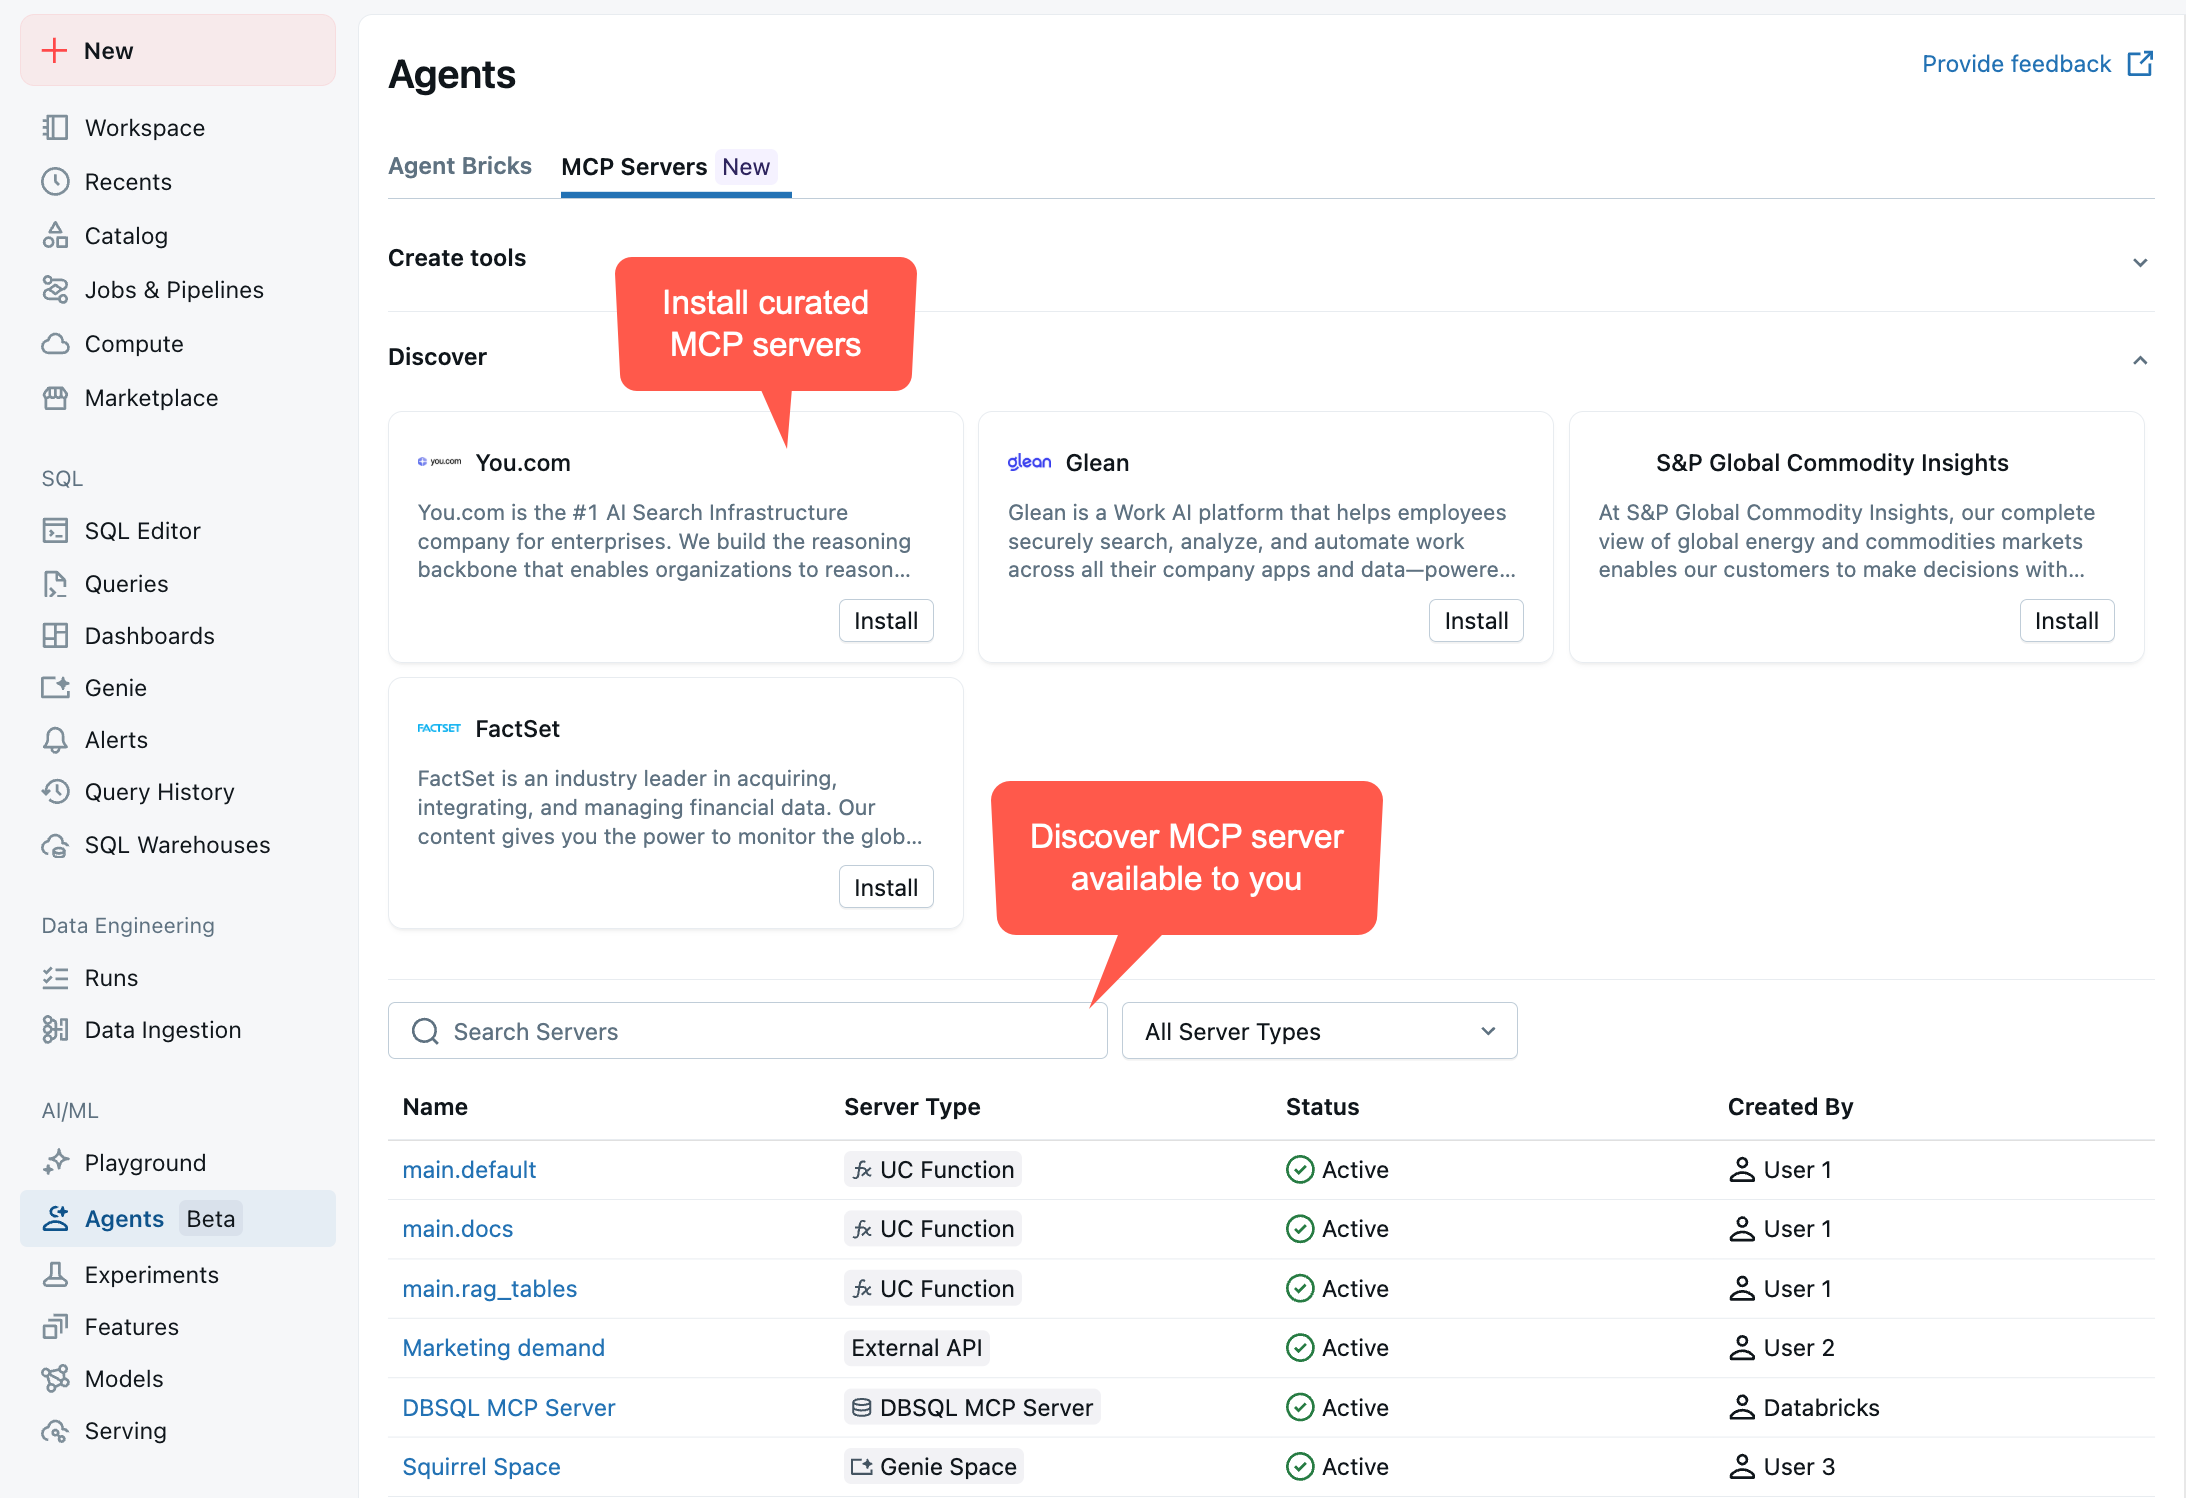
  • Gerenciar servidores MCP: Databricks tem servidores prontos para uso que permitem que os agentes consultem dados e acessem ferramentas em Unity Catalog. As permissões do Unity Catalog são sempre aplicadas, de modo que os agentes e usuários só podem acessar as ferramentas e os dados para os quais têm permissão.

  • Servidores MCP personalizados: Hospede com segurança seu próprio servidor MCP como um aplicativoDatabricks para trazer seu próprio servidor ou executar um servidor MCP de terceiros.

gerenciar servidores MCP

info

Beta

Esse recurso está na versão beta.

Databricks fornece os seguintes servidores MCP gerenciáveis para simplificar a conexão dos agentes aos dados corporativos. Esses servidores estão disponíveis prontos para uso e são hospedados e mantidos pela Databricks:

Servidor MCP

Descrição

URL

Vector Search

Permite que os agentes consultem os índices do Databricks Vector Search no esquema especificado do Unity Catalog.

https://<your-workspace-hostname>/api/2.0/mcp/vector-search/{catalog_name}/{schema_name}

Funções do Unity Catalog

Permite que os agentes executem as funçõesUnity Catalog no esquema Unity Catalog especificado.

https://<your-workspace-hostname>/api/2.0/mcp/functions/{catalog_name}/{schema_name}

Espaço Genie

Permite que os agentes consultem o espaçoGenie especificado para obter percepções de dados estruturados (tabelas em Unity Catalog).

https://<your-workspace-hostname>/api/2.0/mcp/genie/{genie_space_id}

Você pode fornecer ao seu agente vários URLs de servidor para se conectar a várias ferramentas e dados. Por exemplo, o senhor poderia fornecer os seguintes URLs para permitir que um agente consulte tíquetes de suporte ao cliente, tabelas de faturamento e funções relacionadas à execução de faturamento:

  • https://<your-workspace-hostname>/api/2.0/mcp/vector-search/prod/customer_support

    • Permite que seu agente pesquise índices de pesquisa de vetores de uso de dados não estruturados no esquema prod.customer_support
  • https://<your-workspace-hostname>/api/2.0/mcp/genie/{genie_space_id}

    • Permite que seu agente pesquise o uso estruturado de dados em um espaço Genie conectado ao esquema prod.billing
  • https://<your-workspace-hostname>/api/2.0/mcp/functions/prod/billing

    • Permite que o seu agente execute funções Unity Catalog (UDFs de recuperação de dados Python ou SQL personalizadas) regidas em prod.billing

Hospedar servidores MCP usando aplicativos Databricks

O senhor também pode hospedar seus próprios servidores MCP personalizados ou de terceiros como aplicativos Databricks. Isso é útil se o senhor já tiver servidores MCP que deseja implantar e compartilhar com outras pessoas em sua organização ou se quiser executar um servidor MCP de terceiros como fonte de ferramentas.

Um servidor MCP hospedado como um aplicativo Databricks deve implementar um transporte compatível com HTTP, como o transporte HTTP streamable.

dica

Consulte o repositório do servidor MCP personalizado para obter um exemplo de como escrever seu próprio servidor MCP e implantá-lo como um aplicativo Databricks.

Para hospedar um servidor Python MCP existente como um aplicativo Databricks, siga estas etapas:

  1. Adicione um requirements.txt ao diretório raiz do seu servidor e especifique as dependências do Python para o seu servidor.

    Python Os servidores MCP geralmente usam uv para gerenciamento de pacotes. Se você usar uv, adicione uv e ele lidará com a instalação de dependências adicionais.

  2. Adicione um app.yaml especificando o comando CLI para executar seu servidor.

    Por default, os aplicativos Databricks escutam na porta 8000. Se o seu servidor escuta em uma porta diferente, defina-a usando uma substituição de variável de ambiente no arquivo app.yaml.

    Exemplo app.yaml:

    YAML
    command: [
    'uv',
    'run',
    'your-server-name',
    ..., # optionally include additional parameters here
    ]
  3. Crie um aplicativo Databricks para hospedar seu servidor MCP:

    Bash
    databricks apps create mcp-my-custom-server
  4. Faça upload do código-fonte para Databricks e implante o aplicativo executando o seguinte comando no diretório que contém o arquivo app.yaml:

    Bash
    DATABRICKS_USERNAME=$(databricks current-user me | jq -r .userName)
    databricks sync . "/Users/$DATABRICKS_USERNAME/mcp-my-custom-server"
    databricks apps deploy mcp-my-custom-server --source-code-path "/Workspace/Users/$DATABRICKS_USERNAME/mcp-my-custom-server"

Crie agentes usando o MCP

Esta seção mostra como escrever agentes de código personalizado que se conectam a servidores MCP no Databricks.

info

Beta

O senhor deve se inscrever na versão beta dos servidores MCP da Gerenciar para usar os seguintes trechos de código.

A conexão a um servidor MCP no Databricks é semelhante à de qualquer outro servidor MCP remoto. O senhor pode se conectar ao servidor usando SDKs padrão, como o MCP Python SDK. A principal diferença é que os servidores Databricks MCP são seguros por default e exigem que os clientes especifiquem a autenticação. A biblioteca Python databricks-mcp ajuda a simplificar a autenticação no código do agente personalizado.

A maneira mais simples de desenvolver o código do agente é executá-lo localmente e se autenticar em seu site workspace. Use as etapas a seguir para criar um agente AI que se conecta a um servidor MCP Databricks:

  1. Use OAuth para se autenticar em seu site workspace. Execute o seguinte em um terminal local:

    Bash
    databricks auth login --host https://<your-workspace-hostname>
  2. Certifique-se de que o senhor tenha um ambiente local com Python 3.12 ou acima e, em seguida, instale as dependências:

    Bash
    pip install -U databricks-mcp "mcp>=1.9" "databricks-sdk[openai]" "mlflow>=3.1.0" "databricks-agents>=1.0.0"
  3. Execute o seguinte snippet para validar sua conexão com o servidor MCP. O snippet lista suas ferramentas do Unity Catalog e, em seguida, executa a ferramenta integrada de interpretação de código Python. O computesem servidor deve estar habilitado em seu workspace para executar este snipet

    Python
    import asyncio

    from mcp.client.streamable_http import streamablehttp_client
    from mcp.client.session import ClientSession
    from databricks_mcp import DatabricksOAuthClientProvider
    from databricks.sdk import WorkspaceClient

    # TODO: Update to the Databricks CLI profile name you specified when
    # configuring authentication to the workspace.
    databricks_cli_profile = "YOUR_DATABRICKS_CLI_PROFILE"
    assert (
    databricks_cli_profile != "YOUR_DATABRICKS_CLI_PROFILE"
    ), "Set databricks_cli_profile to the Databricks CLI profile name you specified when configuring authentication to the workspace"
    workspace_client = WorkspaceClient(profile=databricks_cli_profile)
    workspace_hostname = workspace_client.config.host
    mcp_server_url = f"{workspace_hostname}/api/2.0/mcp/functions/system/ai"


    # This snippet below uses the Unity Catalog functions MCP server to expose built-in
    # AI tools under `system.ai`, like the `system.ai.python_exec` code interpreter tool
    async def test_connect_to_server():
    async with streamablehttp_client(
    f"{mcp_server_url}", auth=DatabricksOAuthClientProvider(workspace_client)
    ) as (read_stream, write_stream, _), ClientSession(
    read_stream, write_stream
    ) as session:
    # List and call tools from the MCP server
    await session.initialize()
    tools = await session.list_tools()
    print(
    f"Discovered tools {[t.name for t in tools.tools]} "
    f"from MCP server {mcp_server_url}"
    )
    result = await session.call_tool(
    "system__ai__python_exec", {"code": "print('Hello, world!')"}
    )
    print(
    f"Called system__ai__python_exec tool and got result " f"{result.content}"
    )


    if __name__ == "__main__":
    asyncio.run(test_connect_to_server())
  4. O senhor pode aproveitar o snippet acima para definir um agente básico de turno único que usa ferramentas. Salve o código do agente localmente como um arquivo chamado mcp_agent.py para permitir que seja implantado nas seções subsequentes:

    Python
    from contextlib import asynccontextmanager
    import json
    import uuid
    import asyncio
    from typing import Any, Callable, List
    from pydantic import BaseModel

    import mlflow
    from mlflow.pyfunc import ResponsesAgent
    from mlflow.types.responses import ResponsesAgentRequest, ResponsesAgentResponse

    from databricks_mcp import DatabricksOAuthClientProvider
    from databricks.sdk import WorkspaceClient
    from mcp.client.session import ClientSession
    from mcp.client.streamable_http import streamablehttp_client

    # 1) CONFIGURE YOUR ENDPOINTS/PROFILE
    LLM_ENDPOINT_NAME = "databricks-claude-3-7-sonnet"
    SYSTEM_PROMPT = "You are a helpful assistant."
    DATABRICKS_CLI_PROFILE = "YOUR_DATABRICKS_CLI_PROFILE"
    assert (
    DATABRICKS_CLI_PROFILE != "YOUR_DATABRICKS_CLI_PROFILE"
    ), "Set DATABRICKS_CLI_PROFILE to the Databricks CLI profile name you specified when configuring authentication to the workspace"
    workspace_client = WorkspaceClient(profile=DATABRICKS_CLI_PROFILE)
    host = workspace_client.config.host
    # Add more MCP server URLs here if desired, e.g
    # f"{host}/api/2.0/mcp/vector-search/prod/billing"
    # to include vector search indexes under the prod.billing schema, or
    # f"{host}/api/2.0/mcp/genie/<genie_space_id>"
    # to include a Genie space
    MCP_SERVER_URLS = [
    f"{host}/api/2.0/mcp/functions/system/ai",
    ]


    # 2) HELPER: convert between ResponsesAgent “message dict” and ChatCompletions format
    def _to_chat_messages(msg: dict[str, Any]) -> List[dict]:
    """
    Take a single ResponsesAgent‐style dict and turn it into one or more
    ChatCompletions‐compatible dict entries.
    """
    msg_type = msg.get("type")
    if msg_type == "function_call":
    return [
    {
    "role": "assistant",
    "content": None,
    "tool_calls": [
    {
    "id": msg["call_id"],
    "type": "function",
    "function": {
    "name": msg["name"],
    "arguments": msg["arguments"],
    },
    }
    ],
    }
    ]
    elif msg_type == "message" and isinstance(msg["content"], list):
    return [
    {
    "role": "assistant" if msg["role"] == "assistant" else msg["role"],
    "content": content["text"],
    }
    for content in msg["content"]
    ]
    elif msg_type == "function_call_output":
    return [
    {
    "role": "tool",
    "content": msg["output"],
    "tool_call_id": msg["tool_call_id"],
    }
    ]
    else:
    # fallback for plain {"role": ..., "content": "..."} or similar
    return [
    {
    k: v
    for k, v in msg.items()
    if k in ("role", "content", "name", "tool_calls", "tool_call_id")
    }
    ]


    # 3) “MCP SESSION” + TOOL‐INVOCATION LOGIC
    @asynccontextmanager
    async def _mcp_session(server_url: str, ws: WorkspaceClient):
    async with streamablehttp_client(
    url=server_url, auth=DatabricksOAuthClientProvider(ws)
    ) as (reader, writer, _):
    async with ClientSession(reader, writer) as session:
    await session.initialize()
    yield session


    def _list_tools(server_url: str, ws: WorkspaceClient):
    async def inner():
    async with _mcp_session(server_url, ws) as sess:
    return await sess.list_tools()

    return asyncio.run(inner())


    def _make_exec_fn(
    server_url: str, tool_name: str, ws: WorkspaceClient
    ) -> Callable[..., str]:
    def exec_fn(**kwargs):
    async def call_it():
    async with _mcp_session(server_url, ws) as sess:
    resp = await sess.call_tool(name=tool_name, arguments=kwargs)
    return "".join([c.text for c in resp.content])

    return asyncio.run(call_it())

    return exec_fn


    class ToolInfo(BaseModel):
    name: str
    spec: dict
    exec_fn: Callable


    def _fetch_tool_infos(ws: WorkspaceClient, server_url: str) -> List[ToolInfo]:
    print(f"Listing tools from MCP server {server_url}")
    infos: List[ToolInfo] = []
    mcp_tools = _list_tools(server_url, ws).tools
    for t in mcp_tools:
    schema = t.inputSchema.copy()
    if "properties" not in schema:
    schema["properties"] = {}
    spec = {
    "type": "function",
    "function": {
    "name": t.name,
    "description": t.description,
    "parameters": schema,
    },
    }
    infos.append(
    ToolInfo(
    name=t.name, spec=spec, exec_fn=_make_exec_fn(server_url, t.name, ws)
    )
    )
    return infos


    # 4) “SINGLE‐TURN” AGENT CLASS
    class SingleTurnMCPAgent(ResponsesAgent):
    def _call_llm(self, history: List[dict], ws: WorkspaceClient, tool_infos):
    """
    Send current history → LLM, returning the raw response dict.
    """
    client = ws.serving_endpoints.get_open_ai_client()
    flat_msgs = []
    for msg in history:
    flat_msgs.extend(_to_chat_messages(msg))

    return client.chat.completions.create(
    model=LLM_ENDPOINT_NAME,
    messages=flat_msgs,
    tools=[ti.spec for ti in tool_infos],
    )

    def predict(self, request: ResponsesAgentRequest) -> ResponsesAgentResponse:
    ws = WorkspaceClient(profile=DATABRICKS_CLI_PROFILE)

    # 1) build initial history: system + user
    history: List[dict] = [{"role": "system", "content": SYSTEM_PROMPT}]
    for inp in request.input:
    history.append(inp.model_dump())

    # 2) call LLM once
    tool_infos = [
    tool_info
    for mcp_server_url in MCP_SERVER_URLS
    for tool_info in _fetch_tool_infos(ws, mcp_server_url)
    ]
    tools_dict = {tool_info.name: tool_info for tool_info in tool_infos}
    llm_resp = self._call_llm(history, ws, tool_infos)
    raw_choice = llm_resp.choices[0].message.to_dict()
    raw_choice["id"] = uuid.uuid4().hex
    history.append(raw_choice)

    tool_calls = raw_choice.get("tool_calls") or []
    if tool_calls:
    # (we only support a single tool in this “single‐turn” example)
    fc = tool_calls[0]
    name = fc["function"]["name"]
    args = json.loads(fc["function"]["arguments"])
    try:
    tool_info = tools_dict[name]
    result = tool_info.exec_fn(**args)
    except Exception as e:
    result = f"Error invoking {name}: {e}"

    # 4) append the “tool” output
    history.append(
    {
    "type": "function_call_output",
    "role": "tool",
    "id": uuid.uuid4().hex,
    "tool_call_id": fc["id"],
    "output": result,
    }
    )

    # 5) call LLM a second time and treat that reply as final
    followup = (
    self._call_llm(history, ws, tool_infos=[]).choices[0].message.to_dict()
    )
    followup["id"] = uuid.uuid4().hex

    assistant_text = followup.get("content", "")
    return ResponsesAgentResponse(
    output=[
    {
    "id": uuid.uuid4().hex,
    "type": "message",
    "role": "assistant",
    "content": [{"type": "output_text", "text": assistant_text}],
    }
    ],
    custom_outputs=request.custom_inputs,
    )

    # 6) if no tool_calls at all, return the assistant’s original reply
    assistant_text = raw_choice.get("content", "")
    return ResponsesAgentResponse(
    output=[
    {
    "id": uuid.uuid4().hex,
    "type": "message",
    "role": "assistant",
    "content": [{"type": "output_text", "text": assistant_text}],
    }
    ],
    custom_outputs=request.custom_inputs,
    )


    mlflow.models.set_model(SingleTurnMCPAgent())

    if __name__ == "__main__":
    req = ResponsesAgentRequest(
    input=[{"role": "user", "content": "What's the 100th Fibonacci number?"}]
    )
    resp = SingleTurnMCPAgent().predict(req)
    for item in resp.output:
    print(item)

agentes implantados usando MCP

Quando o senhor estiver pronto para implantar um agente que se conecta a servidores MCP, use o processo padrão de implantação de agentes.

Certifique-se de especificar todos os recursos aos quais o seu agente precisa ter acesso no momento do registro. Por exemplo, se seu agente usa os seguintes URLs do servidor MCP:

  • https://<your-workspace-hostname>/api/2.0/mcp/vector-search/prod/customer_support
  • https://<your-workspace-hostname>/api/2.0/mcp/vector-search/prod/billing
  • https://<your-workspace-hostname>/api/2.0/mcp/functions/prod/billing

O senhor deve especificar todos os índices de pesquisa vetorial de que seu agente precisa nos esquemas prod.customer_support e prod.billing como recurso, bem como todas as funções Unity Catalog em prod.billing.

Por exemplo, para implantar o agente definido acima, o senhor pode executar o seguinte snippet, supondo que tenha salvo a definição do código do agente em mcp_agent.py:

Python
import os
from databricks.sdk import WorkspaceClient
from databricks import agents
import mlflow
from mlflow.models.resources import DatabricksFunction, DatabricksServingEndpoint, DatabricksVectorSearchIndex
from mcp_agent import LLM_ENDPOINT_NAME

# TODO: Update this to your Databricks CLI profile name
databricks_cli_profile = "YOUR_DATABRICKS_CLI_PROFILE"
assert (
databricks_cli_profile != "YOUR_DATABRICKS_CLI_PROFILE"
), "Set databricks_cli_profile to the Databricks CLI profile name you specified when configuring authentication to the workspace"
workspace_client = WorkspaceClient(profile=databricks_cli_profile)


# Configure MLflow and the Databricks SDK to use your Databricks CLI profile
current_user = workspace_client.current_user.me().user_name
mlflow.set_tracking_uri(f"databricks://{databricks_cli_profile}")
mlflow.set_registry_uri(f"databricks-uc://{databricks_cli_profile}")
mlflow.set_experiment(f"/Users/{current_user}/databricks_docs_example_mcp_agent")
os.environ["DATABRICKS_CONFIG_PROFILE"] = databricks_cli_profile

# Log the agent defined in mcp_agent.py
here = os.path.dirname(os.path.abspath(__file__))
agent_script = os.path.join(here, "mcp_agent.py")
resources = [
DatabricksServingEndpoint(endpoint_name=LLM_ENDPOINT_NAME),
DatabricksFunction("system.ai.python_exec"),
# --- Uncomment and edit the following lines to specify vector search indices and additional UC functions ---
# --- if referenced via the MCP_SERVER_URLS in your agent code ---
# DatabricksVectorSearchIndex(index_name="prod.customer_support.my_index"),
# DatabricksVectorSearchIndex(index_name="prod.billing.another_index"),
# DatabricksFunction("prod.billing.my_custom_function"),
# DatabricksFunction("prod.billing.another_function"),
]

with mlflow.start_run():
logged_model_info = mlflow.pyfunc.log_model(
artifact_path="mcp_agent",
python_model=agent_script,
resources=resources,
)

# TODO Specify your UC model name here
UC_MODEL_NAME = "main.default.databricks_docs_mcp_agent"
registered_model = mlflow.register_model(logged_model_info.model_uri, UC_MODEL_NAME)

agents.deploy(
model_name=UC_MODEL_NAME,
model_version=registered_model.version,
)

computar preços

Os preços de computação para gerenciar servidores MCP dependem das cargas de trabalho do MCP:

Os servidores MCP personalizados estão sujeitos aos preços do Databricks Apps.